Cheesy Chicken and Rice Casserole

0

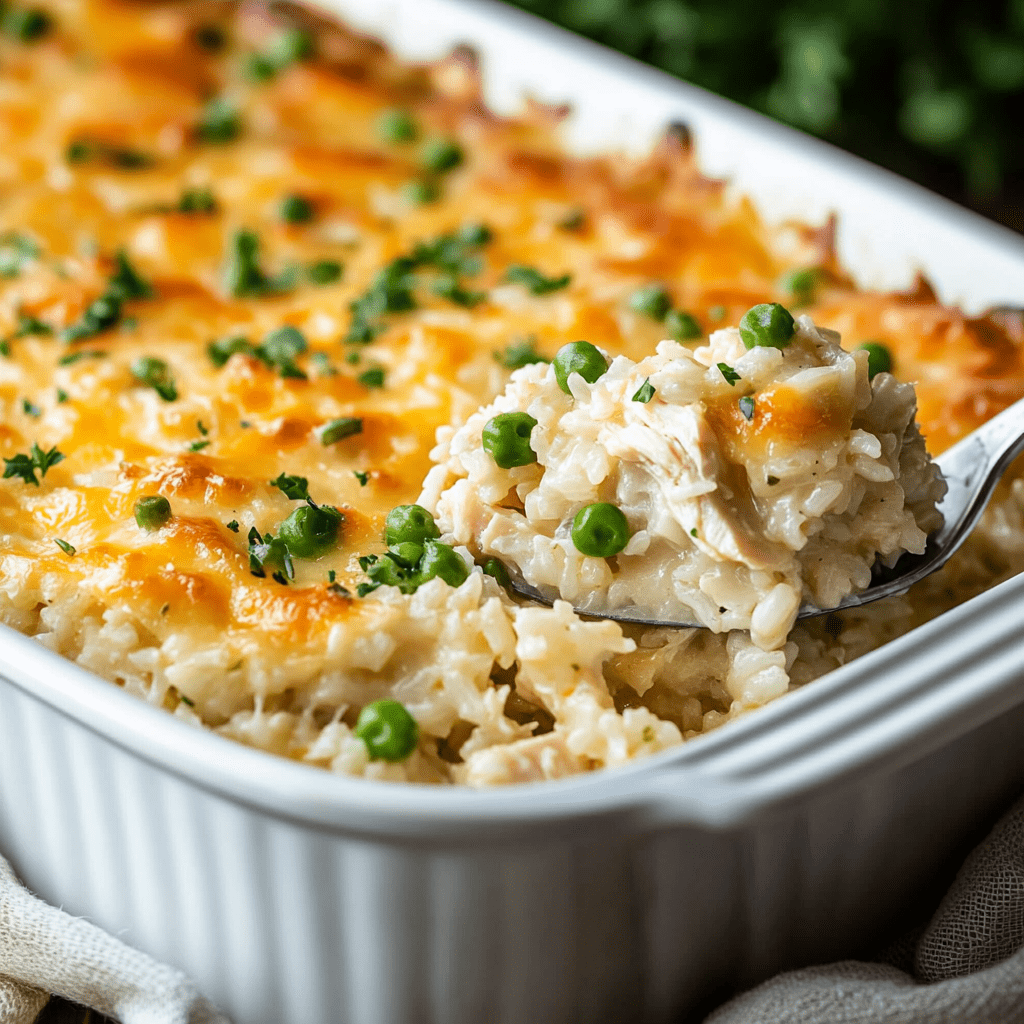
This Cheesy Chicken and Rice Casserole is a comforting and hearty dish that combines tender shredded chicken, creamy rice, mixed vegetables, and melted Colby Jack cheese. It’s a perfect balance of flavors and textures, making it ideal for a cozy family dinner or a comforting meal any time of the week.

Why You’ll Love This Recipe:

  • Comforting and Satisfying: This casserole combines tender shredded chicken, creamy rice, mixed vegetables, and gooey cheese for a comforting and satisfying meal.
  • Easy Preparation: With simple ingredients and straightforward instructions, it’s perfect for busy weeknights or family dinners.
  • Versatile: You can customize the vegetables and cheese to suit your taste preferences or what you have on hand.

Ingredients:

  • 3 cups rotisserie chicken, shredded
  • 2 cups frozen mixed vegetables, thawed
  • 2 cups minute rice, uncooked
  • 1 can (10 oz) cream of chicken soup
  • 2 ½ cups milk, 2% or whole
  • 2 tsp minced garlic
  • 1 tsp onion powder
  • 1 tsp Italian seasoning
  • ½ tsp salt
  • ¼ tsp ground pepper
  • 3 cups Colby Jack cheese, shredded
  • 1 tbsp fresh parsley, chopped

Instructions:

  1. Preheat and Prepare:
    Preheat the oven to 350°F (175°C). Grease a 9×13-inch baking dish.
  2. Prepare Ingredients:
    Shred the rotisserie chicken. Thaw the mixed vegetables under warm running water and drain.
  3. Mix the Casserole:
    In a large mixing bowl, combine shredded chicken, thawed vegetables, uncooked minute rice, cream of chicken soup, milk, minced garlic, onion powder, Italian seasoning, salt, and pepper. Mix well.
  4. Add Cheese:
    Stir in 1½ cups of the shredded Colby Jack cheese into the mixture. Transfer everything into the prepared baking dish and smooth the top with a spatula.
  5. Bake:
    Sprinkle the remaining 1½ cups of cheese evenly over the top. Bake in the preheated oven for 30-35 minutes, or until the rice is tender and the cheese is bubbly.
  6. Garnish and Serve:
    Once done, sprinkle chopped fresh parsley over the top for added color and freshness. Serve warm.

Tips:

  • Feel free to customize with your favorite vegetables or types of cheese.
  • Ensure the rice is fully submerged in the liquid mixture to cook evenly.

Storage Options:

  • Store leftovers in an airtight container in the refrigerator for up to 3 days. Reheat gently in the microwave or oven before serving.

This version includes an introduction that sets the stage for the Cheesy Chicken and Rice Casserole, followed by the recipe with clear instructions, tips, and storage suggestions. Enjoy preparing and sharing this comforting meal!

Roasted Mushroom and Gouda Grilled Cheese Sandwich

0

This Roasted Mushroom and Gouda Grilled Cheese Sandwich elevates the classic grilled cheese with caramelized mushrooms, onions, and creamy gouda cheese, all sandwiched between slices of your favorite bread.

Why You’ll Love This Recipe:

  • Rich and Savory Flavors: Caramelized mushrooms and onions combined with melted gouda cheese create a deliciously savory filling.
  • Simple Preparation: Roasting the vegetables and assembling the sandwiches is straightforward and yields impressive results.
  • Comfort Food Upgrade: Perfect for a satisfying lunch or dinner, this grilled cheese is sure to become a new favorite.

Ingredients:

  • 8 ounces mushrooms, sliced
  • 1 medium onion, sliced
  • 2 tablespoons olive oil
  • Salt and pepper, to taste
  • 4 tablespoons butter
  • 4 slices bread of choice
  • 1 cup gouda cheese, shredded

Instructions:

  1. Preheat Oven: Preheat the oven to 400°F (200°C).
  2. Roast Mushrooms and Onions:
    On a baking sheet, toss sliced mushrooms and onion with olive oil. Sprinkle with salt and pepper. Roast in the preheated oven for about 20 minutes or until they are caramelized and golden.
  3. Prepare the Skillet:
    Melt 4 tablespoons of butter in a skillet over medium heat.
  4. Assemble Sandwiches:
    On one slice of bread, layer half of the shredded gouda cheese. Add the roasted mushrooms and onions on top, then sprinkle with the remaining gouda cheese. Season with salt and pepper. Top with another slice of bread. Lightly press the sandwich together.
  5. Cook the Sandwiches:
    Place each sandwich in the melted butter in the skillet for one second to coat one side, then flip to coat the other side. Cook for about 2 minutes until lightly browned and crispy. Gently flip and cook for an additional 2-3 minutes, or until the cheese is melted and the bread is golden brown.
  6. Serve:
    Slice the sandwiches in half and serve immediately while hot and crispy.

Tips:

  • Experiment with different types of bread such as sourdough, whole wheat, or ciabatta for varied flavors and textures.
  • Add a sprinkle of fresh herbs like thyme or parsley for an extra burst of flavor.

Storage Options:

  • These sandwiches are best enjoyed fresh and hot, but any leftovers can be stored in an airtight container in the refrigerator for up to 1 day. Reheat gently in a toaster oven or skillet before serving.

This format includes a detailed guide for preparing Roasted Mushroom and Gouda Grilled Cheese Sandwiches, highlighting the ingredients, step-by-step instructions, tips, and storage suggestions. Enjoy your delicious sandwich!

Cheesy Beef and Vegetable Bake

0

This Cheesy Beef and Vegetable Bake combines hearty ground beef with a variety of vegetables, topped with melted cheddar cheese for a comforting and flavorful dish. Perfect for a satisfying family meal.

Why You’ll Love This Recipe:

  • Hearty and Filling: Packed with ground beef, potatoes, carrots, celery, and corn, this bake is a complete meal in one dish.
  • Cheesy Goodness: The melted cheddar cheese adds a deliciously gooey topping that everyone will love.
  • Easy Preparation: Simple steps and common ingredients make this dish perfect for busy weeknights.

Ingredients:

  • 1 lb ground beef
  • 1 medium onion, chopped
  • 2 cloves garlic, minced
  • 3 cups diced potatoes
  • 2 cups diced carrots
  • 1 cup diced celery
  • 1 cup corn kernels (fresh or frozen)
  • 1 can (14.5 oz) diced tomatoes, undrained
  • 1 cup beef broth
  • 1 cup shredded cheddar cheese
  • 1 tsp salt
  • 1/2 tsp black pepper
  • 1 tsp dried thyme
  • 1 tsp dried rosemary
  • 1 tbsp olive oil

Instructions:

  1. Preheat your oven: Preheat oven to 375°F (190°C).
  2. Cook the ground beef: In a large skillet, heat olive oil over medium heat. Add the ground beef and cook until browned. Remove the beef with a slotted spoon and set aside.
  3. Sauté onions and garlic: In the same skillet, add the chopped onion and minced garlic. Sauté until the onion becomes translucent, about 3-4 minutes.
  4. Cook the vegetables: Add the diced potatoes, carrots, and celery to the skillet. Cook for about 5 minutes, stirring occasionally.
  5. Combine everything: Stir in the corn kernels, cooked ground beef, diced tomatoes (with juice), and beef broth. Season with salt, black pepper, thyme, and rosemary.
  6. Transfer to baking dish: Transfer the mixture to a greased 9×13-inch baking dish. Cover with aluminum foil and bake in the preheated oven for 30 minutes.
  7. Add cheese topping: Remove the foil and sprinkle the shredded cheddar cheese evenly over the top of the bake.
  8. Finish baking: Bake uncovered for an additional 10-15 minutes, or until the cheese is bubbly and golden.
  9. Rest and serve: Let the bake rest for a few minutes before serving to allow the flavors to meld together. Enjoy this hearty and cheesy beef and vegetable bake!

Tips:

  • Customize the vegetables based on what you have on hand or prefer.
  • This dish can be prepared ahead and baked just before serving for convenience.
  • Serve with a side of crusty bread or a green salad for a complete meal.

Storage Options:

  • Store leftovers in an airtight container in the refrigerator for up to 3 days.
  • Reheat in the oven or microwave until heated through before serving.

This format includes a detailed step-by-step guide, reasons to love the recipe, tips for customization, and storage suggestions for Cheesy Beef and Vegetable Bake. Enjoy your meal!

Quick Pickled Cherry Tomatoes, Red Onion, and Cucumber

0

These quick-pickled cherry tomatoes, red onion, and cucumber are a delightful addition to any meal. With a tangy and slightly sweet flavor profile, they make a refreshing condiment or appetizer that’s easy to prepare and store.

Why You’ll Love This Recipe:

  • Flavorful Pickling Liquid: The combination of vinegar, sugar, and spices creates a vibrant and balanced pickling liquid.
  • Versatile Use: Enjoy these pickled vegetables on sandwiches, salads, or as a side dish.
  • Long Shelf Life: Stored in the refrigerator, they can last up to 2 weeks, allowing you to enjoy them over time.

Ingredients:

  • 1 pint cherry tomatoes
  • 1/2 red onion, thinly sliced
  • 1/2 cucumber, thinly sliced
  • 1 cup white vinegar
  • 1/2 cup water
  • 1/4 cup sugar
  • 1 teaspoon salt
  • 1/2 teaspoon dried oregano
  • 1/4 teaspoon red pepper flakes
  • 1/4 cup fresh dill, chopped

Instructions:

  1. Prepare the Vegetables:
    Wash and dry the cherry tomatoes, red onion, and cucumber. Thinly slice the red onion and cucumber.
  2. Make the Pickling Liquid:
    In a small saucepan, combine the white vinegar, water, sugar, salt, dried oregano, and red pepper flakes. Bring to a boil over medium heat, stirring until the sugar and salt dissolve.
  3. Pour the Pickling Liquid Over the Vegetables:
    Place the cherry tomatoes, red onion, and cucumber in a jar or container. Pour the hot pickling liquid over the vegetables, ensuring they are completely covered.
  4. Add the Dill:
    Stir in the chopped fresh dill.
  5. Seal and Refrigerate:
    Seal the jar or container tightly and refrigerate for at least 2 hours, or up to 2 weeks. The pickled vegetables will become more flavorful the longer they are refrigerated.
  6. Serve:
    Serve as a condiment alongside sandwiches or as an appetizer. Enjoy the tangy and refreshing flavors!

Tips:

  • Experiment with different herbs and spices, such as bay leaves or peppercorns, to customize the flavor.
  • Use a glass or plastic container with a tight-sealing lid to store the pickled vegetables in the refrigerator.

Storage Options:

  • Store in the refrigerator for up to 2 weeks in a sealed container.

Enjoy these quick-pickled cherry tomatoes, red onion, and cucumber to add a burst of flavor to your meals!


This format includes detailed steps, tips, and storage information for making Quick Pickled Cherry Tomatoes, Red Onion, and Cucumber, ensuring clarity and ease of use.

Cheesy Chicken Quesadillas

0

These Cheesy Chicken Quesadillas are a delicious and satisfying meal that’s quick to prepare. With seasoned chicken, melted cheddar and mozzarella cheeses, all wrapped in a crispy tortilla, they make for a perfect lunch or dinner option.

Why You’ll Love This Recipe:

  • Quick and Easy Preparation: Ready in just minutes, making it ideal for busy weekdays or quick meals.
  • Cheesy Goodness: Loaded with shredded cheddar and mozzarella cheeses, ensuring every bite is cheesy and delicious.
  • Customizable: Easily adjust the seasonings and add your favorite toppings or sauces to suit your taste.

Ingredients:

  • 2 large chicken breasts, diced
  • 1 tbsp olive oil
  • 2 tsp garlic powder
  • 1 tsp onion powder
  • 1 tsp paprika
  • Salt and pepper, to taste
  • 1 cup shredded cheddar cheese
  • 1/2 cup shredded mozzarella cheese
  • 4 large flour tortillas
  • 1/2 cup creamy garlic sauce
  • Fresh parsley, chopped (optional, for garnish)

Instructions:

  1. Prepare the Chicken:
    In a bowl, season the diced chicken with olive oil, garlic powder, onion powder, paprika, salt, and pepper.
  2. Cook the Chicken:
    Heat a skillet over medium heat. Cook the seasoned chicken for 6-8 minutes until browned and fully cooked.
  3. Assemble the Quesadillas:
    Spread creamy garlic sauce evenly on each tortilla. Add cooked chicken on one half of each tortilla. Sprinkle shredded cheddar and mozzarella cheeses over the chicken.
  4. Fold and Cook:
    Fold the tortillas over the filling to create a half-moon shape. Cook in the skillet for 2-3 minutes on each side until golden and the cheese is melted.
  5. Serve:
    Slice the quesadillas into wedges. Garnish with chopped fresh parsley, if desired, and serve immediately.

Tips:

  • Customize your quesadillas with additional toppings like diced tomatoes, avocado slices, or a dollop of sour cream.
  • Use a non-stick skillet or griddle to ensure the tortillas crisp up nicely without sticking.

Storage Options:

  • Quesadillas are best enjoyed fresh but can be stored in an airtight container in the refrigerator for up to 2 days. Reheat in a skillet or microwave until heated through.

Enjoy these Cheesy Chicken Quesadillas for a quick and satisfying meal!


This version includes all the recipe components, focusing on the ingredients, detailed instructions, tips, and storage suggestions for making Cheesy Chicken Quesadillas.

Creamy Shredded Chicken(Chicken and gravy)

0

Tender and flavorful, this Creamy Shredded Chicken made in a slow cooker is a versatile dish perfect for easy meals. Seasoned with garlic and onion powder, paprika, and cooked to perfection in chicken broth, it’s then smothered in a creamy sauce for a rich and satisfying flavor.

Why You’ll Love This Recipe:

  • Easy Slow Cooker Prep: This recipe requires minimal hands-on time. Simply place the seasoned chicken in the slow cooker with broth and let it cook to tender perfection. It’s ideal for busy days when you want a delicious meal without much effort.
  • Versatile Serving Options: Enjoy the creamy shredded chicken in various ways—over rice for a comforting dinner, stuffed into tacos for a flavorful twist, or as a filling for sandwiches. Its versatility makes it suitable for different meal preferences and occasions.
  • Creamy and Flavorful: The addition of cream cheese or sour cream transforms this dish into a creamy delight. It adds a luxurious texture and enhances the savory flavors of the chicken and spices, making every bite rich and satisfying.

Ingredients:

  • 3 to 4 boneless, skinless chicken breasts
  • 1 cup chicken broth (low-sodium for more flavor)
  • 1 teaspoon garlic powder
  • 1 teaspoon onion powder
  • 1 teaspoon paprika
  • Salt and pepper, to taste
  • 1 cup cream cheese or sour cream
  • Optional: chopped fresh herbs like parsley or chives for garnish

Equipment:

  • Slow cooker

Instructions:

  1. Prepare the Chicken:
    Place the chicken breasts in the slow cooker. Sprinkle garlic powder, onion powder, paprika, salt, and pepper over the chicken.
  2. Add Broth:
    Pour the chicken broth over the seasoned chicken.
  3. Cook:
    Cover and cook on low for 6-7 hours or on high for 3-4 hours, until the chicken is very tender.
  4. Shred the Chicken:
    Once cooked, remove the chicken from the slow cooker and shred it using two forks. It should be very tender and shred easily.
  5. Make It Creamy:
    Add the cream cheese or sour cream to the slow cooker with the cooking liquid. Whisk until smooth. Return the shredded chicken to the slow cooker and stir to coat the chicken in the creamy sauce.
  6. Serve:
    Serve the creamy shredded chicken over rice, in tacos, or on buns for sandwiches. Garnish with chopped fresh herbs like parsley or chives, if desired.

Tips:

  • For a lighter version, use low-fat cream cheese or Greek yogurt instead of regular cream cheese or sour cream.
  • Customize the seasoning to your taste by adjusting the amounts of garlic powder, onion powder, and paprika.
  • Store leftovers in an airtight container in the refrigerator for up to 3 days. Reheat gently on the stove or in the microwave.

Storage Options:

  • Refrigerate leftovers in an airtight container for up to 3 days.
  • Freeze in portions for up to 2 months. Thaw overnight in the refrigerator and reheat gently.

Enjoy this Creamy Shredded Chicken for a delicious and effortless meal!


This format provides a more detailed description of why this Creamy Shredded Chicken recipe is enjoyable, highlighting its ease of preparation, versatility in serving options, creamy texture, and flavor enhancement from the cream cheese or sour cream.

Homemade Apple Hand Pies

0

Savor the delightful flavors of Homemade Apple Hand Pies, where tender diced apples, sweet cinnamon, and a flaky pastry shell come together to create a portable, comforting treat. These hand pies are perfect for picnics, lunchbox treats, or a cozy dessert, offering a taste of homemade goodness in every bite.

Why You’ll Love This Recipe:

  • Portable and Convenient: Enjoy the classic flavors of apple pie in a handheld form, making them perfect for on-the-go snacking.
  • Simple Ingredients: Basic pantry staples like flour, butter, and apples combine to create a delicious treat with minimal effort.
  • Versatile Treat: Serve warm or at room temperature, these hand pies are versatile enough for any occasion, from casual gatherings to special celebrations.

Ingredients:

For the Pastry:

  • 2 cups all-purpose flour
  • 1/2 teaspoon salt
  • 1 cup unsalted butter, cold and cubed
  • 1/4 cup ice water

For the Apple Filling:

  • 2 medium apples, peeled and finely diced
  • 1/4 cup granulated sugar
  • 1/4 cup brown sugar
  • 1 teaspoon ground cinnamon
  • 1/4 teaspoon ground nutmeg
  • 1 tablespoon lemon juice

For Assembly:

  • 1 egg, beaten (for egg wash)
  • Coarse sugar, optional, for sprinkling

Instructions:

Preparing the Dough:

  1. Preheat Oven: Preheat your oven to 350°F (175°C). Line a baking sheet with parchment paper.
  2. Mix Dry Ingredients: In a large bowl, whisk together the flour and salt.
  3. Cut in Butter: Using a pastry cutter or two forks, cut in the cold cubed butter until the mixture resembles coarse crumbs.
  4. Add Ice Water: Gradually add the ice water to the flour-butter mixture, mixing until the dough begins to come together. You may need to use your hands to gently knead the dough to form a cohesive ball. Divide the dough into two equal portions, wrap each portion in plastic wrap, and refrigerate for at least 30 minutes.

Preparing the Apple Filling:

  1. Combine Ingredients: In a medium bowl, combine the diced apples, granulated sugar, brown sugar, ground cinnamon, ground nutmeg, and lemon juice. Mix well until the apples are evenly coated. Set aside.

Assembling and Baking the Hand Pies:

  1. Roll Out Dough: On a lightly floured surface, roll out one portion of the chilled dough to about 1/8 inch thickness. Use a 3-inch round cookie cutter to cut circles from the dough. Place the circles onto the prepared baking sheet.
  2. Add Filling: Spoon about 1 tablespoon of the prepared apple filling onto the center of each dough circle.
  3. Top and Seal: Roll out the second portion of dough and cut additional circles. Place these circles over the apple filling, pressing the edges gently to seal. You can use a fork to crimp the edges for a decorative seal.
  4. Brush with Egg Wash: Brush the tops of each hand pie with beaten egg wash. This helps to create a golden brown crust when baked. Optionally, sprinkle coarse sugar over the tops of the pies for added sweetness and texture.
  5. Bake: Place the assembled hand pies in the preheated oven and bake for 20-25 minutes, or until the pies are golden brown and the filling is bubbling.
  6. Cool and Serve: Remove the pies from the oven and allow them to cool on the baking sheet for a few minutes before transferring them to a wire rack to cool completely.

Storage Options:

  • Room Temperature: Store cooled hand pies in an airtight container at room temperature for up to 2 days.
  • Refrigeration: For longer storage, refrigerate in an airtight container for up to 5 days. Reheat briefly in the oven or microwave before serving to restore crispness.

Enjoy these Homemade Apple Hand Pies warm or at room temperature, and savor the homemade goodness in every delicious bite!

Creamy Italian Sausage Soup

0

Indulge in the rich flavors of Creamy Italian Sausage Soup, where hearty Italian sausage, creamy Parmesan cheese, and vibrant spinach come together in a comforting bowl of goodness. This soup is a perfect balance of savory and creamy textures, making it an ideal choice for chilly days or whenever you crave a hearty, satisfying meal.

Why You’ll Love This Recipe:

  • Hearty and Fulfilling: Loaded with Italian sausage and Parmesan cheese, this soup is both filling and satisfying.
  • Quick and Easy: Simple ingredients and straightforward cooking steps make this soup perfect for busy weeknights.
  • Versatile Dish: Serve it as a starter or pair it with crusty bread for a complete meal. It’s equally great for family dinners or casual gatherings.

Ingredients:

  • 1 pound Italian sausage, casing removed
  • 1 tablespoon olive oil
  • 1 small onion, chopped
  • 2 cloves garlic, minced
  • 4 cups chicken broth
  • 1 can (14.5 oz) diced tomatoes
  • 1 cup heavy cream
  • 1 cup grated Parmesan cheese
  • 2 cups baby spinach
  • 1 teaspoon Italian seasoning
  • Salt and pepper, to taste

Instructions:

Cooking the Soup:

  1. Brown the Sausage: In a large pot, heat olive oil over medium heat. Add the Italian sausage, breaking it up with a spoon as it cooks. Cook until browned and cooked through, removing any excess fat if necessary.
  2. Cook Onions and Garlic: Add the chopped onion and minced garlic to the pot with the sausage. Cook until the onion becomes translucent, about 3-4 minutes, stirring occasionally.
  3. Add Broth and Tomatoes: Pour in the chicken broth and add the diced tomatoes (with their juices). Bring the mixture to a simmer over medium heat.
  4. Incorporate Cream and Cheese: Stir in the heavy cream and grated Parmesan cheese until the cheese is melted and well incorporated into the soup. Add the Italian seasoning, stirring to combine.
  5. Simmer: Let the soup simmer gently for about 10 minutes, stirring occasionally to blend the flavors together.
  6. Add Spinach: Add the baby spinach to the soup and cook for an additional 2 minutes, or until the spinach is wilted.
  7. Season to Taste: Season the soup with salt and pepper according to your taste preferences.

Serving:

  1. Serve Warm: Ladle the Creamy Italian Sausage Soup into bowls and serve hot. Optionally, garnish with additional grated Parmesan cheese and a sprinkle of Italian seasoning.

Storage Options:

  • Refrigeration: Store any leftover soup in an airtight container in the refrigerator for up to 3-4 days.
  • Freezing: This soup freezes well. Allow it to cool completely before transferring it to freezer-safe containers or bags. Freeze for up to 3 months. Thaw overnight in the refrigerator before reheating.

Enjoy the comforting flavors of this Creamy Italian Sausage Soup as a delicious and satisfying meal any time of the year!

Churro Cheesecake Donut Cookies

0

Experience the delightful fusion of classic snickerdoodle cookies with a creamy cheesecake filling in these Cheesecake Stuffed Snickerdoodle Cookies. Each bite combines the comforting warmth of cinnamon-sugar with a luscious cheesecake surprise, making them a perfect treat for any occasion, from casual gatherings to special celebrations.

Why You’ll Love This Recipe:

  • Decadent Combination: The soft, chewy texture of snickerdoodle cookies complements the rich, creamy cheesecake filling, offering a delightful contrast of flavors and textures.
  • Impressive Presentation: These cookies are not only delicious but also visually appealing, with their distinctive donut-like shape and cinnamon-sugar coating.
  • Versatile Treat: Ideal for dessert tables, holiday parties, or as a homemade gift, these cookies are sure to impress friends and family alike.

Ingredients:

For the Dough:

  • 1 cup unsalted butter, softened
  • 1 cup granulated sugar
  • 2 large eggs
  • 1 tsp vanilla extract
  • 3 cups all-purpose flour
  • 1 tsp baking powder
  • 1/2 tsp salt

For the Cheesecake Filling:

  • 8 oz cream cheese, softened
  • 1/4 cup granulated sugar
  • 1 tsp vanilla extract

For the Cinnamon Sugar Coating:

  • 1 cup granulated sugar
  • 1 tbsp ground cinnamon

Optional:

  • 1 cup caramel sauce for drizzling (after baking)

Instructions:

Prepare the Dough:

  1. Cream Butter and Sugar: In a large mixing bowl, cream together the softened butter and granulated sugar until light and fluffy.
  2. Incorporate Wet Ingredients: Beat in the eggs one at a time, then stir in the vanilla extract.
  3. Combine Dry Ingredients: In another bowl, whisk together the flour, baking powder, and salt. Gradually add the dry ingredients to the wet ingredients, mixing until just combined. Avoid overmixing.

Prepare the Cheesecake Filling:

  1. Mix Filling: In a small bowl, beat together the softened cream cheese, granulated sugar, and vanilla extract until smooth and creamy. Transfer the filling to a piping bag fitted with a small round tip.

Shape the Cookies:

  1. Preheat and Prepare: Preheat the oven to 350°F (175°C) and line a baking sheet with parchment paper.
  2. Form Dough Balls: Roll the cookie dough into 1-inch balls and flatten each ball into a circle about 2 inches in diameter.
  3. Add Filling: Pipe a small amount of cheesecake filling around the edges of each cookie circle. Fold the edges over to enclose the filling, pressing down gently to seal the dough.
  4. Cut Out Centers: Use a small cookie cutter (such as a round piping tip or a small knife) to cut out the center of each cookie, shaping them into a ring or donut-like form.

Coat the Cookies:

  1. Prepare Cinnamon Sugar: In a shallow dish, combine the granulated sugar and ground cinnamon.
  2. Coat Each Cookie: Roll each filled cookie in the cinnamon sugar mixture, ensuring an even coating all around.

Bake the Cookies:

  1. Arrange and Bake: Place the coated cookies on the prepared baking sheet, spacing them about 2 inches apart.
  2. Bake: Bake for 12-15 minutes, or until the cookies are lightly golden and set. Remove from the oven and let them cool on the baking sheet for a few minutes before transferring to a wire rack to cool completely.

Optional Caramel Drizzle:

  1. Drizzle Caramel (Optional): Once cooled, drizzle the tops of the cookies with caramel sauce for an extra indulgent touch.

Storage Options:

Store these Cheesecake Stuffed Snickerdoodle Cookies in an airtight container at room temperature for up to 3 days. For longer storage, keep them in the refrigerator for up to a week. Enjoy them fresh or slightly warmed for a delightful treat!


These cookies are sure to be a hit with their irresistible combination of flavors and textures. Enjoy baking and savoring each delicious bite!

Longhorn Steakhouse Parmesan Chicken

0

Longhorn Steakhouse Parmesan Chicken is a delicious dish featuring crispy chicken breasts coated in a savory Parmesan and mozzarella cheese topping. Baked to perfection, this meal is sure to satisfy with its crispy exterior and gooey cheese blend.

Why You’ll Love This Recipe:
This recipe combines the richness of Parmesan and mozzarella cheeses with the crunch of bread crumbs, creating a flavorful and satisfying chicken dish. It’s perfect for a family dinner or when you want to impress guests with a restaurant-quality meal made at home.

Ingredients:

  • 4 boneless, skinless chicken breasts
  • 1 cup grated Parmesan cheese (divided)
  • 1 cup shredded mozzarella cheese
  • 1 cup bread crumbs
  • 1/2 cup all-purpose flour
  • 2 large eggs
  • 1/4 cup milk
  • 2 cloves garlic, minced
  • 1 teaspoon dried Italian seasoning
  • 1/2 teaspoon salt
  • 1/4 teaspoon black pepper
  • 2 tablespoons olive oil

Step-by-Step Directions:

Step 1: Preheat and Prep

Preheat Your Oven:
Preheat your oven to 375°F (190°C). Grease a baking dish with olive oil and set aside.

Step 2: Prepare the Coatings

Bread Crumb Mixture:
In a shallow dish, combine the bread crumbs, 1/2 cup of Parmesan cheese, Italian seasoning, salt, and black pepper.

Egg Wash:
In another shallow dish, beat the eggs with milk until well combined.

Flour Coating:
Place the flour in a third shallow dish.

Step 3: Bread the Chicken

Dredge the Chicken:
Dredge each chicken breast in the flour, shaking off any excess.

Egg Wash:
Next, dip the floured chicken in the egg mixture, allowing any excess to drip off.

Bread Crumb Coating:
Finally, coat the chicken in the bread crumb mixture, pressing gently to adhere.

Step 4: Pan-Fry the Chicken

Brown the Chicken:
In a large skillet, heat olive oil over medium-high heat. Add the chicken breasts and cook for 3-4 minutes on each side until golden brown and crispy. This step is to create a crust, not to fully cook the chicken.

Step 5: Prepare for Baking

Transfer to Baking Dish:
Transfer the browned chicken breasts to the prepared baking dish.

Cheese Topping:
In a small bowl, mix the remaining 1/2 cup of Parmesan cheese with shredded mozzarella cheese and minced garlic.

Step 6: Top and Bake

Top the Chicken:
Sprinkle the cheese mixture evenly over the chicken breasts.

Bake:
Bake in the preheated oven for 20-25 minutes, or until the chicken is cooked through (internal temperature should reach 165°F or 74°C) and the cheese is melted and bubbly.

Step 7: Serve and Enjoy

Garnish and Serve:
Serve the Parmesan chicken hot, garnished with fresh parsley if desired.

Serving Suggestions:

  • Pair with garlic mashed potatoes or buttered pasta for a comforting meal.
  • Serve alongside steamed vegetables or a crisp garden salad for a balanced dinner.

Storage Options:
Store any leftovers in an airtight container in the refrigerator for up to 3 days. Reheat gently in the oven or microwave before serving.


Enjoy this Longhorn Steakhouse Parmesan Chicken for a delightful meal that’s crispy, cheesy, and packed with flavor!