Italian Crescent Roll Sandwich Bake

0

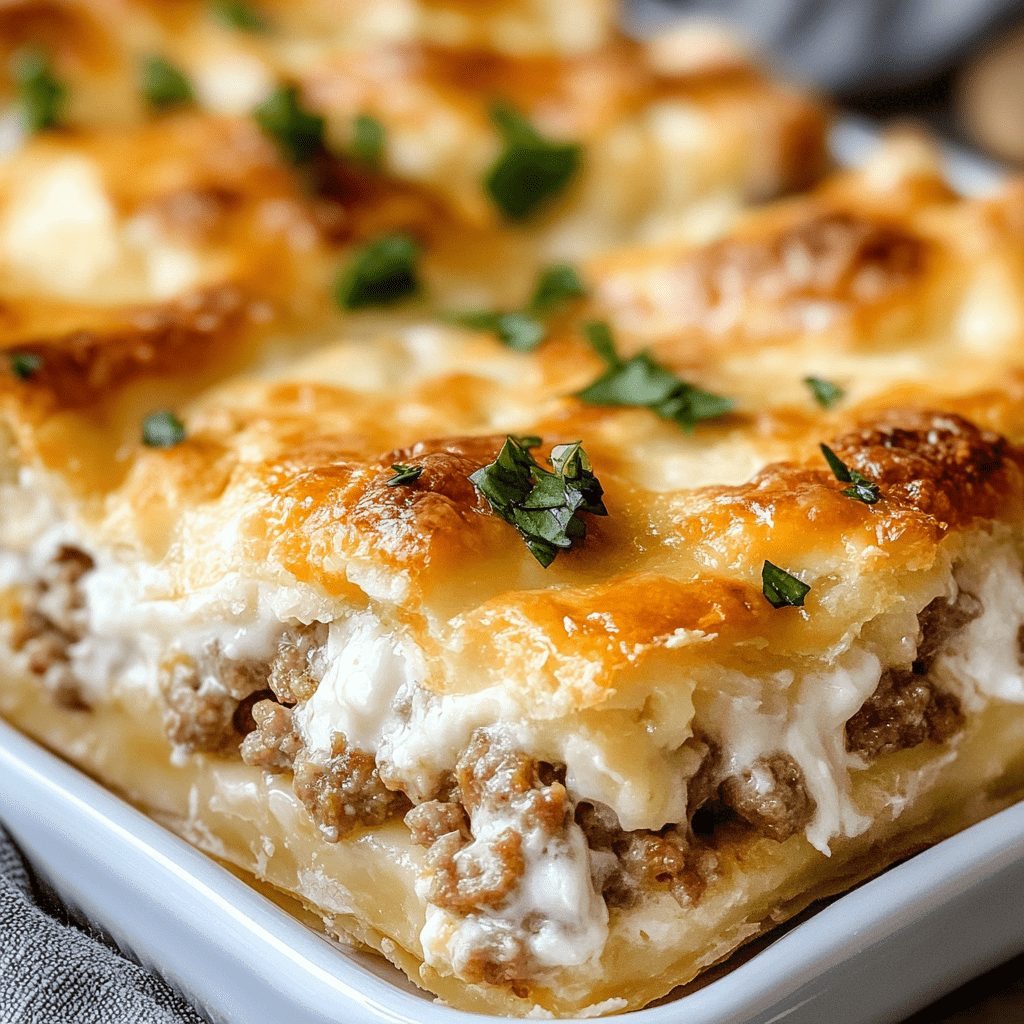
Delight in the savory flavors of the Italian Crescent Ring, where layers of deli meats, cheeses, and tangy peppers are wrapped in flaky crescent dough. This crowd-pleasing dish combines the convenience of crescent rolls with the hearty goodness of an Italian-inspired filling, perfect for casual gatherings or as a hearty appetizer.

Why You’ll Love This Recipe:

  • Easy Assembly: Using pre-made crescent rolls simplifies preparation without compromising on taste.
  • Versatile: Serve it as a main dish for brunch or slice into smaller portions for a party appetizer.
  • Hearty and Flavorful: The combination of meats, cheeses, and peppers offers a satisfying blend of textures and tastes.

Ingredients:

  • 2 cans of refrigerated crescent rolls
  • 1/2 pound sliced ham
  • 1/2 pound sliced salami
  • 1/2 pound sliced provolone cheese
  • 1/2 cup sliced pepperoni
  • 1/2 cup banana pepper rings, drained
  • 1/2 cup roasted red peppers, drained and sliced
  • 1 tablespoon Italian seasoning
  • 1/4 cup grated Parmesan cheese
  • 1/4 cup olive oil
  • Optional: lettuce and tomato slices for serving

Directions:

  1. Preheat your oven to 375°F (190°C).
  2. Prepare the Crescent Base: Unroll one can of crescent rolls and press the dough into the bottom of a greased 9×13-inch baking dish, ensuring to seal the seams and pressing slightly up the sides of the dish.
  3. Layer the Meats and Cheese: Arrange half of the ham, salami, and provolone cheese on top of the crescent dough.
  4. Add Peppers and Pepperoni: Evenly spread the pepperoni, banana pepper rings, and roasted red peppers over the layer of meats and cheese.
  5. Seasoning: Sprinkle the Italian seasoning evenly over the top of the pepperoni and peppers.
  6. Add Remaining Meats and Cheese: Layer the remaining ham, salami, and provolone cheese on top of the pepper mix.
  7. Top with Crescent Dough: Unroll the second can of crescent rolls and lay it over the layers, pressing gently to seal the edges and seams.
  8. Prepare for Baking: Brush the top layer of crescent dough with olive oil and sprinkle with Parmesan cheese.
  9. Bake: Place the prepared dish in the preheated oven and bake for 25-30 minutes, or until the crust is golden brown and the cheese is bubbly.
  10. Cool and Serve: Allow the Italian Crescent Ring to cool slightly before cutting into squares to serve. Optionally, serve with fresh lettuce and tomato slices on the side for added freshness.

Storage Options:

  • Refrigeration: Store any leftovers in an airtight container in the refrigerator for up to 3 days. Reheat in the oven or microwave before serving.
  • Freezing: To freeze, wrap the cooled Italian Crescent Ring tightly in plastic wrap and then aluminum foil. Label with the date and freeze for up to 1 month. Thaw overnight in the refrigerator before reheating.

Tips for Success:

  • Sealing the Edges: When pressing the crescent dough into the baking dish and sealing the edges, ensure there are no gaps to prevent the filling from leaking during baking.
  • Layering: Evenly distribute the meats, cheeses, and peppers to ensure each bite has a balanced flavor profile.
  • Baking Time: Keep an eye on the Italian Crescent Ring towards the end of baking to avoid over-browning. Adjust baking time as needed based on your oven’s performance.

Enjoy the Italian Crescent Ring warm from the oven, or let it cool to room temperature for a delightful addition to any gathering. Its flavorful layers and buttery crust make it a surefire hit with family and friends alike.

Copycat Pasta Fagioli Soup

0

Delve into the rich, heartwarming flavors of this Copycat Pasta Fagioli Soup. It’s a hearty mix of beans, vegetables, and spinach pasta, simmered in a flavorful broth, perfect for a cozy meal. Whether you’re serving it alongside crusty bread or a fresh salad, this soup is bound to become a favorite.

Why You’ll Love This Recipe:

  • Hearty and Nutritious: Packed with vegetables, beans, and pasta, it’s a filling, wholesome meal in a bowl.
  • Simple Ingredients: All pantry staples and fresh veggies make this an easy and quick recipe to prepare.
  • Perfect for Leftovers: The flavors deepen when stored, making it even tastier the next day.

Ingredients:

  • 2 celery stalks, chopped
  • 1 onion, chopped
  • 2 medium tomatoes, peeled and chopped
  • 1 can of cannellini beans (with liquid)
  • 1 tbsp olive oil
  • 3 garlic cloves, minced
  • 2 tsp dried parsley
  • 1 tsp Italian seasoning
  • ¼ tsp crushed red pepper flakes
  • 8 ounces of tomato sauce
  • 14 ½ ounces chicken broth
  • Salt and pepper to taste
  • 1 cup uncooked spinach pasta
  • Grated parmesan cheese for garnish (optional)

How to Make Copycat Pasta Fagioli Soup:

Step 1: Heat the Olive Oil

  • In a large saucepan or Dutch oven, heat 1 tablespoon of olive oil over medium heat.

Step 2: Cook the Vegetables

  • Add Celery and Onion: Toss in the chopped celery and onion, cooking until the onions are translucent—about 5-7 minutes.
  • Add Garlic: Stir in the minced garlic and cook for another minute, being careful not to burn the garlic.

Step 3: Add Seasonings and Liquids

  • Seasonings: Add dried parsley, Italian seasoning, and crushed red pepper flakes to the sautéed vegetables. Let them cook for 2-3 minutes to enhance the flavors.
  • Tomatoes and Broth: Add the peeled and chopped tomatoes, tomato sauce, and chicken broth. Stir to combine, and bring the mixture to a simmer.

Step 4: Simmer the Soup

  • Let the soup simmer for about 15 minutes, allowing the flavors to meld.

Step 5: Add the Pasta

  • Pasta: Stir in the uncooked spinach pasta and let it cook in the soup for 12-15 minutes, or until al dente.

Step 6: Add Beans

  • Beans: Add the can of cannellini beans, including their liquid, to the soup. Stir well to combine and let the soup simmer for another 5 minutes.

Step 7: Taste and Adjust

  • Taste the soup and adjust the seasoning with salt and pepper as needed.

Serving Suggestions:

  • Breadsticks or Crusty Bread: Serve the soup with warm breadsticks or a slice of crusty bread to soak up the delicious broth.
  • Salad or Roasted Vegetables: Pair with a light salad or roasted vegetables for a complete, well-rounded meal.

For added richness, sprinkle grated parmesan cheese on top before serving.

Pro Tip:

If you plan on having leftovers, cook the pasta separately and add it to each bowl before ladling the soup on top. This prevents the pasta from becoming mushy when stored in the fridge.

Storage Options:

Refrigerator:

  • Store any leftover soup in an airtight container in the fridge for up to 3 days. When reheating, you may need to add a little water or broth to thin it out as the pasta may absorb some of the liquid.

Freezer:

  • This soup freezes well. Transfer to a freezer-safe container, leaving space for expansion, and freeze for up to 3 months. Thaw overnight in the refrigerator before reheating.

Enjoy!

Cornmeal Pancakes Recipe

0

These cornmeal pancakes bring a delightful mix of crispiness and fluffiness, perfect for a savory snack or a sweet breakfast. Infused with the earthy taste of cornmeal and a soft bite from the buttermilk, these pancakes are a true Southern comfort food. They can be enjoyed on their own with syrup or paired with greens for a complete meal.

Why You’ll Love This Recipe:

  • Crunchy Yet Soft: The combination of cornmeal and self-rising flour creates pancakes with a crispy edge and a soft, tender inside.
  • Versatile: You can enjoy them sweet with syrup, or savory by soaking up juice from greens. Add fresh corn kernels for an even more authentic summer treat!
  • Quick and Easy: With minimal ingredients and a simple process, you’ll have a batch of hot pancakes ready in no time.
  • Customizable: These pancakes can be made into thicker cornbread-style pancakes or kept thinner for a more traditional feel.

Ingredients:

  • 1 cup self-rising flour
  • 1 cup cornmeal
  • 2 teaspoons baking powder
  • 1/2 teaspoon salt
  • 1 tablespoon sugar (optional)
  • 2 eggs
  • 3/4 cup buttermilk
  • 1/3 cup water
  • 1/4 cup cooking oil (vegetable, canola, or melted bacon fat)
  • 1 tablespoon fat (butter, oil, or a combination) for frying

Optional Additions:

  • 1 cup fresh corn kernels (when in season)

Preparation:

Step 1: Prepare the Cooking Surface

  • Set Up for Draining: Line a baking sheet with paper towels and place a rack on top. This will be used for draining the pancakes once they are cooked to keep them crisp.

Step 2: Mix the Dry Ingredients

  • Combine Dry Ingredients: In a large mixing bowl, whisk together the self-rising flour, cornmeal, baking powder, salt, and sugar (if using). This ensures the leavening agents and flavors are evenly distributed throughout the batter.

Step 3: Mix the Wet Ingredients

  • Mix Liquids: Pour the buttermilk into a measuring cup, then add the water and oil. Stir to ensure they are well blended.
  • Add Eggs: Crack the eggs into the liquid mixture, whisking until smooth and fully combined.

Step 4: Combine Wet and Dry Ingredients

  • Create the Batter: Gradually pour the wet mixture into the dry ingredients. Use a whisk to gently mix the batter until just combined. Be careful not to overmix—small lumps are okay. If you’re adding fresh corn kernels, fold them in at this point. The batter should be thick but pourable.

Step 5: Heat the Skillet

  • Heat the Pan: Heat a cast-iron skillet or griddle over medium to medium-high heat. Add the tablespoon of fat (oil or butter) and allow it to melt, swirling it around to coat the bottom of the pan evenly.

Step 6: Cook the Pancakes

  • Portion the Batter: Using a 1/8-cup measuring tool, pour small amounts of batter into the hot skillet, forming little circles.
  • Cook the Pancakes: Let the pancakes cook until golden and crispy on the bottom, about 2-3 minutes. Bubbles should start to form on the surface. Flip the pancakes and cook the other side until golden and crispy as well.
  • Drain the Pancakes: Remove the pancakes from the skillet and place them on the prepared rack to drain. This helps maintain their crispiness. Continue with the remaining batter.

Step 7: Serve

  • Serve Hot: These cornmeal pancakes are best served immediately while still warm and crispy. Enjoy them with a drizzle of syrup for a sweet breakfast or dip them in savory greens to soak up the flavorful juices.

Variations and Cornbread Pancake Option:

  • Add Fresh Corn: During corn season, you can enhance the pancakes by adding about 1 cup of fresh corn kernels removed from the cob. This adds bursts of juicy sweetness and texture to the pancakes. You’ll need one large ear of corn for this.
  • Make Cornbread Pancakes: For a thicker, heartier version, turn this recipe into a cornbread-style pancake. Reduce the water, and only add just enough buttermilk to achieve a thicker batter consistency.
  • Cooking Tip: Pour the thickened batter into a well-oiled, hot 8-inch cast-iron skillet over medium-high heat. Once the bottom is browned (about 10-15 minutes), flip the pancake carefully using a metal spatula and cook the other side until browned.
  • Baking Option: Alternatively, bake the cornbread pancake in a 425°F (220°C) preheated oven for 15-20 minutes until golden. No flipping required!

Storage Options:

Room Temperature:
Cornmeal pancakes are best enjoyed fresh, but if you have leftovers, you can keep them at room temperature for up to 2 hours before storing.

Refrigerator:
To store leftovers, place the pancakes in an airtight container or wrap them in foil, and refrigerate for up to 3 days. Reheat in a hot skillet or oven to restore their crispy edges.

Freezer:
Freeze the pancakes by placing them in a single layer on a baking sheet and freezing until solid. Then transfer them to a freezer-safe bag or container for up to 2 months. To reheat, bake them directly from frozen in a 375°F (190°C) oven for 10-15 minutes, or until heated through.

Helpful Tips:

  • Prevent Sticking: Spray your measuring cup with a little non-stick spray before portioning out the batter to ensure it slides out easily.
  • For Uniform Pancakes: If you don’t have a 1/8-cup measuring cup, you can use a ladle or eyeball it to get the right size for evenly cooked pancakes.
  • Crispier Pancakes: Using a mixture of butter and oil when frying gives the pancakes a nice golden crust without the butter burning.

Enjoy these golden cornmeal pancakes any time of the day! Whether you’re having them for breakfast with syrup or dipping them in greens, they’re bound to bring warmth and comfort to your table.

Baked Potato Chicken and Broccoli Casserole

0

Indulge in this hearty Loaded Chicken and Broccoli Stuffed Potatoes Casserole, where tender baked potatoes are filled with a savory mix of chicken, broccoli, and a creamy cheese sauce. This cozy dish is perfect for a comforting weeknight dinner or a crowd-pleasing side at family gatherings. Combining the satisfying flavors of a baked potato with cheesy goodness and nutritious ingredients, this casserole hits the mark for both flavor and comfort.

Why You’ll Love This Recipe:

  • Comforting and Satisfying: Creamy cheese, tender chicken, and hearty potatoes come together in a dish that is the ultimate comfort food.
  • Nutritious Ingredients: Broccoli adds a dose of vitamins and minerals, while the chicken provides lean protein, making this casserole both delicious and wholesome.
  • Customizable: You can easily swap out or add ingredients to suit your taste or what you have on hand, like adding bacon, different cheeses, or other vegetables.
  • Easy to Prepare: With minimal prep and simple steps, this recipe comes together effortlessly, especially if you use leftover or rotisserie chicken.

Ingredients:

  • 4 large russet potatoes, washed and scrubbed
  • 2 cups cooked chicken, diced or shredded
  • 2 cups broccoli florets, blanched
  • 1 1/2 cups shredded cheddar cheese
  • 1 cup sour cream
  • 1/2 cup milk
  • 2 tablespoons unsalted butter
  • 2 tablespoons all-purpose flour
  • 2 cloves garlic, minced
  • Salt and pepper, to taste
  • Chopped fresh chives or green onions, for garnish (optional)

Step-by-Step Instructions

Step 1: Preheat and Prepare

  • Preheat the Oven: Preheat your oven to 375°F (190°C). Ensuring the oven is ready when you begin will help everything bake evenly.
  • Grease the Baking Dish: Grease a 9×13-inch baking dish with butter or non-stick cooking spray to prevent sticking and make clean-up easier.

Step 2: Bake the Potatoes

  • Bake the Potatoes: Place the washed and scrubbed potatoes directly on the oven rack. Bake for 45-60 minutes, or until the potatoes are tender when pierced with a fork. The time may vary based on the size of the potatoes, so check them after about 45 minutes. Once they’re done, remove the potatoes from the oven and let them cool slightly before handling.

Step 3: Prepare the Cheese Sauce

  • Melt the Butter: In a medium saucepan over medium heat, melt 2 tablespoons of unsalted butter.
  • Cook the Garlic: Add the minced garlic to the melted butter and sauté for about 1 minute until it becomes fragrant. Be careful not to let the garlic brown, as it can become bitter.
  • Make the Roux: Stir in 2 tablespoons of all-purpose flour into the butter and garlic mixture. Cook for about 1 minute, stirring continuously, to form a roux that will thicken the sauce.
  • Add the Milk: Gradually whisk in 1/2 cup of milk, ensuring you stir constantly to prevent lumps from forming. Continue whisking until the mixture thickens and becomes smooth.
  • Add Cheese and Sour Cream: Once the sauce has thickened, remove the saucepan from the heat. Stir in 1 cup of shredded cheddar cheese and 1 cup of sour cream until the cheese is fully melted and the sauce is creamy. Season with salt and pepper to taste.

Step 4: Assemble the Casserole

  • Prepare the Potato Shells: Once the baked potatoes have cooled slightly, cut them in half lengthwise. Using a spoon, carefully scoop out the flesh of the potatoes, leaving a thin layer attached to the skins to maintain the shape. Set the potato shells aside in your greased baking dish.
  • Mix the Filling: Dice the scooped-out potato flesh and place it in a large mixing bowl. Add the cooked chicken, blanched broccoli florets, and the prepared cheese sauce to the bowl. Gently toss all the ingredients together until everything is well coated with the sauce.

Step 5: Fill the Potato Shells

  • Fill the Shells: Spoon the chicken, broccoli, and potato mixture back into the hollowed-out potato shells. Divide the mixture evenly between the potato halves, ensuring each shell is generously filled.
  • Top with Cheese: Sprinkle the remaining 1/2 cup of shredded cheddar cheese over the top of the filled potatoes to create a cheesy, golden crust as it bakes.

Step 6: Bake the Casserole

  • Bake: Place the baking dish in the preheated oven and bake for 20-25 minutes, or until the cheese on top is melted, bubbly, and slightly golden. The filling should be heated through, and the potatoes should be hot and ready to eat.
  • Cool and Garnish: Once baked, remove the casserole from the oven and allow it to cool for a few minutes before serving. For a finishing touch, garnish the stuffed potatoes with chopped fresh chives or green onions for a pop of color and extra flavor.

Storage Options:

Room Temperature:
You can leave the casserole at room temperature for up to 2 hours before refrigerating or freezing the leftovers.

Refrigerator:
Store any leftover stuffed potatoes in an airtight container in the refrigerator for up to 3 days. When reheating, place them in a preheated oven at 350°F (175°C) for about 10-15 minutes or until heated through, or you can microwave them in 30-second intervals until warmed.

Freezer:
To freeze the casserole, let the stuffed potatoes cool completely, then wrap each one tightly in plastic wrap and place them in a freezer-safe bag or container. They can be frozen for up to 2 months. When ready to serve, thaw the potatoes in the refrigerator overnight and reheat in the oven at 350°F (175°C) for 20-25 minutes until heated through.

Tips for Best Results:

  • Blanch the Broccoli: Blanching the broccoli florets before mixing them into the casserole helps retain their vibrant green color and crisp-tender texture.
  • Choose the Right Potatoes: Russet potatoes are ideal for this recipe because of their size and ability to hold their shape after baking.
  • Make it Ahead: You can prepare the casserole ahead of time and store it in the refrigerator for up to 1 day before baking. This makes it a great option for meal prep or entertaining.
  • Get Creative with Toppings: Add a sprinkle of bacon bits, extra cheese, or even a dollop of sour cream before serving for extra indulgence.

Enjoy this Loaded Chicken and Broccoli Stuffed Potatoes Casserole as a comforting, wholesome dish that brings together the best of baked potatoes and casserole comfort in one satisfying meal!

Grandma’s Ground Beef Casserole

0

This comforting ground beef casserole is a hearty and easy-to-make dish that combines rich beef, creamy soups, and melted cheese. It’s a perfect meal for family dinners or cozy gatherings, bringing together simple ingredients for a flavorful and filling bake. The casserole’s cheesy, potato-filled goodness will keep everyone coming back for more.

Why You’ll Love This Recipe:

  • Family Favorite: A classic casserole that’s both satisfying and easy to prepare.
  • One-Pan Wonder: Everything comes together in one dish for minimal cleanup.
  • Customizable: You can easily swap ingredients to suit your tastes or dietary needs.

Ingredients You’ll Need:

  • Ground beef: 1 to 1.5 pounds – Provides a rich, savory base for the casserole.
  • Condensed cream of mushroom soup: 1 tin (10.5 ounces) – Adds a creamy, earthy flavor.
  • Condensed cream of cheddar cheese soup: 1 tin (10.5 ounces) – Gives the dish a cheesy, tangy element that melts beautifully into the mixture.
  • Frozen potato cubes: 3 cups – Creates a hearty, filling texture.
  • Cheddar cheese, shredded: 1 cup – Adds a gooey, cheesy topping.
  • Salt and pepper: To taste – Essential for seasoning.

Ingredient Tips and Substitutions:

  • Meat Alternatives: You can substitute the ground beef with ground turkey or chicken for a lighter version. For a vegetarian option, use plant-based ground meat or crumbled tofu.
  • Cheese Substitutes: Swap cheddar cheese with Colby Jack, mozzarella, or any cheese that melts well for a different flavor.
    • Add Extra Veggies: Stir in diced bell peppers, peas, or corn to give the dish added color and nutrition.
  • Gluten-Free Version: Use gluten-free condensed soups to make this dish gluten-free.
  • Creamier Option: If you want an even creamier dish, add 1/2 cup of sour cream or Greek yogurt to the mixture.

Instructions: How to Make Grandma’s Ground Beef Casserole

Step 1: Preheat the Oven
Preheat your oven to 350°F (175°C). Grease a 9×13-inch casserole dish with cooking spray or a little oil to prevent the casserole from sticking during baking.

Step 2: Cook the Ground Beef
In a large skillet, cook 1 to 1.5 pounds of ground beef over medium heat until it’s fully browned. As the beef cooks, break it apart with a spatula to crumble it. Once browned, drain any excess fat to keep the dish from becoming too greasy. Transfer the cooked beef to a large mixing bowl.

Step 3: Mix the Ingredients
Add one 10.5-ounce tin of condensed cream of mushroom soup and one 10.5-ounce tin of condensed cream of cheddar cheese soup to the bowl with the ground beef. Stir until the soups are well combined with the beef, creating a rich and creamy mixture.

Step 4: Add the Potatoes and Cheese
To the beef and soup mixture, stir in 3 cups of frozen cubed potatoes and 1/2 cup of shredded cheddar cheese. Season with salt and pepper to taste. Mix everything together until the potatoes and cheese are evenly distributed throughout the beef mixture.

Step 5: Assemble the Casserole
Transfer the beef and potato mixture to the greased casserole dish. Spread it out evenly so that the mixture fills the entire dish. Sprinkle the remaining 1/2 cup of shredded cheddar cheese over the top, which will create a delicious cheesy crust as the casserole bakes.

Step 6: Bake the Casserole
Cover the casserole dish with aluminum foil and place it in the preheated oven. Bake for 30 minutes covered, allowing the flavors to meld and the potatoes to soften. After 30 minutes, remove the foil and continue baking for an additional 30 minutes, or until the top is golden brown and the potatoes are tender when pierced with a fork.

Step 7: Rest and Serve
Once the casserole is finished baking, remove it from the oven and let it rest for about 5 minutes. This allows the flavors to fully develop and makes it easier to serve. Slice and enjoy!

Serving Suggestions:

This hearty ground beef casserole pairs well with a variety of sides to complete your meal:

  • Crisp Green Salad: A mixed green salad with a tangy vinaigrette is the perfect contrast to the richness of the casserole.
  • Roasted or Steamed Vegetables: Roasted broccoli, steamed carrots, or sautéed green beans make for great, fresh sides.
  • Crusty Bread: Serve with warm, crusty bread to soak up any extra sauce and enhance the comfort food vibes.
  • Pickled Vegetables: Add a side of pickled beets, onions, or cucumbers for a tangy bite that cuts through the creaminess.

Storage Options:

  • Refrigeration: Store any leftovers in an airtight container in the refrigerator for up to 3 days. To reheat, simply warm individual portions in the microwave or reheat the entire dish in the oven at 350°F for about 15 minutes until heated through.
  • Freezing: If you want to make this dish ahead of time, freeze the unbaked casserole. Cover it tightly with plastic wrap and aluminum foil, and freeze for up to 3 months. To bake from frozen, simply remove the plastic wrap, cover with foil, and bake at 350°F for about 1 hour and 30 minutes. Remove the foil in the last 30 minutes of baking to allow the top to brown.

Final Thoughts:

Grandma’s Ground Beef Casserole is the perfect combination of creamy, cheesy, and hearty comfort food. Whether you make it for a family dinner, potluck, or a cozy night in, this casserole is sure to become a go-to recipe in your household. With its easy preparation and rich flavor, it’s bound to win over anyone who takes a bite!

Sweet Potato Pie with a Butter Glaze

0

This Sweet Potato Pie combines the natural sweetness of cooked, mashed sweet potatoes with a buttery glaze for a dessert that’s comforting, rich, and utterly delicious. The smooth and creamy filling is balanced by a flaky pie crust, while the optional glaze adds a glossy finish and a subtle crunch from the walnuts. Whether you make it with or without the glaze, this pie is a must-try for any dessert lover.

Why You’ll Love This Recipe:

Comforting and Sweet: The creamy texture of the sweet potatoes, combined with the subtle notes of vanilla, make for a perfect fall-inspired dessert.

Simple Ingredients: With pantry staples like sugar, flour, and butter, this pie is easy to make without needing to hunt for specialty ingredients.

Optional Glaze: The butter glaze adds an extra layer of sweetness and texture, but the pie is just as delightful without it.

Ingredients:

  • Sweet potatoes: 2 cups, cooked and mashed (about 3 medium sweet potatoes)
  • Sugar: 1 1/2 cups
  • Flour: 2 tablespoons
  • Evaporated milk: 1 can (5 ounces), divided
  • Egg: 1, lightly beaten
  • Vanilla extract: 1 teaspoon
  • Pie crust: 1 unbaked 9-inch pie crust

For the Glaze:

  • Sugar: 1/2 cup
  • Flour: 2 1/4 teaspoons
  • Butter: 2 tablespoons, melted
  • Evaporated milk: 2 tablespoons (from the previous can)
  • Walnut pieces (optional): 1/4 cup

Step-by-Step Instructions:

Step 1: Prepare the Oven and Pie Crust
Preheat your oven to 375°F (190°C). Place the unbaked pie crust on a cookie sheet to catch any spills during baking. This also makes it easier to move the pie in and out of the oven later.

Step 2: Make the Sweet Potato Filling
In a large mixing bowl, combine 1 1/2 cups of sugar, 2 tablespoons of flour, and 3 ounces of the evaporated milk (remember to set aside 2 tablespoons for the glaze). Add the lightly beaten egg and 1 teaspoon of vanilla extract, mixing until everything is well incorporated.

Once the wet mixture is smooth, fold in 2 cups of cooked and mashed sweet potatoes. Stir gently until the sweet potatoes are fully combined with the rest of the ingredients. The filling should be smooth and creamy, with no large lumps.

Step 3: Pour the Filling into the Pie Crust
Carefully pour the sweet potato mixture into the unbaked pie shell, spreading it out evenly. Make sure the surface is smooth and level, as this will help the glaze sit evenly on top.

Step 4: Prepare the Butter Glaze
In a separate small bowl, mix together 1/2 cup of sugar and 2 1/4 teaspoons of flour. Stir in the 2 tablespoons of melted butter and the 2 tablespoons of evaporated milk that you set aside earlier. Whisk until the mixture is smooth and glossy.

Step 5: Glaze the Pie
Drizzle the glaze evenly over the sweet potato mixture, but be careful not to overdo it. The glaze should form a thin, glossy layer on top of the pie without sinking too deeply into the filling. If desired, sprinkle 1/4 cup of walnut pieces over the glaze for an added crunch and nutty flavor.

Step 6: Bake the Pie
Place the pie in the preheated oven and bake for about 1 hour, or until the crust is golden brown and a knife inserted near the center comes out clean. The filling should be set but still soft and creamy, while the glaze will have formed a slightly crisp, sugary layer on top.

Step 7: Cool and Serve
Once baked, remove the pie from the oven and let it cool on a wire rack. Allow the pie to cool completely before slicing and serving, as this helps the filling to set and makes for cleaner slices.

Storage Options:

Refrigeration: Store any leftover pie in an airtight container in the refrigerator for up to 4 days. To serve, you can enjoy it chilled or warm it up slightly in the microwave.

Freezing: If you’d like to save some pie for later, wrap individual slices tightly in plastic wrap, then place them in a freezer-safe container or bag. The pie can be frozen for up to 2 months. To thaw, leave the slices in the refrigerator overnight and warm in the microwave if desired.

Optional Tips:

  • If you’re worried about the pie being too sweet, feel free to skip the glaze entirely, especially if your sweet potatoes are naturally sweeter. The pie is delicious and rich enough on its own without it.
  • For a twist, you can replace the walnuts with pecans or leave out the nuts entirely.
  • Serve the pie with a dollop of whipped cream or a scoop of vanilla ice cream for an extra treat.

Final Thoughts:

This Sweet Potato Pie with a Butter Glaze is a classic comfort dessert that brings the warmth of sweet potatoes and the richness of a buttery crust together in perfect harmony. Whether you enjoy it with or without the glaze, this pie is a delightful treat for any occasion—especially during the fall and winter months. Enjoy!

Sausage and Cream Cheese Crescent Roll Bake

0

This easy-to-make casserole combines savory pork sausage crumbles with the creamy richness of cream cheese, all wrapped between buttery, flaky layers of crescent roll dough. Perfect for breakfast, brunch, or even a quick dinner, this dish is a comforting and crowd-pleasing option that’s sure to become a regular in your meal rotation.

Why You’ll Love This Recipe:

Simple and Quick: With just a few ingredients and minimal prep time, this recipe delivers maximum flavor with little effort.

Savory and Creamy: The combination of seasoned sausage and cream cheese creates a deliciously creamy filling that contrasts beautifully with the flaky crescent roll dough.

Versatile: Ideal for breakfast, brunch, or dinner, this casserole can be enjoyed anytime. It’s also perfect for feeding a crowd or meal prepping for the week.

Ingredients:

  • Crescent roll dough: 2 cans (8 ounces each)
  • Pork sausage crumbles: ~20 ounces
  • Cream cheese: 8 ounces

Step-by-Step Instructions:

Step 1: Preheat the Oven
Preheat your oven to 375°F (190°C) to ensure it’s ready when your casserole is assembled. Grease a 9×13-inch baking dish lightly with cooking spray or butter to prevent the crescent roll dough from sticking.

Step 2: Cook the Sausage
In a medium skillet, cook the pork sausage crumbles over medium heat. Stir frequently, breaking the sausage apart with a spatula as it cooks. Continue cooking until the sausage is browned and fully cooked through with no pink remaining. If your sausage has rendered a lot of fat, drain the excess grease from the skillet.

Step 3: Prepare the Creamy Filling
Reduce the heat to low and add the softened cream cheese to the cooked sausage in the skillet. Stir continuously until the cream cheese is fully melted and combined with the sausage, creating a smooth and creamy mixture. Once the filling is ready, remove the skillet from the heat and set it aside to cool slightly while you prepare the dough.

Step 4: Assemble the Bottom Layer
Unroll one of the cans of crescent roll dough and press it into the bottom of the prepared 9×13-inch baking dish. If you’re using pre-cut crescent rolls, pinch together the seams to form a single, even layer of dough that covers the entire bottom of the dish.

Step 5: Add the Sausage Mixture
Evenly spread the sausage and cream cheese mixture over the crescent roll dough in the baking dish. Make sure the filling is distributed across the surface so each bite of the casserole will have that delicious combination of flavors.

Step 6: Add the Top Layer
Open the second can of crescent roll dough and unroll it over the sausage mixture, creating a “top crust.” Just like with the bottom layer, pinch together any seams if necessary to create a smooth, unbroken sheet of dough.

Step 7: Bake the Casserole
Place the baking dish in the preheated oven and bake for 15-20 minutes. You’ll know the casserole is ready when the crescent roll dough has puffed up and turned a beautiful golden brown on top. Check the casserole around the 15-minute mark, and if the top is browning too quickly, you can loosely cover it with foil to prevent over-browning.

Step 8: Serve and Enjoy
Once the casserole is baked to golden perfection, remove it from the oven and allow it to cool for a few minutes before slicing and serving. This dish is delicious on its own but can also be served with a side of scrambled eggs, a fresh salad, or some crispy hash browns for a more complete meal.

Storage Options:

Refrigeration: Store any leftover Sausage and Cream Cheese Crescent Roll Bake in an airtight container in the refrigerator for up to 3 days. To reheat, simply warm a portion in the microwave or oven until heated through.

Freezing: This dish freezes well for future meals. Allow the casserole to cool completely before wrapping individual portions tightly in plastic wrap, then foil, and place them in a freezer-safe container or bag. Freeze for up to 2 months. To reheat, thaw the portions in the refrigerator overnight and warm them in the oven at 350°F (175°C) until heated through.

Serving Suggestions:

This casserole is incredibly versatile and can be served in a variety of ways depending on the meal or occasion:

  • Breakfast or Brunch: Serve with a side of scrambled eggs and fresh fruit for a complete breakfast or brunch spread.
  • Dinner: Pair with a simple salad or steamed vegetables for a hearty, savory dinner.
  • Snack: Slice into smaller pieces and serve as an easy snack or appetizer at parties or gatherings.

Whether you’re making this for a quick family breakfast or prepping for a potluck, this Sausage and Cream Cheese Crescent Roll Bake is sure to be a hit!

Cheesy Taco Cream Cheese Pasta

0

Dive into the ultimate comfort food fusion with this Cheesy Taco Cream Cheese Pasta. Combining the bold flavors of taco-seasoned beef with a rich, creamy cheese sauce, this dish is a hearty, flavorful meal that’s sure to become a family favorite. With just the right balance of spice from diced tomatoes and green chilies, and the indulgent creaminess of cheddar and cream cheese, this pasta dish takes weeknight dinners to the next level.

Why You’ll Love This Recipe:

Bold and Comforting Flavor: The savory taco-seasoned beef paired with a luxuriously creamy cheese sauce makes for a perfect blend of comfort and flavor.

Simple Ingredients, Big Taste: With just a few everyday ingredients, this recipe delivers a satisfying meal that’s rich, cheesy, and filling.

One-Pot Wonder: Aside from cooking the pasta, most of the magic happens in a single skillet, making cleanup a breeze.

Ingredients:

  • Ground beef: 1 lb
  • Taco seasoning: 1 package
  • Pasta shells or elbow macaroni: 1 lb
  • Butter: 2 tablespoons
  • Milk: 1 cup
  • Cream cheese (softened): 8 oz
  • Shredded cheddar cheese: 2 cups
  • Diced tomatoes with green chilies (drained): 1 can (10 oz)
  • Salt and pepper: To taste
  • Optional garnishes: Chopped cilantro, diced green onions, sour cream

Step-by-Step Instructions: Bringing It All Together

Step 1: Cook the Pasta
Start by boiling 1 lb of pasta shells or elbow macaroni in a large pot of salted water. Cook the pasta according to the package instructions until it reaches an al dente texture. This typically takes around 8-10 minutes, but be sure to check your pasta to ensure it doesn’t overcook. Once it’s done, drain the pasta and set it aside for later. Don’t worry if you sneak a bite or two—it’s hard to resist freshly cooked pasta!

Step 2: Brown the Beef
While the pasta is cooking, heat a large skillet over medium-high heat. Add 1 lb of ground beef and cook, breaking it apart with a spatula as it browns. Stir and cook the beef until there is no pink left, and the beef is fully cooked. Once done, drain any excess fat from the skillet.

Next, sprinkle in a package of taco seasoning, stirring it into the beef until fully coated. This step transforms the beef into that classic taco flavor we all know and love. Set the seasoned beef aside while you work on the cheese sauce.

Step 3: Make the Cheese Sauce
In the same large pot you used to cook the pasta, melt 2 tablespoons of butter over medium heat. Once the butter is fully melted and bubbling, slowly pour in 1 cup of milk, stirring constantly to avoid scalding.

Now, it’s time for the magic ingredient—cream cheese. Add 8 oz of softened cream cheese into the pot and whisk it into the milk. Stir continuously until the cream cheese has fully melted and you’re left with a smooth, creamy mixture. At this point, you’ll notice the sauce starting to come together.

Next, add in 2 cups of shredded cheddar cheese. Stir until the cheddar is melted into the cream cheese mixture, creating a luscious, cheesy sauce that you’ll want to dive into with a spoon. Resist the temptation and move on to the next step.

Step 4: Combine Everything
Now that your cheese sauce is ready, it’s time to bring everything together. Add the cooked pasta and seasoned ground beef to the cheese sauce. Stir to combine, ensuring that every piece of pasta and every bite of beef is coated in the rich, cheesy goodness.

Open and drain 1 can of diced tomatoes with green chilies, then stir it into the pasta mixture. The tomatoes and chilies add a bright, slightly spicy note that balances out the richness of the sauce. Stir everything together until the tomatoes are evenly distributed.

Taste the mixture and season with salt and pepper to taste. Let the pasta simmer for 2-3 minutes over low heat to allow all the flavors to meld together.

Step 5: Serve and Enjoy
Your Cheesy Taco Cream Cheese Pasta is now ready to serve! Spoon it into bowls and, if desired, garnish with chopped cilantro, diced green onions, or a dollop of sour cream to add a fresh and zesty finish.

Optional Sides:

This pasta dish is hearty and filling on its own, but if you’re looking to round out the meal, here are a few serving ideas:

  • Tortilla Chips: Serve alongside some crispy tortilla chips for added texture and crunch. You can even dip the chips into the cheesy pasta for an extra fun taco-pasta experience.
  • Green Salad: Balance the richness of the pasta with a light and refreshing green salad. A simple lettuce mix with a citrus vinaigrette would pair perfectly.
  • Mexican Rice or Beans: For a heartier meal, consider serving the pasta alongside Mexican rice or refried beans. These sides complement the taco-inspired flavors of the dish.

Storage Options:

If you have any leftovers (though they may disappear quickly!), here’s how to store them for later enjoyment:

Refrigeration: Store the leftover pasta in an airtight container and refrigerate for up to 3-4 days. To reheat, simply warm it in the microwave or on the stovetop, adding a splash of milk to keep the sauce creamy.

Freezing: This pasta also freezes well. Allow it to cool completely before transferring to a freezer-safe container. It can be frozen for up to 2 months. To reheat, thaw the pasta in the refrigerator overnight and then warm it on the stovetop or in the microwave. Again, adding a little milk will help bring the sauce back to its creamy consistency.

Final Thoughts:

Cheesy Taco Cream Cheese Pasta is the ultimate blend of two favorite comfort foods—tacos and pasta. The creamy cheese sauce, with the taco-flavored beef and the slight heat from the chilies, creates a dish that’s both satisfying and delicious. Whether you’re cooking for family, friends, or just yourself, this meal is sure to become a go-to recipe in your kitchen. Plus, with minimal prep and just a few simple ingredients, it’s a weeknight winner!

Enjoy your new favorite dinner with a side of fun and flavor!

Spicy Dumpling Soup

0

Delve into the invigorating warmth of Spicy Dumpling Soup, where tender dumplings swim in a rich, flavorful broth infused with bold spices and fresh vegetables. This comforting dish brings the heartiness of homemade dumplings together with the satisfying heat of a well-spiced soup, creating a perfect bowl for chilly evenings or whenever you need a bit of warmth and comfort.

Why You’ll Love This Recipe:

  • Robust Flavor: The spicy broth combined with tender dumplings offers a dynamic and satisfying flavor profile that will excite your taste buds.
  • Hearty and Nourishing: Packed with vegetables, protein, and hearty dumplings, this soup is as nourishing as it is delicious.
  • Customizable Heat: Adjust the level of spice to suit your taste, making it perfect for those who love a little or a lot of heat.

Ingredients:

For the Dumplings:

  • Ground meat (pork, chicken, or beef): 1 pound
  • Finely chopped green onions: 1/2 cup
  • Minced garlic: 2 cloves
  • Soy sauce: 2 tbsp
  • Sesame oil: 1 tbsp
  • Ground ginger: 1 tsp
  • Dumpling wrappers: 1 pack (about 40 wrappers)

For the Spicy Broth:

  • Chicken or vegetable broth: 6 cups
  • Soy sauce: 3 tbsp
  • Chili paste or Sriracha: 2 tbsp (adjust to taste)
  • Fresh ginger, thinly sliced: 1 inch piece
  • Garlic, minced: 3 cloves
  • Carrots, thinly sliced: 2 medium
  • Bok choy or spinach: 2 cups, roughly chopped
  • Mushrooms, sliced: 1 cup
  • Green onions, chopped: 1/2 cup
  • Sesame oil: 1 tbsp

Instructions:

Dumpling Preparation:

  1. In a large mixing bowl, combine the ground meat, green onions, minced garlic, soy sauce, sesame oil, and ground ginger. Mix until well combined.
  2. Place about 1 teaspoon of filling in the center of each dumpling wrapper. Moisten the edges with water, fold over, and press to seal. Set the prepared dumplings aside.

Spicy Broth Preparation:

  1. In a large pot, heat the sesame oil over medium heat. Add the minced garlic and sliced ginger, sautéing until fragrant, about 2 minutes.
  2. Add the chicken or vegetable broth, soy sauce, and chili paste or Sriracha. Bring the mixture to a boil, then reduce to a simmer.
  3. Stir in the carrots and mushrooms, simmering for about 5 minutes until they begin to soften.

Cooking the Dumplings:

  1. Carefully add the prepared dumplings to the simmering broth. Cook for 5-7 minutes, or until the dumplings are cooked through and float to the surface.
  2. Add the bok choy or spinach and cook for an additional 2 minutes, just until wilted.

Serving:

  1. Ladle the soup into bowls, ensuring each serving has a generous portion of dumplings and vegetables. Garnish with chopped green onions.
  2. Serve hot, enjoying the warming and spicy flavors.

Storage Options:

Store any leftover soup in an airtight container in the refrigerator for up to 3 days. The dumplings will continue to absorb the broth, so consider adding a little extra broth when reheating. This soup can also be frozen for up to 2 months—simply reheat gently on the stovetop when ready to enjoy.

Enjoy this Spicy Dumpling Soup as a flavorful and comforting meal, perfect for warming up on a cold day or whenever you’re craving something hearty and satisfying!

Garlic Bread Sloppy Joes

0

Garlic Bread Sloppy Joes are a fun and flavorful twist on the classic sloppy joe sandwich. Combining the rich, savory filling with the crunchy, buttery goodness of garlic bread, this dish is perfect for a family dinner or a casual get-together. It’s a quick and satisfying meal that everyone will love!

Why You’ll Love This Recipe

This recipe takes two beloved comfort foods—garlic bread and sloppy joes—and combines them into one mouthwatering dish. The crunchy garlic bread perfectly complements the hearty sloppy joe filling, and the melted cheese on top adds an extra layer of indulgence. It’s an easy, one-pan meal that’s perfect for busy weeknights or feeding a crowd. Plus, it’s customizable: you can adjust the seasoning or add extra toppings like jalapeños or pickles to suit your taste.

Ingredients

For the Bread:

  • 1 loaf of Italian bread
  • ½ cup unsalted butter, softened
  • 1 teaspoon garlic salt

For the Sloppy Joe Filling:

  • 1 pound ground beef
  • ¼ cup yellow onion, chopped
  • ½ teaspoon garlic powder
  • 1 teaspoon yellow mustard
  • ¾ cup ketchup
  • ½ teaspoon kosher salt
  • ¼ teaspoon black pepper
  • ½ cup water

For the Topping:

  • 1 cup shredded mozzarella cheese
  • 1 cup shredded sharp cheddar cheese
  • Chopped parsley for garnish

Instructions

Preparation:
Preheat your oven to 350°F (175°C). Line a baking sheet with parchment paper to prevent sticking and make cleanup easier.

Preparing the Bread:
Slice the Italian bread lengthwise into two halves, creating a perfect base for the sloppy joe filling. Place the halves cut side up on the prepared baking sheet. In a small bowl, combine the softened butter and garlic salt, mixing until smooth. Spread this garlic butter mixture evenly over the cut sides of the bread. The garlic butter will not only add flavor but also help the bread achieve a golden, crispy texture when baked. Set the bread aside while you prepare the sloppy joe filling.

Making the Sloppy Joe Filling:
In a medium nonstick skillet over medium heat, cook the ground beef and chopped onions until the beef is browned and no longer pink, about 8-10 minutes. Stir frequently to break up the beef into small pieces, ensuring even cooking. Once the beef is browned, drain any excess grease from the skillet to avoid a greasy filling. Stir in the garlic powder, mustard, ketchup, salt, pepper, and water. Mix thoroughly until all the ingredients are well combined and the sauce thickens slightly, about 2-3 minutes. This mixture should be rich and tangy, with just the right balance of sweetness and spice.

Assembling the Garlic Bread Sloppy Joes:
Spoon the prepared sloppy joe mixture evenly over the two halves of the bread. Be generous with the filling to ensure every bite is packed with flavor. Once the sloppy joe mixture is evenly spread, sprinkle the shredded mozzarella and sharp cheddar cheese over the top. The combination of these cheeses adds a deliciously gooey, melty texture that pairs perfectly with the savory filling and crispy bread.

Baking:
Place the assembled bread halves in the preheated oven and bake for 12-14 minutes, or until the cheese is fully melted and the bread is golden brown and crispy around the edges. The cheese should be bubbly and slightly browned, adding a nice contrast to the rich filling. Keep an eye on the bread towards the end of the baking time to ensure it doesn’t burn.

Serving:
Once the Garlic Bread Sloppy Joes are out of the oven, let them cool slightly before cutting them into slices. Garnish with freshly chopped parsley for a burst of color and a hint of freshness. The parsley not only adds a nice visual touch but also complements the rich flavors of the dish.

Storage Options

If you have any leftovers (which is rare because they’re so delicious!), you can store them in an airtight container in the refrigerator for up to 2 days. To reheat, place the slices in a preheated oven at 350°F (175°C) for about 10 minutes, or until warmed through. You can also reheat them in the microwave for a quicker option, but the bread may lose some of its crispiness.

Conclusion

These Garlic Bread Sloppy Joes are a fantastic way to elevate a classic comfort food. The combination of crispy garlic bread, savory sloppy joe filling, and melted cheese creates a dish that’s satisfying, easy to make, and perfect for any occasion. Whether you’re making them for a family dinner, a party, or just because, these sloppy joes are sure to become a new favorite in your recipe rotation. Enjoy the rich flavors and the fun twist on a classic with this easy-to-follow recipe.