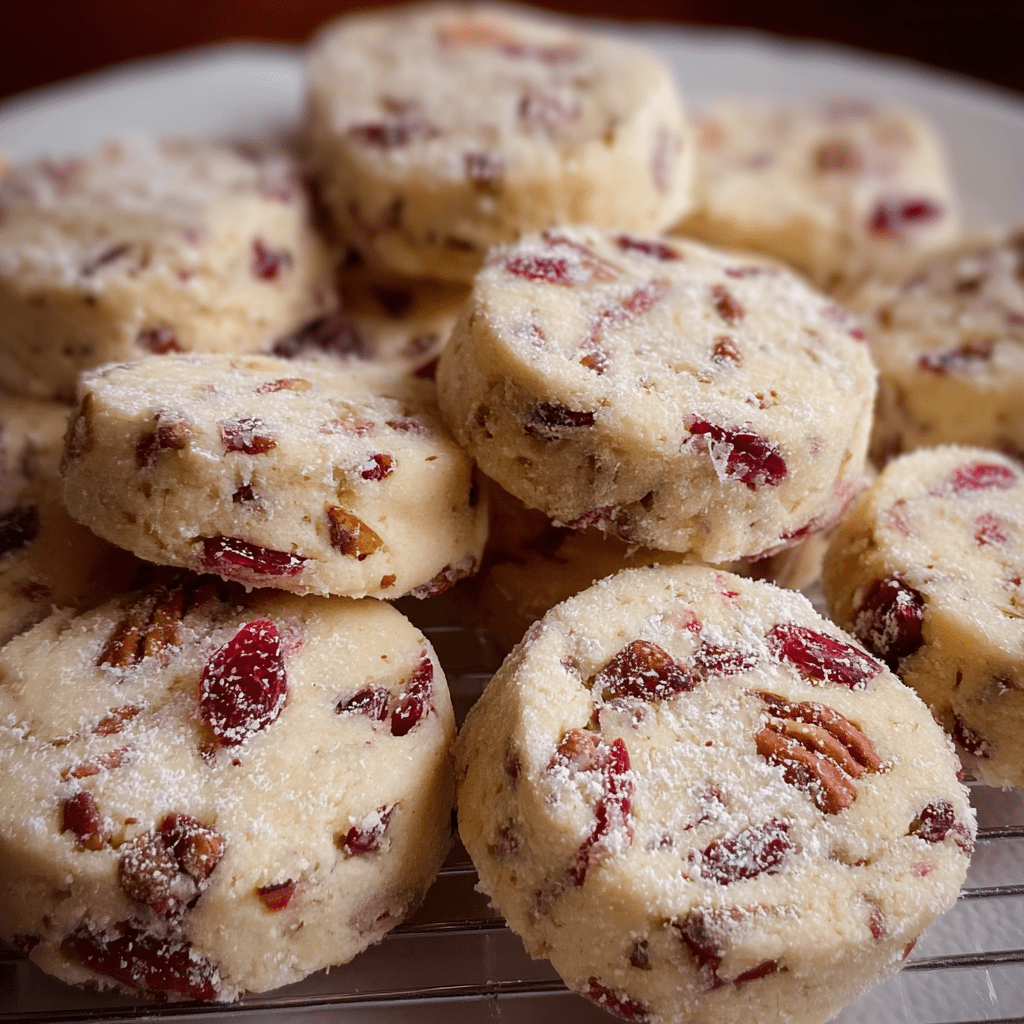
LATEST ARTICLES

Chicken and Dressing Casserole

0

Chicken and Dressing Casserole is the epitome of Southern comfort food—a hearty, soul-warming dish that brings together tender chicken, a rich and creamy sauce, and a buttery, herb-infused stuffing topping. This casserole is the kind of recipe you turn to when you want something cozy, filling, and family-approved. It uses simple, classic ingredients like canned soup, chicken broth, and stuffing mix, yet it tastes like it’s been simmering all day in Grandma’s kitchen.

Perfect for weeknight dinners, potlucks, or even holiday gatherings, this dish is incredibly versatile and easy to prepare. You can use rotisserie chicken to save time, and with two layers—creamy chicken on the bottom and golden, slightly crispy dressing on top—it’s a full meal baked into one comforting casserole. The sautéed onions and celery add depth and texture, while poultry seasoning and sage give it that nostalgic Thanksgiving-like flavor, even in the middle of the week.

Why You’ll Love This Recipe

• All-in-one comfort food that’s both creamy and savory

• Great use for leftover chicken or rotisserie chicken

• Simple pantry ingredients with big flavor

• Perfect for feeding a crowd or prepping ahead

Ingredients

For the Casserole:

3 cups cooked chicken breast or rotisserie chicken, shredded or cubed

1 medium onion, diced

2 stalks celery, diced

½ cup butter, divided

1 (10.5 oz) can cream of chicken soup

1 (10.5 oz) can cream of mushroom soup

1½ cups chicken broth, divided

1 teaspoon poultry seasoning

½ teaspoon black pepper

½ teaspoon sage (optional)

1 package (about 6 oz or 3 cups) stuffing mix

2 large eggs, beaten

Instructions

Step 1: Preheat and Prep

Preheat your oven to 350°F (175°C).

Grease a 9×13-inch baking dish with butter or nonstick spray and set aside.

Step 2: Sauté the Vegetables

In a skillet over medium heat, melt ¼ cup of butter.

Add the diced onion and celery. Sauté for 5–7 minutes until the vegetables are softened and fragrant.

Remove from heat and set aside to cool slightly.

Step 3: Prepare the Chicken Mixture

In a large mixing bowl, combine the shredded chicken, cream of chicken soup, cream of mushroom soup, and ½ cup of chicken broth.

Stir in poultry seasoning, black pepper, and sage if using.

Add the sautéed onion and celery and stir until fully incorporated.

Step 4: Prepare the Stuffing Mixture

In a separate bowl, combine the dry stuffing mix with 1 cup of chicken broth and the remaining ¼ cup of melted butter.

Add the beaten eggs and stir until the stuffing is well-moistened. It should be soft but not soggy.

Let the mixture sit for a few minutes to allow the bread to absorb the liquid.

Step 5: Assemble the Casserole

Spread the chicken mixture evenly in the bottom of the prepared baking dish.

Spoon the stuffing mixture on top of the chicken, gently spreading it to cover the surface in an even layer.

Step 6: Bake the Casserole

Cover the baking dish with foil and place it in the preheated oven.

Bake for 30 minutes, then remove the foil and continue baking for another 10–15 minutes, or until the top is golden brown and slightly crisp.

Step 7: Serve and Enjoy

Remove the casserole from the oven and let it rest for 5–10 minutes before serving.

Garnish with chopped fresh parsley for a pop of color, if desired.

Serve warm, preferably with a side of green beans or a simple salad to complete the meal.

Tips for Success

Use rotisserie chicken to save time: It adds flavor and cuts down on prep. Leftover roasted or poached chicken also works well.

Stuffing mix varies: Some brands include seasoning, so you may want to reduce or omit added sage or poultry seasoning if yours is highly seasoned.

Don’t skip the eggs in the stuffing: They help bind the topping so it holds together as it bakes.

Let it rest before slicing: This helps the layers firm up, making it easier to serve neatly.

Make it ahead: Assemble the casserole up to a day in advance and refrigerate. Let it come to room temperature before baking, or add 10–15 minutes to the bake time.

Storage Options

This casserole stores and reheats beautifully, making it ideal for leftovers or meal prep.

Refrigerator: Store leftovers in an airtight container for up to 4 days. Reheat individual portions in the microwave or larger portions in the oven at 350°F until heated through.

Freezer: Cool completely, then wrap tightly and freeze for up to 2 months. Thaw in the refrigerator overnight and reheat in the oven, covered with foil, until hot.

Make-Ahead Tip: Assemble the full casserole without baking and refrigerate it overnight. Bake as instructed when ready, adding 5–10 minutes to compensate for the cold start.

Hearty, flavorful, and incredibly satisfying, this Chicken and Dressing Casserole hits all the right notes. It brings together the best parts of a traditional holiday meal in a dish that’s simple enough to enjoy any night of the week. Whether served to family or brought to a potluck, it’s bound to become a go-to recipe in your comfort food collection.

Slow Cooker Creamy Potato Bacon Soup

0

Slow Cooker Creamy Potato Bacon Soup is the kind of soul-warming comfort food that turns a chilly evening into something cozy and satisfying. It’s everything you want in a hearty soup: creamy, savory, and filled with the smoky richness of bacon. This dish brings together simple pantry staples—potatoes, broth, onion, and cream—and transforms them into a thick, velvety soup with the help of your slow cooker. It’s perfect for busy weekdays, lazy weekends, or anytime you need a fuss-free meal that feels like a warm hug in a bowl.

What makes this soup extra special is the slow cooking process, which allows the flavors to deepen and the potatoes to become tender and naturally thicken the base. The bacon and onion are sautéed before going into the pot, giving the soup a deep, savory foundation that plays beautifully against the creamy dairy finish. A touch of dill weed and white pepper adds subtle complexity without overpowering the classic flavor. Topped with extra crispy bacon or shredded cheese, this soup easily becomes the star of the dinner table. Pair it with warm bread, and you’ve got comfort food perfection.

Why You’ll Love This Recipe

• Creamy, savory, and full of flavor

• Hands-off slow cooker recipe—perfect for busy days

• Smoky bacon and tender potatoes in every bite

• Easy to prepare and even better the next day

Ingredients

6 slices bacon, cut into ½-inch pieces

1 onion, finely chopped

2 (10.5 oz) cans condensed chicken broth

2 cups water

5 large potatoes, peeled and diced

½ teaspoon salt

½ teaspoon dried dill weed

½ teaspoon ground white pepper

½ cup all-purpose flour

2 cups half-and-half cream

1 (12 oz) can evaporated milk

How To Make Slow Cooker Creamy Potato Bacon Soup

Step 1: Cook Bacon and Onion

In a large, deep skillet, cook the chopped bacon over medium-high heat until it’s crispy and golden brown.

Add the finely chopped onion and continue to cook until the onion is soft and translucent, about 3–4 minutes.

Drain off excess grease and transfer the bacon and onion mixture to the slow cooker.

Step 2: Load the Slow Cooker

Add the diced potatoes, chicken broth, water, salt, dill weed, and white pepper to the slow cooker.

Stir everything together to combine evenly.

Cover the slow cooker with the lid and cook on Low for 6 to 7 hours, or until the potatoes are tender. Stir occasionally if you’re nearby to help the soup cook evenly.

Step 3: Thicken the Soup

In a small mixing bowl, whisk together the flour and half-and-half cream until smooth and lump-free.

Pour the flour mixture and the evaporated milk into the slow cooker.

Stir well to incorporate the thickening mixture into the soup.

Cover again and continue cooking on Low for 30 minutes, or until the soup is thickened and creamy.

Step 4: Serve and Enjoy

Once the soup is done, taste and adjust seasoning if needed. Add more salt or pepper to your liking.

Serve hot, garnished with extra bacon bits, shredded cheese, or chopped green onions if desired.

Tips for Success

Use starchy potatoes: Russets work best for creating a creamy texture as they break down slightly during cooking.

Don’t skip the flour mixture: This is key to achieving the velvety consistency—just be sure to whisk it thoroughly to avoid lumps.

Stir gently: Especially after adding the dairy, to avoid breaking up the potatoes too much.

Want extra richness? Substitute heavy cream for some of the half-and-half.

Double the bacon: If you’re a bacon lover, cook a few extra slices for garnish—crispy bacon on top adds the perfect finish.

Storage Options

This soup stores and reheats wonderfully, making it great for leftovers or meal prep.

Refrigerator: Store in an airtight container for up to 4 days. Reheat gently on the stovetop over medium-low heat or in the microwave.

Freezer: You can freeze the soup, but keep in mind that cream-based soups may separate upon thawing. If you do freeze it, reheat slowly while stirring often to restore texture.

Make-Ahead Tip: Prepare everything except the dairy and thickener in advance. Refrigerate the slow cooker base overnight, then cook and add the cream and flour mix fresh for best results.

Creamy, filling, and full of flavor, this Slow Cooker Potato Bacon Soup is comfort food at its finest. It’s a guaranteed hit whether you’re feeding a crowd, meal prepping for the week, or just looking for something warm to curl up with on a quiet night.

Strawberries and Cream Sweet Rolls

0

Strawberries and Cream Sweet Rolls are the perfect blend of comforting homemade pastry and fresh, fruity flavor. Think of them as a bright, summery twist on classic cinnamon rolls—featuring a soft, buttery dough swirled with a jammy strawberry filling and finished with a silky cream cheese glaze. These rolls offer the nostalgic feel of a morning bakery visit, but with the satisfaction of knowing you made them from scratch. Each bite is packed with tender dough, vibrant berries, and the tangy-sweet touch of cream cheese icing that melts into the warm rolls.

These sweet rolls are ideal for weekend brunches, holiday mornings, or as a show-stopping dessert for gatherings. What makes this recipe extra special is the homemade strawberry filling—it’s fresh, slightly tart, and thickened just enough to stay nestled within each spiral. The dough is soft and pillowy, and though it takes some time to rise and roll, the process is straightforward and rewarding. Once baked and topped with glaze, these sweet rolls are irresistible warm from the oven or even at room temperature. If you’re looking for a treat that feels both indulgent and homemade with love, Strawberries and Cream Sweet Rolls are it.

Why You’ll Love This Recipe

• Fresh strawberries provide a naturally sweet, fruity center

• Cream cheese glaze adds a luscious, tangy finish

• Soft, homemade dough with a tender crumb

• Perfect for brunch, special occasions, or make-ahead treats

Ingredients

For the Dough

3½ cups all-purpose flour (plus more for kneading)

1 packet (2¼ teaspoons) active dry yeast

1 cup warm milk (110°F/43°C)

¼ cup granulated sugar

1 large egg

¼ cup unsalted butter, melted

½ teaspoon salt

For the Strawberry Filling

1½ cups fresh strawberries, chopped

¼ cup granulated sugar

2 teaspoons cornstarch

1 teaspoon lemon juice

For the Cream Cheese Glaze

4 oz (113g) cream cheese, softened

2 tablespoons unsalted butter, softened

1 cup powdered sugar

1 teaspoon vanilla extract

2–3 tablespoons milk (as needed for consistency)

Instructions

Prepare the Dough

In a large mixing bowl, combine warm milk and yeast. Let sit for 5–10 minutes until the mixture becomes foamy, indicating the yeast is active.

Add sugar, egg, melted butter, and salt to the yeast mixture. Stir to combine.

Gradually add in the flour, about 1 cup at a time, mixing until a soft dough forms.

Turn the dough out onto a lightly floured surface and knead for 6–8 minutes until the dough is smooth and elastic.

Place the kneaded dough into a greased bowl, cover with a clean kitchen towel or plastic wrap, and let rise in a warm place for about 1 hour, or until doubled in size.

Make the Strawberry Filling

While the dough is rising, place the chopped strawberries, sugar, cornstarch, and lemon juice in a small saucepan over medium heat.

Cook for 5–7 minutes, stirring frequently, until the mixture thickens and becomes glossy.

Remove from heat and allow the filling to cool completely before spreading on the dough.

Roll and Assemble

Once the dough has risen, punch it down and transfer it to a floured surface.

Roll it out into a large rectangle, approximately 10×16 inches, with the long side facing you.

Spread the cooled strawberry filling evenly across the surface, leaving a ½-inch border around the edges.

Starting from the long edge, roll the dough tightly into a log, seam-side down.

Use a sharp knife or unflavored dental floss to slice the log into 9 to 12 equal rolls.

Place the rolls in a greased 9×13-inch baking dish or similar sized pan, spacing them slightly apart.

Cover loosely and let them rise for another 30 minutes until slightly puffed.

Bake the Rolls

Preheat your oven to 350°F (175°C).

Bake the rolls for 22–25 minutes, or until golden brown on top and cooked through in the center.

Remove from the oven and allow them to cool slightly while you prepare the glaze.

Make the Cream Cheese Glaze

In a medium mixing bowl, beat the softened cream cheese and butter together until smooth and creamy.

Add the powdered sugar and vanilla extract, mixing until well incorporated.

Add milk one tablespoon at a time, beating after each addition, until the glaze reaches your desired consistency—thick but spreadable.

Glaze and Serve

Once the rolls have cooled slightly (but are still warm), spread the cream cheese glaze generously over the tops.

Serve warm for the best texture and flavor, but leftovers are still delicious at room temperature.

Tips for Success

Don’t rush the rise: Allow the dough to rise fully each time to ensure fluffy, tender rolls.

Cool the filling before spreading: A hot filling can melt the dough and make rolling difficult.

Use floss to cut the rolls: This helps keep the spirals intact and prevents squishing.

Watch the baking time: Depending on your oven, rolls may brown quickly—tent with foil if needed.

Add a touch of extra flavor: A sprinkle of cinnamon in the filling or a lemon zest in the glaze can add dimension.

Storage Options

Room Temperature: Store leftover rolls in an airtight container for up to 2 days.

Refrigerator: Store in the fridge for up to 4 days. Reheat individual rolls in the microwave for 10–15 seconds before serving.

Freezer: Freeze unglazed rolls tightly wrapped for up to 2 months. Thaw overnight in the fridge and warm before glazing.

Make-Ahead Tip: Prepare and assemble the rolls the night before, then refrigerate before the second rise. In the morning, let them come to room temperature and rise for 30 minutes before baking.

Strawberries and Cream Sweet Rolls offer the best of both worlds: the satisfaction of a homemade baked good and the fresh, juicy burst of strawberries in every bite. With their soft dough, fruity filling, and creamy glaze, they’re a perfect treat to enjoy for breakfast, brunch, or dessert.

Hunan Chicken

0

Hunan Chicken is a bold and fiery stir-fry dish rooted in the flavors of Chinese Hunan cuisine, which is known for its heat, garlic-forward profile, and balance of savory and tangy elements. This version brings together tender velveted chicken, a colorful medley of stir-fried vegetables, and a deeply flavorful sauce that clings to every bite. It’s spicy, slightly sweet, and full of umami from ingredients like soy sauce, oyster sauce, and chili paste. The result is a restaurant-style dish that’s surprisingly easy to recreate at home.

What makes Hunan Chicken so satisfying is the contrast between the crisp-tender vegetables and the silky chicken, which is marinated and coated with cornstarch to give it that velvety texture you often find in Chinese takeout. The sauce is layered with complexity—from the heat of chili paste to the brightness of vinegar and ginger, all mellowed with a touch of honey. It’s versatile enough to serve over steamed white rice, brown rice, or even noodles. Whether you’re looking to impress dinner guests or just want a flavorful weeknight meal, Hunan Chicken delivers in both taste and texture.

Why You’ll Love This Recipe

• Spicy, tangy, and full of umami

• Velvety chicken that’s tender and juicy

• Loaded with colorful, crisp vegetables

• Better than takeout and easy to make at home

Ingredients

Velvet Chicken

1¼ lb boneless, skinless chicken breasts, thinly sliced

2 tablespoons low-sodium soy sauce

1 tablespoon cold water

1 tablespoon cornstarch

1 tablespoon vegetable oil

Hunan Sauce

3 tablespoons low-sodium soy sauce

2 tablespoons oyster sauce

1 tablespoon rice vinegar

1 tablespoon Shaoxing wine (or dry sherry)

1 tablespoon honey

1 tablespoon grated fresh ginger or ginger paste

2 cloves garlic, minced

2 teaspoons chili paste or sambal oelek

Vegetables for Stir-Fry

1 tablespoon vegetable oil (more as needed)

2 cups broccoli florets

½ yellow onion, chopped

1 rib celery, thinly sliced

1 red bell pepper, diced

1 large carrot, peeled and chopped

Instructions

Step 1: Marinate the Chicken

In a medium bowl, combine the thinly sliced chicken with soy sauce and cold water. Let it sit for 10 minutes to absorb the seasoning.

Stir in the cornstarch and vegetable oil until the chicken is evenly coated. Let the mixture rest for an additional 20 minutes—this process tenderizes the meat and creates a silky texture when cooked.

Step 2: Mix the Sauce

In a small bowl, whisk together the soy sauce, oyster sauce, rice vinegar, Shaoxing wine, honey, grated ginger, garlic, and chili paste.

Set the sauce aside so the flavors can meld while you prepare the rest of the dish.

Step 3: Cook the Chicken

Heat 1 tablespoon of vegetable oil in a large skillet or wok over medium-high heat.

Using tongs, remove the chicken from the marinade and place it in the skillet in a single layer. Avoid overcrowding the pan—work in batches if needed.

Cook for 2–3 minutes until the bottom side is browned, then flip and cook for another 2–3 minutes, or until fully cooked through.

Transfer the cooked chicken to a plate and cover loosely to keep warm.

Step 4: Stir-Fry the Vegetables

In the same skillet, add another tablespoon of oil over medium-high heat.

Add the broccoli florets and stir-fry for 1–2 minutes until they begin to turn bright green.

Add the chopped onion, celery, red bell pepper, and carrot to the skillet. Stir-fry for another 2–3 minutes until the vegetables are just tender but still have a bit of crunch.

Transfer the vegetables to the same plate as the chicken and cover to keep warm.

Step 5: Cook the Sauce

Reduce the heat to medium. Whisk the sauce once more to make sure the cornstarch (if any has settled) is fully mixed in.

Pour the sauce into the skillet and cook, whisking frequently, until it starts to bubble and thicken—about 1–2 minutes.

Step 6: Combine and Finish

Return the cooked chicken and vegetables to the skillet with the thickened sauce.

Toss everything together until evenly coated and heated through.

Serve immediately over steamed white or brown rice. For extra heat, drizzle with more chili paste or add crushed red pepper flakes on top.

Tips for Success

Velveting matters: The combination of cornstarch and oil gives the chicken that classic silky, tender texture you expect from stir-fry dishes.

Don’t overcrowd the pan: Cook the chicken in batches to ensure even browning and avoid steaming the meat.

Prep all ingredients ahead: Stir-fry moves fast, so have everything chopped, measured, and ready before you turn on the heat.

Customize the spice: Use more or less chili paste depending on your heat preference. Sambal oelek offers a clean heat, while other chili pastes like doubanjiang add more complexity.

Swap vegetables if needed: Snow peas, mushrooms, baby corn, or zucchini also work well.

Storage Options

Hunan Chicken keeps well and is perfect for leftovers.

Refrigerator: Store in an airtight container for up to 4 days. Keep the rice separate for best texture when reheating.

Freezer: Freeze cooked chicken and vegetables with sauce in a freezer-safe container for up to 2 months. Thaw overnight in the fridge before reheating.

Reheating: Warm gently in a skillet over medium heat, adding a splash of water or broth to loosen the sauce. Microwave reheating also works, though the vegetables may lose some of their crispness.

Hunan Chicken is a go-to stir-fry for when you want something fast, flavorful, and full of bold character. It’s a dish that satisfies takeout cravings while giving you complete control over ingredients and spice level. Once you make it at home, you might just find yourself skipping the delivery menu altogether.

Broccoli Cauliflower Salad

0

Broccoli Cauliflower Salad is a crunchy, creamy, and utterly satisfying dish that brings together fresh vegetables, sharp cheddar, crispy bacon, and a tangy-sweet dressing. It’s the perfect side dish when you want something that feels hearty but still fresh. Unlike leafy salads that wilt over time, this one holds up beautifully—making it ideal for potlucks, holiday dinners, or meal prep. The mix of raw broccoli and cauliflower gives the salad plenty of texture, while the almonds, red onion, and cheddar add layers of flavor and crunch. Toss it all with a quick three-ingredient dressing, and you’ve got a crowd-pleasing favorite that’s as easy to make as it is to love.

One of the best things about this salad is its versatility. You can make it ahead of time, and it just gets better as it chills in the fridge. The dressing, made from mayo, sugar, and vinegar, hits that perfect balance of creamy and tangy, enhancing the natural sweetness of the cauliflower and mellowing the bite of raw broccoli. Add the smoky crunch of bacon and the richness of cheddar, and every bite delivers contrast and flavor. Whether you’re serving it at a summer BBQ, packing it in a lunchbox, or rounding out a holiday spread, Broccoli Cauliflower Salad fits the occasion beautifully.

Why You’ll Love This Recipe

• No cooking required for the veggies

• Crunchy, creamy, and full of flavor

• Perfect for make-ahead meals or gatherings

• Easy to customize with your favorite mix-ins

Ingredients

Dressing

1 cup mayonnaise

1½ tablespoons granulated sugar

3 tablespoons apple cider vinegar (or red wine vinegar)

Broccoli Cauliflower Salad

3 cups broccoli florets, cut into bite-size pieces

3 cups cauliflower florets, cut into bite-size pieces

⅔ cup sliced almonds

⅓ cup finely chopped red onion

1 cup finely cubed cheddar cheese

10 slices crispy cooked bacon, coarsely chopped

Salt, to taste

Freshly ground black pepper, to taste

Instructions

Step 1: Prepare the Dressing

In a small mixing bowl, whisk together the mayonnaise, sugar, and apple cider vinegar until smooth and creamy.

Taste and adjust the sweetness or acidity if needed—add a bit more vinegar for tang, or sugar for extra sweetness.

Set aside while you prep the rest of the salad.

Step 2: Assemble the Salad Ingredients

In a large mixing bowl, combine the bite-size broccoli and cauliflower florets.

Add in the sliced almonds, chopped red onion, cubed cheddar cheese, and chopped crispy bacon.

Toss the ingredients gently to distribute everything evenly.

Step 3: Dress and Toss

Pour the prepared dressing over the broccoli-cauliflower mixture.

Toss everything well until all the ingredients are evenly coated with the creamy dressing.

Add salt and freshly ground black pepper to taste.

Step 4: Chill and Serve

Cover the salad and refrigerate for at least 30 minutes before serving. This resting time helps the flavors meld and slightly softens the vegetables for better texture.

Just before serving, give the salad a gentle toss again. Garnish with extra almonds or bacon bits if desired.

Tips for Success

Chop vegetables evenly: Bite-size pieces make the salad easier to eat and allow the dressing to coat everything more thoroughly.

Use sharp cheddar: The stronger the cheese, the better the flavor. Mild cheddar can get lost among the other bold ingredients.

Cook bacon until crispy: This adds the best texture contrast. Soft bacon can become chewy in the dressing.

Toast the almonds: While optional, lightly toasting the almonds enhances their flavor and adds a deeper crunch.

Let it rest: Don’t skip the chilling step—it improves both the texture and taste of the salad.

Storage Options

Broccoli Cauliflower Salad is an excellent make-ahead dish and keeps well for several days.

Refrigerator: Store in an airtight container for up to 3 days. The vegetables will remain crunchy, and the flavors will deepen over time.

Avoid freezing: The mayonnaise-based dressing and fresh vegetables don’t freeze well, as the texture will change dramatically upon thawing.

Make-ahead tip: You can chop all the ingredients and make the dressing a day in advance. Store them separately and combine shortly before serving for maximum freshness.

Whether you’re looking to jazz up your weekly meal prep or bring a standout dish to your next get-together, this Broccoli Cauliflower Salad delivers flavor, crunch, and convenience. It’s simple, satisfying, and incredibly versatile—exactly what you want in a no-fuss, craveable salad.

Ramen Noodle Salad

0

Ramen Noodle Salad is the kind of vibrant, crunchy side dish that turns heads at any gathering. With its satisfying texture and bold, tangy dressing, this salad is a refreshing take on slaw that’s anything but ordinary. It combines crunchy coleslaw mix and matchstick carrots with toasted almonds and broken ramen noodles for a dish that’s light yet incredibly satisfying. What makes it truly stand out is the homemade dressing—a flavorful blend of olive oil, rice vinegar, honey, garlic, ginger, and sesame oil—that infuses every bite with sweet, savory, and slightly nutty notes.

This salad is a go-to for potlucks, picnics, and barbecues because it’s not only easy to make but also holds up well over time. The dry ramen noodles soften slightly as they soak in the dressing, creating a pleasant chewiness that contrasts with the crisp vegetables and toasted almonds. It’s delicious as-is, but it also plays well with additions like shredded chicken, mandarin oranges, or edamame for a heartier main dish. With minimal prep and maximum flavor, this Ramen Noodle Salad is sure to become a favorite in your rotation.

Why You’ll Love This Recipe

• Bold, tangy-sweet dressing with a hint of sesame

• Crunchy textures from cabbage, carrots, and toasted ramen

• Easy to make ahead and great for feeding a crowd

• Customizable with proteins or extra veggies

Ingredients

Ramen Salad

14 ounces coleslaw mix

2 (3-ounce) packages dry ramen noodles, broken into small pieces (seasoning packets discarded)

1 cup matchstick carrots

½ cup sliced green onions

1 cup slivered almonds, toasted

Ramen Salad Dressing

½ cup olive oil

¼ cup rice vinegar

2 tablespoons honey

2 cloves garlic, minced

1 tablespoon grated fresh ginger

1 teaspoon sesame oil

Salt and pepper, to taste

Instructions

Step 1: Make the Dressing

In a mason jar or small bowl, combine the olive oil, rice vinegar, honey, minced garlic, grated ginger, and sesame oil.

Seal the jar and shake well until the dressing is emulsified and the honey is fully dissolved.

Taste and season with salt and freshly ground black pepper as desired.

Step 2: Toast the Almonds

Preheat a small skillet over medium heat.

Add the slivered almonds and toast for 3–5 minutes, stirring often, until golden and fragrant.

Transfer the almonds to a plate to cool while you prepare the salad.

Step 3: Prepare the Salad Base

In a large mixing bowl, combine the coleslaw mix, matchstick carrots, and sliced green onions.

Break the dry ramen noodles into small, bite-sized pieces using your hands or a rolling pin, and add them to the bowl.

Add the cooled, toasted almonds to the salad as well.

Step 4: Dress the Salad

Pour the prepared dressing over the salad ingredients.

Toss everything together gently but thoroughly to ensure all the veggies, noodles, and almonds are coated with the dressing.

Step 5: Let It Rest and Serve

Let the salad sit for 10–15 minutes before serving to allow the flavors to meld and the ramen to soften slightly.

Serve as a refreshing side dish or top with grilled chicken, shrimp, or tofu for a more filling meal.

Tips for Success

Use fresh ingredients: Crisp coleslaw mix and fresh carrots add the most crunch and flavor.

Toast the almonds: This quick step enhances the nuttiness and gives the salad extra depth.

Break the ramen into uneven chunks: Varying sizes provide an enjoyable texture contrast.

Let the salad sit briefly: This softens the noodles slightly without making them soggy, giving the salad a more cohesive texture.

Add protein for a full meal: Shredded rotisserie chicken, grilled steak strips, or even crispy tofu can turn this into a complete main dish.

Storage Options

Ramen Noodle Salad can be made ahead, but keep a few tips in mind:

If making ahead: Combine all dry ingredients and keep the dressing separate. Toss together just before serving to maintain the crunch.

Refrigerator: Store leftovers in an airtight container for up to 2 days. The noodles will continue to soften, but the flavors will still be great.

Not freezer-friendly: This salad relies on the crunch of fresh vegetables and dry noodles, which don’t hold up after freezing.

Meal prep tip: Portion out individual servings in containers and keep the dressing on the side to mix just before eating.

With its bright flavors, addictive crunch, and beautiful presentation, Ramen Noodle Salad is a versatile dish that can easily go from casual lunch to party table centerpiece. Once you try it, it’s likely to become a regular in your recipe lineup—both for its simplicity and its crave-worthy taste.

Banana Cream Pie

0

Banana Cream Pie is a nostalgic, dreamy dessert that never goes out of style. With its buttery graham cracker crust, layers of fresh banana slices, and rich, silky custard filling, it’s a comforting, classic treat that’s perfect for any occasion. What sets this pie apart is the balance of textures and flavors: the crispness of the crust, the softness of the bananas, the luscious pudding-like filling, and the light, fluffy whipped cream on top. Each bite melts in your mouth while offering just the right amount of sweetness and a hint of vanilla.

This pie is often seen as a summer favorite, but it really works year-round. It’s surprisingly easy to make from scratch, even though it looks and tastes like something you’d find at a bakery. With a bit of care and patience, you can create a show-stopping dessert that feels indulgent but approachable. Whether you’re making it for a birthday celebration, family gathering, or just a lazy weekend treat, this Banana Cream Pie is sure to disappear fast—especially if you add that extra touch of fresh banana and graham cracker crumb on top. Make it once, and it’ll quickly become part of your dessert rotation.

Why You’ll Love This Recipe

• Classic flavor with a rich homemade custard filling

• Sweet, ripe bananas layered into every bite

• Buttery graham cracker crust for crunch and contrast

• Topped with soft whipped cream for a light finish

Ingredients

Graham Cracker Crust

1 ½ cups graham cracker crumbs (reserve 1½ tablespoons for garnish)

6 tablespoons butter, melted

⅓ cup sugar

Filling

2 bananas, sliced

1¼ cups 2% milk

1 cup whipping cream

⅔ cup sugar

⅛ teaspoon salt

¼ cup cornstarch

4 large egg yolks, room temperature

1 teaspoon vanilla extract

2 tablespoons unsalted butter

Whipped Topping

1 cup whipping cream

1½ tablespoons powdered sugar

½ teaspoon vanilla extract

Banana slices, for garnish

Instructions

Step 1: Make the Graham Cracker Crust

Preheat your oven to 350°F (175°C).

In a mixing bowl, combine the graham cracker crumbs, melted butter, and sugar.

Mix until the crumbs are evenly moistened and press the mixture firmly into the bottom and up the sides of a 9-inch pie dish.

Bake for 7 minutes, then remove from the oven and cool completely on a wire rack.

Once cooled, layer the bottom and sides of the crust with banana slices. Try to use ripe but firm bananas to prevent them from becoming mushy.

Step 2: Prepare the Custard Filling

In a medium saucepan over medium heat, whisk together the milk, whipping cream, sugar, salt, and cornstarch.

Continue whisking constantly until the mixture begins to bubble and thicken slightly. This usually takes about 5–7 minutes.

Once it begins bubbling, cook for an additional 2 minutes, still whisking constantly.

Step 3: Temper the Egg Yolks

In a separate medium bowl, whisk the egg yolks together.

Carefully ladle out ½ cup of the hot cream mixture and slowly whisk it into the egg yolks. This process is called tempering—it prevents the eggs from scrambling when added to the hot mixture.

Slowly pour the tempered egg yolk mixture back into the saucepan, whisking the entire time.

Continue cooking the mixture over medium heat until it thickens to a pudding-like consistency. You’ll know it’s ready when it bubbles again, holds a whisk trail, and slightly piles when poured.

Step 4: Finish the Custard and Cool

Remove the saucepan from heat and stir in the vanilla extract and unsalted butter.

Whisk until the butter melts completely and the mixture is smooth.

Let the custard cool for about 15 minutes, whisking every few minutes to prevent a skin from forming on the surface.

Step 5: Assemble and Chill

Pour the warm custard over the banana slices in the graham cracker crust. Use a spatula to smooth the surface evenly.

Press a piece of plastic wrap directly onto the surface of the custard to prevent a skin from forming.

Refrigerate the pie for at least 4 hours, or overnight, until the filling is fully set and chilled.

Step 6: Make the Whipped Topping

About 30 minutes before you’re ready to serve the pie, place your mixing bowl and beaters in the freezer for about 20 minutes.

Once chilled, pour the whipping cream into the bowl. Add powdered sugar and vanilla extract.

Beat on low speed until the cream begins to thicken, then increase to medium-high speed and continue beating until stiff peaks form.

Step 7: Garnish and Serve

Remove the pie from the refrigerator and discard the plastic wrap.

Spread or pipe the whipped cream over the top of the chilled pie.

Garnish with fresh banana slices and sprinkle the reserved graham cracker crumbs over the top.

Serve immediately or refrigerate for up to 24 hours before serving.

Tips for Success

Use ripe but firm bananas: Overripe bananas will become too soft in the pie and might release excess moisture.

Don’t skip tempering the eggs: This step ensures your custard is smooth and silky instead of scrambled.

Refrigerate long enough: Give the pie at least 4 hours to chill so the filling sets properly.

Chill your equipment for whipped cream: A cold bowl and beaters make it easier to whip cream to stiff peaks.

Add whipped cream just before serving: If you’re prepping the pie ahead, add the topping right before serving for the best texture.

Storage Options

Refrigerator: Store any leftover pie covered in the fridge for up to 3 days. The bananas may brown slightly, but the flavor will remain delicious.

Freezing not recommended: Banana cream pie does not freeze well due to the fresh bananas and custard texture.

Make-ahead tip: You can prepare the crust and custard filling a day in advance. Add the whipped cream topping and banana garnish just before serving for a fresh look and flavor.

Banana Cream Pie is the kind of dessert that brings smiles with every bite. Its creamy, cool texture and classic flavors make it the perfect ending to any meal, from casual family dinners to special celebrations. And once you’ve made it from scratch, you’ll see just how rewarding (and easy!) it is to skip the boxed pudding mixes and create your own version of this timeless favorite.

Pineapple Chicken and Rice

0

Pineapple Chicken and Rice is a vibrant, tropical-inspired dish that beautifully blends sweet, savory, and tangy flavors. This recipe pairs tender, golden-seared chicken breasts with a luscious sauce made from pineapple juice, honey, Dijon mustard, and garlic—then finishes it off with warm pineapple slices for a dish that feels both comforting and exotic. It’s served over a bed of fluffy rice, which soaks up all the flavorful juices, making every bite satisfying and complete.

This dish is ideal for those nights when you want something hearty yet refreshing. It comes together in one skillet, which means minimal cleanup, and features a sauce that hits all the right notes: rich from the mustard, sweet from the honey, sharp from the garlic, and tropical from the pineapple. The chicken cooks slowly in this sauce, soaking up flavor and becoming incredibly tender, while the final addition of thickened sauce brings a glossy finish. It’s a balanced meal that’s both family-friendly and impressive enough to serve guests.

Why You’ll Love This Recipe

• Tropical flavor twist with pineapple and honey

• One-pan cooking makes cleanup easy

• The sauce is rich, tangy, and slightly sweet

• Perfect over rice for a filling, well-rounded meal

Ingredients

1½ pounds boneless chicken breasts

1 teaspoon dried thyme

½ teaspoon salt

⅛ teaspoon pepper

1 tablespoon vegetable oil

1 can (20 oz) sliced pineapple – reserve the juice

1 tablespoon cornstarch

¼ cup Dijon mustard

¼ cup honey

2 cloves garlic, minced

4 servings cooked rice

Instructions

Step 1: Season the Chicken

Pat the chicken breasts dry with a paper towel.

Sprinkle both sides of the chicken with dried thyme, salt, and pepper, pressing gently to adhere the seasonings.

Step 2: Brown the Chicken

Heat vegetable oil in a large skillet over medium heat until shimmering.

Add the chicken breasts and cook for 5–7 minutes per side, or until golden brown and almost cooked through.

Remove the chicken from the skillet and set aside on a plate while you prepare the sauce.

Step 3: Prepare the Pineapple and Sauce Base

Drain the juice from the can of sliced pineapple, reserving the juice. Set the pineapple slices aside.

Measure out 2 oz (about ¼ cup) of the reserved pineapple juice and mix it with the cornstarch in a small bowl until smooth. This will be your thickening agent.

In a separate bowl, combine the remaining pineapple juice with Dijon mustard, honey, and minced garlic. Stir until well mixed.

Step 4: Simmer the Chicken with the Sauce

Pour the Dijon-mustard mixture into the same skillet you used for the chicken. Stir gently and bring the heat down to low.

Return the browned chicken breasts to the skillet, nestling them into the sauce.

Cover with a lid and simmer for about 15 minutes, or until the chicken is fully cooked through and tender.

Step 5: Thicken the Sauce

Remove the chicken breasts from the skillet temporarily and set them aside.

Stir the cornstarch and pineapple juice mixture into the skillet. Increase the heat to medium.

Bring the sauce to a boil, stirring continuously, until it thickens to a silky consistency—this should take about 2 minutes.

Step 6: Return Chicken and Add Pineapple

Once the sauce has thickened, return the chicken to the skillet and turn to coat it well.

Place the pineapple slices on and around the chicken in the skillet.

Cover the skillet again and let everything heat together for another 2–3 minutes, just enough to warm the pineapple through and let the flavors combine.

Step 7: Serve Over Rice

Scoop cooked rice into bowls or plates.

Top each portion with a chicken breast and several warm pineapple slices.

Drizzle any remaining sauce from the skillet generously over the top of the chicken and rice.

Tips for Success

Use fresh garlic for the best flavor: It adds a punchy note that balances the sweetness of the pineapple and honey.

Don’t skip browning the chicken: This step locks in moisture and adds flavor to the finished dish.

Control the sweetness: If you prefer a less sweet sauce, reduce the honey slightly or add a splash of rice vinegar or lime juice to increase the tanginess.

Cut chicken into cutlets for faster cooking: If you’re short on time, slice the breasts in half horizontally before searing.

Double the sauce if you love it extra saucy: The rice soaks it up wonderfully, so more is always welcome.

Storage Options

Pineapple Chicken and Rice keeps well and reheats beautifully, making it a great choice for meal prepping or saving leftovers.

Refrigerator: Store leftovers in an airtight container for up to 4 days. Keep the rice and chicken together or in separate containers depending on preference.

Freezer: Freeze chicken and sauce separately from rice in airtight containers or freezer bags for up to 2 months. Defrost overnight in the refrigerator before reheating.

Reheating: Warm on the stovetop over medium-low heat or in the microwave, adding a splash of water or broth to loosen the sauce if needed.

Whether you’re planning a weeknight dinner or need a crowd-pleasing dish that looks and tastes like you spent hours making it, Pineapple Chicken and Rice delivers. With its sweet-and-savory balance, beautiful presentation, and satisfying textures, it’s a dish that checks all the boxes and brings a little sunshine to your dinner table any time of year.

Dill Pickle Potato Salad

0

Dill Pickle Potato Salad is a flavorful, creamy side dish that takes the classic potato salad you know and love and gives it a tangy, zesty upgrade. Loaded with hearty russet potatoes, crisp vegetables, and chopped hard-boiled eggs, this salad is anything but boring. What really sets it apart is the signature tang from sweet pickle relish and a hint of mustard, balanced with a touch of dark brown sugar that rounds out the flavor profile. This combination creates a salad that’s rich yet refreshing—perfect for backyard barbecues, summer cookouts, or potluck dinners.

It’s the kind of dish that benefits from a bit of time in the fridge, where all the flavors can meld together into something truly crave-worthy. Whether you’re pairing it with grilled burgers, smoked ribs, or even just eating it on its own, this Dill Pickle Potato Salad is guaranteed to please a crowd. It’s creamy without being too heavy, flavorful without being overwhelming, and thanks to the pickles and vegetables, it delivers just the right amount of texture in every bite. Once you try this version, you may never go back to a plain old potato salad again.

Why You’ll Love This Recipe

• Bold, tangy flavor from sweet pickle relish and mustard

• Creamy, hearty, and loaded with satisfying textures

• Great for feeding a crowd or prepping ahead for gatherings

• Balanced sweetness from dark brown sugar adds unique depth

Ingredients

5 lb russet potatoes

8 hard-boiled eggs

1 ½ cups chopped red onion

1 cup chopped celery

½ cup chopped green pepper

¼ cup dark brown sugar

½ cup sweet pickle relish

3 cups mayonnaise

½ cup mustard

1 tsp salt

½ tsp black pepper

Instructions

Step 1: Cook the Potatoes

Place the russet potatoes (skin on) in a large pot and cover them with cold water. Bring to a boil over high heat, then reduce to a simmer.

Cook for 20–25 minutes, or until the potatoes are fork-tender but not falling apart.

Drain the potatoes and let them cool enough to handle. Once cool, peel off the skins and chop the potatoes into bite-sized cubes. Set aside.

Step 2: Prepare the Other Ingredients

While the potatoes cool, peel and chop the hard-boiled eggs into chunks.

Finely chop the red onion, celery, and green pepper, keeping the pieces uniform in size for even texture and flavor.

Step 3: Make the Dressing

In a large mixing bowl, whisk together the dark brown sugar, sweet pickle relish, mayonnaise, mustard, salt, and pepper until smooth and well combined.

Taste the dressing and adjust seasoning if desired—for extra tang, add a spoonful of pickle juice; for more sweetness, a bit more brown sugar.

Step 4: Combine and Mix

Add the chopped potatoes, eggs, red onion, celery, and green pepper into the bowl with the dressing.

Using a large spatula or spoon, gently fold the ingredients together. Take care not to mash the potatoes too much—fold just until everything is well coated.

Step 5: Chill and Serve

Cover the bowl with plastic wrap or transfer the salad to an airtight container.

Refrigerate for at least 2 hours, preferably overnight. This resting time helps the flavors to meld and enhances the overall taste.

Before serving, give the salad a quick stir and garnish with fresh herbs or an extra spoonful of relish, if desired.

Tips for Success

Choose the right potatoes: Russets work well because they absorb the dressing, but you can also use Yukon Golds for a creamier texture and slightly buttery flavor.

Don’t overcook the potatoes: They should be fork-tender but still hold their shape when mixed. Overcooked potatoes can lead to a mushy salad.

Cool the potatoes completely before mixing: This prevents the mayonnaise from becoming greasy or separating when combined with warm ingredients.

Customize to your taste: If you love more pickle flavor, add chopped dill pickles or a splash of pickle brine. If you want it creamier, increase the mayo or add a bit of sour cream.

For a crunchier bite: Add extra celery or even a handful of chopped pickles or green onions right before serving.

Storage Options

This Dill Pickle Potato Salad stores exceptionally well and even improves after sitting for a day.

Refrigerator: Store leftovers in an airtight container for up to 4 days. Stir gently before serving to redistribute the dressing.

Freezer: Not recommended. Potato salad with mayonnaise doesn’t freeze well, as the texture changes dramatically after thawing.

Make ahead tip: Prepare the salad a day before your event for best flavor. Keep it chilled and covered, and give it a fresh stir before serving.

Whether you’re hosting a backyard cookout, packing a picnic, or just want a reliable, crowd-pleasing side dish, this Dill Pickle Potato Salad is the answer. It’s packed with classic flavor and just enough flair to make it unforgettable—definitely the kind of dish guests will be asking you to bring again and again.

Sunshine Salad

0

Sunshine Salad is a bright, fruity, and refreshing dish that comes together in minutes and is perfect for potlucks, brunches, or a simple family dessert. With a sweet, creamy coating created by dry vanilla pudding mix (no milk needed!), it transforms basic fruit into a dessert-like salad that’s bursting with tropical flavors.

The juicy pineapple, sweet Mandarin oranges, and soft bananas blend beautifully with the pudding mix to create a lightly creamy texture that clings to the fruit without overwhelming it. It’s a no-fuss, no-cook recipe with simple ingredients and big flavor — a great way to enjoy fruit in a slightly unexpected way.

Why You’ll Love This Recipe

  • Quick & Easy – Just 5 minutes of prep and no cooking required.
  • Naturally sweet & creamy – The pudding mix adds sweetness and creaminess without extra sugar or dairy.
  • Perfect for any occasion – Great as a side, snack, or dessert.
  • Customizable – Add berries, apples, or grapes if you’d like to change it up.

Ingredients

  • 1 fresh pineapple, cored and cut into chunks
  • 1 can (15 oz) Mandarin oranges in light syrup (do not drain)
  • 2 bananas, peeled and sliced
  • 1 box (4-serving size) Jell-O sugar-free vanilla instant pudding (dry mix only)

Instructions

  1. Prep the Fruit:
    • Chop the fresh pineapple into bite-sized chunks.
    • Peel and slice the bananas.
    • Open the Mandarin oranges without draining the syrup.
  2. Combine the Fruit:
    • In a large bowl, add the pineapple, Mandarin oranges (with syrup), and banana slices.
  3. Add the Pudding Mix:
    • Sprinkle the dry vanilla instant pudding mix evenly over the fruit. Do not mix it with milk beforehand.
  4. Stir to Combine:
    • Gently stir everything together. The syrup from the oranges and the juice from the fruit will naturally activate the pudding mix, forming a creamy coating.
  5. Chill:
    • Cover and refrigerate for at least 1 hour before serving to allow the flavors to blend and the pudding to thicken.
  6. Serve:
    • Spoon into bowls or cups. Each serving is about 1 cup.

Storage Tips

  • Refrigerate leftovers in an airtight container for up to 2 days.
  • Best eaten the day it’s made—bananas can brown slightly over time.

Optional Add-Ins

  • Sliced strawberries
  • Halved grapes
  • Mini marshmallows
  • Shredded coconut
  • Chopped pecans or walnuts

This Sunshine Salad is sunshine in a bowl—bright, sweet, and so satisfying. Perfect for summer gatherings, brunches, or anytime you want something sweet without turning on the oven!