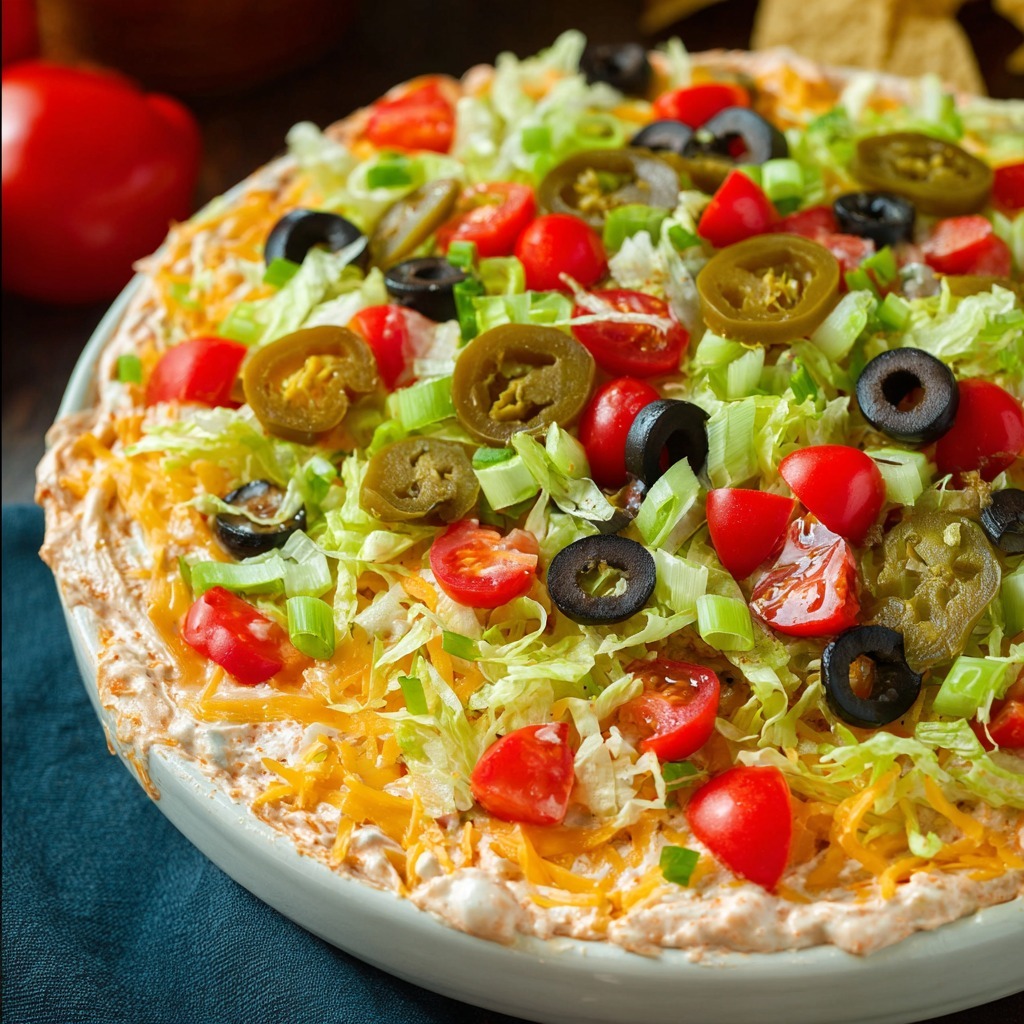
Chef Salad

0

A classic Chef Salad is like a deli platter tossed right into a bowl — crisp lettuce, savory deli meats, creamy cheese, and crunchy toppings that all come together for one satisfying and refreshing meal. Whether you’re meal prepping for the week or throwing together a last-minute lunch, this hearty salad is quick to assemble and endlessly customizable.

It’s the kind of salad that doesn’t feel like a compromise — it’s full of bold textures, protein-packed ingredients, and your favorite dressing drizzled over top. Serve it as a full meal or as a starter for a larger gathering. It’s one of those dishes that never goes out of style.

Why You’ll Love This Recipe:

Hearty and Satisfying: Packed with protein from ham, turkey, bacon, and eggs.

Quick Assembly: No cooking required (aside from boiling eggs and bacon).

Perfect for Meal Prep: Stays fresh when prepped ahead, dressing added later.

Customizable: Use your favorite deli meats, cheeses, or dressings.

Crowd-Friendly: Great for family meals, picnics, or potlucks.

Ingredients:

• 1 medium head romaine lettuce, chopped

• 2–3 cups iceberg lettuce, chopped into bite-sized pieces

• 4 hard-boiled eggs, peeled and quartered lengthwise

• 4 slices crispy cooked bacon

• 4 ounces deli-style sliced Swiss cheese, cut into julienne strips

• 4 ounces deli-style sliced ham, cut into julienne strips

• 4 ounces deli-style sliced turkey, cut into julienne strips

• 1 cup sliced English cucumber (about 1/3 of a cucumber)

• 1 cup halved grape tomatoes

• 1 cup seasoned croutons

• ⅔–1 cup salad dressing (ranch, chipotle ranch, avocado ranch, bleu cheese, Italian, or honey mustard)

• Kosher salt, to taste

• Freshly ground black pepper, to taste

Instructions:

Prepare the Base

Add the romaine and iceberg lettuce to a large salad bowl or arrange on a serving platter.

Layer the Toppings

Arrange the hard-boiled eggs, bacon, Swiss cheese, ham, and turkey over the lettuce.

Scatter the cucumbers, grape tomatoes, and croutons evenly across the top.

Dress and Serve

Drizzle your favorite salad dressing over the salad right before serving.

Toss lightly to coat, or serve the dressing on the side for guests to add their own.

Season with kosher salt and fresh ground black pepper to taste.

Tips:

Use Freshly Cooked Bacon: It adds irresistible crunch and flavor.

Prep Ahead: Chop veggies and meats ahead of time and store separately for quick weekday lunches.

Customize Your Protein: Try grilled chicken, roast beef, or salami instead of deli turkey or ham.

Egg Tip: Use older eggs for easier peeling when boiling.

Cheese Options: Swap Swiss for cheddar, provolone, or pepper jack depending on your preference.

Storage and Reheating:

Refrigerator:

Store salad components separately in airtight containers in the fridge for up to 3 days.

Keep dressing and croutons separate until ready to serve to avoid sogginess.

Make-Ahead Tip:

Assemble the salad base (lettuce, meats, cheese, and veggies) in a large container or meal prep boxes. Add croutons and dressing just before eating to keep textures crisp and fresh.


Whether you’re feeding a crowd or just yourself, this Chef Salad is a well-balanced, crave-worthy dish that checks every box — crunchy, creamy, fresh, and filling. It’s a timeless recipe that you’ll find yourself making again and again.

Baked Onion Beef Fried Rice with Mixed Vegetables

0

This Baked Onion Beef Fried Rice is the perfect cozy dish for busy weeknights, meal prep days, or when you’re staring into your fridge thinking, “I need something easy and satisfying.” It’s hearty, flavorful, and built around pantry staples like rice, ground beef, onions, and mixed veggies. What makes it extra special? The finishing touch in the oven that gives the top layer a toasty texture — almost like a crispy rice crust you’d find at the bottom of a good wok.

This version ditches the traditional stir-fry method and embraces a comforting, baked approach. The flavors deepen, and you get a dish that holds up beautifully whether served straight from the oven or enjoyed as leftovers. And with garlic, onion, soy sauce, and oyster sauce, every bite is packed with savory umami goodness. It’s family-friendly, freezer-friendly, and definitely taste-bud-friendly.

Why You’ll Love This Recipe:

One-Pan Wonder: Start on the stove and finish in the oven — minimal cleanup, maximum flavor.

Comforting and Hearty: Loaded with beef, rice, and vegetables for a satisfying all-in-one meal.

Customizable: Easy to swap in your favorite veggies or use ground turkey instead.

Crispy-Top Finish: Baking adds a golden, slightly crispy top layer that sets this version apart from traditional fried rice.

Great for Leftovers: Tastes even better the next day and reheats like a dream.

Ingredients:

• 2 cups cooked rice (preferably day-old)

• 1 pound ground beef

• 1 large onion, diced

• 1 cup mixed vegetables (peas, carrots, corn)

• 2 tbsp soy sauce

• 1 tbsp oyster sauce

• 2 cloves garlic, minced

• 1 tbsp vegetable oil

• Salt and pepper to taste

• 2 green onions, sliced (for garnish)

Instructions:

Preheat the Oven

Preheat your oven to 350°F (175°C) so it’s hot and ready for baking once your rice mixture is prepped.

Brown the Beef

In a large skillet, heat the vegetable oil over medium-high heat.

Add the ground beef and cook until browned, breaking it up into crumbles as it cooks. This should take about 5–7 minutes.

Add Aromatics and Veggies

Stir in the diced onion and minced garlic. Sauté for about 3 minutes, or until the onion turns soft and translucent.

Add the mixed vegetables and cook for another 2–3 minutes, just until heated through.

Incorporate the Rice and Sauces

Add the cooked rice to the skillet, breaking up any clumps with your spoon or spatula.

Pour in the soy sauce and oyster sauce, stirring well to evenly coat the rice and meat mixture.

Season with salt and pepper to taste.

Transfer and Bake

Pour the mixture into a greased baking dish and spread it out evenly.

Bake in the preheated oven for 15–20 minutes, or until the top gets a little golden and slightly crisp.

Cool and Garnish

Remove from the oven and let rest for about 5 minutes to settle.

Sprinkle with sliced green onions for a fresh finish before serving.

Tips:

Day-Old Rice Works Best: Freshly cooked rice can be too moist. If using fresh rice, spread it out on a baking sheet and let it cool for 15–20 minutes first.

Make It Spicy: Add a dash of sriracha or a pinch of red pepper flakes to the skillet if you want some heat.

Swap Your Protein: Ground turkey, chicken, or even plant-based meat can easily be substituted.

Mix Up the Veggies: Frozen mixed vegetables are super convenient, but feel free to use chopped bell peppers, broccoli, or edamame.

Add an Egg: For a true fried rice vibe, stir in a scrambled egg or two right before baking.

Storage and Reheating:

Refrigerator:

Store leftovers in an airtight container in the fridge for up to 4 days. Reheat in the microwave or oven until warmed through.

Freezer:

Let the dish cool completely, then store in a freezer-safe container for up to 2 months. Thaw overnight in the fridge and reheat in a 350°F oven for 20–25 minutes, or until hot in the center.


This baked fried rice is a game-changer for those days when you want the taste of takeout without the wok or the effort. It’s savory, comforting, and just as satisfying as any restaurant version — with the added bonus of crispy baked edges.

French Silk Pie Bars

0

If you’re a fan of rich, velvety French silk pie but don’t feel like fussing with a pie crust, these French Silk Pie Bars are your dream come true. This bar-style version transforms the classic pie into a handheld dessert with a buttery shortbread crust, luscious chocolate mousse filling, and a fluffy whipped cream topping. They look fancy but come together with surprisingly simple ingredients and a few straightforward steps.

Perfect for holidays, potlucks, or whenever that chocolate craving hits, these bars will absolutely steal the show on any dessert table. The silky filling is made with real chocolate and whipped eggs, giving it that authentic, melt-in-your-mouth texture. Top it off with freshly whipped cream and you’ve got a layered masterpiece that tastes just like the original pie — maybe even better.

Why You’ll Love This Recipe:

Silky and Decadent: Rich chocolate mousse filling that’s ultra smooth and satisfying.

No-Fuss Crust: Simple shortbread base made with just a few pantry staples.

Perfect for Sharing: Slice into bars for a beautiful dessert tray or potluck table.

Authentic Flavor: Real melted chocolate and eggs create that classic French silk texture.

Make-Ahead Friendly: Chill ahead of time and serve when you’re ready — stress-free entertaining!

Ingredients:

For the Crust:

• 1 cup all-purpose flour

• 1/2 cup unsalted butter, melted

• 1/4 cup granulated sugar

• 1/4 tsp salt

For the Chocolate Filling:

• 1 cup semisweet chocolate chips

• 1/2 cup unsalted butter, softened

• 3/4 cup granulated sugar

• 1 tsp vanilla extract

• 3 large eggs

For the Whipped Topping:

• 1 cup heavy whipping cream

• 2 tbsp powdered sugar

Instructions:

Preheat the Oven

Preheat your oven to 350°F (175°C). Grease a 9×9-inch baking pan or line it with parchment paper for easy removal.

Make the Crust

In a medium mixing bowl, stir together the flour, melted butter, granulated sugar, and salt until a soft dough forms.

Press the dough evenly into the bottom of the prepared pan.

Bake for 15–18 minutes, or until lightly golden. Set aside to cool completely before adding the filling.

Melt the Chocolate

Place the chocolate chips in a microwave-safe bowl. Heat in 30-second intervals, stirring after each, until melted and smooth. Set aside to cool slightly.

Make the Chocolate Filling

In a large mixing bowl, beat the softened butter and granulated sugar on high speed until light and fluffy — this should take about 3–4 minutes.

Add the melted chocolate and vanilla extract, and beat until combined.

Add the eggs one at a time, beating on high speed for 3 minutes after each egg. This whipping is what creates that signature French silk texture. The filling should be thick, creamy, and satiny smooth.

Spread the filling evenly over the cooled crust.

Whip the Cream Topping

In a separate bowl, whip the heavy cream and powdered sugar until stiff peaks form.

Spread the whipped cream evenly over the chocolate layer using a spatula.

Chill and Serve

Refrigerate the bars for at least 4 hours, or until fully set. For clean slices, use a sharp knife and wipe it clean between cuts.

Serve chilled and enjoy every silky bite!

Tips:

Use Pasteurized Eggs: Because the eggs are not cooked, opt for pasteurized eggs for safety.

Room Temperature Butter: Make sure your butter is soft enough to cream easily — this helps the sugar dissolve into the mousse.

Whip It Good: Don’t skip beating each egg for 3 full minutes — this creates that airy texture that defines French silk.

Add Chocolate Curls: Sprinkle chocolate shavings or curls on top of the whipped cream for a fancy finish.

Storage and Reheating:

Refrigerator:

Store leftovers in an airtight container in the fridge for up to 4 days. Keep chilled until ready to serve.

Freezer:

You can freeze the bars (without whipped cream) for up to 1 month. Wrap tightly in plastic wrap and foil. Thaw overnight in the refrigerator, then top with fresh whipped cream before serving.


These French Silk Pie Bars are rich, creamy, and completely irresistible — just like the pie, only easier to serve and share. Whether you’re making them for a celebration or just because, they’ll quickly become one of your favorite go-to chocolate desserts.

Oven-Braised Beer Brats with Apples & Onions

0

This dish is the very definition of fall comfort in a pan — juicy bratwursts nestled into a golden bed of caramelized onions and apples, all gently braised in a bath of beer, broth, and Dijon mustard. The result is tender, flavor-packed brats that feel rustic, hearty, and surprisingly elegant. If you’ve never cooked brats in the oven before, this method will absolutely win you over.

It’s a perfect one-pot meal for weekends or casual company — low effort, high reward. The sweetness from the apples and onions balances beautifully with the tang of the mustard and the slight bitterness of the beer. Serve these beauties straight from the pan with some crusty bread, buttery mashed potatoes, or even roasted cabbage, and you’ve got a meal everyone will remember.

Why You’ll Love This Recipe:

Easy One-Pan Wonder: Everything cooks in one skillet or Dutch oven for simple prep and cleanup.

Big Fall Flavor: Beer, apples, onions, and mustard create a savory-sweet combo that’s full of warmth.

Crowd-Friendly: Perfect for game day, Oktoberfest, or just a cozy night in.

Adaptable: Use your favorite beer, swap in different sausages, or make it a little spicy.

Make-Ahead Friendly: Tastes even better the next day!

Ingredients:

• 2 tablespoons olive oil

• 2 tablespoons butter

• 2 large yellow onions, thinly sliced

• 2 apples (Honeycrisp or Braeburn), cored and sliced

• 3 garlic cloves, minced

• 6 bratwursts

• 1 cup beer (choose something drinkable, not too dark)

• 1 cup beef broth

• 2 tablespoons Dijon mustard

• Salt and freshly ground black pepper, to taste

• Fresh chopped parsley for garnish (optional)

Instructions:

Step 1: Preheat the Oven

Preheat your oven to 350°F (175°C). Grab a large oven-safe skillet or Dutch oven — make sure it has high sides and ideally a lid.

Step 2: Sauté Onions and Apples

Add the olive oil and butter to your skillet over medium heat. Once the butter has melted, toss in the sliced onions and apples. Cook slowly, stirring occasionally, for 20–25 minutes, until everything is golden and softened. You’re looking for soft, caramelized texture—not browned or crispy.

Step 3: Add Garlic

Stir in the minced garlic and sauté for 1 minute, just until fragrant.

Step 4: Add the Brats

Nestle the bratwursts directly on top of the apple and onion mixture. Let them press gently into the surface so they absorb all that goodness.

Step 5: Add Liquid & Seasoning

In a measuring cup, whisk together the beer, beef broth, and Dijon mustard. Pour the mixture over the brats. Season with a generous pinch of salt and freshly ground pepper.

Step 6: Bring to a Simmer

Bring everything to a gentle simmer on the stovetop. This step helps get things moving and blends the flavors.

Step 7: Oven-Braise

Transfer the whole pan to your preheated oven. Bake uncovered for 30–40 minutes, or until the brats are fully cooked (internal temp should reach 160°F) and the liquid has reduced slightly to a flavorful sauce.

Step 8: Garnish & Serve

Remove from the oven and sprinkle with fresh parsley if desired. Serve hot — with crusty bread, mashed potatoes, or spooned into warm buns for a rustic sandwich.

Tips:

Beer Choice: Use a mild lager or amber ale. Avoid overly hoppy or dark stouts unless you like bold bitterness.

Don’t Skip the Onions: Letting the onions and apples cook low and slow is key — they bring a deep, sweet flavor that ties the dish together.

Make It a Meal: Serve over buttered egg noodles, roasted potatoes, or even creamy polenta.

Spice It Up: Add a pinch of crushed red pepper flakes or a splash of apple cider vinegar for zing.

Storage and Reheating:

Refrigerator:

Store leftovers in an airtight container for up to 3 days. The flavors actually deepen over time!

Freezer:

You can freeze cooked brats and apple-onion mixture in a sealed container for up to 2 months. Thaw in the fridge overnight before reheating.

Reheating:

Reheat gently in a covered skillet over medium-low heat with a splash of broth or water to keep it moist, or warm in a 350°F oven until heated through.


Oven-Braised Beer Brats with Apples & Onions is that kind of dish that smells like comfort, tastes like fall, and feels like a small celebration in every bite. It’s simple enough for a weeknight and cozy enough for guests. Enjoy!

Baked Rigatoni

0

Nothing says comfort food quite like a warm, cheesy dish of Baked Rigatoni. This hearty, family-style pasta bake brings together layers of tender rigatoni, a rich meat sauce made with Italian sausage and ground beef, and a blanket of melty mozzarella and Parmesan cheese. It’s the kind of meal that fills your kitchen with the cozy aroma of home cooking—and brings everyone to the table fast.

Perfect for feeding a hungry crowd or prepping ahead for busy nights, this baked rigatoni is a no-fuss recipe that never disappoints. The combination of marinara, seasoned meats, and gooey cheese creates that classic Italian-American flavor we all know and love, while a bit of fresh basil or parsley adds the perfect pop of brightness right at the end.

Why You’ll Love This Recipe:

Rich and Flavorful: A meat sauce that simmers with butter and garlic—need we say more?

Cheesy and Comforting: Melty mozzarella and Parmesan bring that irresistible cheesy goodness.

Easy to Make Ahead: Assemble and refrigerate, then bake when ready.

Family-Friendly: It’s filling, familiar, and perfect for picky eaters and pasta lovers alike.

Great for Leftovers: Tastes even better the next day!

Ingredients:

• 1 lb rigatoni

• 1 lb sweet Italian sausage

• 1 lb ground beef

• 1 medium yellow onion, chopped

• 4 cloves garlic, minced

• 1 teaspoon Italian seasoning

• 32 ounces marinara sauce

• 4 tablespoons butter

• ⅔ cup grated Parmesan cheese

• 2 cups shredded mozzarella cheese

• Fresh basil or parsley, for garnish

Instructions:

Step 1: Preheat the Oven

Preheat your oven to 350°F (175°C). Lightly spray a 9×13-inch casserole dish with non-stick spray to make cleanup easier.

Step 2: Cook the Meat

In a large skillet over medium heat, brown the Italian sausage and ground beef. About halfway through, add the chopped onion and continue cooking until the meat is fully browned and the onion is soft. Drain off any excess fat.

Step 3: Make the Sauce

Reduce the heat to low. Stir in the minced garlic and Italian seasoning and cook for about 1 minute, just until fragrant. Pour in the marinara sauce and let it simmer for 5 minutes. Add the butter and continue simmering for another 5 minutes, stirring occasionally until the butter is melted and well incorporated.

Step 4: Cook the Pasta

While the sauce simmers, cook the rigatoni according to package instructions until just al dente. Drain well.

Step 5: Assemble the Casserole

Add the drained pasta and meat sauce to the prepared casserole dish. Gently stir everything together so the pasta is fully coated in the sauce. Sprinkle the Parmesan cheese evenly over the top, followed by the shredded mozzarella.

Step 6: Bake

Cover the dish with foil and bake for 20 minutes. Then uncover and bake for another 15–20 minutes, or until the cheese is melted and bubbly and the casserole is hot all the way through.

Step 7: Garnish and Serve

Remove from the oven and let it sit for 5–10 minutes before serving. Top with fresh basil or parsley if desired.

Tips:

Make Ahead: Assemble the entire dish up to 24 hours in advance and refrigerate. When ready to bake, add an extra 10–15 minutes to the cooking time if baking straight from the fridge.

Cheese Options: Add a layer of ricotta or use an Italian blend of shredded cheese for even more flavor.

Vegetarian Version: Omit the meat and add sautéed mushrooms, zucchini, or spinach for a hearty vegetarian option.

More Heat: Use spicy Italian sausage or add red pepper flakes to the sauce for a little kick.

Don’t Overcook Pasta: Keep the rigatoni just shy of fully cooked so it doesn’t get mushy when baked.

Storage and Reheating:

Refrigerator:

Store leftovers in an airtight container for up to 4 days. The flavors continue to develop, making it even better the next day.

Freezer:

Let the baked rigatoni cool completely, then wrap tightly with foil or transfer to a freezer-safe container. Freeze for up to 3 months. Thaw overnight in the fridge before reheating.

Reheating:

Oven: Reheat at 350°F, covered with foil, for about 20–25 minutes.

Microwave: Place individual portions in a microwave-safe dish and heat in 1-minute intervals, stirring in between, until heated through.


Baked Rigatoni is that dependable, crowd-pleasing dish that feels like a warm hug on a plate. Make it for Sunday dinner, weeknight comfort food, or your next potluck—you’ll be glad you did!

Slow Cooker 3-Ingredient Mac and Cheese

0

This Slow Cooker 3-Ingredient Mac and Cheese is about as simple and comforting as it gets. Perfect for busy weeknights, potlucks, or anytime you just want a warm bowl of cheesy goodness without standing over the stove. With just a handful of ingredients and almost no effort, you’ll have creamy, gooey mac and cheese that’s practically made itself.

The beauty of this recipe is how hands-off it is—toss everything in, stir once or twice, and let your slow cooker work its magic. It’s a great dish for both picky eaters and hungry grownups, with plenty of room for add-ins if you want to dress it up later. But truly, it’s delicious in its simplest form.

Why You’ll Love This Recipe:

Only 3 Ingredients: Can’t get easier than that.

Kid-Approved: Even the pickiest eaters go back for seconds.

Hands-Off Cooking: Set it and forget it—no boiling or draining.

Customizable: Add extras like ham, peas, or hot sauce if you’re feeling fancy.

Creamy and Cheesy: Classic comfort food vibes with every bite.

Ingredients:

• 2 cups elbow macaroni (or shells, or any short pasta your crew loves)

• 2 cups shredded cheddar cheese (sharp cheddar works best, but use what you like)

• 2 cups milk (whole milk makes it extra rich, but 2% works fine too)

• Optional: pinch of salt and black pepper, to taste

Instructions:

Step 1: Load It Up

Add the uncooked pasta, shredded cheese, and milk to your slow cooker. Stir it well to combine—make sure all the pasta is coated and the cheese is mixed in. Add a pinch of salt and pepper if you like (recommended!).

Step 2: Flip the Switch

Place the lid on your slow cooker and cook on LOW for 2–3 hours, stirring every 30–45 minutes. This helps prevent the cheese from clumping and keeps the sauce smooth.

Step 3: Check and Serve

The mac and cheese is ready when the pasta is tender and the cheese is fully melted into a creamy sauce. Serve hot and enjoy right away for the best texture.

Tips:

Cheese Choices: Feel free to mix in other cheeses like Monterey Jack, mozzarella, or a bit of Parmesan for extra depth.

Don’t Overcook: Keep an eye on the texture—overcooked pasta gets mushy fast in the slow cooker.

Extra Creaminess: For a richer version, swap ½ cup of milk for half-and-half or add a tablespoon of cream cheese.

Add Protein or Veggies: Stir in cooked chicken, crumbled bacon, or steamed broccoli during the last 30 minutes.

Crunchy Topping: If you like a crispy top, transfer to a baking dish, sprinkle with breadcrumbs, and broil for 2–3 minutes before serving.

Storage and Reheating:

Refrigerator:

Store leftovers in an airtight container for up to 3–4 days. The pasta may thicken as it sits—just add a splash of milk when reheating.

Reheating:

Microwave: Heat in 30-second intervals, stirring in between, and add milk as needed.

Stovetop: Warm gently over low heat with a splash of milk, stirring until smooth.

Freezer:

Mac and cheese can be frozen but may change in texture slightly. To freeze, let it cool completely, portion it into airtight containers, and freeze for up to 2 months. Thaw overnight in the fridge and reheat as above.


This Slow Cooker 3-Ingredient Mac and Cheese proves that simple really is better sometimes. Whether you’re serving it up on a busy weeknight or using it as a side dish at your next get-together, it’s always a crowd-pleaser.

Ham and Cheese Calzones

0

These Ham and Cheese Calzones are everything you love about a classic deli sandwich—warm, cheesy, and savory—wrapped in golden, fluffy pizza dough. Crispy on the outside and melty on the inside, they’re perfect for lunch, dinner, or even a hearty snack. Whether you’re feeding hungry kids or prepping game-day food, these calzones are an easy win.

Made with a few pantry staples and leftover ham, this recipe comes together quickly and bakes up beautifully in under 30 minutes. They’re portable, freezable, and endlessly customizable—plus, who can resist that gooey blend of mozzarella, ricotta, and Parmesan tucked inside soft, buttery dough?

Why You’ll Love This Recipe:

Crispy Outside, Gooey Inside: The perfect texture in every bite.

Family-Friendly: Kids and adults alike devour these calzones.

Easy to Make Ahead: Bake now, freeze for later.

Great Use of Leftovers: Ideal for leftover ham or cheese.

Customizable: Add spinach, mushrooms, or swap out meats and cheeses.

Ingredients:

• 1 pound pizza dough

• 1 cup cooked ham, diced

• 1 cup shredded mozzarella cheese

• ½ cup ricotta cheese

• ¼ cup grated Parmesan cheese

• 1 teaspoon dried oregano

• ½ teaspoon garlic powder

• 1 egg, beaten (for sealing the edges)

• 1 tablespoon olive oil (for brushing the tops)

Instructions:

Step 1: Preheat the Oven

Preheat your oven to 425°F (220°C). Line a baking sheet with parchment paper and set aside.

Step 2: Prepare the Dough

On a floured surface, divide the pizza dough into four equal portions. Roll each piece into a circle about 8 inches in diameter.

Step 3: Make the Filling

In a mixing bowl, combine the diced ham, mozzarella cheese, ricotta, Parmesan, oregano, and garlic powder. Mix until well combined.

Step 4: Fill the Calzones

Spoon one-quarter of the filling onto one half of each dough circle, leaving about a ½-inch border around the edge.

Step 5: Seal the Edges

Brush the edges of the dough with the beaten egg. Fold the dough over the filling to create a half-moon shape. Press the edges with a fork to seal tightly.

Step 6: Prep for Baking

Transfer the calzones to the prepared baking sheet. Brush the tops with olive oil and cut a small slit in the top of each to allow steam to escape. You can sprinkle extra mozzarella or Parmesan on top if you’d like.

Step 7: Bake

Bake in the preheated oven for 15–20 minutes, or until the calzones are golden brown and puffed.

Step 8: Cool and Serve

Let the calzones cool for 5 minutes before serving. This helps the cheese settle and prevents burns from hot steam.

Tips:

Use Store-Bought or Homemade Dough: Either works great—use whatever’s easier!

Add Veggies: Try adding sautéed mushrooms, spinach, or bell peppers for extra flavor and nutrition.

Extra Flavor: Add a sprinkle of crushed red pepper flakes or fresh basil to the filling for a twist.

Dipping Sauce: Serve with warm marinara, ranch, or even honey mustard for a delicious dipping option.

Mini Calzones: Make smaller calzones for party snacks or lunchbox-sized portions.

Storage and Reheating:

Refrigerator:

Store leftovers in an airtight container for up to 3 days. Reheat in the oven at 350°F for 10–15 minutes or in the microwave for 1–2 minutes (though the crust stays crispier in the oven).

Freezer:

Let calzones cool completely, then wrap each in foil or plastic wrap and place in a freezer bag. Freeze for up to 3 months. To reheat, bake from frozen at 375°F for 25–30 minutes.


These Ham and Cheese Calzones are quick to make, fun to eat, and endlessly adaptable to whatever’s in your fridge. Serve them with a side salad or dipping sauce, and you’ve got a warm, satisfying meal in no time.

Slow Cooker Bananas Foster Pudding

0

This Slow Cooker Bananas Foster Pudding is pure cozy comfort in a bowl—a warm, caramelized banana dessert inspired by the classic New Orleans treat. With just a few pantry staples and ripe bananas, you can create a rich, syrupy pudding that’s perfect for topping pancakes, waffles, ice cream, or simply enjoying all on its own.

The slow cooker does all the heavy lifting, gently cooking the bananas until they’re tender and coated in a buttery brown sugar cinnamon sauce that tastes like pure magic. It’s the kind of dessert that feels fancy but is wonderfully fuss-free. Whether you serve it after a holiday meal or as a midweek sweet treat, this easy pudding will quickly earn a spot in your regular dessert rotation.

Why You’ll Love This Recipe:

Ridiculously Easy: Just stir, pour, and let the slow cooker work its magic.

Cozy & Comforting: Warm bananas in cinnamon-brown sugar sauce—what’s not to love?

No Oven Needed: Great for summer or busy kitchen days.

Versatile: Serve it over pancakes, French toast, vanilla ice cream, or on its own.

Great Use for Ripe Bananas: A delicious alternative to banana bread.

Ingredients:

• 4 ripe bananas, sliced

• ½ cup brown sugar (light or dark)

• ¼ cup unsalted butter, melted

• 1 teaspoon vanilla extract

• 1 teaspoon ground cinnamon

• Butter or nonstick spray (for greasing the slow cooker)

Instructions:

Step 1: Prep the Slow Cooker

Grease the inside of your slow cooker with butter or a quick spray of nonstick cooking spray to prevent sticking.

Step 2: Combine the Ingredients

In a large mixing bowl, combine the sliced bananas, brown sugar, melted butter, vanilla extract, and cinnamon. Stir until the bananas are fully coated in the sugary, buttery mixture.

Step 3: Load the Slow Cooker

Transfer the banana mixture to the greased slow cooker. Spread it out evenly into a single layer for even cooking.

Step 4: Cook Low and Slow

Cover and cook on LOW for 2 to 3 hours, or until the bananas are soft and the sauce has thickened into a warm, syrupy consistency.

Step 5: Stir and Serve

Give everything a gentle stir to coat the bananas well in the sauce. Serve warm in bowls, or spoon over your favorite dessert or breakfast.

Tips:

Banana Ripeness Matters: Use ripe but firm bananas—they’ll hold their shape better during cooking.

Try a Splash of Rum: For a traditional Bananas Foster flavor, stir in 1 tablespoon of dark rum or rum extract before cooking.

Add Nuts: Sprinkle chopped pecans or walnuts in during the last 30 minutes for a nutty crunch.

More Creaminess: For a pudding-style finish, stir in a splash of heavy cream or coconut milk just before serving.

Spice It Up: Add a pinch of nutmeg or cardamom for extra warmth.

Storage and Reheating:

Refrigerator:

Store leftovers in an airtight container in the fridge for up to 3 days.

Freezer:

Freeze in small portions for up to 2 months. Thaw overnight in the fridge before reheating.

Reheating:

Microwave: Reheat in 30-second intervals, stirring gently in between.

Stovetop: Warm over low heat with a splash of milk or cream to loosen the sauce.


Slow Cooker Bananas Foster Pudding is one of those secretly simple desserts that delivers big flavor with almost no effort. Whether you’re feeding guests or just craving something sweet, this warm, sticky-sweet banana dish will hit the spot every single time.

Cream Cheese Corn Casserole

0

If you’re looking for the perfect side dish that’s creamy, rich, and effortlessly comforting, this Cream Cheese Corn Casserole is just the ticket. It’s a warm, velvety corn dish that comes together right in your slow cooker—no need to turn on the oven or fuss with baking dishes. This casserole hits that sweet spot between savory and just slightly sweet, making it a favorite alongside everything from holiday roasts to weeknight chicken dinners.

The best part? It only takes a handful of ingredients and a few minutes of prep. The cream cheese and butter melt into the corn, creating a luscious, silky texture that feels indulgent but couldn’t be easier to throw together. Whether you’re hosting a big holiday meal or just want to elevate your usual veggie side, this dish delivers comfort and flavor in every bite.

Why You’ll Love This Recipe:

No-Fuss Slow Cooker Prep: Just toss in the ingredients and let it simmer.

Velvety Texture: Cream cheese and butter make this irresistibly smooth and creamy.

Family-Friendly Flavor: Mild, buttery, and just sweet enough to please even picky eaters.

Perfect Holiday Side: Pairs beautifully with turkey, ham, roast beef, or chicken.

Make-Ahead Friendly: Keeps well and tastes even better the next day.

Ingredients:

• 4 cups corn kernels (fresh or frozen)

• 8 oz cream cheese, cubed

• ½ cup butter, sliced

• ¼ cup milk

• 2 tablespoons granulated sugar

• ½ teaspoon salt

• ¼ teaspoon black pepper

Instructions:

Step 1: Layer the Ingredients in the Slow Cooker

Place the corn kernels into the bottom of your slow cooker. Add the cubed cream cheese and butter slices on top of the corn.

Step 2: Add the Milk and Seasonings

Pour the milk evenly over the top. Sprinkle in the sugar, salt, and black pepper.

Step 3: Slow Cook to Perfection

Cover and cook on LOW for 3–4 hours, stirring occasionally. The cream cheese and butter will melt slowly, creating a rich and creamy sauce that coats the corn.

Step 4: Stir and Serve

Right before serving, give everything a good stir to make sure the cream cheese is fully incorporated and the mixture is smooth and creamy. Serve warm.

Tips:

Use Frozen or Fresh Corn: Both work well. If using frozen corn, no need to thaw—it will cook perfectly in the slow cooker.

Make It Sweeter: Prefer a sweeter flavor? Add an extra tablespoon of sugar.

Add a Kick: Stir in a pinch of cayenne or a few dashes of hot sauce for a little heat.

Cheesy Upgrade: Add ½ cup of shredded cheddar or pepper jack cheese for extra richness.

Make It a Meal: Stir in cooked, crumbled bacon or diced ham for a heartier side or light main.

Storage and Reheating:

Refrigerator:

Store leftovers in an airtight container in the refrigerator for up to 4 days.

Freezer:

Freeze in a freezer-safe container for up to 2 months. Thaw overnight in the refrigerator before reheating.

Reheating:

Microwave: Heat in 30-second intervals, stirring in between until warmed through.

Stovetop: Reheat over low heat, stirring frequently. Add a splash of milk if it thickens too much.

Slow Cooker: Rewarm on low for 1–2 hours, stirring occasionally.


Cream Cheese Corn Casserole is a cozy, crowd-pleasing side that brings creamy, buttery corn to a whole new level. It’s simple, satisfying, and always a hit—whether it’s on your holiday table or part of an easy weeknight dinner.

Baked 3-Packet Pot Roast

0

Looking for a no-fuss, full-flavor dinner that practically cooks itself? This Baked 3-Packet Pot Roast is your answer. With just a handful of pantry staples and one big pot, you’ll end up with fork-tender beef, perfectly cooked vegetables, and a savory gravy that’ll have everyone at the table asking for seconds.

This recipe gets its name from the three magical seasoning packets—ranch, Italian dressing, and brown gravy mix—that come together to make a rich, flavor-packed sauce. Add in some hearty root vegetables and a marbled chuck roast, and you’ve got a warm, rustic meal that tastes like Sunday dinner with grandma (but without the hours in the kitchen).

Why You’ll Love This Recipe:

One Pot Wonder: Minimal cleanup and maximum flavor.

Effortlessly Tender: The long bake time turns even a tough cut of beef into melt-in-your-mouth magic.

No Guesswork: The seasoning packets do all the flavoring for you.

Perfect for Family Dinners: Hearty enough to feed a crowd.

Great Leftovers: Tastes even better the next day.

Ingredients:

• 1 (3–4 pound) chuck roast

• 1 packet ranch dressing mix

• 1 packet Italian dressing mix

• 1 packet brown gravy mix

• 1 cup water or beef broth

• 2 tablespoons olive oil

• 4–5 large carrots, peeled and cut into chunks

• 5–6 medium potatoes, peeled and quartered

• 1 large onion, quartered

• Salt and pepper, to taste

Instructions:

Step 1: Preheat the Oven

Set your oven to 325°F (165°C). This low and slow heat is key to tender, flavorful beef.

Step 2: Sear the Roast

In a large oven-safe pot or Dutch oven, heat the olive oil over medium-high heat.

While it heats, season the roast generously with salt and pepper.

Sear the roast on both sides until browned—about 3–4 minutes per side. This adds great flavor.

Step 3: Add the Veggies

Remove the roast and set it aside for a moment.

Add the carrots, potatoes, and onion to the pot. Stir them around to soak up all those flavorful brown bits from the beef.

Step 4: Return the Roast to the Pot

Place the seared roast on top of the veggies. It’ll sit right in the middle, acting as the flavor base for everything else.

Step 5: Mix the Sauce

In a separate bowl, whisk together the ranch mix, Italian dressing mix, and brown gravy mix with the water or beef broth until smooth.

Step 6: Pour and Cover

Pour the seasoning mixture evenly over the roast and vegetables. Cover the pot tightly with a lid or aluminum foil.

Step 7: Bake Low and Slow

Transfer the pot to the preheated oven and bake for 3 to 4 hours, or until the roast is fall-apart tender and the veggies are perfectly cooked.

Step 8: Serve and Enjoy

Let the roast rest for about 10 minutes before slicing. Spoon the gravy and vegetables over the top and dig in!

Tips:

Use Broth for More Flavor: Beef broth adds a deeper richness than water.

Don’t Skip the Sear: It locks in flavor and gives the roast a beautiful crust.

Veggie Variations: Try adding parsnips, turnips, or celery if you like.

Make It Spicy: Add red pepper flakes or a few dashes of hot sauce to the seasoning mix.

Gluten-Free? Use GF versions of the seasoning packets if needed.

Storage and Reheating:

Refrigerator:

Store leftovers in an airtight container for up to 4 days. The flavors only deepen over time.

Freezer:

Freeze cooled roast and vegetables (with gravy) in freezer-safe containers for up to 3 months. Thaw in the fridge overnight before reheating.

Reheating:

Oven: Reheat in a covered baking dish at 300°F until hot (20–30 minutes).

Stovetop: Warm gently in a covered pot over medium-low heat.

Microwave: Reheat individual portions in short intervals, stirring in between.


This Baked 3-Packet Pot Roast is the kind of no-fail dinner that makes everyone feel taken care of. It’s classic comfort food at its finest—easy to make, full of flavor, and guaranteed to fill your home with the most mouthwatering aroma.