Double Chocolate Banana Muffins

0

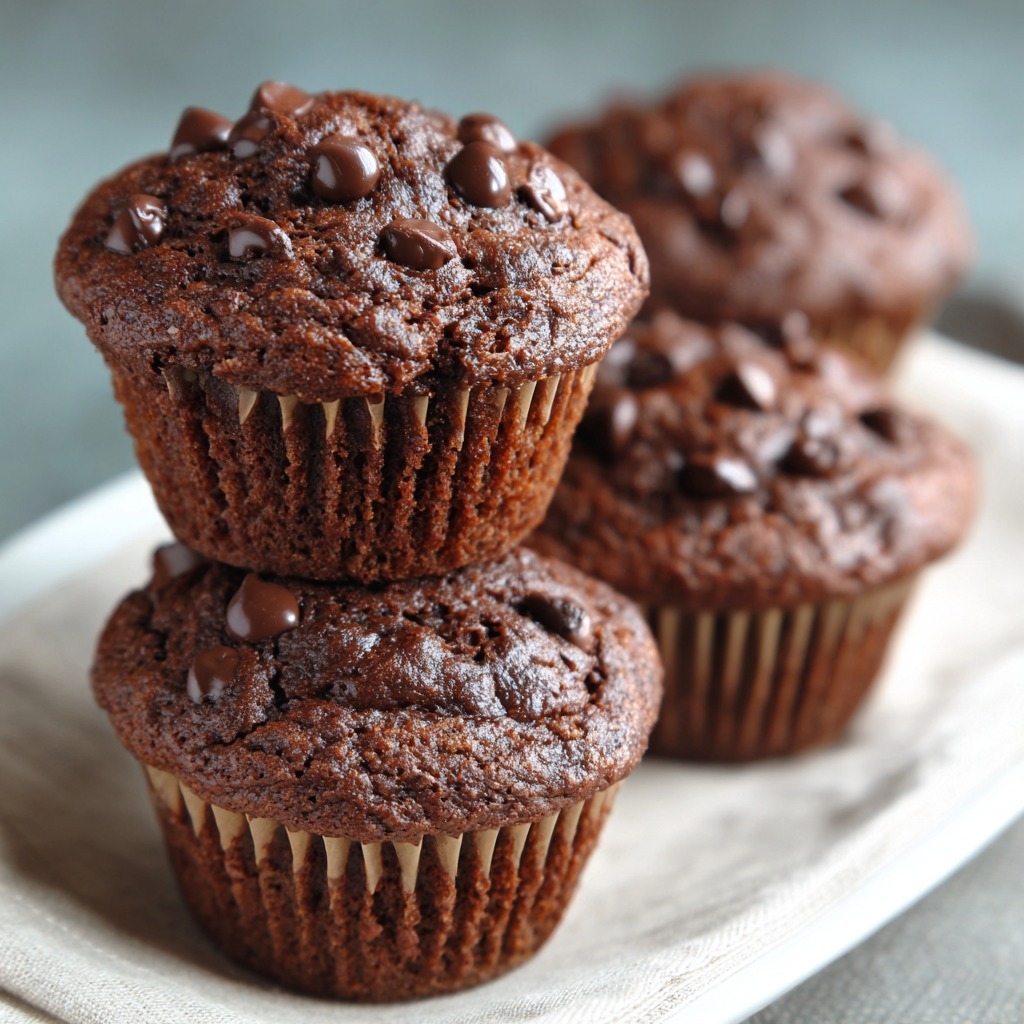
Double Chocolate Banana Muffins are the ultimate indulgence for chocolate and banana lovers alike—a decadent, bakery-style treat that transforms overripe bananas into incredibly moist, tender muffins, then amplifies them with a rich, double dose of deep, dark cocoa and pools of melted semi-sweet chocolate chips. This recipe is a masterful balance, where the natural sweetness and moisture of ripe bananas create a supremely tender crumb that perfectly complements the intense, fudgy richness of the cocoa. The magic lies in the combination: the bananas ensure the muffins stay incredibly soft and moist for days, while the cocoa powder provides a deep, complex chocolate flavor that doesn’t overwhelm the fruit. A full cup of chocolate chips, folded into the batter and optionally pressed onto the tops, melts into gooey pockets of chocolatey goodness in every single bite.

The brilliance of this recipe extends to its clever baking technique, which guarantees a beautiful, domed top. Starting the muffins at a high temperature (425°F) for the first five minutes creates an initial burst of steam that pushes the batter up, forming that coveted bakery-style rise. Reducing the heat to 350°F for the remainder of the bake ensures the centers cook through without burning the tops. The result is a muffin with a slightly crisp exterior and a luxuriously soft, almost brownie-like interior. These muffins are the perfect solution for those overly ripe bananas sitting on your counter, transforming them into a treat that feels more like dessert than breakfast—a rich, chocolatey, and utterly satisfying indulgence suitable for any time of day.

Why You’ll Love This Recipe:

  • Intensely Chocolatey, Perfectly Moist: The combination of cocoa, chocolate chips, and ripe bananas creates a fudgy, incredibly tender texture.
  • Bakery-Style Tops: The high-heat start guarantees beautiful, domed muffin tops.
  • Great Way to Use Overripe Bananas: Transforms spotty bananas into a decadent, crowd-pleasing treat.
  • Double the Chocolate: Cocoa powder in the batter and a full cup of chocolate chips ensure every bite is rich and satisfying.
  • Versatile Indulgence: Perfect for breakfast, dessert, or a satisfying snack any time.

Ingredients:

For the Wet Ingredients:
1 ½ cups mashed overripe bananas (about 4 medium or 3 large bananas)
1 cup granulated sugar
¼ cup sour cream (full-fat or light)
1 large egg
¼ cup vegetable oil (or canola oil)
1 teaspoon pure vanilla extract

For the Dry Ingredients:
1 cup all-purpose flour, spooned and leveled
½ cup unsweetened cocoa powder (Dutch-process or special dark recommended)
1 teaspoon baking soda
1 teaspoon baking powder
½ teaspoon salt

For the Chocolate Add-In:
1 cup semi-sweet chocolate chips, plus extra for topping (optional)

Instructions:

Step 1: Preheat Oven and Prepare Pan
Preheat your oven to 425°F (220°C). Line a 12-cup standard muffin pan with paper liners or generously spray each cup with non-stick cooking spray.

Step 2: Mash Bananas and Mix Wet Ingredients
In a medium bowl, add the peeled bananas and mash them thoroughly with a fork until mostly smooth with a few small lumps remaining. Add the granulated sugar, sour cream, egg, vegetable oil, and vanilla extract. Whisk vigorously until everything is well combined and smooth.

Step 3: Combine Dry Ingredients
In a large bowl, whisk together the all-purpose flour, cocoa powder, baking soda, baking powder, and salt until evenly combined.

Step 4: Combine Wet and Dry
Pour the wet ingredients into the bowl with the dry ingredients. Using a spatula or wooden spoon, gently fold and stir until just combined. Be careful not to overmix—a few small lumps are fine. Fold in the semi-sweet chocolate chips.

Step 5: Fill Muffin Cups
Divide the batter evenly among the 12 prepared muffin cups, filling each about ¾ full. If desired, press a few extra chocolate chips onto the tops of the muffins for a decorative finish.

Step 6: Bake (Two-Temperature Method)
Place the muffin pan in the preheated 425°F (220°C) oven. Bake for 5 minutes. Without removing the muffins from the oven, reduce the oven temperature to 350°F (175°C). Continue baking for 14-16 minutes, or until a toothpick inserted into the center of a muffin comes out clean or with a few moist crumbs.

Step 7: Cool
Remove the muffin pan from the oven and let it cool on a wire rack for 5-10 minutes. Then, carefully transfer the muffins from the pan to the wire rack to cool completely. (If you added extra chocolate chips to the tops, they may need a few minutes to set.)

Tips:

  • Very Ripe Bananas are Key: Use bananas with plenty of brown spots—they are sweeter and provide more moisture.
  • Spoon and Level the Flour: Scooping directly into the flour bag compacts it. Spoon flour into your measuring cup and level it off with a knife for accuracy.
  • Don’t Overmix: Overmixing develops gluten and can lead to tough, dense muffins. Stir just until the flour disappears.
  • The High-Heat Start: This technique creates a burst of steam that lifts the batter for taller, domed tops.
  • Test for Doneness: A toothpick should come out clean or with a few moist crumbs. If it comes out wet, bake for a few more minutes.

Storage Options:

  • Room Temperature: Store muffins in an airtight container at room temperature for up to 4 days.
  • Refrigerator: For longer storage, keep in the refrigerator for up to 1 week. Bring to room temperature or warm slightly before serving.
  • Freezing: These muffins freeze beautifully for up to 3 months. Wrap individually in plastic wrap and place in a freezer bag. Thaw at room temperature or warm in the microwave.
  • Make-Ahead: The batter can be made, portioned into the muffin tin, covered, and refrigerated overnight. Bake directly from the fridge, adding a few minutes to the bake time.

Double Chocolate Banana Muffins are a chocolate lover’s dream—rich, moist, and packed with chocolate in every single bite. They’re the perfect way to start the day or satisfy an afternoon craving, proving that overripe bananas are always an opportunity for something delicious.

Ham & Swiss Pie

0

Ham & Swiss Pie is a glorious, custardy, savory masterpiece that sits at the perfect intersection of a hearty quiche and a impossibly simple weeknight dinner. This recipe is a celebration of convenience and comfort, transforming just a handful of everyday ingredients into a golden, puffed, and deeply satisfying pie that feels both rustic and refined. The magic begins with a simple, no-roll crust—not a traditional pastry, but a self-forming batter made from dry biscuit mix, eggs, and milk that bakes into a tender, golden shell that cradles the filling beautifully. Layered within are generous amounts of savory diced ham, sweet caramelized notes from finely chopped onion, and nutty, melted Swiss cheese that forms a glorious, stringy top. As it bakes, the batter rises up and around the filling, creating a pie that is both sturdy and impossibly tender.

The brilliance of this recipe lies in its incredible simplicity and the stunning, crowd-pleasing result it delivers. It requires no rolling, no blind baking, and no complicated techniques—just layer, whisk, pour, and bake. The result is a complete meal in a dish that is perfect for breakfast, brunch, lunch, or a light dinner. The combination of salty ham, creamy Swiss, and the rich, savory custard is timeless and universally loved. Served with a simple green salad or a side of roasted vegetables, Ham & Swiss Pie transforms a busy weeknight into a cozy, satisfying occasion. It’s a recipe that proves you don’t need a long ingredient list or hours in the kitchen to create something truly delicious and memorable.

Why You’ll Love This Recipe:

  • Incredibly Easy, No-Roll Crust: The biscuit mix creates its own tender, golden crust as it bakes.
  • Rich, Savory, Custardy Filling: Eggs and milk create a luscious, quiche-like texture that’s packed with flavor.
  • Perfect Use for Leftover Ham: A delicious way to transform holiday ham into a brand new meal.
  • Versatile for Any Meal: Equally perfect for brunch, lunch, or a simple dinner.
  • Crowd-Pleasing Comfort: The classic combination of ham, Swiss, and custard is a guaranteed hit.

Ingredients:

For the Filling Layers:
2 cups diced cooked ham
1 cup (about 4 oz) grated Swiss cheese
½ cup yellow onion, finely chopped

For the Custard Batter:
4 large eggs, beaten
2 cups whole milk
1 cup dry biscuit mix (such as Bisquick)
½ teaspoon salt
½ teaspoon garlic powder
½ teaspoon onion powder
¼ teaspoon freshly ground black pepper

Instructions:

Step 1: Preheat and Prepare Dish
Preheat your oven to 400°F (200°C). Generously grease a 10-inch deep-dish pie plate or a 9-inch deep-dish pie dish.

Step 2: Layer the Fillings
Sprinkle the diced ham evenly over the bottom of the prepared pie dish. Top the ham with the finely chopped onion, spreading it evenly. Sprinkle the grated Swiss cheese over the onion layer.

Step 3: Make the Custard Batter
In a large bowl, whisk together the beaten eggs, whole milk, and dry biscuit mix until the mixture is smooth and well combined, with no large lumps of biscuit mix remaining. Add the salt, garlic powder, onion powder, and black pepper. Whisk again to incorporate.

Step 4: Assemble and Bake
Carefully pour the egg and milk mixture evenly over the layered ham, onion, and cheese in the pie dish. It will rise as it bakes.

Step 5: Bake
Bake in the preheated oven for 35-40 minutes. The pie is done when the top is puffed and golden brown, and a toothpick or knife inserted into the center comes out clean.

Step 6: Rest and Serve
Remove from the oven and let the pie rest on a wire rack for 5-10 minutes before slicing. This allows it to set slightly for cleaner slices. Slice into wedges and serve warm.

Tips:

  • Use Good-Quality Ham: Diced leftover baked ham works beautifully, but you can also use thick-cut ham steak or good-quality deli ham.
  • Grate Your Own Cheese: Pre-shredded cheese contains anti-caking agents that can affect the texture. Grating Swiss cheese yourself ensures a smooth, creamy melt.
  • Don’t Overmix the Batter: Whisk just until the ingredients are combined. Overmixing can make the final texture tough.
  • Check for Doneness: The center should be set and a toothpick should come out clean. If the top is browning too quickly, tent loosely with foil.
  • Customize It: Add a cup of cooked, chopped broccoli or spinach (squeezed dry) for extra vegetables and color.

Storage Options:

  • Refrigerator: Store leftovers in an airtight container in the refrigerator for up to 4 days.
  • Reheating: Reheat individual slices in the microwave, or place the whole pie (covered with foil) in a 325°F (165°C) oven for 15-20 minutes until warmed through.
  • Freezing: This pie freezes well. Cool completely, wrap tightly in plastic wrap and foil, and freeze for up to 2 months. Thaw overnight in the refrigerator before reheating.
  • Make-Ahead: You can assemble the pie completely (through Step 4) up to 8 hours in advance. Cover and refrigerate. Add 5-10 minutes to the bake time if baking from cold.

Ham & Swiss Pie is the ultimate easy, comforting, and satisfying meal. It takes simple ingredients and transforms them into a golden, puffed, and deliciously savory pie that will earn a permanent place in your recipe rotation.

Can You Put a Toilet Brush in the Dishwasher? (Short Answer… Please Don’t)

0

So let’s just start with the question people don’t always say out loud.

Can you wash a toilet brush in the dishwasher?

Technically… I mean, yes, you can. The machine will run. Water will spray. Things will happen.

But should you?

Yeah—no. Not really. And once you think it through, it starts to feel like one of those ideas that sounded fine for about three seconds and then quickly got worse.

Why This Even Comes Up (Because It Does)

Toilet brushes are one of those things nobody wants to deal with.

You use them, you put them back, and then at some point you realize… wait, this thing is probably not very clean.

And then the brain goes: dishwasher = hot water = cleaning = problem solved.

It’s kind of logical. But also kind of not.

The Dishwasher Isn’t Built for This (At All)

Dishwashers are great—but they have a lane.

Plates, glasses, forks. Stuff that had food on it.

Not… bathroom tools.

The issue isn’t just temperature or soap. It’s the type of mess. Toilet brushes deal with bacteria that dishwashers aren’t really designed to handle.

And more importantly, they’re not designed to keep that bacteria contained in a way that makes you feel good about using your dishes afterward.

Because that’s the part people gloss over.

The Cross-Contamination Thing (Yeah, It’s As Bad As It Sounds)

Let’s not overcomplicate it.

You put a toilet brush in the dishwasher… and then later you put plates in there.

Even if the machine runs hot, even if you use detergent, there’s still that mental—and honestly practical—line you’re crossing.

Water splashes around inside a dishwasher. It circulates. It doesn’t politely stay in one corner with the toilet brush and mind its business.

So now everything in there is sharing space.

And that’s just not a risk worth taking for something you could clean another way in five minutes.

Also, It Probably Won’t Even Clean It Well

This part gets overlooked, but it matters.

Toilet brushes aren’t smooth like dishes. They’re all bristles—tight, layered, kind of chaotic.

Dishwasher spray can’t always reach deep into that. So you end up with a brush that went through a full cycle… and still isn’t fully clean.

Which is somehow worse.

And There’s a Chance You Mess Up Your Dishwasher Too

It’s not guaranteed, but it happens.

Hard bristles knocking around, maybe scratching the interior, maybe getting caught somewhere they shouldn’t.

Plus, some brushes have metal parts, coatings, or materials that just don’t react well to dishwasher heat.

So now you’ve got a questionable brush and a dishwasher you’re side-eyeing.

Not ideal.

So What Should You Do Instead?

Nothing complicated, honestly. Just more appropriate.

  • Bleach (the classic, for a reason)
    Bucket. Hot water. A bit of bleach.
    Let the brush sit for a while—doesn’t have to be exact, just long enough to do its job.
    Rinse it well, let it dry.
    Simple, effective, done.
  • Hydrogen Peroxide (if bleach isn’t your thing)
    Pour it over the bristles, let it sit for a few minutes.
    Rinse. Dry.
    It’s a quieter method, but it works.
  • Vinegar + Baking Soda (a little fizzy, a little satisfying)
    This one’s more “natural cleaning aisle energy.”
    Sprinkle baking soda, add vinegar, let it bubble up. Give it a few minutes.
    Rinse everything off and you’re good.

The Small Habits That Actually Keep It Clean

This part matters more than any deep clean, honestly.

  • Rinse the brush after each use
  • Let it dry fully (don’t trap it in a wet holder)
  • Clean it regularly, not just when it starts looking suspicious

It’s not glamorous, but it keeps things under control.

And At Some Point… Just Replace It

There’s a limit to how clean a toilet brush can get.

If the bristles are bent, if there’s a smell that won’t go away, or if it just looks tired—replace it.

Every few months to a year is pretty normal.

It’s not the kind of item you keep forever.

So Yeah… Dishwasher Is a No

It seems convenient for about a minute.

But between the hygiene concerns, the not-great cleaning results, and the whole “this is where my plates go” realization… it’s just not worth it.

There are easier, safer ways to clean a toilet brush that don’t leave you questioning your life choices halfway through unloading the dishwasher.

And honestly? That’s reason enough.

Should You Wash Pre-Washed Lettuce?

0

You ever open a bag of lettuce, read “triple-washed, ready to eat”… and still pause for a second?

Yeah. Same.

There’s always that tiny voice in your head going, “Should I rinse this anyway?”—especially if you’ve ever seen one too many food safety headlines or just grew up in a kitchen where everything got washed twice, no questions asked.

So let’s talk about it. Not in a scary way. Just honestly.

What “Pre-Washed” Actually Means (And What It Doesn’t)

Here’s the thing—pre-washed lettuce isn’t just rinsed once and tossed in a bag.

Most of it goes through multiple cleaning stages, often with sanitized water systems designed to remove dirt, bacteria, and anything that shouldn’t be there. That’s why you’ll see labels like “triple-washed” or “ready to eat.”

So technically? It’s meant to be eaten straight from the bag.

But—and this is where people start to hesitate—”cleaned” doesn’t always feel the same as “completely risk-free.”

Why Some People Still Feel Unsure

Even with all those safety steps, lettuce is still… well, a fresh product.

It comes from farms. It travels. It gets handled, packaged, transported. And somewhere along that chain, contamination can happen—even if it’s rare.

That’s why you hear about things like:

  • E. coli
  • Salmonella
  • Listeria

Not often. But enough to make people pause in their kitchens.

And honestly? That hesitation isn’t irrational—it’s human.

The “Just Trust the Label” Side

A lot of food safety experts—and agencies like the FDA—say pre-washed lettuce is safe as is.

And their logic makes sense:

  • It’s processed under controlled conditions
  • It’s tested and regulated
  • Washing it again at home might not actually reduce risk

In fact, if you wash it improperly (say, in a not-so-clean sink), you could accidentally introduce new bacteria instead.

So from a purely technical standpoint? Opening the bag and eating it is perfectly acceptable.

But Then There’s the “I’m Still Gonna Rinse It” Crowd

And you know what? That group has a point too.

Because sometimes it’s not just about science—it’s about peace of mind.

People choose to rinse pre-washed lettuce because:

  • It feels safer
  • It removes any leftover grit or residue
  • It’s just how they’ve always done it

And especially for:

  • kids
  • elderly family members
  • anyone with a sensitive immune system

That extra step can feel worth it—even if it’s more about comfort than necessity.

So… What Do Experts Actually Say?

This is where it gets interesting.

There’s no dramatic divide. No “you must do this” rule.

Instead, experts tend to say something like:

  • It’s safe to eat without washing
  • But rinsing it isn’t a bad idea if it makes you feel better

That’s it. No pressure. No panic.

Kind of refreshing, honestly.

If You Do Wash It, Do It the Right Way

Here’s where people sometimes overcomplicate things.

If you’re going to rinse your lettuce:

  • Use cold, clean water
  • Make sure your hands and sink are clean
  • Skip soap (seriously—never use soap on produce)
  • Gently dry it if needed

Simple. Nothing fancy.

Small Habits That Matter More Than You Think

Whether you wash it or not, these habits actually make a bigger difference:

  • Check the expiration date
  • Look for slimy leaves or odd smells
  • Keep it refrigerated properly
  • Don’t leave the bag open too long

Because freshness plays a bigger role than people realize.

So… Should You Wash It or Not?

Here’s the honest answer:

You can.
You don’t have to.

And both choices are valid.

If you trust the process and want convenience—eat it straight from the bag.
If rinsing it gives you peace of mind—go ahead and rinse it.

There’s no gold star either way.

Final Thought (The Real Takeaway)

Food isn’t just about safety—it’s also about comfort.

Some people trust labels. Others trust habits. Most of us sit somewhere in between.

And that’s okay.

Because at the end of the day, the goal is simple: feel good about what you’re eating… and actually enjoy it.

That One Shrimp Dinner That Got Weird (But Taught Me Something)

0

Okay, so here’s what happened.

We’re at my in-laws’. It’s one of those casual dinners — you know the type, where someone shows up with salad in a Tupperware and there’s an open bottle of wine just sitting on the counter. Nothing fancy. Just family. Comfortable. Familiar.

Then my mother-in-law brings out this shrimp dish. It smells incredible. That buttery, garlicky, shrimp-y aroma that makes your stomach literally say “yes, bring that here.”

Except… the shrimp still had their shells on.

And — here’s the thing — they weren’t deveined either.

Now look, I’m not trying to be dramatic. But that little dark line? Still there. Front and center. And in that moment, I just couldn’t. I didn’t want to eat it, and there was no way I was serving it to the kids. Cue the internal panic spiral.

Do I say something? Would that be rude? Am I just being too picky? Should I suck it up and eat it?

We smiled. We thanked her. We loaded up on other sides and made vague comments about how the kids “weren’t really feeling shrimp tonight.” Classic polite avoidance.

But on the drive home, my brain kept circling back: Is deveining shrimp actually that important? Or am I just overthinking this whole thing?

Turns out, it’s not nearly as black-and-white as I assumed.

Why This Isn’t Really About Shrimp
Let’s be real — this is one of those small things that’s kind of not that small.

Because it’s not just about how shrimp get prepared. It’s about food boundaries. Cleanliness. Culture. What each of us was raised to think of as “normal” or “acceptable” at the dinner table.

It’s also about family — and how tricky it can be to navigate food preferences without offending someone who just spent an hour cooking for you. Especially when you’re trying to raise kids with your own standards while also not coming across as That Parent.

So yeah. Shrimp. But also, definitely not just shrimp.

So What Is Deveining, and Does It Actually Matter?
Okay, quick science moment (I’ll keep it short, promise).

That “vein” running along the shrimp’s back is actually its digestive tract. Sometimes it’s clean and barely noticeable. Other times it contains grit, sand, or… well, you know.

Technically speaking, it’s safe to eat — the shrimp is cooked, any bacteria are long gone, and millions of people around the world eat shrimp this way without a second thought.

But also… I mean, ew? Not to be squeamish, but if I have the option to skip the shrimp’s last meal, I’m going to take it.

Here’s the Thing: It’s Cultural Too
This part genuinely surprised me.

In many Western kitchens, especially in the US, we’re taught that deveining is just part of the prep. It’s like shucking corn or peeling a banana. You just do it automatically.

But in lots of other cultures — including many Asian, Caribbean, and Mediterranean cooking traditions — shrimp are often served whole, shells and veins intact. Why? Because the shell adds flavor. Because that’s how it’s always been done. Because the messiness is part of the experience.

So what felt wrong or “unclean” to me might feel completely normal and delicious to someone else.

That’s humbling to realize.

So… Who’s Right?
Honestly? Nobody. Or everybody. Depends how you look at it.

Deveining isn’t mandatory. It’s optional — a choice based on texture, presentation, and what you’re used to.

Some people don’t mind the vein. Some don’t even notice it. Some will insist leaving it in makes the shrimp more flavorful. Others, like me, find it unappealing and would rather skip dinner than accidentally crunch down on sandy grit.

It all comes down to what you grew up with — and what you’re open to now.

Want to Devein Shrimp at Home? It’s Easier Than You Think
If you’re like me and prefer your shrimp vein-free, here’s how to do it without losing your mind:

What you’ll need:

  • A small knife (or a fancy shrimp deveiner if you’ve got one)
  • Cold water
  • A good podcast or playlist to pass the time

Steps:

  1. Rinse your shrimp under cold water.
  2. Peel off the shell (unless you’re keeping it on for a specific recipe).
  3. Make a shallow cut along the back.
  4. Use the knife tip to lift out the vein.
  5. Give everything another rinse.

It’s not difficult, but it does take a little time — which is probably why my mother-in-law skipped it. And honestly? Fair enough.

What If You’re at Someone Else’s Table?
This is where it gets delicate.

You’re at someone’s home. They’ve cooked for you. You notice something about the dish — whether it’s the shrimp or the seasoning or the preparation — that gives you pause.

Do you speak up? Do you eat around it? Do you make an excuse and move on?

I don’t have a perfect answer. But here’s what worked for me:

I led with gratitude first. Always.

I chose silence in the moment. Because sometimes, saying nothing is more respectful than saying something.

I planned for future conversations — not to criticize, just to share. Gently. Later.

Food is personal. So is family. Navigating both? That takes grace.

Can You Adapt Shrimp Recipes Without Hurting Feelings?
Absolutely.

If you want to meet in the middle — honoring tradition while keeping your own preferences — here are some ideas:

  • Use pre-deveined shrimp. No shame in the freezer aisle.
  • Make two versions of the dish — one traditional, one peeled and cleaned.
  • Get family involved in prep. Cooking together can smooth over a lot of differences.
  • Explain your reason simply. “The texture just throws me off” goes much further than “This is gross.”

Food should bring us together, not create distance.

How Long Does Cooked Shrimp Last? (Because Leftovers Happen)
End up with shrimp leftovers? Lucky you.

Here’s how to keep them tasty:

  • Store in the fridge in an airtight container — max 2–3 days.
  • Reheat gently in a skillet with a splash of broth or butter. Low heat is your friend.
  • Skip the microwave if you can. It’s the fastest route to rubbery disappointment.
  • Or just eat them cold in a salad. Honestly, cold shrimp with lemon, arugula, and a little olive oil? Perfection.

Final Thoughts From the Shrimp Situation
So… do I still think shrimp should be deveined?

Yes. For me, personally.

But do I also understand now that there’s no single “correct” way to serve shrimp — and that my preferences are just that: mine?

Also yes.

That dinner turned out fine. My kids were happy with rice and veggies. My mother-in-law never noticed we skipped the shrimp. And I walked away with something important — about food, about culture, and about how small moments can open up bigger conversations.

If you’ve ever been in a similar spot — awkward food moment, cultural difference at the table, or just a “wait, is this normal?” kind of dinner — I’d honestly love to hear about it.

Drop a comment. Send a message. Or just take this as your reminder that food is messy. And human. And honestly, that’s kind of the whole point.

Dutch Oven Pot Roast

0

Dutch Oven Pot Roast is the ultimate expression of comfort food—a glorious, fall-apart tender beef roast, surrounded by carrots and potatoes, all swimming in a rich, savory, wine-infused gravy that tastes like it simmered all day in a rustic French farmhouse kitchen. This recipe is a masterclass in the art of braising, transforming a tough, economical cut of beef chuck into a meltingly tender, deeply flavorful centerpiece through the magic of low, slow, moist heat. The magic begins with a hard sear, creating a deep brown crust on the meat that locks in flavor and builds a treasure of caramelized bits—the fond—on the bottom of the pot. A splash of red wine deglazes the pan, lifting those flavor-packed morsels into the braising liquid, which is then enriched with beef broth, Worcestershire, and aromatic herbs. As the roast simmers gently in the oven for hours, the collagen breaks down into unctuous gelatin, the meat becomes fork-tender, and the vegetables absorb the savory essence of the broth.

The brilliance of this recipe lies in its methodical, nearly foolproof technique and the profound rewards it yields. The initial high-heat sear, the aromatic sofrito of onions and garlic, the wine deglazing, and the long, gentle oven braise all work in harmony to create layers of flavor that simply cannot be rushed. The final step—thickening the cooking liquid into a glossy, luscious gravy—elevates the dish from homey to extraordinary. Served on a large platter, surrounded by tender vegetables and generously napped with gravy, this pot roast is more than a meal; it’s an event. It’s the dish you make when you want to fill your home with an intoxicating aroma, gather your loved ones around the table, and share in the deep, soul-satisfying comfort of a true classic.

Why You’ll Love This Recipe:

  • Unbelievably Tender, Flavor-Packed Beef: The long, slow braise transforms chuck roast into melt-in-your-mouth perfection.
  • Rich, Luscious Gravy: The cooking liquid is transformed into a silky, deeply savory gravy that ties the whole dish together.
  • Complete One-Pot Meal: Tender beef, potatoes, and carrots all cook together, absorbing incredible flavor.
  • Classic, Foolproof Technique: A step-by-step method that yields perfect results every time.
  • Make-Ahead & Leftover Hero: Tastes even better the next day and makes incredible sandwiches and soups.

Ingredients:

For the Roast:
1 (3-4 lb) boneless beef chuck roast
2 teaspoons kosher salt, plus more for seasoning
1 teaspoon freshly ground black pepper, plus more for seasoning
2 tablespoons olive oil, divided
1 large yellow onion, thickly sliced
4 cloves garlic, minced

For the Braising Liquid:
1 cup dry red wine (such as Cabernet Sauvignon or Merlot)
2 cups low-sodium beef broth
2 tablespoons Worcestershire sauce
3 sprigs fresh rosemary (or 1 teaspoon dried)
4 sprigs fresh thyme (or 1 teaspoon dried)
2 bay leaves

For the Vegetables:
1 ½ lbs Yukon Gold or baby potatoes, scrubbed (larger ones halved)
4 large carrots, peeled and cut into 2-inch chunks

For the Gravy:
2 tablespoons cornstarch
¼ cup cold water
Kosher salt and freshly ground black pepper, to taste

Instructions:

Step 1: Preheat Oven and Sear the Roast
Preheat your oven to 300°F (150°C). Pat the chuck roast completely dry with paper towels. Generously season all sides with salt and pepper. Heat 1 tablespoon of olive oil in a large Dutch oven over medium-high heat. When the oil shimmers, carefully place the roast in the pot. Sear undisturbed for 4-5 minutes per side, until a deep, dark brown crust forms. Transfer the roast to a large plate.

Step 2: Sauté the Aromatics
Reduce the heat to medium. Add the remaining tablespoon of olive oil if needed. Add the sliced onion and cook, stirring occasionally, for 5-7 minutes until softened and browned on the edges. Turn the heat off, add the minced garlic, and stir constantly for 1 minute—the residual heat will cook it perfectly.

Step 3: Deglaze and Build the Braising Liquid
Return the heat to medium. Pour in the red wine and, using a wooden spoon, scrape up all the browned bits from the bottom of the pot. Add the beef broth, Worcestershire sauce, rosemary, thyme, and bay leaves. Bring to a simmer.

Step 4: Braise
Return the seared roast to the Dutch oven, along with any accumulated juices. The liquid should come about halfway up the sides of the roast. Turn off the heat, cover the pot tightly with the lid, and transfer it to the preheated oven. Braise for 1 hour 45 minutes.

Step 5: Add Vegetables
Carefully remove the pot from the oven. Add the potatoes and carrots to the pot, nestling them around the roast. Cover and return to the oven. Continue braising for 45-60 minutes, until the meat and vegetables are fork-tender.

Step 6: Rest and Make Gravy
Remove the pot from the oven and let it rest, covered, for 20 minutes. Using tongs, carefully transfer the roast to a cutting board and tent loosely with foil. Remove the vegetables to a serving platter and cover to keep warm. Discard the bay leaves and herb sprigs. Skim excess fat from the surface of the braising liquid. Place the pot over low heat. In a small bowl, whisk the cornstarch and cold water into a smooth slurry. Slowly whisk the slurry into the simmering liquid. Cook, stirring constantly, for 2-3 minutes until the gravy thickens. Season with salt and pepper to taste.

Step 7: Slice and Serve
Remove any large pieces of fat and connective tissue from the roast. Slice the meat against the grain into ½-inch thick slices. Arrange the sliced meat on a platter with the vegetables. Pour the gravy over everything or serve it on the side.

Tips:

  • Pat the Roast Dry: This is crucial for a good sear. Moisture is the enemy of browning.
  • Sear Undisturbed: Let the roast develop a deep crust before flipping. If it sticks, it’s not ready to turn.
  • Don’t Skip the Wine: The wine adds essential acidity and complexity to the gravy. If avoiding alcohol, use an additional cup of beef broth with a tablespoon of balsamic vinegar.
  • Slice Against the Grain: Look for the lines of muscle fiber and slice perpendicular to them for the most tender slices.
  • Rest the Meat: The 20-minute rest allows juices to redistribute throughout the roast, ensuring every slice is moist and flavorful.

Storage Options:

  • Refrigerator: Store leftover pot roast, vegetables, and gravy in an airtight container in the refrigerator for up to 4 days. The flavors improve overnight.
  • Reheating: Reheat gently in a covered skillet or Dutch oven over low heat, adding a splash of broth to loosen the gravy if needed.
  • Freezing: This pot roast freezes beautifully for up to 3 months. Cool completely and store in a freezer-safe container. Thaw overnight in the refrigerator before reheating.
  • Make-Ahead: Pot roast is an ideal make-ahead meal. Cook it completely, cool, and refrigerate. The fat will solidify on top, making it easy to remove, and the flavors will be even better the next day. Reheat gently before serving.

Dutch Oven Pot Roast is the pinnacle of comfort cooking—a dish that rewards patience with incredible flavor and tenderness. It’s a meal that brings people together, fills the home with warmth, and creates memories around the table. It’s a classic for a reason.

German Pork Chops and Sauerkraut

0

German Pork Chops and Sauerkraut is a hearty, soul-warming dish that embodies the robust, comforting flavors of traditional German home cooking—a perfect balance of savory, tangy, and subtly sweet elements that come together in a single, satisfying casserole. This recipe is a celebration of contrasts, where juicy, bone-in pork chops are seared to golden perfection, then nestled beneath a bed of tangy sauerkraut that has been transformed by the addition of sweet diced apple, caramelized brown sugar, aromatic caraway seeds, and savory sautéed onion. As it bakes slowly in the oven, the pork chops absorb the complex flavors of the kraut mixture, while the sauerkraut itself mellows and sweetens, its sharp edge softened by the apple and sugar. The result is a dish where every component enhances the others, creating a cohesive, deeply flavorful meal that is far greater than the sum of its parts.

The brilliance of this recipe lies in its rustic simplicity and the profound depth of flavor achieved with minimal effort. A quick sear on the pork chops builds a savory foundation, locking in juices and creating a flavorful crust. The sauerkraut mixture, tossed together in a single bowl, is then piled generously over the chops, ensuring they remain moist and tender as they braise in the oven. The covered baking time allows all the flavors to meld and mingle, the pork becoming fall-apart tender and the sauerkraut evolving into a rich, savory-sweet bed of goodness. Served with classic German sides like mashed potatoes, spaetzle, or crusty rye bread to soak up the delicious juices, this dish is the ultimate comfort food for a cold evening, transporting you straight to a cozy Bavarian gasthaus with every single bite.

Why You’ll Love This Recipe:

  • Classic German Comfort Food: Authentic, hearty flavors that are deeply satisfying and warming.
  • Perfect Sweet & Savory Balance: The tangy sauerkraut is beautifully offset by sweet apple and brown sugar.
  • Tender, Juicy Pork Chops: Braising in the sauerkraut mixture ensures the chops stay moist and flavorful.
  • Simple, One-Dish Meal: Easy to assemble and bakes in a single dish for minimal cleanup.
  • Incredible Aroma: Your kitchen will fill with the irresistible scent of pork, caraway, and apples as it bakes.

Ingredients:

For the Pork Chops:
4 large, bone-in center-cut pork chops (about 1-inch thick)
1 tablespoon olive oil
Kosher salt and freshly ground black pepper, to taste

For the Sauerkraut Mixture:
2 lbs (32 oz) sauerkraut, drained well (reserve a little liquid if desired)
1 large red apple, peeled, cored, and diced
1 medium yellow onion, chopped
⅔ cup packed light brown sugar
1 tablespoon caraway seeds

Instructions:

Step 1: Preheat Oven and Prepare Dish
Preheat your oven to 350°F (175°C). Generously grease a 9×13-inch baking dish with butter or non-stick cooking spray.

Step 2: Sear the Pork Chops
Pat the pork chops dry with paper towels. Season both sides generously with salt and pepper. Heat the olive oil in a large skillet over medium-high heat. Add the pork chops and sear for 3-4 minutes per side, until a deep golden-brown crust forms. They do not need to be cooked through. Transfer the browned chops to the prepared baking dish, arranging them in a single layer.

Step 3: Prepare the Sauerkraut Mixture
In a large mixing bowl, combine the drained sauerkraut, diced apple, chopped onion, brown sugar, and caraway seeds. Stir until all ingredients are well mixed and the sugar is evenly distributed.

Step 4: Assemble the Casserole
Spread the sauerkraut mixture evenly over the pork chops in the baking dish, covering them completely.

Step 5: Bake
Cover the baking dish tightly with aluminum foil. Bake in the preheated oven for 45 minutes.

Step 6: Rest and Serve
Carefully remove the dish from the oven and let it rest, covered, for 10 minutes before serving. This allows the juices to redistribute. Serve hot, spooning the sauerkraut mixture over the pork chops.

Tips:

  • Choose Bone-In Chops: Bone-in pork chops are more flavorful and stay juicier during the longer baking time.
  • Don’t Skip the Sear: Browning the chops adds a crucial layer of savory flavor (the Maillard reaction) that enhances the entire dish.
  • Drain the Sauerkraut: Draining prevents the dish from becoming too watery, but you can reserve a little liquid to add back if you prefer a saucier result.
  • Caraway is Essential: The caraway seeds provide that authentic German flavor profile. Don’t omit them.
  • Customize the Sweetness: Adjust the amount of brown sugar to your taste. You can also use a tart apple like Granny Smith for more contrast.

Storage Options:

  • Refrigerator: Store leftovers in an airtight container in the refrigerator for up to 4 days. The flavors deepen and improve overnight.
  • Reheating: Reheat gently in a covered skillet or baking dish in a 325°F (165°C) oven until warmed through. Can also be reheated in the microwave.
  • Freezing: This dish freezes well for up to 2 months. Cool completely, portion into freezer-safe containers, and freeze. Thaw overnight in the refrigerator before reheating.
  • Make-Ahead: Assemble the entire casserole (without baking) up to 24 hours in advance. Cover and refrigerate. Add 10-15 minutes to the bake time.

German Pork Chops and Sauerkraut is a true taste of Old-World comfort. It’s a hearty, satisfying, and deeply flavorful dish that brings warmth to the table and joy to the soul, proving that simple ingredients, treated with care, can create something truly memorable.

My Mom Always Left the Butter Out — So, Is It Actually Safe?

0

Growing up, there was always a small butter dish on the kitchen counter, right next to the toaster. It was practically a household fixture, like the magnets on the fridge or that pile of mail no one ever sorted. My mom, with all her kitchen wisdom, insisted that cold butter absolutely ruins toast. And honestly? She wasn’t wrong. But now that I’m older (and maybe a tad more paranoid about food safety), I’ve caught myself wondering — is leaving butter out for days really okay?

Turns out, this question leads down a surprisingly fascinating rabbit hole. So let’s dig in.

Why You’ll Fall in Love With Room Temperature Butter (Even If It Feels a Little Risky)

  • No more destroyed toast. Soft butter glides on effortlessly. Say goodbye to torn bread tragedies.
  • Always ready when you are. No waiting around for a solid brick to soften for baking or spreading.
  • Just feels cozier. Something about that little butter dish makes a kitchen feel warm and lived-in.

But the real question lingers: is it actually safe? That’s where things get interesting — and a little complicated.

Let’s Talk About Butter: What’s Actually In It (And Why That Matters)
Butter isn’t just pure fat. It’s mostly fat — about 80% milk fat — but the rest is water and milk solids. And that last part is key, because those non-fat components are where spoilage likes to start.

Here’s the deal: fat doesn’t go bad quickly. It’s actually pretty resistant to bacteria. But add moisture and milk proteins into the mix? That’s when bacteria and mold might decide to move in — especially if your butter is unsalted.

Salted butter, though, comes with a natural preservative. That salt helps keep unwanted microbes away, which is exactly why it lasts longer at room temperature.

So yes, what kind of butter you’re using matters — a lot.

The Science of Spoilage (Or, When Butter Goes From Delicious to Disappointing)
There are two main ways butter can go bad: oxidation and microbial growth.

Oxidation happens when fats react with oxygen. The result? Rancid butter. It smells weird, tastes off, and while it won’t actually hurt you, it will absolutely wreck your morning toast.

Microbial growth is slower in butter than in, say, milk — but it’s still possible. Molds and bacteria can sneak in, especially if the butter’s been exposed to air, moisture, or has been sitting out for days on end.

Warm, humid kitchens speed up both of these processes. So if you live somewhere that feels like a tropical jungle during summer? You might want to rethink keeping butter on the counter.

So… How Long Can Butter Actually Sit Out?
Here’s where the experts mostly agree:

  • Salted butter: generally safe at room temperature for up to two days — maybe three if your kitchen stays cool and dry.
  • Unsalted butter: best used within 24 hours if left out.

Some people push it longer (my mom definitely did). Others keep theirs strictly in the fridge, only pulling it out when breakfast hits. It really comes down to your comfort level — and how closely you’re paying attention to signs of spoilage.

Which brings us to…

How to Tell If Butter Has Gone Bad (And When to Just Toss It)
You don’t need a science degree to figure this out. Your senses will tell you everything.

Watch for:

  • A sour, cheesy, or just generally “wrong” smell
  • Darkening or yellowing, especially around the edges
  • Any spots or streaks of mold
  • A flavor that tastes metallic or bitter

If your butter shows any of these signs? Trust your gut and throw it out.

And please — scraping off the moldy part isn’t enough. Mold has roots. It can spread below the surface. Don’t take that risk.

What Happens If You Accidentally Eat Spoiled Butter?
Let’s not panic — in most cases, a little rancid butter won’t land you in the hospital. But it can cause mild food poisoning symptoms, like:

  • Nausea
  • Stomach cramps
  • Diarrhea
  • Vomiting

People with weaker immune systems — kids, older adults, or anyone immunocompromised — should be extra careful. Butter might not be the most dangerous food out there, but it’s not completely harmless either.

The Great Butter Debate: What Do the Experts Say?
Food safety professionals are (predictably) team refrigerator. They recommend keeping butter chilled when you’re not actively using it — especially unsalted or fancy cultured varieties.

But even they’ll admit that a small amount of salted butter left out for a couple of days in a clean, covered dish? It’s probably fine.

Here’s the unofficial consensus:

A little butter on the counter is okay. A lot of butter sitting out for a long time? Probably not.

How to Store Butter Like a Pro (Without Losing That Cozy Vibe)
Want spreadable butter without the worry? Here’s the sweet spot:

  • Keep a small amount (maybe half a stick) in a covered dish on the counter.
  • Try a butter bell or crock — they create an airtight seal using water, keeping air out and freshness in.
  • Store the rest in the fridge, especially if you buy in bulk or bake often.
  • Always use clean utensils. No crumbs. No toast debris. It genuinely matters.
  • Keep it away from direct sunlight and heat — not above the stove or near a sunny window.

It’s a balancing act — but totally doable.

Quick Flavor Twist: Want to Take Your Butter Up a Notch?
This one’s for the food lovers.

Try making compound butters — softened butter mixed with fresh herbs, honey, roasted garlic, or even cinnamon sugar. They’re incredible on toast, steak, pancakes… you name it.

Keep them in the fridge and let them come to room temp naturally when you’re ready. Better yet, wrap them in parchment and stash them in the freezer for butter whenever you need it.

The Bottom Line (aka, What Would Mom Say?)
So back to my mom. Her countertop butter habit? Not nearly as reckless as I once thought. If she’s using salted butter, keeping the dish clean, and rotating it out every couple of days — she’s totally fine. Honestly, probably safer than some of us with mystery leftovers from last week still hanging out in the fridge.

But if you’re still uneasy? That’s okay too. Refrigerated butter works perfectly — you just need a little patience (or a quick low-power microwave moment).

Either way, butter is better when it makes you feel at home. Whether it’s fridge-cold or counter-soft, that little golden block holds a pretty big place in our kitchens — and our memories.

Got butter questions? Storage tips handed down from your grandma? Strong feelings about butter bells versus classic dishes? I’d honestly love to hear it. Drop a comment below — because the butter debate might just be the tastiest conversation we can have.

Tomato Paste: The Tiny Can That Won’t Quit…and 10 Surprisingly Fun Ways to Use What’s Left

0

You ever open a can of tomato paste, use a single spoonful, and then stare at the rest like, “Now what?” Same.

For the longest time, I thought tomato paste was just a one-time-use kind of thing—a splash in chili, a stir into marinara, and the rest? Forgotten. Lost in the fridge behind that mystery jar of pickles.

But once I realized just how versatile this stuff really is? Game-changer. That tiny blob of concentrated tomato magic turns out to be way more useful than it gets credit for.

So here we are—a little love letter to leftover tomato paste and all the weirdly wonderful things you can do with it.

First Things First: Store It Like a Pro (Or at Least Not Like Me)

If you’re anything like me, you’ve scraped tomato paste off the lid of a crusty can and hoped for the best. Let’s fix that.

  • Short-term fix: Wrap the paste in plastic wrap like a little tomato burrito, pop it in an airtight container, and store it in the fridge for up to a week.
  • Long-term magic: Scoop tablespoons into an ice cube tray, freeze ’em, then toss the cubes into a zip-top freezer bag. Now you’ve got perfectly portioned tomato power ready when you need it—no can opener required.

Now for the Good Stuff — 10 Clever Ways to Use Leftover Tomato Paste

1. Soup Starter Vibes

Making soup? Start it with a spoonful of tomato paste. Sauté it with onions and garlic—let it darken just a bit. That caramelized tomato flavor gives your soup a cozy, slow-cooked feel even if you’re working with whatever’s left in the fridge and 30 minutes before homework chaos.

Great for:

  • Lentil soup
  • Chicken noodle (trust me)
  • Any “throw-it-all-in” veggie soup

2. Upgrade Your Pasta Night

No full sauce jar? No problem. Sauté your leftover paste with olive oil, garlic, and Italian herbs. Add a splash of pasta water or cream, and boom—you’ve got a silky, savory, lick-the-bowl kind of sauce.

Want to level it up? Add:

  • Crumbled sausage
  • A handful of olives
  • A glug of red wine (for the sauce or you)

3. DIY Pizza Sauce That Actually Tastes Like Pizza

Tomato paste + oregano + garlic powder + olive oil + a tiny pinch of sugar = pizza sauce that doesn’t taste like spaghetti leftovers. Smooth it on your dough (or naan bread or English muffin or whatever you’re working with), add toppings, and bake.

Pro move: Make extra and freeze the sauce in small containers so future-you can thank current-you.

4. Sneak It into Chili

Chili purists, look away for a second. The rest of us? Toss in a tablespoon of tomato paste when browning your onions or ground meat. It deepens the flavor in a way that canned tomatoes alone just can’t.

Try it in:

  • Classic beef chili
  • Veggie bean chili
  • Even white chicken chili—just a touch, for balance

5. Slather It Into a Marinade

Mix tomato paste with olive oil, garlic, vinegar, paprika, cumin—whatever your spice mood is that day—and use it as a marinade for chicken, tofu, or roasted veggies. It’s thick, tangy, and gives off “I cooked this for hours” energy even if it only took 20 minutes.

Side bonus: It smells amazing while it cooks.

6. Tomato Hummus, Anyone?

Mash a spoonful of paste into your store-bought (or homemade!) hummus and give it a little swirl of smoked paprika and lemon. Suddenly you’re not just eating hummus. You’re eating fancy hummus.

Also works in:

  • White bean dip
  • Greek yogurt + garlic spread
  • That half-tub of cream cheese you forgot you had

7. Make a Fast BBQ or Ketchup-ish Sauce

Tomato paste is the unsung hero of homemade condiments. Mix it with:

  • Brown sugar
  • Vinegar
  • Spices (cayenne, mustard, garlic powder)

You’ve got a quick BBQ sauce that slaps. Or dial it sweeter and smoother for a DIY ketchup that’s way less sugary than the store stuff.

8. Give Casseroles a Little Backbone

You know that moment in a casserole when everything’s a little too… beige? Tomato paste brings the flavor and the color. Stir it in with the sauce, mix it into your cheesy layer, or blend it with broth to pour over the top.

Works wonders in:

  • Shepherd’s pie
  • Pasta bakes
  • Veggie gratins

9. Bake With It. No, Really.

Hear me out.

Add a teeny spoonful of tomato paste to savory muffins or scones with cheese and herbs. It gives them a subtle depth, almost like sun-dried tomato, without the chewy bits. It’s not sweet, just… rounder in flavor.

Think:

  • Cheddar chive muffins
  • Parmesan rosemary biscuits
  • Even garlic knots (mix into the dough or butter!)

10. Make Your Scrambled Eggs Fancy

I was skeptical too. But trust me—whisking in a tiny bit of tomato paste with your eggs before scrambling? Life-changing. It gives your eggs a savory, almost cheesy flavor that’s amazing on toast.

Top with:

  • Feta
  • Chives
  • A little chili oil, if you’re feeling wild

TL;DR: Tomato Paste Is the Sidekick Your Kitchen Needs

The next time you open a can for “just one tablespoon,” don’t sigh and shove it in the back of the fridge. Think of it like this tiny, flavor-packed superhero—just waiting for its next mission.

Freeze it. Stir it. Bake with it. Sneak it into places it doesn’t technically belong.

Tomato paste doesn’t care about the rules. And now? Neither do you.

Got your own weirdly genius use for tomato paste? I wanna hear it. Leave a comment, send a message, or just keep making food fun—and just a little bit scrappy.


Ready for the next one whenever you are!

The Most Controversial Pizza Toppings (That Might Ruin Your Last Slice)

0

From briny little fish to sweet tropical fruit, let’s dive into the pizza toppings that split households, spark heated debates, and occasionally end friendships. These are the ingredients that—depending on who’s eating—are either pure genius or absolute crimes against crust.

1. Anchovies – The Tiny Fish That Causes Big Drama
Anchovies are basically the culinary version of a strong personality—small but mighty, and definitely not for everyone.

These little fillets are oily, intensely salty, and loaded with umami (that fancy “fifth taste” food enthusiasts never shut up about). If you’re a fan, you can’t imagine pizza without them. If you’re not, a single anchovy can make the whole pie taste like low tide.

Are they technically considered gourmet? Sure. Do they start arguments? Absolutely.

Honestly, anchovies are the reason some people scan the topping list three times before taking a bite. Approach with caution.

2. Pineapple – Tropical Treat or Pizza Heresy?
Ah, the eternal Pineapple Debate™.

This one’s been causing chaos for decades. People have Very Strong Feelings about it. On one side: devotees who insist the sweet-savory combo of pineapple and ham is absolute perfection. On the other: folks who believe fruit has no business anywhere near melted cheese.

My take? Cooked pineapple gets weirdly juicy. Like, why is my crust suddenly damp?

That said, millions of people love it—and if it convinces kids to eat something besides chicken fingers, maybe it’s not all bad.

3. Sardines – Anchovies’ Bolder, Bulkier Cousin
If anchovies are confident, sardines are downright audacious.

They’re larger, oilier, and even more aggressively fishy. Fantastic if you grew up eating Mediterranean street food. Less fantastic if your seafood comfort zone ends at “fried shrimp basket.”

Honestly, sardines on pizza feels like someone took a dare too far. Unless you’re actually in Italy, in which case it’s probably incredible and I’m just revealing my unsophisticated palate.

4. Durian – The Topping That Smells Like Bad Decisions
If you’ve never encountered durian, here’s what you need to know: it’s actually banned on public transportation in some countries because of its overwhelming smell.

The flesh is creamy, custard-like, and genuinely beloved by many. But on pizza? Alongside sauce, cheese, and crust?

That’s a hard no for most people.

Durian pizza absolutely exists—especially throughout Southeast Asia—and it has genuine fans. But if you didn’t grow up with it, you’re basically biting into sweet, garlicky pudding on bread that carries the faint aroma of gym locker. Sorry not sorry.

5. Blue Cheese – Sophisticated or Just Stinky?
Blue cheese is that friend who shows up overdressed to casual events—bold, memorable, and impossible to ignore.

It brings a sharp, tangy punch that some people absolutely crave. Others? They catch one whiff and immediately pass.

The flavor comes from actual mold (Penicillium, if we’re being fancy), which sounds gourmet until you realize your pizza now smells like the forgotten back of your refrigerator drawer.

Delicious to some. Way too much personality for others.

6. Canned Tuna – Kitchen Staple or Pizza Sabotage?
Canned tuna definitely has its moments—tuna salad, casseroles, late-night snacks eaten straight from the tin. But on pizza?

It’s… polarizing.

Several European countries embrace it. Tuna pizza is genuinely popular in Germany, for instance. But for many, combining fish, cheese, and tomato sauce feels like a culinary dare. Throw on some onions and olives, and suddenly you’re tasting someone’s reheated office lunch.

Hard pass for plenty of people, though protein enthusiasts will defend it passionately.

7. Pickles – Did We Go Too Far?
This one feels like something that escaped from a viral TikTok challenge.

Thin dill pickle slices, arranged over cheese and sauce, do deliver a tangy, briny crunch. But here’s the thing: it also tastes suspiciously like a cheeseburger… minus the actual burger.

Pickle devotees (and you know who you are) insist it’s brilliant. Everyone else? They’re quietly wondering who ordered the gag pizza and why it tastes like a practical joke.

8. Olives – You Either Get It or You Don’t
Black olives have been showing up on pizzas forever, and yet they remain surprisingly divisive.

They’re salty, faintly bitter, and have that distinctive chewy texture. Either they provide the perfect briny contrast or they completely overwhelm every bite.

If you love them, great. If you don’t, picking them off just leaves greasy little ghosts behind—and somehow, the olive flavor lingers anyway.

9. Hot Dogs – What Are We Even Doing Here?
Hot dogs on pizza feels like one of those “just because we technically can doesn’t mean we should” situations.

Maybe it’s nostalgia. Maybe it’s budgeting. Maybe someone genuinely thought, “What if we turned cafeteria lunch into dinner?”

Whatever the reason, chopped hot dogs on pizza just feels… wrong. The smoky, processed flavor clashes with sauce and cheese, and the texture gets genuinely strange upon reheating.

Kids love it. Adults find it deeply confusing.

10. Corn – Little Golden Balls of Controversy
Corn seems innocent enough—until you realize it’s quietly dividing pizza eaters everywhere.

In places like South Korea, Brazil, and Japan, corn on pizza is completely normal. Sweet, colorful, and surprisingly mainstream.

Elsewhere? People spot corn and instantly assume the pizza isn’t for them.

It’s sweet, slightly chewy, and definitely disrupts the expected savory experience. But hey, food fusion exists for a reason—maybe corn is just ahead of its time.

11. Eggplant – Satisfying or Soggy?
Eggplant on pizza sounds wonderfully virtuous. Grilled vegetables! Mediterranean flair! Grown-up choices!

But here’s the reality: if not prepared perfectly, eggplant turns problematic. Mushy. Slightly slippery. The flavor? Pretty neutral at best.

To its credit, it absorbs sauce beautifully and remains a vegetarian favorite. But for dedicated meat-lovers or cheese-obsessed diners, eggplant pizza can feel like a disappointing compromise.

Final Thoughts: Just Keep Your Toppings Off My Slice
Pizza is deeply personal. What disgusts one person might be another’s absolute favorite. Some folks swear by shrimp and mayo. Others insist banana curry pizza is where it’s at (yes, Sweden, we’re looking at you).

So yeah—taste is subjective. But if you ever spot anchovies, durian, or hot dogs anywhere near my slice?

Feel free to take it. I’ll happily wait for the next pie.

Now It’s Your Turn
What’s your absolute dealbreaker topping? The one that makes you suddenly “not hungry” even when you’re starving? Drop it in the comments—and don’t worry, no judgment here.

(Unless it’s durian. Then we might need to talk.)