Southern Fried Chicken

0

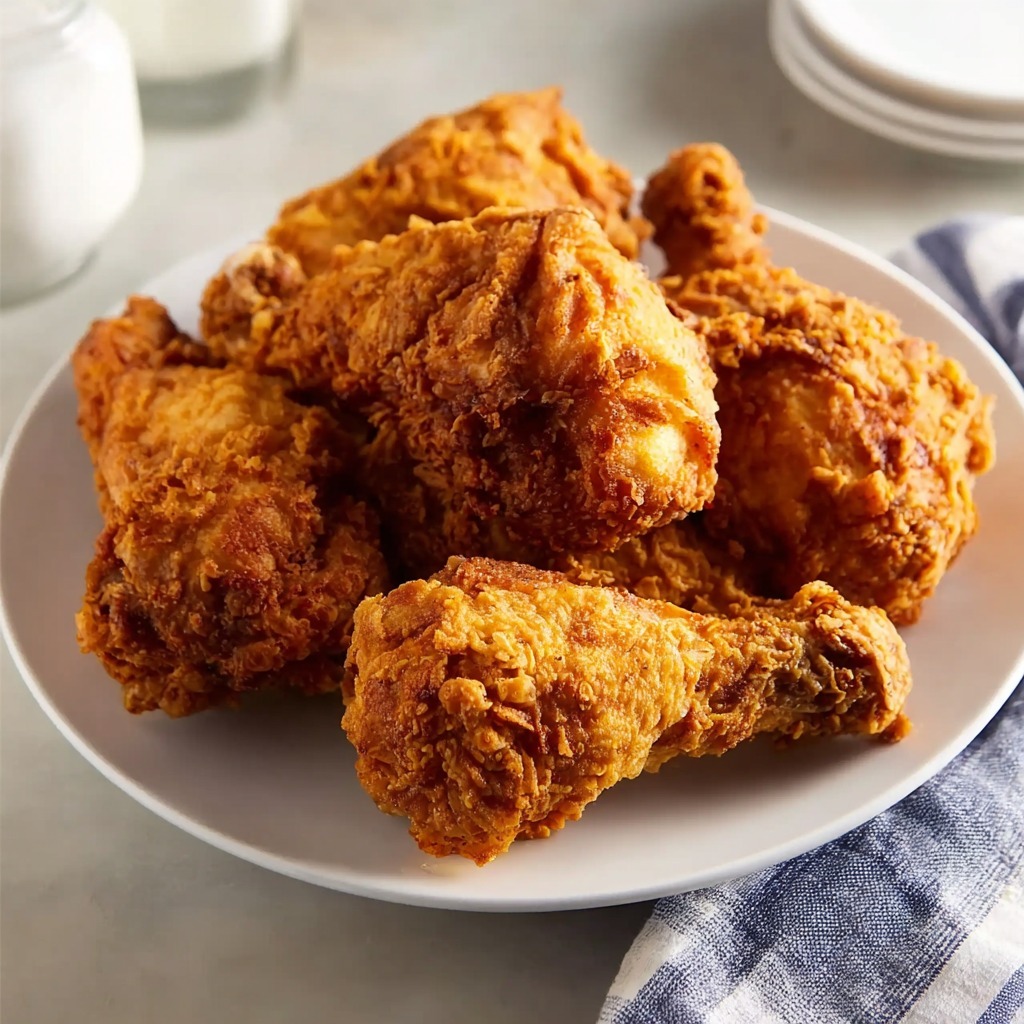
Southern Fried Chicken is the undisputed crown jewel of American comfort food, a recipe where patience and technique transform simple ingredients into a masterpiece of crisp, craggy crust and impossibly juicy, flavorful meat. This recipe is a testament to tradition, beginning with a crucial buttermilk bath that tenderizes the chicken deep into the bone while infusing it with a subtle tang and the optional kick of hot sauce. The magic truly unfolds in the double-dredging process, where the marinated chicken is pressed firmly into a seasoned flour blend, creating a shaggy, textured coating that fries up into an iconic, golden-brown crust with audible crunch. Each spice in the mix—paprika for color and sweetness, garlic and onion powder for savory depth, thyme for earthiness, and cayenne for a whisper of heat—works in harmony to build layers of flavor that penetrate beyond the crust into the very soul of the chicken.

The brilliance of this recipe lies in its uncompromising methodology and the profound results it yields. Frying at a precise, steady temperature in a heavy pot ensures the crust sets quickly without absorbing excess oil, while the chicken inside steams gently to succulent perfection. The final rest on a wire rack is non-negotiable, allowing the crust to remain crisp on all sides as the juices redistribute throughout the meat. This is more than just fried chicken; it is a culinary heirloom—a dish that evokes memories of Sunday suppers, family gatherings, and pure, unadulterated satisfaction. It’s a recipe that demands respect for the process and rewards you with a perfect, crunchy, juicy bite that stands as the gold standard of home-cooked fried chicken.

Why You’ll Love This Recipe:

  • Ultra-Crispy, Flavorful Crust: The seasoned flour and buttermilk marinade create a shaggy, craggy coating that fries up to golden, shatteringly crisp perfection.
  • Unbelievably Juicy Meat: The buttermilk marinade tenderizes the chicken, ensuring every bite—even the breast—is moist and flavorful.
  • Classic, Time-Tested Technique: Follows the foundational steps of soaking, dredging, and frying at the right temperature for guaranteed success.
  • Feeds a Crowd Perfectly: An iconic centerpiece for picnics, potlucks, and family dinners that everyone adores.
  • Customizable Heat Level: Control the spice with the optional hot sauce and cayenne pepper to suit your taste.

Ingredients:

For the Chicken & Marinade:
3 pounds bone-in, skin-on chicken pieces (thighs, drumsticks, breasts, wings)
2 cups buttermilk
1 tablespoon hot sauce (like Texas Pete or Crystal)
1 ½ teaspoons kosher salt
1 teaspoon freshly ground black pepper

For the Seasoned Coating:
2 ½ cups (312g) all-purpose flour
1 tablespoon paprika (sweet or smoked)
2 teaspoons garlic powder
2 teaspoons onion powder
1 teaspoon dried thyme
1 teaspoon kosher salt
1 teaspoon freshly ground black pepper
½ teaspoon cayenne pepper (optional)

For Frying:
4-5 cups vegetable oil, peanut oil, or shortening (for a 2-inch depth in your pot)

Instructions:

Step 1: Marinate the Chicken
In a large bowl or resealable bag, whisk together buttermilk, hot sauce, salt, and pepper. Add the chicken pieces, ensuring they are fully submerged. Cover and refrigerate for at least 4 hours, and ideally overnight (up to 24 hours).

Step 2: Prepare the Coating and Oil
About 30 minutes before frying, remove the chicken from the refrigerator. In a large, shallow dish (like a 9×13 pan), whisk together all the seasoned coating ingredients. Pour oil into a large, heavy-bottomed Dutch oven or deep cast-iron skillet to a depth of 2 inches. Heat over medium-high heat to 350°F (175°C). Use a deep-fry or candy thermometer for accuracy.

Step 3: Dredge the Chicken
Remove one piece of chicken from the buttermilk, allowing excess to drip off. Dredge it thoroughly in the flour mixture, pressing and tossing to ensure an even, clumpy coating. Shake off excess and place on a wire rack. Repeat with all pieces. For an extra-thick crust, you can dip the floured chicken back into the buttermilk and into the flour for a second coat.

Step 4: Fry the Chicken
Carefully lower 3-4 pieces of chicken into the hot oil, skin-side down, without crowding the pot. The oil temperature will drop; adjust heat to maintain a steady 300-325°F. Fry for 12-20 minutes (depending on the size of the piece), turning every 4-5 minutes, until the crust is deep golden brown and the internal temperature reaches 165°F for white meat and 175°F for dark meat.

Step 5: Drain and Rest
Using tongs, transfer the fried chicken to a clean wire rack set over a baking sheet—do not place on paper towels, as this will steam the bottom crust and make it soggy. Let the chicken rest for at least 10 minutes before serving. This allows the juices to settle and the crust to set.

Tips:

  • The Long Marinade is Key: Overnight marinating makes a significant difference in tenderness and flavor.
  • Patience with Oil Temperature: Maintaining the correct oil temperature (around 325°F during cooking) is critical. Too hot = burnt outside/raw inside. Too cool = greasy, soggy crust.
  • Use a Wire Rack: This is the secret to keeping the crust crisp on all sides as it cools.
  • Fry Dark Meat First: Dark meat (thighs, drumsticks) can handle slightly longer cooking. Start with them, then do white meat.
  • Don’t Crowd the Pot: Frying in batches ensures even cooking and a crisp crust.

Storage Options:

  • Refrigerator: Store leftover chicken in an airtight container in the refrigerator for up to 4 days.
  • Reheating: To restore crispness, reheat on a wire rack in a 375°F (190°C) oven for 10-15 minutes until hot. Avoid the microwave.
  • Freezing: Fully cooked and cooled fried chicken freezes well. Wrap pieces individually and freeze for up to 2 months. Reheat from frozen in a 375°F oven until hot and crispy.
  • Make-Ahead: You can marinate the chicken and mix the dry coating up to 2 days in advance.

Southern Fried Chicken is a celebration of craft and comfort. It’s a recipe that honors tradition, delivers breathtaking flavor and texture, and creates a meal that feels like a loving embrace. It’s worth every minute of preparation.

I Accidentally Used Coffee Instead of Beef Broth in My Pot Roast — Here’s What Happened

0

Cooking mishaps have a funny way of humbling you. One minute you’re confidently moving through your usual routine, and the next… you’re staring into your slow cooker wondering if you’ve just ruined dinner.

That’s exactly what happened to me.

I meant to grab beef broth. I really did. But somewhere between answering a phone call and pouring liquid into the pot, I grabbed a fresh pot of strong coffee instead—and didn’t realize it until it was already soaking into my pot roast.

And at that point? There’s a moment where you either panic… or lean into it.

I leaned in.

Eight hours later, I had answers.

So, About That Coffee Mistake…

It started like any other slow Sunday. Coffee brewing, roast prepping, a little multitasking that felt manageable at the time (you know where this is going).

I seasoned my chuck roast, got a nice sear going, tossed in carrots, potatoes, onions—the usual lineup. Then came the liquid.

Except it wasn’t broth.

It was two full cups of dark, strong coffee.

I wish I could say I noticed immediately. I didn’t. By the time it clicked, the coffee had already settled into everything like it belonged there.

And here’s the thing—I paused. Considered dumping it. Starting over.

But something in me thought… wait a second. Coffee and beef? That’s not completely absurd.

Wait… Coffee and Beef Actually Work Together?

It sounds odd at first, but it’s not some wild kitchen accident with zero logic behind it.

Coffee has bitterness, yes—but also depth, a little smokiness, even hints of chocolate depending on the roast. Those flavors sit surprisingly well next to beef’s natural richness.

Think about it:

  • Coffee is often used in BBQ rubs
  • It shows up in chili recipes
  • Some chefs even use it in braises

So no, I didn’t invent something groundbreaking. But I definitely stumbled into something interesting.

Also—and this part matters—coffee has mild acidity. Not enough to turn your roast into mush, but enough to help tenderize it over time.

Which, honestly, gave me a little hope.

What I Changed… and What I Refused to Touch

Here’s the funny part: once the coffee was in, I didn’t overcorrect.

No panic ingredients. No trying to “fix” it midway.

I stuck to my usual method:

  • 3-pound chuck roast, seasoned well
  • A proper sear (don’t skip this—it matters more than people think)
  • Carrots, potatoes, onions
  • Slow cooker set to low

The only real change? That coffee standing in for broth.

And I’ll say this—keeping everything else familiar made it easier to tell what the coffee actually did.

The Long Wait (And That Smell…)

A few hours in, the kitchen started to smell… different.

Not bad. Just different.

There was still that cozy, slow-cooked beef aroma—but layered with something darker. Almost like a roasted, slightly bitter edge in the background. If you’ve ever smelled coffee and chocolate together, it was kind of in that direction.

I wasn’t sure if it would translate well to flavor—but it didn’t smell like a disaster. That felt like a win.

The Moment of Truth: Texture First

After eight hours, I lifted the lid expecting… I don’t know, something off.

But visually? It looked great. Maybe a bit darker than usual, but in a rich, glossy way.

And the texture?

Honestly, exactly what you want from a pot roast. Tender, pull-apart, no resistance. The kind of meat that doesn’t even need a knife if we’re being real.

If anything—and this might sound subtle—it felt just slightly softer. Not falling apart in a mushy way, just… relaxed. Like the fibers had given up a little earlier than usual.

That’s likely the coffee doing its quiet work.

Flavor: The Part I Was Nervous About

Alright. First bite.

I expected bitterness to hit me right away.

It didn’t.

Instead, what came through first was depth. Real depth. The beef tasted… beefier, if that makes sense. Richer. Like someone had quietly turned up the contrast.

Then came a mild bitterness—but not harsh. More like dark chocolate than burnt coffee.

And here’s the part that surprised me most: the sweetness.

The carrots, the onions, even the meat itself—they all tasted slightly sweeter. Not sugary, just more pronounced. Like the coffee somehow pulled those flavors forward.

It wasn’t traditional. But it worked.

And Then There Was the Gravy…

Now this could’ve gone wrong fast.

The leftover liquid in the slow cooker looked like a cross between broth and very diluted coffee. Not exactly appetizing at first glance.

But I strained it, heated it, added a cornstarch slurry—and watched it turn into something completely different.

It thickened into a silky, deep brown sauce with a glossy finish.

Taste-wise? That same balance showed up again:

  • Savory
  • Slightly bitter
  • A touch of sweetness

Drizzled over the meat, it tied everything together. Without it, the dish would’ve been interesting. With it, it felt intentional.

The Real Test: Family Reactions

You can analyze flavor all you want, but nothing beats putting it on the table.

There were questions. A few raised eyebrows. Someone definitely sniffed their plate before taking a bite.

Fair.

But then—surprise.

“It tastes richer than usual.”
“What did you do differently?”
“Wait… this is actually really good.”

No one guessed coffee right away. Which says a lot.

And once I told them? Reactions ranged from curiosity to “we should do this again.”

Quick Reality Check: What About the Caffeine?

This crossed my mind too.

But here’s the thing—once the coffee is diluted, cooked for hours, and spread across multiple servings, the caffeine impact is minimal.

You’re not eating a cup of coffee. You’re eating a dish that once had coffee in it.

So unless you’re extremely sensitive, it’s not something you’ll notice.

So… Would I Do It Again?

Yes. But not exactly the same way.

Next time, I’d probably:

  • Use half coffee, half beef broth
  • Try a medium roast instead of very dark
  • Maybe add a splash of balsamic or Worcestershire to round it out

Because while the full coffee version worked—it leaned bold. And not everyone wants that every time.

But as a variation? As a “hey, try this once” twist?

Absolutely.

The Bigger Lesson (Because There Is One)

Cooking doesn’t always go as planned. You miss a step, grab the wrong ingredient, get distracted—it happens.

But sometimes, those moments lead somewhere better than expected.

Not always. Let’s be honest—some mistakes are just mistakes.

But every now and then, you end up with something new. Something you wouldn’t have tried on purpose.

And honestly? That’s where things get interesting.

Does Anyone Know Why There’s This Extra Chain Hanging Down at the Back of a Tanker Truck?

0

Tanker trucks are specialized vehicles designed to transport liquid or gaseous products, such as fuel, water, chemicals, and food-grade liquids. These trucks are equipped with a cylindrical tank mounted on a chassis, which is engineered to safely contain and transport these substances. The design and components of tanker trucks are crucial for ensuring the safe and efficient delivery of their cargo. Among the various components, one might notice an extra chain hanging down at the back of the truck. This seemingly simple feature plays a significant role in the overall safety and functionality of the vehicle.

The Purpose of the Extra Chain on Tanker Trucks

The extra chain hanging from the back of a tanker truck serves as a grounding device. Its primary purpose is to dissipate static electricity that can build up during the transportation of flammable liquids. As the truck moves, friction between the liquid and the tank, as well as the movement of the truck itself, can generate static electricity. If not properly managed, this static charge can lead to sparks, which pose a significant risk of igniting the flammable cargo. The chain drags along the ground, providing a path for the static electricity to safely discharge into the earth, thereby reducing the risk of fire or explosion.

Historical Context: How the Extra Chain Became Standard

The use of grounding chains on tanker trucks became standard practice as the dangers of static electricity in fuel transportation were better understood. In the early days of fuel transport, accidents caused by static discharge were more common, leading to devastating fires and explosions. As a result, safety regulations evolved to include measures for static dissipation. The grounding chain emerged as a simple yet effective solution and became a standard feature on tanker trucks worldwide. Over time, this practice has been reinforced by industry standards and regulations, ensuring that all tanker trucks are equipped with this crucial safety feature.

Safety Considerations and Regulations

Safety is a paramount concern in the transportation of hazardous materials, and regulations governing tanker trucks are stringent. Various international and national bodies, such as the Department of Transportation (DOT) in the United States, have established guidelines to ensure the safe operation of these vehicles. These regulations cover aspects such as tank construction, pressure limits, and static electricity management. The grounding chain is a mandated safety feature, and its presence and functionality are often checked during routine inspections. Compliance with these regulations is essential to prevent accidents and ensure the safety of both the transport personnel and the public.

The Science Behind Static Electricity and Fuel Transport

Static electricity is a common phenomenon that occurs when two surfaces come into contact and then separate, causing an imbalance of electric charges. In the context of fuel transport, the movement of liquid within the tanker can generate static electricity due to friction. This is particularly concerning with flammable liquids, as a static discharge can ignite vapors and lead to explosions. The grounding chain provides a conductive path for the static charge to dissipate safely into the ground, preventing the buildup of potentially dangerous electrical energy. Understanding the science behind static electricity is crucial for developing effective safety measures in fuel transport.

Alternative Methods for Grounding Tanker Trucks

While grounding chains are a traditional method for dissipating static electricity, there are alternative technologies and methods used in modern tanker trucks. Some trucks are equipped with static grounding reels, which are retractable cables that can be attached to a grounding point during loading and unloading. Additionally, anti-static additives can be mixed with the fuel to reduce static buildup. Advanced materials and coatings are also being developed to minimize friction and static generation. These alternatives provide additional layers of safety and are often used in conjunction with grounding chains to enhance the overall safety of fuel transport operations.

Common Misconceptions About the Extra Chain

One common misconception about the extra chain on tanker trucks is that it is merely a leftover piece of equipment or serves no real purpose. In reality, the chain is a critical safety feature designed to prevent static discharge. Another misconception is that the chain is used to stabilize the truck or assist with braking, which is not the case. Some people may also believe that the chain is outdated and unnecessary with modern technology, but it remains a vital component due to its simplicity and effectiveness in grounding static electricity.

The Role of the Extra Chain in Preventing Accidents

The grounding chain plays a crucial role in preventing accidents associated with static electricity in fuel transport. By providing a continuous path to the ground, the chain ensures that any static charge generated during transport is safely dissipated. This reduces the risk of sparks that could ignite flammable vapors, thereby preventing fires and explosions. The presence of the chain is a simple yet effective measure that significantly enhances the safety of tanker truck operations, protecting both the transport personnel and the surrounding environment.

Maintenance and Inspection of the Extra Chain

Regular maintenance and inspection of the grounding chain are essential to ensure its effectiveness. Over time, the chain can become worn, corroded, or damaged, which can compromise its ability to dissipate static electricity. During routine inspections, the chain should be checked for signs of wear and tear, and any damaged sections should be replaced promptly. Ensuring that the chain maintains good contact with the ground is also important for its proper functioning. Adhering to maintenance schedules and inspection protocols is crucial for maintaining the safety and reliability of the grounding system.

Conclusion: The Importance of the Extra Chain in Fuel Transport Safety

In conclusion, the extra chain hanging from the back of a tanker truck is a vital safety feature that plays a key role in preventing static-related accidents. Its ability to safely dissipate static electricity into the ground helps mitigate the risk of fires and explosions during the transport of flammable liquids. Despite its simplicity, the grounding chain is an essential component of tanker truck safety, supported by regulations and industry standards. Understanding its purpose and maintaining its functionality are crucial for ensuring the safe and efficient transport of hazardous materials.

Chicken Alfredo Lasagna Roll-Ups

0

Chicken Alfredo Lasagna Roll-Ups are an elegant and ingenious reimagining of classic Italian comfort food, transforming the traditional layered casserole into beautiful, individualized portions that are as impressive to serve as they are delicious to eat. This recipe masterfully combines the creamy, dreamy richness of a from-scratch Alfredo sauce with a savory, hearty filling of rotisserie chicken, cottage cheese, and mozzarella, all wrapped in tender lasagna noodles. The genius of the roll-up format lies in its visual appeal and perfect portion control, allowing each serving to be a self-contained bundle of flavor where the creamy filling is enveloped in pasta and generously draped with more of the luxurious, nutmeg-kissed Alfredo sauce and a final blanket of melted cheese. It’s a dish that feels special and refined, yet is built upon accessible, convenient ingredients.

The brilliance of this recipe extends beyond its presentation to its flawless, creamy Alfredo sauce—a silky emulsion of butter, garlic, heavy cream, and Parmesan, subtly spiced with Italian seasoning and a hint of nutmeg for warmth. Using cottage cheese in the filling is a stroke of practical genius, providing a lighter, tangier creaminess that perfectly complements the rich sauce and savory chicken. As the roll-ups bake, the sauce bubbles and thickens, the cheese melts into a golden cap, and the flavors meld into a cohesive, deeply satisfying whole. These roll-ups are the perfect solution for a dinner party where you want to impress without stress, or for a family meal where everyone gets their own perfectly crafted portion of cheesy, chicken-filled delight. It’s a recipe that proves creativity and comfort can exist in one stunning dish.

Why You’ll Love This Recipe:

  • Elegant Individual Portions: Beautiful, easy-to-serve roll-ups make this dish perfect for entertaining and special occasions.
  • Creamy, Dreamy Alfredo Sauce: A rich, from-scratch sauce with Parmesan, nutmeg, and a touch of heat from red pepper flakes.
  • Savory, Satisfying Filling: The combination of rotisserie chicken, creamy cottage cheese, and mozzarella is hearty and flavorful.
  • Great Use for Rotisserie Chicken: Transforms a convenient store-bought staple into a spectacular homemade meal.
  • Make-Ahead Friendly: Can be assembled hours in advance and baked just before serving, making it ideal for easy entertaining.

Ingredients:

For the Roll-Ups & Filling:
12 lasagna noodles, uncooked
2 cups (16 oz) small-curd cottage cheese
2 large eggs
2 cups (8 oz) shredded mozzarella cheese, divided
3 cups cooked rotisserie chicken, shredded or diced

For the Alfredo Sauce:
4 tablespoons unsalted butter
3 cloves garlic, minced
2 tablespoons all-purpose flour
2 ½ cups heavy cream
1 teaspoon Italian seasoning
½ teaspoon garlic powder
1 teaspoon kosher salt
½ teaspoon freshly ground black pepper
⅛ teaspoon ground nutmeg
¼ teaspoon red pepper flakes (optional)
1 ½ cups (about 5 oz) freshly grated Parmesan cheese

For Garnish:
Fresh parsley, chopped

Instructions:

Step 1: Cook Noodles & Preheat Oven
Preheat oven to 350°F (175°C). Grease a 9×13-inch baking dish. Cook lasagna noodles in salted boiling water until al dente according to package directions. Drain and lay noodles flat on parchment or wax paper to prevent sticking.

Step 2: Prepare the Filling
In a large bowl, mix the cottage cheese, eggs, 1 ½ cups of the mozzarella cheese, and the cooked chicken until well combined. Set aside.

Step 3: Make the Alfredo Sauce
In a large saucepan or skillet, melt butter over medium heat. Add minced garlic and cook for 30 seconds until fragrant. Whisk in flour and cook for 1-2 minutes to form a roux. Gradually whisk in the heavy cream until smooth. Add Italian seasoning, garlic powder, salt, black pepper, nutmeg, and red pepper flakes.

Step 4: Simmer and Thicken Sauce
Bring the sauce to a gentle simmer, whisking frequently. Let it cook for 3-5 minutes until it begins to thicken. Reduce heat to low. Gradually whisk in the grated Parmesan cheese until fully melted and the sauce is smooth. Remove from heat.

Step 5: Assemble the Roll-Ups
Spread about ¾ cup of the Alfredo sauce evenly over the bottom of the prepared baking dish. Lay one cooked noodle flat on a clean surface. Spread a heaping ⅓ cup of the chicken and cheese filling evenly along the length of the noodle. Roll the noodle up from one end to the other and place it seam-side down in the baking dish. Repeat with remaining noodles and filling.

Step 6: Top and Bake
Spoon the remaining Alfredo sauce evenly over the tops of the roll-ups. Sprinkle with the remaining ½ cup of mozzarella cheese.

Step 7: Bake and Serve
Bake, uncovered, for 25-30 minutes, until the sauce is bubbly and the cheese on top is melted and lightly golden. Let stand for 5-10 minutes before serving. Garnish with fresh parsley.

Tips:

  • Prevent Sticky Noodles: After draining, toss noodles with a tiny bit of olive oil or lay them out separately to prevent them from gluing together.
  • Freshly Grate Parmesan: For the smoothest, creamiest sauce, use a block of Parmesan and grate it yourself. Pre-grated cheese often contains anti-caking agents.
  • Don’t Overfill: Use about ⅓ cup of filling per noodle. Overfilling can cause the rolls to burst open during baking.
  • Shred Chicken Finely: Finely shredded or diced chicken incorporates better into the filling and makes rolling easier.
  • Adjust Sauce Thickness: If your sauce seems too thick after adding the cheese, whisk in a splash of milk or chicken broth. If too thin, let it simmer a bit longer.

Storage Options:

  • Refrigerator: Store leftovers covered in the baking dish or in an airtight container in the refrigerator for up to 4 days.
  • Reheating: Reheat individual portions in the microwave. For larger amounts, cover with foil and reheat in a 325°F (165°C) oven until warmed through, about 20 minutes.
  • Freezing: Assemble the roll-ups in the baking dish with sauce and cheese. Do not bake. Wrap tightly in plastic wrap and foil. Freeze for up to 3 months. Thaw overnight in the refrigerator and bake as directed, adding 10-15 minutes to the bake time.
  • Make-Ahead: Assemble the entire dish up to a day in advance. Cover and refrigerate. Bake as directed, adding 5-10 minutes to the bake time.

Chicken Alfredo Lasagna Roll-Ups are the perfect marriage of elegance and comfort. They turn a weeknight staple into a special occasion meal, delivering creamy, cheesy, chicken-filled satisfaction in every beautifully presented bite.

Pecan Pie Muffins

0

Pecan Pie Muffins are a stroke of culinary genius, a delightful deconstruction that captures the rich, caramelized soul of a classic pecan pie and packages it into a perfectly portable, single-serving muffin. This recipe is a masterful alchemy of simple ingredients, where melted butter and dark brown sugar combine with eggs to form a luxuriously gooey base that bakes into a moist, dense crumb with a texture reminiscent of the pie’s famous filling. The finely chopped pecans are not merely a garnish but are folded directly into the batter, ensuring that every bite is infused with their buttery, toasted flavor and subtle crunch. Unlike traditional muffins that rely on leavening for a fluffy rise, these muffins derive their irresistible character from the dense, candy-like emulsion of sugar and butter, resulting in a treat that is wonderfully rich and satisfyingly substantial.

The brilliance of this recipe lies in its astonishing simplicity and the profound depth of flavor it achieves with minimal effort. It requires no pie crust, no fussy syrup-making, and no special equipment—just a bowl, a whisk, and a muffin tin. In under thirty minutes, your kitchen will be filled with the warm, buttery aroma of baking pecans and caramelized sugar. As they bake, the tops develop a delicate, crackly crust that gives way to a tender, almost brownie-like interior. These muffins are the ultimate hybrid dessert: they offer the nostalgic comfort and sophisticated taste of a holiday pie with the everyday convenience and shareable joy of a muffin, making them perfect for holiday breakfasts, bake sales, or any moment that calls for a touch of sweet, nutty indulgence.

Why You’ll Love This Recipe:

  • All the Flavor of Pecan Pie, None of the Fuss: Captures the iconic taste and texture of pecan pie filling in a quick, no-crust muffin form.
  • Incredibly Easy & Quick: Comes together in one bowl in under 10 minutes and bakes in less than 25.
  • Rich, Gooey, and Addictively Good: The brown sugar and butter create a luxuriously moist, dense, and caramel-sweet crumb.
  • Perfect for Portion Control & Sharing: Individual servings make them ideal for parties, gifts, or preventing overindulgence in a whole pie.
  • Make-Ahead Friendly: These muffins taste incredible warm from the oven and stay moist and delicious for days.

Ingredients:

For the Muffin Batter:
1 cup (about 100g) pecans, finely chopped
1 cup (200g) packed light brown sugar
½ cup (1 stick / 113g) unsalted butter, melted and slightly cooled
2 large eggs, at room temperature
¼ cup (60ml) whole milk, at room temperature
1 teaspoon pure vanilla extract

For the Dry Ingredients:
½ cup (62g) all-purpose flour, spooned and leveled
½ teaspoon baking powder
¼ teaspoon fine sea salt

Instructions:

Step 1: Preheat and Prepare
Preheat your oven to 350°F (175°C). Line a standard 12-cup muffin tin with paper liners or grease each cup thoroughly with butter or non-stick spray.

Step 2: Combine Wet Ingredients
In a large mixing bowl, whisk together the packed brown sugar and melted butter until smooth and well combined. Whisk in the eggs, one at a time, until fully incorporated. Stir in the milk and vanilla extract.

Step 3: Add Dry Ingredients and Pecans
In a separate small bowl, whisk together the flour, baking powder, and salt. Add the dry ingredients to the wet ingredients. Using a spatula, fold gently until just combined and no pockets of dry flour remain—do not overmix. Gently fold in the finely chopped pecans, reserving 2-3 tablespoons for topping if desired.

Step 4: Portion and Top
Divide the batter evenly among the prepared muffin cups, filling each about ¾ full. Sprinkle the tops with the reserved chopped pecans.

Step 5: Bake
Bake for 18-22 minutes. The muffins are done when the tops are set, the edges are lightly golden, and a toothpick inserted into the center comes out clean or with a few moist crumbs (not wet batter).

Step 6: Cool and Serve
Allow the muffins to cool in the pan on a wire rack for 5 minutes. Then, carefully transfer them directly to the wire rack to cool completely, or enjoy warm. They are delicious at any temperature.

Tips:

  • Properly Measure Flour: Spoon flour into the measuring cup and level it off with a knife. Scooping directly packs the flour, leading to dry muffins.
  • Room Temperature Eggs & Milk: This ensures they incorporate smoothly into the butter and sugar without seizing or curdling.
  • Don’t Overmix: Overmixing the batter after adding the flour develops gluten, which can make the muffins tough instead of tender.
  • Finely Chop Pecans: A fine chop ensures the nuts are distributed evenly and provide texture without being too chunky.
  • Test for Doneness: Ovens vary. Start checking at 18 minutes. The muffin tops should spring back lightly when touched.

Storage Options:

  • Room Temperature: Store completely cooled muffins in an airtight container at room temperature for up to 3 days.
  • Refrigerator: For longer storage, keep in the refrigerator for up to 1 week. Let come to room temperature or warm gently before serving.
  • Freezing: These muffins freeze beautifully. Wrap individually in plastic wrap and place in a freezer bag for up to 3 months. Thaw at room temperature or in the refrigerator overnight.
  • Make-Ahead: The batter can be prepared, portioned into the muffin tin, covered, and refrigerated overnight. Bake as directed directly from the fridge, adding 1-2 minutes to the bake time.

Pecan Pie Muffins are a magical, bite-sized celebration of classic Southern flavor. They deliver maximum satisfaction with minimum effort, proving that the most beloved desserts can be both elegant and effortlessly simple.

Tiny Black Bugs in Your Flour? Here’s What’s Really Going On (And What to Do Next)

0

You’re about to bake something—maybe pancakes, maybe a quick loaf of bread—and then you see it.

Tiny black specks. Moving.

Wait… moving?

For a second, you freeze. Because now it’s not just flour anymore—it’s something else. Something you definitely didn’t sign up for.

If this has ever happened to you, you’re not alone. It’s more common than most people think, and no—it doesn’t mean your kitchen is dirty.

But it does mean something is going on behind the scenes.

Let me explain.

So… What Are Those Little Bugs, Exactly?

Those tiny moving specks?

They’re most likely flour weevils.

Small. Dark. Barely noticeable at first—until you really look. They’re usually around 2–3 mm long and blend right into the flour like they belong there.

And here’s the part that surprises most people:

They didn’t show up because your jar wasn’t sealed properly.

They were already there.

The Part Nobody Tells You: They Start Before You Even Buy It

This is where things get a little uncomfortable.

Flour weevils don’t sneak in after you get home. The process usually starts much earlier—during grain storage or processing.

Adult weevils lay eggs directly on the grain. Those eggs are microscopic, basically invisible. Then the grain gets milled… packaged… shipped… and ends up on your shelf.

Everything looks perfectly normal.

Until one day, those eggs hatch.

And suddenly, your “sealed” flour isn’t so sealed after all.

Wait—So a Sealed Jar Doesn’t Help?

It helps… but not in the way you think.

A sealed container keeps new bugs out. That part is true.

But it doesn’t stop what’s already inside.

If eggs are present—and they often are—they’ll hatch regardless. Even in low-oxygen environments. Even in containers that seem airtight.

It’s a bit like locking the door after someone’s already in the house.

Signs You Might Have a Bigger Problem

Sometimes you see the bugs right away.

Other times… it’s more subtle.

Here’s what to watch for:

  • A slightly sour or musty smell
  • Flour that feels clumpy or uneven
  • Fine web-like strands inside the container
  • Tiny tunnels or movement when disturbed

If you notice even one of these, it’s worth taking a closer look.

Because once they’re active, they multiply fast.

Be Honest—Is It Dangerous If You Already Ate Some?

Short answer: no.

Longer answer: still no… just unpleasant.

Flour weevils don’t carry harmful diseases, and accidentally consuming a few won’t make you sick.

But taste and texture? That’s another story.

So while it’s not unsafe, it’s definitely not ideal.

What You Should Do Right Away

If you spot them, don’t overthink it.

Just act quickly.

  • Throw the flour out — seal it in a bag first
  • Take it outside immediately
  • Wash the container thoroughly (hot water + soap works well)
  • Check nearby pantry items — they spread easily

It’s not about being dramatic. It’s about stopping the cycle before it spreads.

The Deep Clean Most People Skip (But Shouldn’t)

Here’s where a lot of people stop too soon.

They toss the flour… wipe the shelf… and move on.

But if eggs or larvae are hiding nearby, the problem comes right back.

So take a few extra minutes:

  • Empty the entire pantry shelf
  • Vacuum corners, cracks, edges
  • Wipe surfaces with vinegar or mild bleach solution
  • Let everything dry completely before restocking

It’s a reset. And honestly, it makes a difference.

How to Stop This From Happening Again

Now for the part that actually saves you frustration later.

Because yes—you can prevent this.

Smart habits that work:

  • Buy smaller quantities (use them faster)
  • Check packaging for damage before buying
  • Choose fresher products when possible

Storage tricks that matter:

  • Use truly airtight containers (glass or thick plastic)
  • Store flour in a cool, dry place
  • Freeze flour for 48 hours after buying it

That last one? It’s a game-changer.

Freezing kills any hidden eggs before they have a chance to hatch.

When It Keeps Happening (Even After You Tried Everything)

If you’ve cleaned everything… replaced your flour… and they still come back?

That’s when it’s worth stepping back.

It could mean:

  • There’s an overlooked source (another grain product nearby)
  • The infestation has spread beyond one container
  • Or the environment itself is encouraging it

At that point, bringing in a professional isn’t overreacting—it’s practical.

The Takeaway Nobody Expects

Here’s the strange part.

Finding bugs in your flour doesn’t mean your kitchen is dirty.

It means you bought flour.

That’s it.

Because this issue starts long before your kitchen ever enters the picture.

But once it shows up, what you do next matters.

Handle it quickly. Clean thoroughly. Store smarter.

And next time you open that jar?

It’ll just be flour.

Exactly how it should be.

Your Method Isn’t Quite Right: Here’s the Correct Way to Maintain a Clean Home

0

Keeping a clean home isn’t just about crossing tasks off a list—it’s about creating an environment that supports your health, mood, and daily peace of mind. But here’s the thing most people get wrong: the approach. We scrub and organize and stress, yet somehow the mess always comes back faster than we expected.

The problem isn’t effort. It’s strategy.

Whether you’re a busy parent, working long hours, or just tired of feeling like your home is winning the battle against you, these guidelines will help you build a routine that actually works. No perfection required—just smarter habits that stick.

1. Why a Clean Home Actually Matters

A tidy home does more than look nice. Studies show it can lower stress, sharpen focus, and make it easier to relax in your own space. There’s also the health side—regular cleaning cuts down on dust, allergens, and bacteria that can mess with your breathing and overall well-being.

Beyond all that, a clean home just feels good. It’s a space that reflects you, supports you, and gives you a little sense of pride every time you walk in the door. That’s worth the effort.

2. Daily Habits That Keep Chaos Away

You don’t need to clean all day every day. You just need a few small habits that prevent mess from taking over.

Start with the bed. Making it in the morning takes two minutes and sets a productive tone. Spend 10–15 minutes each day tidying high-traffic areas—the living room, the kitchen—so clutter doesn’t pile up.

And clean as you go. Wash dishes right after meals instead of letting them sit. Wipe counters while dinner simmers. These tiny actions keep things from spiraling.

3. Weekly Tasks That Keep Things Sparkling

Once a week, go a little deeper. Vacuum and mop floors to pull up dirt and allergens that daily sweeping misses. Dust everything—shelves, furniture, electronics—before it builds up.

Bathrooms need weekly attention too. Scrub toilets, sinks, and showers. Swap out towels and bath mats. It’s not glamorous, but it keeps things fresh and keeps bigger messes from forming.

4. Monthly Deep-Cleaning for the Overlooked Spots

Some things only need attention once a month, but they matter. Wash windows, blinds, and curtains to let light in and improve air quality. Flip and vacuum mattresses to keep them clean and make them last longer.

Appliances need love too. Run a cleaning cycle on your washing machine, descale the coffee maker, wipe down the oven. These small chores keep your machines running well so they don’t quit on you.

5. Seasonal Cleaning: Getting Ready for What’s Next

Seasons change, and your home should too. In spring, declutter and organize. Swap heavy bedding for lighter stuff. Clear out closets to make room for warmer weather clothes.

When fall hits, prep for cold months—check heating systems, seal windows and doors, pack away summer gear. Seasonal cleaning keeps your home comfortable and functional no matter the weather.

6. The Annual Overhaul: Start Fresh Once a Year

Once a year, go all in. Deep-clean carpets and upholstery. Wash walls and ceilings. Tackle storage spaces like the attic or basement that don’t get regular attention.

This is also the time to assess what you actually need. Donate or toss things you haven’t touched in a year. An annual reset keeps your home from slowly filling up with stuff you don’t use.

7. Eco-Friendly Cleaning That Actually Works

You don’t need harsh chemicals to get things clean. Vinegar, baking soda, and lemon handle most jobs just fine. They’re effective, cheap, and way better for the planet.

Switch to reusable tools—microfiber cloths, washable mop pads—to cut down on waste. Good for your home, good for the earth, good for your wallet.

8. Making Small Spaces Feel Bigger and Work Harder

Tiny home? No problem. Use vertical space—shelves and hooks keep floors clear. Look for furniture that pulls double duty, like ottomans with hidden storage.

Clear bins and labels make closets and cabinets functional instead of chaotic. A little thought about layout goes a long way in a small space.

9. Common Mistakes That Trip People Up

The biggest mistake? No schedule. When cleaning is random, messes get overwhelming fast. Pick specific days for specific tasks and stick to them.

Another one: wrong products. Using the wrong cleaner can damage surfaces or just not work. Read labels. Know what you’re cleaning. It saves time and frustration.

10. Viral Cleaning Hacks: Do Any Actually Work?

TikTok loves a cleaning hack. Some are genius. Some are nonsense.

That lemon for stainless steel? Leaves streaks. Vinegar and baking soda down a drain? Actually works pretty well.

If you see a viral trick, test it somewhere small first. Not everything that looks good on video holds up in real life.

11. How to Stay Motivated When You’d Rather Not

Nobody feels motivated to clean every single day. That’s normal. The trick is making it manageable.

Set a timer. Fifteen minutes. That’s it. When the timer goes off, stop if you want. Often you’ll keep going, but having permission to stop makes starting easier.

Break big jobs into small chunks. Reward yourself when you finish. A treat, a break, a few minutes of guilt-free scrolling. Associate cleaning with something positive and it gets easier over time.

There’s Something About a Burger That Just Feels Right

0

There’s something about a burger that just feels right. Maybe it’s the smell drifting through the car when you pull into a drive-thru after a long day. Maybe it’s the memory of summer cookouts, paper plates bending under the weight of something juicy, and ketchup finding its way onto your fingers no matter how careful you are. Fast food has stitched itself into American life, whether we admit it or not. It’s quick, it’s cheap, and let’s be honest, it tastes pretty good when you’re hungry and tired.

And most days, hungry and tired pretty much sums it up, doesn’t it?

Fast food isn’t just about food. It’s about relief. Relief from cooking, from cleaning, from deciding one more thing when your brain is already full. You swing by somewhere familiar, grab something warm, and keep moving. No dishes. No chopping. No waiting.

Honestly, I get it. We all do.

But here’s the thing. Convenience has a way of sneaking past our good sense. And sometimes, what feels like a simple dinner choice carries a whole lot more weight than we realize. Literally and figuratively.

Why We Keep Coming Back Anyway

Before we get too serious, let’s be fair. Fast food exists because it solves a real problem. You’re running between work, school pickup, errands, and maybe a soccer practice that starts in ten minutes. Cooking feels like climbing a small mountain. So you grab something fast and familiar and call it good enough.

And sometimes, good enough really is good enough.

Fast food doesn’t pretend to be fancy. It promises speed, comfort, and that reliable flavor you can count on. And when a place is known for fresh patties and generous portions, like Five Guys, it feels almost… better. Like you’re getting a more “real” burger, not some sad little puck on a bun.

But generous portions can be a double-edged spatula.

What starts as “fresh and hearty” can quietly turn into “more than the body knows what to do with,” especially when it becomes a regular stop instead of an occasional treat.

When Convenience Starts Calling the Shots

Here’s where habits slip in without much fanfare. One late night turns into two. A busy week becomes a busy month. And before you know it, the drive-thru feels like part of the routine.

Nobody plans that.

It just happens when life stays loud and schedules stay full.

And the body? Well, it keeps score even when we don’t.

Health groups have been waving their little warning flags for years about fast food and chronic illness. Obesity, heart trouble, blood pressure that won’t behave. You’ve heard the list. Still, not all burgers are built the same, and some are doing a lot more damage than others.

That’s where a recent study by PlushCare comes in.

What That PlushCare Study Actually Looked At

This wasn’t just a bunch of folks pointing at burgers and shaking their heads. PlushCare reviewed burgers from 24 different fast food chains and ranked them by health risk. They scored each burger based on things that really matter for long-term health:

  • Calories
  • Total fat, especially saturated fat
  • Sodium
  • Sugar

They rolled all of that into an overall “unhealthiness” score. The higher the number, the tougher the impact on your body if this shows up often in your diet.

The Five Guys Cheeseburger scored a 50.

For comparison, other heavy hitters like the Whataburger Jalapeño & Cheese and Smashburger’s Classic Smash landed around 42. Still not gentle on the body, but not quite in the same class.

And no, this isn’t about shaming anyone’s lunch. It’s about understanding what’s really on that tray, because knowing helps you make choices that fit your real life, not some perfect plan that only exists on paper.

Why the Five Guys Cheeseburger Stood Out

Let’s talk about what makes this burger such a heavyweight.

First off, the standard cheeseburger at Five Guys comes with two beef patties. Not one. Two. Add cheese, and then add whatever toppings you like, which they happily pile on without charging extra.

Sounds great, right?

Well, yes… and also no.

Here’s where the numbers get a little eye-opening.

Calories

That cheeseburger comes in at about 1,060 calories. For many adults, that’s over half of what the body needs for the entire day.

One big meal won’t undo your health. But if meals like that happen often, weight gain tends to creep in quietly. And once it’s there, it usually brings a few unwanted companions: sore joints, blood sugar trouble, and that worn-out feeling that never quite leaves.

Fat and Saturated Fat

Total fat clocks in around 62 grams, with 30 grams of saturated fat.

Saturated fat is the one doctors side-eye the hardest because it raises LDL cholesterol, the “bad” kind that likes to stick to artery walls. Over time, that buildup can narrow blood vessels, which sets the stage for heart attacks and strokes.

It doesn’t happen overnight. It’s slow and quiet. Which is why people don’t connect it to that burger they love.

Sodium

Here’s the sneaky one. The burger packs about 1,310 milligrams of sodium. That’s more than half of what the American Heart Association suggests for an entire day.

High sodium doesn’t always make you feel bad right away. No stomach ache, no obvious warning. But it pushes blood pressure up, and high blood pressure quietly strains the heart, kidneys, and blood vessels year after year.

Sugar

Only about 1 gram, which isn’t the main troublemaker here. Burgers aren’t desserts, after all. But when sugar joins high fat and high sodium, it adds to the overall stress the body has to manage.

Put all that together, and it’s easier to see why this burger landed at the top of the list.

Portion Size: The Quiet Troublemaker

Here’s a mild contradiction that needs saying: Five Guys uses fresh ingredients, and that’s a good thing. Fresh beef, fresh toppings, real cheese. No argument there.

But freshness doesn’t cancel out portion size.

Their burgers are big. Really big. And when “everything on it” becomes the usual order, nutrition takes a serious hit without anyone really noticing.

Compare that to smaller burgers at places like McDonald’s or Wendy’s, where portions are tighter and calories usually land between 550 and 700. Still not health food, but not in the same heavyweight class.

Big portions don’t feel dangerous. They feel generous. That’s part of the charm. It’s also part of the problem.

What Long-Term Research Keeps Showing

PlushCare isn’t out on a limb here. Other research has been circling the same concerns for years.

The National Institutes of Health has linked frequent fast food meals with higher risk of obesity, insulin resistance, and metabolic problems. Translation? The body struggles to manage sugar and fat the way it should, which can lead to diabetes and heart trouble down the road.

The American Heart Association keeps pointing out that meals high in saturated fat and sodium raise the risk of coronary heart disease. Burgers and fries come up a lot in those conversations, which won’t surprise anyone who’s ever glanced at a drive-thru menu.

And then there’s research out of UCLA suggesting that diets heavy in saturated fat and salt may even affect memory and learning. That one always makes me pause. We usually think of food affecting waistlines, not brains.

It all circles back to the same message: habits matter more than single meals.

So… Are Burgers the Enemy Now?

No. And I wouldn’t say that even if someone paid me to.

Food is meant to be enjoyed. It’s tied to memories, comfort, and celebration. There’s room for treats, comfort meals, and yes, the occasional greasy paper bag on the passenger seat. Life would be pretty dull without that little bit of freedom.

The trouble starts when indulgence becomes routine instead of occasional.

If fast food is part of your week more often than not, small changes can help without turning meals into math problems:

  • Choose single patties instead of doubles when possible
  • Skip extra cheese and heavy sauces once in a while
  • Balance heavier meals with lighter ones later in the day
  • Drink water instead of soda when you can

Nothing fancy. Just small nudges that add up over time.

Why Balance Beats Perfection Every Single Time

Here’s what I’ve learned after years of cooking, tasting, and feeding a family that does not enjoy being lectured about vegetables. People don’t stick with perfect plans. They stick with reasonable ones.

You can enjoy a big, messy burger now and then and still care about your health. You can love fast food and also pay attention to how often it shows up on your calendar.

Knowing that the Five Guys Cheeseburger ranks high on the health-risk list doesn’t mean you can never order it again. It just means you understand what you’re choosing when you do.

And honestly, that kind of awareness is powerful. It turns mindless eating into a decision. Not a guilty one. Just an informed one.

A Little Perspective From the Kitchen Table

Let me tell you something that doesn’t show up in studies and charts. Most folks don’t eat this way because they don’t care. They eat this way because they’re tired, busy, and juggling too much at once.

When cooking feels like one more chore, fast food feels like relief. It buys you twenty quiet minutes and a full stomach. That matters, especially on hard days.

So instead of telling yourself you should never go through a drive-thru again, maybe the gentler goal is this: don’t let it be the only plan you’ve got.

Keep a few easy dinners at home. Soup in the freezer, eggs in the fridge, a bag of salad that doesn’t require chopping. That way, fast food becomes a choice, not a default.

Seasons, Schedules, and the Way We Really Eat

Food habits shift with the calendar, too. Summer brings cookouts and late nights. Fall brings packed schedules and quick dinners between school and work. Winter? That’s when comfort food really digs in its heels.

None of that is wrong. It’s just real life.

But knowing which seasons pull you toward fast food can help you plan a little better. Maybe that means keeping chili on hand in January or tossing a few slow-cooker meals into rotation when evenings get tight.

Not perfect. Just practical.

Wrapping This Up Without a Lecture

Fast food will always have a place in American dining. It’s stitched into road trips, lunch breaks, late nights, and those evenings when cooking feels impossible. Burgers, especially, carry a lot of nostalgia and comfort.

But not all burgers treat our bodies the same way.

The PlushCare study simply put numbers to what many doctors and dietitians have been saying for years. Some menu items carry a heavier health load than others, and the Five Guys Cheeseburger happens to sit right at the top of that pile.

Knowing that doesn’t mean giving up what you love. It just means choosing with open eyes, mixing in lighter meals when you can, and remembering that health is built on patterns, not perfection.

And if you do find yourself holding that foil-wrapped burger someday? Enjoy it. Really enjoy it. Just maybe don’t make it a weekly tradition. Your heart, your blood pressure, and probably your future self will thank you for that little bit of restraint.

Now, if you’ll excuse me, all this burger talk has me thinking about soup and a quiet evening at home. And that, my friend, feels just right too.

90% of People Ruin Their Fabrics: Here Are 10 Laundry Habits to Break Immediately

0

Laundry is one of those chores we do on autopilot. Toss things in, push a button, walk away. But here’s the thing—most of us are accidentally destroying our clothes in the process. Faded colors, shrunken sweaters, stretched-out necklines—it’s not just bad luck. It’s habit.

Turns out, a huge number of people admit to ruining their fabrics during washing and drying. The good news? Once you know what you’re doing wrong, fixing it is surprisingly simple. Here are ten laundry habits to break starting today, so your clothes can actually last.

1. Washing Everything on the Same Cycle

It’s easy to just throw it all in and hit “normal.” But not all fabrics are built the same. Delicates like silk and lace need a gentle, slow cycle. Heavy stuff like towels and jeans can handle—and actually need—a more robust wash.

When you treat everything the same, delicates wear out faster and sturdy items don’t get as clean. Take an extra minute to sort by fabric type and pick the right cycle. Your clothes will thank you.

2. Overloading the Machine and Starving Clothes of Water

Cramming in as much as possible feels efficient, but it’s actually working against you. When the drum is too full, clothes can’t move freely. Water and detergent can’t circulate. Nothing gets properly clean, and the friction causes extra wear.

Stick to filling the machine about two-thirds full. Give everything room to tumble. A little breathing space makes a big difference in how well your laundry washes—and how long it lasts.

3. Using Too Much Detergent (Especially on Dark Clothes)

More soap does not equal cleaner clothes. In fact, excess detergent leaves residue that makes fabrics feel stiff and actually attracts more dirt. Dark clothes are especially vulnerable—that residue can cause fading and leave weird marks.

Read the instructions on your detergent. Use less than you think you need, especially if you have a high-efficiency machine. A little goes a long way, and your colors will stay richer longer.

4. Ignoring Care Labels on Delicates and Swimwear

Those tiny tags aren’t just there for decoration. They tell you exactly how to keep that garment alive. Ignore them, and you’re guessing—which is how lingerie loses its shape and swimwear stretches out.

Before you wash anything delicate, check the label. Hand washing is often best, but if you’re using a machine, invest in a mesh laundry bag and stick to a gentle cycle with cold water. It takes two extra seconds and saves your favorite pieces.

5. Tossing Activewear in With Regular Cotton Loads

Your gym clothes are made differently for a reason. They’re designed to wick moisture and stretch with your body. Washing them with regular cotton—especially with fabric softener—breaks down the elasticity and traps odors in the fabric.

Wash activewear separately with a mild detergent. Skip the fabric softener completely. Use cold water. This keeps the fabric working the way it should and smelling fresh instead of funky.

6. Machine-Washing Wool Sweaters Like T-Shirts

Wool is wonderful until you treat it like cotton. Heat and agitation are wool’s enemies—they cause shrinking, felting, and general sadness.

Hand wash wool sweaters in cold water with a detergent made specifically for wool. If you must use a machine, pick the wool or hand wash cycle and put the sweater in a mesh bag. Always lay it flat to dry. Never hang it. Your future self will thank you when it still fits.

7. Using Hot Water by Default on Fabrics That Can’t Handle It

Hot water is great for killing germs and tackling tough stains, but it’s not for everything. Using it by default fades colors, shrinks fabrics, and damages synthetics.

For most everyday loads, cold or warm water works just fine. Save the hot water for white linens or stuff that’s truly filthy. Your clothes will hold their shape and color much longer.

8. Abusing the Dryer: High Heat for Everything

The dryer is convenient, but high heat is brutal on fabric. It shrinks wool, ruins elasticity in spandex, and fades colors across the board.

Drop the heat setting. Use low or medium instead. Take things out as soon as they’re dry. And for anything delicate, just skip the dryer altogether—air drying is the gentlest option by far. It takes longer, but your clothes will last way longer too.

9. Skipping Color Sorting and Fading Your Dark Clothes

Sorting by color feels old-fashioned, but there’s a reason our grandmothers did it. Dyes bleed, especially in new clothes. When dark colors mix with lights, you risk transfer. When darks mix with other darks, they fade faster.

Take the two minutes to separate whites, lights, and darks. Toss in a color-catcher sheet if you’re nervous. It’s a small habit that keeps everything looking the way it should.

10. Letting Wet Laundry Sit and Destroy Fibers Over Time

We’ve all done it—forgotten about the wash until hours later. But letting wet laundry sit is a fast track to mildew, musty smells, and weakened fibers.

Set a timer if you have to. Move laundry to the dryer or hanging rack as soon as the cycle ends. If you absolutely can’t, at least crack the door open so air can circulate. Fresh-smelling, healthy fabric starts with timing.

The Secret to Better Bacon: Why a Splash of Vinegar Helps

0

I remember the exact moment because it genuinely threw me off.

We were standing in my aunt’s kitchen, nothing fancy—just a quiet weekend morning, coffee brewing, bacon sizzling in an old skillet that’s probably seen more meals than I’ve had birthdays.

Everything felt normal… until it didn’t.

Right in the middle of cooking, she grabbed a bottle of vinegar and casually splashed a little over the bacon.

No explanation. No hesitation.

Just sizzle.

I stared at her like—what are you doing?

And honestly, if you’ve never seen this before, you’d probably react the same way.

Wait… Vinegar? On Bacon?

It sounds wrong at first.

Bacon is already salty, rich, kind of indulgent in the best way. Vinegar? That sharp, acidic bite? It feels like it should clash.

But here’s the thing—and I didn’t expect this either—it doesn’t clash at all.

It balances.

And once you notice it, you really notice it.

The Way We Usually Cook Bacon (And Why It Works)

Most of us don’t overthink bacon.

You throw it in a pan, maybe start it cold if you’re patient, maybe crank the heat if you’re not. Some people bake it in the oven for even crisping. Others swear by cast iron.

Different methods, same goal: crispy edges, rendered fat, that deep savory flavor.

And honestly, that already works. Bacon doesn’t need help to taste good.

But… it can taste better. Just slightly. Just enough to make you pause mid-bite.

So What Does Vinegar Actually Do Here?

This is where it gets interesting—but I’ll keep it real, not overly technical.

When a little vinegar hits the pan, a few things happen at once:

  • It cuts through the fat
  • It sharpens the flavor
  • It helps the bacon crisp up a bit more evenly

Not dramatically. Not in a way that screams “this is vinegar bacon!”

It’s subtle. Almost annoyingly subtle.

But the richness feels lighter. Cleaner. Like the flavor has more definition instead of just… salt and fat.

The Part No One Tells You: It’s About Contrast

Good cooking is often just contrast.

Sweet with salty. Crunchy with soft. Rich with something that cuts through it.

Bacon, on its own, leans heavily in one direction—rich, fatty, savory.

Vinegar pulls it back just enough.

Not to change it. Just to keep it from going too far.

It’s the same reason people love bacon with maple syrup or tomatoes. That little contrast makes everything pop more.

And Yeah… It Actually Helps with Crispiness

This surprised me the most.

The vinegar doesn’t make it soggy (which is what I expected). If anything, it helps the fat render a bit more efficiently, so the bacon cooks up with a cleaner, slightly crisper finish.

Not crunchy like a chip—just… better structured.

Less greasy. More bite.

But Don’t Overdo It (Seriously)

This is not a “pour it on” situation.

We’re talking a light splash. A teaspoon at most.

Too much, and yeah—you’ll taste it. And not in a good way.

It should disappear into the cooking process, not stand out.

If you can clearly taste vinegar, you’ve gone too far.

If You’re Curious, Try It This Way

Next time you make bacon, do a side-by-side test:

  • Cook half the batch like you normally do
  • On the other half, add a small splash of vinegar halfway through
  • Same pan, same heat, same everything else.

Then taste.

That’s really the only way to get it. Reading about it only goes so far.

You Can Play Around with It Too

Once you get the idea, you can tweak things:

  • Apple cider vinegar adds a slightly softer tang
  • White vinegar is sharper, more neutral
  • A tiny drizzle of maple syrup with it? That’s a whole different level

Not necessary. But fun to experiment with.

Final Thought (Because This Stuck with Me)

What I like about this trick isn’t just the result—it’s what it represents.

It’s one of those small, passed-down kitchen habits that doesn’t show up in most recipes. No big explanation. Just something someone figured out years ago and kept doing because… it works.

And honestly, those are usually the best ones.

So next time you’re frying bacon and you see that bottle of vinegar sitting there…

You might hesitate.

I did too.

But now? I don’t skip it.