Cheesy Mozzarella Chicken Bake

0

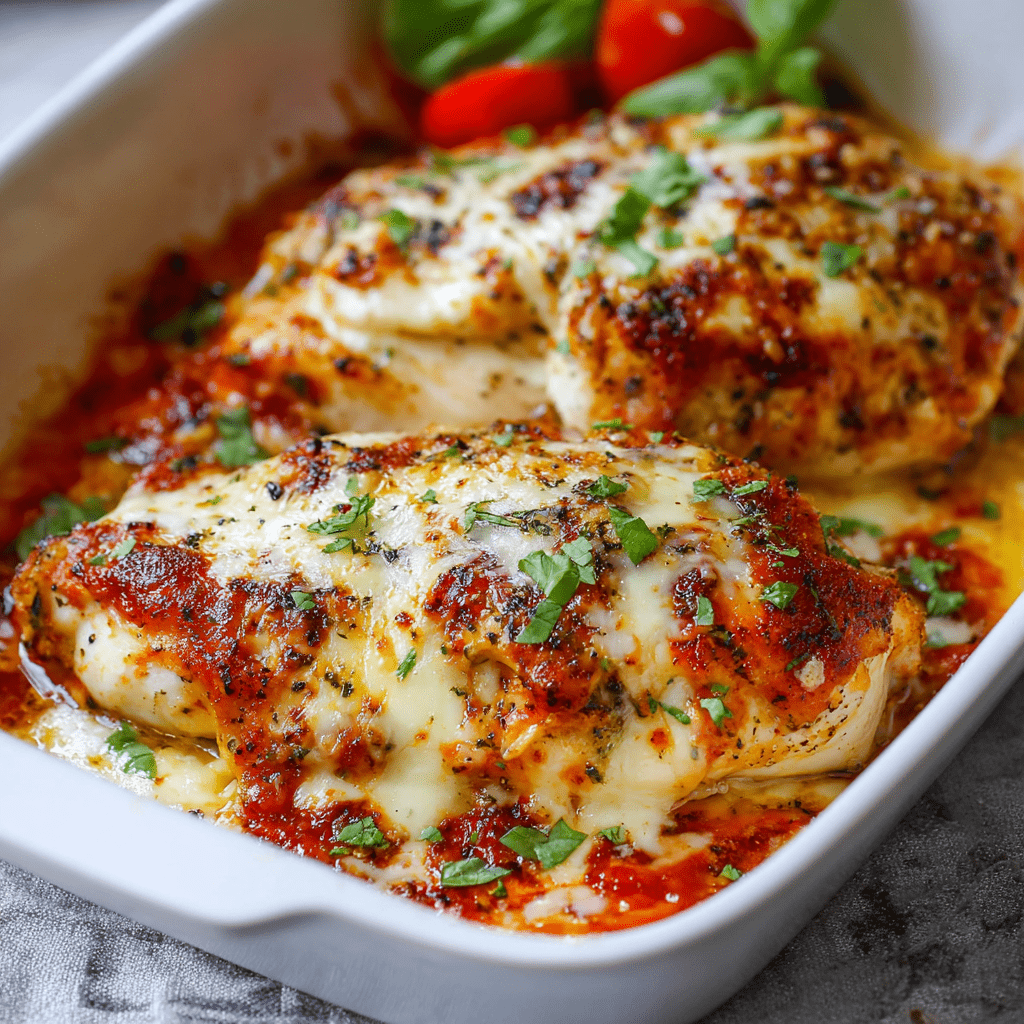
Cheesy Mozzarella Chicken Bake is the quintessential weeknight hero, a dish that masterfully combines simplicity with robust, crowd-pleasing flavors to create a comforting and complete meal with minimal effort. This recipe transforms basic chicken breasts into a juicy, savory, and indulgent centerpiece by layering them with vibrant marinara sauce and a generous blanket of melted, golden cheese. The process begins with a crucial step of searing the chicken, which not only locks in juices but also builds a flavorful, caramelized crust that adds a welcome depth to the final bake. Nestled in a dish and smothered with tangy marinara sauce, the chicken is then crowned with a blend of gooey mozzarella and sharp Parmesan, which melts into a bubbly, irresistible cheese cap as it bakes. The result is a harmonious blend of tender, well-seasoned chicken, zesty tomato sauce, and creamy, stretchy cheese in every forkful.

The true brilliance of this dish lies in its elegant efficiency and universal appeal. It requires just a handful of pantry-staple ingredients and one skillet-to-oven baking dish, making cleanup a breeze. The Italian seasoning and garlic powder infuse the chicken with classic Mediterranean aromas, while the two-cheese topping provides the perfect textural contrast between the soft, melted mozzarella and the slightly crisp, nutty Parmesan. This bake is incredibly versatile, serving beautifully over a bed of pasta, alongside a crisp salad, or with crusty garlic bread for soaking up the delicious sauce. Cheesy Mozzarella Chicken Bake is more than just a recipe; it’s a reliable, family-friendly solution for busy evenings that delivers restaurant-style satisfaction with homestyle ease, proving that the most beloved meals are often the simplest to prepare.

Why You’ll Love This Recipe:

  • Easy One-Pan Meal: With searing and baking happening in the same dish, prep and cleanup are incredibly simple.
  • Family-Friendly Favorite: The combination of tender chicken, tomato sauce, and melted cheese is a guaranteed hit with both kids and adults.
  • Quick and Impressive: Ready in under 40 minutes, this dish is perfect for a busy weeknight but looks and tastes special enough for company.
  • Endlessly Customizable: Easily add sliced mushrooms, spinach, or pepperoni under the cheese, or use your favorite pasta sauce.

Ingredients:

  • 4 boneless, skinless chicken breasts (about 1.5 – 2 lbs)
  • 1 tablespoon olive oil
  • 1 teaspoon Italian seasoning
  • 1 teaspoon garlic powder
  • Salt and black pepper, to taste
  • 1 cup marinara sauce
  • 1 cup shredded mozzarella cheese
  • 2 tablespoons grated Parmesan cheese
  • Fresh basil or parsley, chopped (for garnish)

Instructions:

Step 1: Preheat and Prepare
Preheat your oven to 375°F (190°C). Pat the chicken breasts dry with paper towels and season both sides generously with Italian seasoning, garlic powder, salt, and pepper.

Step 2: Sear the Chicken
Heat the olive oil in a large, oven-safe skillet (like cast iron) over medium-high heat. Once hot, add the chicken breasts and sear for 3-4 minutes per side, until a golden-brown crust forms. The chicken does not need to be cooked through at this stage.

Step 3: Assemble the Bake
If your skillet is oven-safe, leave the chicken in it. Otherwise, transfer the seared chicken to a baking dish. Pour the marinara sauce over and around the chicken breasts. Sprinkle the shredded mozzarella cheese evenly over each piece, then top with the grated Parmesan.

Step 4: Bake to Perfection
Transfer the skillet or baking dish to the preheated oven. Bake, uncovered, for 20-25 minutes, or until the chicken is cooked through (internal temperature of 165°F / 74°C) and the cheese is melted, bubbly, and lightly golden.

Step 5: Rest and Serve
Remove the dish from the oven and let the chicken rest for 5 minutes before serving. This allows the juices to redistribute. Garnish with fresh basil or parsley and serve hot.

Tips:

  • Pound for Even Cooking: For perfectly even cooking, place the chicken breasts between two pieces of plastic wrap and gently pound them to an even ½-inch thickness before seasoning.
  • Don’t Skip the Sear: Searing creates the flavorful fond (browned bits) in the pan. If you’re using a baking dish, you can deglaze the skillet with a splash of chicken broth after searing and pour those flavorful juices over the chicken before adding the sauce.
  • Use High-Quality Sauce: Since the sauce is a key flavor component, using a good-quality jarred marinara or homemade sauce makes a significant difference.
  • Add Vegetables: For a more complete meal, add a layer of sautéed spinach, sliced mushrooms, or bell peppers on top of the chicken before adding the sauce and cheese.

Storage Options:

  • Refrigerator: Store leftovers in an airtight container in the refrigerator for up to 3 days.
  • Reheating: Reheat gently in a covered oven-safe dish at 350°F (175°C) until warmed through, or in the microwave. For best texture, use the oven method.
  • Freezing: This dish freezes well after baking. Cool completely, wrap tightly, and freeze for up to 2 months. Thaw in the refrigerator overnight before reheating.

Savory Breakfast Bundt Cake

0

The Savory Breakfast Bundt Cake is a spectacular and ingenious centerpiece dish that reimagines the classic breakfast casserole into a stunning, golden-brown, ring-shaped masterpiece perfect for feeding a crowd. This recipe is a celebration of layers, textures, and flavors, meticulously constructing a hearty and satisfying meal that is as impressive to behold as it is delicious to eat. The foundation is built with cubes of day-old bread that soak up a rich, savory custard made from eggs, milk, and heavy cream, seasoned with dry mustard and a hint of cayenne for depth. Between the layers of bread, a colorful and flavorful medley of ingredients is nestled: salty diced ham, wilted spinach, crispy golden hash browns, and sharp green onions, all bound together with a generous amount of melted cheese. Baked in a classic Bundt pan, this dish emerges from the oven as a beautifully sculpted, puffed, and golden ring that, when inverted onto a platter, makes a dramatic and unforgettable presentation.

The true brilliance of this dish lies in its versatility and make-ahead convenience, making it the ultimate solution for holiday brunches, weekend guests, or any special morning gathering. The entire assembly can be completed the night before, allowing the bread to fully absorb the custard overnight, which results in an incredibly moist and cohesive texture after baking. The Bundt pan design is not just for show; it ensures even cooking and creates more surface area for crispy, golden edges in every slice. Each serving delivers a perfect cross-section of all the components—creamy custard, soft bread, savory ham, and crispy potatoes—in one elegant package. The Savory Breakfast Bundt Cake is more than just a meal; it’s a show-stopping, shareable culinary event that transforms familiar breakfast ingredients into a celebratory feast.

Why You’ll Love This Recipe:

  • Spectacular Presentation: The beautiful ring shape makes it a stunning centerpiece for any brunch table, guaranteed to draw “oohs” and “aahs.”
  • Perfect for Feeding a Crowd: This recipe yields a large quantity, making it ideal for holidays, family gatherings, or potlucks.
  • Excellent Make-Ahead Dish: Assemble it completely the night before for stress-free morning hosting—just bake and serve.
  • Complete Meal in Every Slice: Packed with protein, vegetables, and carbs, it’s a hearty and satisfying all-in-one breakfast.

Ingredients:

  • 8 cups day-old bread, diced into ¾-inch cubes (a sturdy loaf like French or sourdough works best)
  • 1 heaping cup ham, diced
  • 2 cups fresh spinach, chopped
  • 2 cups frozen shredded hash browns
  • ¼ cup green onions, chopped
  • 12 large eggs
  • 2 cups whole milk
  • 1 cup heavy cream
  • 2 cups shredded cheese (a blend of cheddar and Monterey Jack is ideal), divided
  • 1 teaspoon dry mustard
  • ½ teaspoon garlic powder
  • ½ teaspoon salt (plus more for seasoning)
  • ½ teaspoon black pepper (plus more for seasoning)
  • A large pinch of cayenne pepper
  • Butter or non-stick spray for greasing

Instructions:

Step 1: Sauté the Fillings
In a large skillet over medium heat, sauté the chopped spinach with a pinch of salt until wilted, about 2-3 minutes. Remove and set aside. In the same skillet, add a tablespoon of oil and cook the frozen hash browns, stirring occasionally, until thawed and golden brown. Season with salt and pepper. Set aside.

Step 2: Grease the Pan and Begin Layering
Generously grease a standard 10-12 cup Bundt pan with butter or non-stick spray. Place half of the diced bread cubes (4 cups) evenly in the bottom of the pan.

Step 3: Build the Layers
Evenly distribute the diced ham, sautéed spinach, and chopped green onions over the bread layer. Next, spread the cooked hash browns in an even layer. Sprinkle 1 cup of the shredded cheese over the hash browns. Top with the remaining 4 cups of diced bread cubes.

Step 4: Prepare and Pour the Custard
In a very large bowl, whisk together the eggs, milk, heavy cream, dry mustard, garlic powder, ½ teaspoon salt, ½ teaspoon black pepper, and cayenne pepper until smooth and well-combined. Slowly and evenly pour the custard mixture over the entire layered structure in the Bundt pan. Use a spatula to gently press down on the top, ensuring all the bread is submerged and soaking up the custard.

Step 5: Chill
Cover the pan tightly with plastic wrap and refrigerate for at least 4 hours, or preferably overnight.

Step 6: Bake
When ready to bake, preheat your oven to 350°F (175°C). Remove the plastic wrap and sprinkle the remaining 1 cup of shredded cheese over the top. Bake for 50-60 minutes, or until the top is deeply golden brown, the cake is puffed, and a knife inserted into the center comes out clean. If the top browns too quickly, tent it loosely with aluminum foil.

Step 7: Rest, Invert, and Serve
Let the Bundt cool in the pan on a wire rack for 15-20 minutes. Carefully run a thin knife around the inner and outer edges to loosen. Place a large serving platter over the top of the pan and, with confidence, invert the pan and platter together to release the breakfast Bundt. Slice into wedges and serve warm.

Tips:

  • Use Stale Bread: Day-old, slightly stale bread is perfect as it soaks up the custard without disintegrating.
  • Press and Soak: After pouring the custard, press down firmly on the bread layers to ensure maximum absorption. The long soak time is non-negotiable for the right texture.
  • Customize the Fillings: Swap the ham for cooked sausage or bacon, or add sautéed mushrooms or bell peppers. Use your favorite cheese blend.
  • Test for Doneness: The internal temperature should reach 160°F (71°C) in the center when fully cooked.

Storage Options:

  • Refrigerator: Store leftover slices in an airtight container in the refrigerator for up to 4 days.
  • Reheating: Reheat individual slices in the microwave or in a 325°F (165°C) oven until warmed through.
  • Freezing: The fully baked and cooled Bundt freezes well. Wrap the whole ring or individual slices tightly in plastic wrap and foil. Thaw overnight in the refrigerator and reheat.

Best Steak Bites

0

Best Steak Bites are an irresistible, protein-packed appetizer or main course that delivers the deep, savory satisfaction of a perfectly seared steak in fun, bite-sized, and perfectly seasoned morsels. This recipe is a masterclass in maximizing flavor with minimal effort, relying on a robust marinade that transforms simple steak cubes into tender, juicy, and explosively flavorful bites. The marinade is a powerful yet balanced blend of salty soy sauce, rich olive oil, tangy Worcestershire sauce, and aromatic garlic and herbs, which penetrates the meat deeply during a long soak, ensuring every piece is seasoned from the inside out. The key to their phenomenal texture is the use of a well-marbled, tender cut like flat iron or top sirloin, which is cut into uniform pieces to guarantee even cooking. When these marinated cubes hit a scorching-hot skillet, they develop a beautiful, caramelized crust almost instantly, sealing in the savory juices while achieving a perfect medium-rare to medium doneness in just minutes.

The true brilliance of this recipe lies in its versatility and its foolproof method for achieving restaurant-quality results at home. The hands-on cooking time is incredibly short, making these steak bites a fantastic last-minute dish for entertaining or a quick, impressive weeknight dinner. They can be served sizzling straight from the skillet with toothpicks as a crowd-pleasing party appetizer, tossed into a salad for a hearty lunch, or piled atop creamy mashed potatoes or buttery rice for a complete and satisfying meal. The marinade does all the heavy lifting, meaning even novice cooks can confidently produce tender, flavorful steak with a professional sear. Best Steak Bites are more than just a recipe; they are a quick, elegant, and universally loved way to enjoy steak that promises to become a go-to favorite for any occasion.

Why You’ll Love This Recipe:

  • Explosive Flavor in Every Bite: The potent marinade ensures deep, savory, and herbaceous flavor in each tender piece of steak.
  • Quick and Impressive: With just a few minutes of active cooking time, this dish is perfect for fast dinners or last-minute entertaining.
  • Versatile Serving Options: Serve them as an appetizer with toothpicks, as a main course with sides, or even tossed into pasta or salads.
  • Foolproof Perfect Sear: Cutting the steak into small pieces guarantees a delicious crust on every side with minimal risk of overcooking.

Ingredients:

  • 1 ½ pounds flat iron or top sirloin steak
  • ½ cup soy sauce (low-sodium preferred)
  • ⅓ cup olive oil
  • ¼ cup Worcestershire sauce
  • 1 teaspoon minced garlic
  • 2 tablespoons dried basil
  • 1 tablespoon dried parsley
  • 1 teaspoon freshly cracked black pepper
  • 2 tablespoons vegetable or canola oil (for searing)

Instructions:

Step 1: Prepare the Marinade
In a large resealable plastic bag or a shallow dish, combine the soy sauce, olive oil, Worcestershire sauce, minced garlic, dried basil, dried parsley, and black pepper. Seal the bag and shake vigorously, or whisk in the bowl, until the marinade is well combined.

Step 2: Marinate the Steak
Trim any excess fat from the steak and cut it into uniform 1-inch cubes. Add the steak pieces to the marinade, ensuring they are all submerged. Seal the bag or cover the dish and refrigerate. Marinate for a minimum of 3 hours, or ideally up to 24 hours for maximum flavor and tenderness.

Step 3: Prepare to Cook
When ready to cook, remove the steak bites from the refrigerator and let them sit at room temperature for 20-30 minutes. Discard the used marinade. Pat the steak pieces very dry with paper towels. This is a critical step for achieving a good sear.

Step 4: Sear the Steak Bites
Heat a large cast-iron or heavy-bottomed skillet over medium-high heat until very hot. Add the 2 tablespoons of vegetable oil and swirl to coat the pan. Working in batches to avoid overcrowding, add the steak bites in a single layer, ensuring they are not touching. Sear undisturbed for 2 minutes to develop a crust. Flip and cook for another 1-3 minutes, depending on your desired doneness (2-3 minutes total for medium-rare, 4-5 for medium).

Step 5: Rest and Serve
Immediately transfer the cooked steak bites to a clean plate or platter. Let them rest for 3-5 minutes to allow the juices to redistribute. Serve hot, garnished with fresh herbs like parsley or chives if desired.

Tips:

  • Dry the Steak Thoroughly: Removing all surface moisture from the marinated steak before cooking is the single most important step for achieving a deep, caramelized crust instead of steaming the meat.
  • Don’t Crowd the Pan: Cooking in batches is essential. Overcrowding will lower the pan temperature dramatically, causing the steak to release its juices and steam rather than sear.
  • Use a Thermometer for Precision: For perfect results, use an instant-read thermometer. Aim for 130-135°F (54-57°C) for medium-rare or 140-145°F (60-63°C) for medium.
  • Let it Rest: Allowing the steak bites to rest after cooking ensures they remain juicy when you bite into them.

Storage Options:

  • Refrigerator: Store leftover cooked steak bites in an airtight container in the refrigerator for up to 3 days.
  • Reheating: Reheat gently in a skillet over medium-low heat until just warmed through to avoid overcooking. They can also be reheated in the microwave in short bursts.
  • Freezing: You can freeze the uncooked, marinated steak bites. Place them in a single layer on a parchment-lined sheet to freeze solid, then transfer to a freezer bag. Thaw in the refrigerator before patting dry and cooking. Cooked steak bites can also be frozen but may lose some texture upon reheating.

Amish Country Casserole

0

Amish Country Casserole is the epitome of humble, hearty, and homestyle cooking, a dish that embodies the simple, nourishing, and deeply comforting food traditions of the Amish community. This recipe is a masterclass in creating a satisfying and flavorful meal from a handful of pantry-staple ingredients, resulting in a cozy, all-in-one dinner that is both economical and incredibly family-friendly. The foundation is built with ground beef and pasta, a classic and filling combination that is elevated by a uniquely creamy and savory sauce made from a blend of canned tomato and mushroom soups. The soups meld together with milk during baking to create a rich, velvety coating that is far greater than the sum of its parts, while sautéed onions and garlic provide an essential aromatic depth that grounds the entire dish. Topped with a simple sprinkle of paprika and parsley for a pop of color, this casserole bakes into a bubbly, golden-topped masterpiece that is the very definition of comfort food.

The true brilliance of this recipe lies in its effortless assembly and its reliable, crowd-pleasing nature. It requires no complicated techniques or hard-to-find ingredients, making it an ideal choice for a busy weeknight, a potluck contribution, or a simple meal that stretches to feed a crowd. The method of rinsing the cooked pasta with cold water is a small but crucial step that prevents it from becoming mushy and sticky as it bakes, ensuring each bite has the perfect tender texture. Unlike many casseroles that are overly heavy, this one strikes a wonderful balance—it is substantial and satisfying without being overly rich. Amish Country Casserole is more than just a recipe; it is a warm, welcoming, and nostalgic dish that promises to soothe and satisfy with its straightforward, honest goodness.

Why You’ll Love This Recipe:

  • Ultimate Comfort Food: This hearty, creamy, and savory casserole is the definition of a comforting, homestyle meal.
  • Simple and Economical: Made with affordable, pantry-staple ingredients, it’s a budget-friendly way to feed a family.
  • Easy One-Dish Meal: With minimal prep and easy cleanup, it’s a perfect solution for a busy weeknight dinner.
  • Family-Friendly Favorite: Its mild, savory flavor and familiar ingredients are a guaranteed hit with both kids and adults.

Ingredients:

  • 1 pound (approximately 500 grams) pasta (such as elbow macaroni, rotini, or egg noodles)
  • 1 tablespoon olive oil
  • 1 large yellow onion, chopped
  • 2 tablespoons garlic, finely chopped or from a paste
  • 1.5 pounds (750 grams) ground beef
  • Salt and black pepper, to taste
  • 1 (10.5 oz / 298g) can condensed tomato soup, undiluted
  • 1 (10.5 oz / 298g) can condensed cream of mushroom soup, undiluted
  • 1 cup whole milk
  • ½ teaspoon paprika (for garnish)
  • 1 tablespoon fresh parsley, chopped (for garnish)

Instructions:

Step 1: Preheat and Prepare
Preheat your oven to 400°F (200°C). Lightly grease a 9×13-inch baking dish with butter or non-stick cooking spray.

Step 2: Cook the Pasta
Bring a large pot of salted water to a boil. Cook the pasta according to the package directions until it is just al dente (firm to the bite). Drain the pasta and rinse it briefly with cold water to stop the cooking process and prevent the noodles from sticking together.

Step 3: Brown the Beef and Aromatics
While the pasta cooks, heat the olive oil in a large skillet over medium heat. Add the chopped onion and sauté for 3-4 minutes until it begins to soften. Add the garlic and cook for one more minute until fragrant. Add the ground beef, breaking it up with a spoon, and cook until it is fully browned. Season generously with salt and pepper. Drain off any excess grease.

Step 4: Combine All Ingredients
In a very large mixing bowl, combine the cooked and rinsed pasta, the browned beef mixture, the undiluted tomato soup, the undiluted cream of mushroom soup, and the milk. Stir until everything is thoroughly and evenly combined. Taste and adjust seasoning with more salt and pepper if needed.

Step 5: Assemble and Bake
Pour the mixture into the prepared baking dish and spread it into an even layer. Sprinkle the top evenly with the paprika and chopped parsley.

Step 6: Bake to Bubbly Perfection
Bake, uncovered, for 20-25 minutes, or until the casserole is hot all the way through and bubbly around the edges.

Step 7: Rest and Serve
Remove the casserole from the oven and let it stand for 5-10 minutes before serving. This allows it to set slightly for easier scooping.

Tips:

  • Don’t Overcook the Pasta: Remember that the pasta will continue to cook in the oven. Cooking it to al dente ensures it won’t become mushy in the final dish.
  • Rinse the Pasta: Rinsing the cooked pasta with cold water is a crucial step to wash away excess starch, which prevents the casserole from becoming gummy.
  • Customize It: Feel free to add a cup of frozen peas, corn, or mixed vegetables to the beef mixture for an extra boost of color and nutrition.
  • Cheese Lover’s Twist: For an extra layer of flavor, stir 1 cup of shredded cheddar cheese into the mixture before baking, and/or sprinkle another ½ cup on top before it goes in the oven.

Storage Options:

  • Refrigerator: Store leftovers in an airtight container in the refrigerator for up to 4 days.
  • Reheating: Reheat individual portions in the microwave. For larger portions, reheat in a 350°F (175°C) oven, covered with foil, for 15-20 minutes or until hot.
  • Freezing: This casserole freezes very well. Assemble it completely but do not bake. Wrap tightly in plastic wrap and foil and freeze for up to 3 months. Thaw in the refrigerator overnight and bake as directed, adding 5-10 minutes to the baking time if needed.

French Onion Broccoli Cheese Casserole

0

French Onion Broccoli Cheese Casserole is a sophisticated and deeply flavorful twist on the classic green vegetable casserole, masterfully marrying the rich, savory-sweet essence of French onion soup with the comforting, creamy goodness of broccoli and cheese. This recipe elevates humble ingredients into an elegant side dish or vegetarian main course by building layers of complex flavor. The journey begins with slowly caramelized onions, cooked low and slow with a pinch of sugar until they become meltingly soft, deeply golden, and intensely sweet, forming the soul of the dish. This aromatic base is then combined with bright, blanched broccoli florets and enveloped in a luxurious, from-scratch cheese sauce that is uniquely crafted with nutty Gruyère—the classic cheese for French onion soup—and sharp cheddar for a bold, tangy punch. The entire creation is crowned with a buttery, crisp panko breadcrumb topping that provides the perfect textural contrast to the creamy, savory filling beneath.

The true brilliance of this casserole lies in its harmonious balance of flavors and its make-ahead convenience. The step of blanching the broccoli is crucial; it sets the vibrant green color and ensures the florets are perfectly tender-crisp before baking, preventing them from turning mushy. The sauce, a simple béchamel enriched with broth and cheese, clings beautifully to every floret and onion strand, creating a cohesive and decadent bite. Unlike many casseroles that can be heavy, this one feels refined and balanced, with the sweet onions and sharp cheese cutting through the richness. French Onion Broccoli Cheese Casserole is more than just a side dish; it’s a show-stopping, restaurant-quality addition to any holiday table or special weeknight dinner that is sure to impress with its depth of flavor and elegant presentation.

Why You’ll Love This Recipe:

  • Gourmet Flavor Profile: The combination of sweet caramelized onions, nutty Gruyère, and sharp cheddar creates a sophisticated taste that far surpasses any standard cheese casserole.
  • Perfect Textural Contrast: Enjoy the creamy, savory filling against a crispy, buttery panko crust in every bite.
  • Elegant Enough for a Holiday: This dish is impressive enough to serve as the star side dish for Thanksgiving, Christmas, or Easter dinner.
  • Make-Ahead Friendly: You can caramelize the onions, blanch the broccoli, and make the sauce a day in advance for easy assembly and baking on the day you plan to serve.

Ingredients:

  • 1 tablespoon olive oil
  • 2 tablespoons + 2 tablespoons + 2 tablespoons unsalted butter, divided
  • 2 large yellow onions, thinly sliced
  • ½ teaspoon granulated sugar
  • 1 teaspoon kosher salt, divided
  • 2 cloves garlic, minced
  • ½ teaspoon dried thyme
  • 2 tablespoons all-purpose flour
  • 1 cup low-sodium beef broth
  • 1 cup whole milk
  • 4 cups broccoli florets
  • 6 ounces Gruyère cheese, shredded
  • 1 cup sharp cheddar cheese, shredded and divided
  • ½ teaspoon black pepper
  • 1 cup panko breadcrumbs
  • 1 tablespoon fresh parsley, chopped (optional, for garnish)

Instructions:

Step 1: Caramelize the Onions
In a large skillet, heat the olive oil and 2 tablespoons of butter over medium-low heat. Add the thinly sliced onions, sugar, and ½ teaspoon of the salt. Cook, stirring occasionally, for 20-25 minutes until the onions are deeply golden brown, soft, and jammy. Stir in the minced garlic and dried thyme and cook for one more minute. Remove from heat and set aside.

Step 2: Blanch the Broccoli
Bring a large pot of salted water to a boil. Add the broccoli florets and cook for 2 minutes until bright green and crisp-tender. Immediately drain and rinse with cold water to stop the cooking process. Pat the broccoli very dry with paper towels or a clean kitchen towel to prevent a watery casserole.

Step 3: Make the Cheese Sauce
Preheat your oven to 375°F (190°C) and grease a 9×13-inch baking dish. In a medium saucepan, melt 2 tablespoons of butter over medium heat. Whisk in the flour and cook for 1 minute to form a roux. Gradually whisk in the beef broth and then the milk, ensuring no lumps form. Bring the mixture to a simmer, whisking constantly, until it thickens enough to coat the back of a spoon, about 3-4 minutes. Remove from heat.

Step 4: Combine Cheese and Assemble
Stir the shredded Gruyère and ½ cup of the shredded cheddar into the warm sauce until smooth and melted. Season with the remaining ½ teaspoon of salt and the black pepper. In the prepared baking dish, combine the blanched, dried broccoli and the caramelized onions. Pour the cheese sauce over the top and gently stir to combine everything. Sprinkle the remaining ½ cup of cheddar cheese evenly over the top.

Step 5: Add the Topping and Bake
In a small bowl, combine the panko breadcrumbs with the remaining 2 tablespoons of melted butter. Sprinkle this mixture evenly over the casserole. Bake for 18-22 minutes, or until the casserole is bubbly around the edges and the topping is golden brown.

Step 6: Rest and Serve
Let the casserole rest for 5-10 minutes before serving. This allows the sauce to set slightly for cleaner serving. Garnish with fresh parsley if desired.

Tips:

  • Patience with the Onions: Don’t rush the caramelization process. Cooking them low and slow is essential for developing their deep, sweet flavor.
  • Dry the Broccoli Thoroughly: This is the most critical step to avoid a watery sauce. Ensure the blanched broccoli is completely dry before adding it to the casserole.
  • Use Freshly Shredded Cheese: Pre-shredded cheese contains anti-caking agents that can prevent it from melting smoothly. Shredding your own Gruyère and cheddar is highly recommended.
  • Vegetarian Option: For a vegetarian version, simply substitute the beef broth with a rich vegetable broth.

Storage Options:

  • Refrigerator: Store leftovers in an airtight container in the refrigerator for up to 4 days.
  • Reheating: Reheat individual portions in the microwave. For best results and to maintain the crispy topping, reheat larger portions in a 350°F (175°C) oven until warmed through.
  • Freezing: This casserole can be assembled (without the panko topping) and frozen before baking. Wrap tightly and freeze for up to 2 months. Thaw in the refrigerator overnight, add the panko topping, and bake as directed.

Air Fryer Sliced Potatoes

0

Air Fryer Sliced Potatoes are a revelation in easy, healthy, and delicious side dishes, offering the satisfying crispiness of fried potatoes with a fraction of the oil and effort. This recipe masterfully leverages the intense, circulating heat of the air fryer to transform simple potato rounds into a golden-brown, crispy-edged, and tender-centered treat that is incredibly versatile. The process begins with a crucial step of slicing and soaking the potatoes, which removes excess surface starch and is the secret to achieving that perfect crispy exterior without sogginess. A light coating of olive oil and a simple yet robust seasoning blend of garlic granules and dried herbs ensures every bite is packed with savory flavor, while the hot air circulation works its magic, cooking the slices evenly and creating an irresistible texture that rivals any deep-fried alternative.

The true brilliance of this recipe lies in its simplicity and its ability to deliver a crowd-pleasing side dish or snack with minimal active cooking time. Unlike oven-roasting, which can take much longer, the air fryer delivers these crispy potatoes in under 20 minutes, making them an ideal last-minute addition to any weeknight meal. They are a blank canvas for customization; you can experiment with different spice blends like smoked paprika, cayenne for heat, or rosemary and thyme for a more herbal note. Whether served alongside a juicy burger, a roasted chicken, or simply enjoyed on their own with a dipping sauce, Air Fryer Sliced Potatoes are a guaranteed hit that proves healthy eating doesn’t have to mean sacrificing flavor or that beloved satisfying crunch.

Why You’ll Love This Recipe:

  • Healthier “Fried” Potatoes: Achieves a wonderfully crispy texture using just a tablespoon of oil, making it a guilt-free alternative to deep-frying.
  • Quick and Easy: Ready in under 30 minutes from start to finish, with very little hands-on prep time.
  • Incredibly Versatile: The perfect side for breakfast, lunch, or dinner, and easily adaptable with your favorite herbs and spices.
  • Foolproof Method: The soaking and drying step ensures perfectly crisp results every single time.

Ingredients:

  • 4 large Russet or Yukon Gold potatoes
  • 1 tablespoon olive oil
  • 1 teaspoon garlic powder
  • 1 teaspoon dried mixed herbs (such as an Italian blend)
  • ½ teaspoon kosher salt, plus more to taste

Instructions:

Step 1: Prepare the Potatoes
Scrub the potatoes clean under cold running water. You can peel them or leave the skins on for extra texture and nutrients. Using a sharp knife or a mandoline slicer for uniformity, slice the potatoes into ½ cm (approximately ¼-inch) thick rounds.

Step 2: Soak and Dry
Place the sliced potatoes in a large bowl and cover them with cold water. Let them soak for at least 20-30 minutes. This step is crucial for removing excess starch, which leads to a crispier result. Drain the potatoes thoroughly and then pat them completely dry with a clean kitchen towel or paper towels. Removing all surface moisture is key.

Step 3: Season the Slices
Transfer the dried potato slices to a large, dry bowl. Drizzle with the olive oil and sprinkle with the garlic powder, dried herbs, and salt. Toss vigorously with your hands until every slice is evenly and lightly coated.

Step 4: Air Fry
Preheat your air fryer to 390°F (200°C) if your model requires it. Arrange the potato slices in the air fryer basket in a single layer, ensuring they aren’t overlapping too much. You may need to cook in batches. Air fry for 18-20 minutes, pausing to shake the basket or toss the slices halfway through the cooking time for even browning.

Step 5: Check for Doneness
The potatoes are done when they are golden brown and crispy on the edges and can be easily pierced with a fork. If you prefer them extra crispy, cook for an additional 2-3 minutes.

Step 6: Serve and Enjoy
Remove the potato slices from the air fryer and season with an extra pinch of salt if desired. Serve immediately while they are hot and at their crispiest.

Tips:

  • Dry Thoroughly: This is the most important step for crispiness. After soaking, take the time to pat every slice completely dry.
  • Don’t Overcrowd the Basket: Air circulation is vital. Cooking in batches is better than stacking the slices, which will steam them instead of frying them.
  • Uniform Slicing: Try to slice the potatoes to the same thickness so they all cook at the same rate.
  • Customize Your Seasoning: Feel free to use your favorite spice blends. Smoked paprika, onion powder, or a Cajun seasoning mix are all excellent options.

Storage Options:

  • Best Served Immediately: These potatoes are at their absolute peak straight out of the air fryer.
  • Refrigerator: Store leftovers in an airtight container in the refrigerator for up to 3 days.
  • Reheating: Reheat in the air fryer at 375°F (190°C) for 3-5 minutes to restore crispiness. The microwave will make them soft.

Creamed Chicken and Biscuits Casserole

0

Creamed Chicken and Biscuits Casserole is the ultimate expression of homestyle comfort food, a hearty and satisfying dish that wraps tender, savory chicken in a rich, creamy sauce and tops it with fluffy, golden-brown biscuits. This recipe masterfully transforms simple, pantry-friendly ingredients into a cohesive and deeply comforting meal that feels both nostalgic and effortlessly modern. The creamy chicken base begins with a sautéed onion for a sweet, aromatic foundation, which is then combined with shredded cooked chicken, cream of chicken soup, mayonnaise for tangy richness, and milk to create a luxuriously smooth sauce. The addition of chopped roasted red peppers introduces a subtle sweetness and vibrant color, while a generous amount of mild cheddar cheese melted throughout provides a sharp, gooey richness that binds everything together. The final, crowning glory is a layer of refrigerated biscuit dough that bakes to a perfect, buttery golden brown, creating a delightful textural contrast to the creamy filling beneath.

The true brilliance of this casserole lies in its ingenious method and its role as the perfect solution for a busy cook. It is an exceptional way to use up leftover roasted or rotisserie chicken, turning it into a completely new and exciting meal with minimal effort. The two-stage baking process is key: pre-baking the chicken mixture ensures it is hot and bubbly before the biscuits are added, which allows the biscuits to cook through perfectly without the bottom becoming soggy. As it bakes, the biscuits rise and brown, the cheese melts into a bubbly blanket, and the creamy sauce thickens around the chicken, resulting in a complete, one-dish meal that is both nourishing and incredibly delicious. Creamed Chicken and Biscuits Casserole is a reliable, family-friendly dinner that delivers unwavering comfort and satisfaction with every single spoonful.

Why You’ll Love This Recipe:

  • Ultimate Comfort Food: The combination of creamy chicken, melted cheese, and fluffy biscuits is the very definition of hearty, homestyle comfort.
  • Perfect for Using Leftovers: It’s a brilliant and delicious way to repurpose leftover cooked chicken into a brand-new meal.
  • Easy One-Dish Meal: With minimal prep and a single baking dish, this casserole is simple to make and even easier to clean up.
  • Family-Friendly Favorite: Its creamy, savory, and cheesy profile is a guaranteed hit with both kids and adults.

Ingredients:

  • 1 ½ teaspoons unsalted butter
  • 1 small yellow onion, chopped
  • 2 pounds cooked chicken, shredded or diced
  • 1 (10.5 oz) can cream of chicken soup
  • ½ cup mayonnaise
  • 1 cup whole milk
  • ½ cup jarred roasted red peppers, drained and chopped
  • 1 ½ cups mild cheddar cheese, shredded and divided
  • 1 (16 oz) can refrigerated biscuit dough (8-count)
  • Fresh chopped parsley for garnish (optional)

Instructions:

Step 1: Preheat and Sauté
Preheat your oven to 350°F (175°C). Grease a 9×13-inch baking dish. In a small skillet, melt the butter over medium heat. Add the chopped onion and sauté for 5-6 minutes, until softened and translucent.

Step 2: Combine the Filling
In a large mixing bowl, combine the sautéed onion, shredded chicken, cream of chicken soup, mayonnaise, milk, and chopped roasted red peppers. Stir until the chicken is evenly coated in the creamy sauce.

Step 3: First Bake
Transfer the chicken mixture to the prepared baking dish and spread it into an even layer. Bake, uncovered, for 15 minutes.

Step 4: Add Toppings and Final Bake
Remove the dish from the oven. Sprinkle 1 cup of the shredded cheddar cheese evenly over the hot chicken mixture. Separate the biscuit dough and arrange the biscuits on top of the cheese. Sprinkle the remaining ½ cup of cheese over the biscuits. Return the casserole to the oven and bake for an additional 18-22 minutes, or until the biscuits are golden brown and cooked through, and the cheese is bubbly.

Step 5: Rest and Serve
Remove the casserole from the oven and let it stand for 5-10 minutes before serving. This allows the filling to set slightly for easier serving. Garnish with fresh parsley if desired.

Tips:

  • Use Rotisserie Chicken: A store-bought rotisserie chicken is the perfect time-saver for this recipe. Simply shred the meat from the breast, thighs, and legs.
  • Don’t Overcook the Biscuits: Keep a close eye on the casserole during the final bake. The biscuits are done when they are golden and sound hollow when tapped.
  • Customize the Vegetables: Feel free to add other vegetables to the filling. A cup of frozen peas and carrots, thawed, would be a classic and delicious addition.
  • Check for Doneness: To ensure the biscuits are fully cooked, insert a toothpick into the center of a biscuit; it should come out clean, not doughy.

Storage Options:

  • Refrigerator: Store leftovers in an airtight container in the refrigerator for up to 3 days.
  • Reheating: Reheat individual portions in the microwave. For best results, reheat larger portions in a 325°F (165°C) oven until warmed through, covering with foil to prevent the biscuits from over-browning.
  • Freezing: It is best to freeze the casserole before the final bake. Assemble the chicken base in the dish, but do not add the biscuits or cheese. Wrap tightly and freeze for up to 2 months. Thaw in the refrigerator overnight, then proceed with adding the toppings and baking as directed.

Homemade Savory Twisted Puff Pastry Rolls

0

Homemade Savory Twisted Puff Pastry Rolls are an effortlessly elegant and delicious appetizer or snack that masterfully combines the rich, buttery flakiness of puff pastry with a creamy, savory vegetable and cheese filling. This recipe transforms simple, store-bought puff pastry into a stunning, professional-looking treat that is perfect for entertaining, brunch, or a satisfying savory bite. The magic lies in the filling—a vibrant and creamy blend of cream cheese (or ricotta) and mozzarella that provides a rich, tangy base, punctuated by the fresh, juicy pop of diced tomato, the mild sharpness of spring onions, and the subtle crunch of bell peppers. An optional addition of sliced mushrooms introduces an earthy depth, while dried herbs like oregano tie everything together with a classic Italian-inspired aroma. Encased in the pastry and twisted into a beautiful spiral, each roll bakes into a golden, multi-layered masterpiece that is as delightful to look at as it is to eat.

The true brilliance of this recipe is its versatility and foolproof method. The twisting technique is simple to execute yet creates an impressive visual effect that suggests a high level of baking skill. The process is wonderfully adaptable; you can easily swap the vegetables based on what you have on hand—spinach, caramelized onions, or sun-dried tomatoes would all be excellent alternatives. The final egg wash gives the rolls a glossy, golden-brown finish, while a sprinkle of sesame seeds or coarse salt adds a final touch of texture and flavor. These Savory Twisted Puff Pastry Rolls are more than just an appetizer; they are a customizable, make-ahead-friendly, and guaranteed crowd-pleasing dish that brings a touch of bakery-style artistry to your table with minimal effort.

Why You’ll Love This Recipe:

  • Impressive and Elegant: The beautiful twisted shape and golden finish make these rolls look like they came from a professional bakery.
  • Incredibly Versatile Filling: The recipe is a canvas for your favorite savory ingredients—easily customize the cheeses and vegetables to your taste.
  • Perfect for Make-Ahead: You can assemble the rolls hours in advance and keep them refrigerated until ready to bake, making them ideal for stress-free entertaining.
  • Crowd-Pleasing Appetizer: These are a guaranteed hit at parties, potlucks, or as a sophisticated snack, appealing to both kids and adults.

Ingredients:

For the Dough:

  • 2 sheets puff pastry, thawed according to package instructions
  • 1 large egg, beaten (for egg wash)

For the Filling:

  • 1 cup cream cheese or ricotta, at room temperature
  • ½ cup grated mozzarella cheese
  • ¼ cup grated cheddar cheese (optional)
  • 1 medium tomato, seeds removed and finely diced
  • ¼ cup chopped spring onions
  • ¼ cup finely chopped red or green bell pepper
  • ¼ cup finely sliced mushrooms (optional)
  • ½ teaspoon dried oregano or Italian seasoning
  • Salt and black pepper, to taste

For Garnish (optional):

  • Sesame seeds
  • Coarse sea salt
  • Fresh parsley or chives, chopped

Instructions:

Step 1: Preheat and Prepare
Preheat your oven to 375°F (190°C). Line two large baking sheets with parchment paper.

Step 2: Make the Filling
In a medium bowl, combine the cream cheese (or ricotta), mozzarella, cheddar (if using), diced tomato, spring onions, bell pepper, mushrooms (if using), dried oregano, salt, and pepper. Mix until well combined and creamy.

Step 3: Shape the Twists
On a lightly floured surface, gently roll out one sheet of puff pastry just enough to smooth any creases. Using a sharp knife or a pizza cutter, cut the pastry into long strips, approximately 3 inches wide and 8 inches long.

Step 4: Fill and Fold
Spoon 1-2 tablespoons of the filling mixture in a straight line down the center of each pastry strip. Fold one side of the pastry over the filling, then bring the other side over to meet it, slightly overlapping the edges to encase the filling completely. Gently press along the seam to seal.

Step 5: Twist and Seal
Holding one end of the filled pastry strip down on the work surface, gently twist the entire length of the strip 2-3 times to create a spiral effect. Press the ends gently to seal. Place the twisted roll seam-side down on the prepared baking sheet. Repeat with the remaining pastry and filling.

Step 6: Apply Egg Wash and Garnish
Brush the top and sides of each twisted roll generously with the beaten egg. If desired, sprinkle with sesame seeds and/or a pinch of coarse sea salt.

Step 7: Bake to Perfection
Bake for 20-25 minutes, or until the pastry is puffed and a deep golden brown.

Step 8: Cool and Serve
Allow the rolls to cool on the baking sheet for 5-10 minutes before serving. Garnish with fresh chopped parsley or chives. Serve warm.

Tips:

  • Thaw Puff Pastry Properly: The key to easy handling is allowing the pastry to thaw slowly in the refrigerator for several hours. If it becomes too soft and sticky, it will be difficult to work with.
  • Remove Tomato Seeds: Taking a moment to scoop out the seeds and excess juice from the tomato before dicing it will prevent the filling from becoming too watery and making the pastry soggy.
  • Don’t Overfill: Using too much filling can cause it to leak out during baking. A moderate amount ensures a clean, beautiful spiral.
  • Work Quickly: Puff pastry works best when cold. If the dough becomes too warm while you’re working, place the baking sheet with the assembled rolls in the refrigerator for 15 minutes before baking.

Storage Options:

  • Refrigerator (Unbaked): Assembled, unbaked rolls can be covered tightly and refrigerated for up to 8 hours before baking.
  • Freezer (Unbaked): For longer storage, place the unbaked, assembled rolls on a baking sheet to freeze solid, then transfer to a freezer bag. Bake from frozen, adding 5-10 minutes to the baking time.
  • Reheating: Reheat leftover baked rolls in a 350°F (175°C) oven for 5-10 minutes to restore crispiness. The microwave will make them soft.

Toffee Pecan Cookies

0

Toffee Pecan Cookies are a masterclass in texture and flavor, a decadent cookie that elevates the classic chocolate chip cookie into a richer, more sophisticated treat. This recipe perfectly balances a soft and chewy brown sugar base with the delightful crunch of toasted pecans and the irresistible, buttery crunch of toffee bits. The process begins by creaming butter with both brown and granulated sugars, a crucial step that incorporates air into the dough and creates a foundation that is both crisp at the edges and tender in the center. The addition of eggs and vanilla provides structure and warmth, while a careful blend of flour, baking soda, and salt ensures the cookies rise just enough without becoming cakey. The generous fold-in of toffee bits and pecans transforms the dough into a chunky, textural delight, promising a complex and satisfying experience in every single bite, where sweet, buttery, and nutty notes harmonize perfectly.

The true brilliance of these cookies lies in their sophisticated yet simple nature and their flawless execution. They are straightforward enough for a beginner baker yet impressive enough for a holiday cookie tray or a gourmet gift. The toffee bits, which melt and caramelize slightly in the oven, create pockets of rich, buttery flavor that contrast beautifully with the earthy, crunchy pecans. Unlike many cookies that spread thin, these hold their shape well, baking up with a slightly crisp exterior that gives way to a wonderfully soft and chewy interior. Toffee Pecan Cookies are more than just a sweet treat; they are a comforting, indulgent, and universally beloved cookie that is guaranteed to become a staple in your baking repertoire, offering a perfect blend of homestyle comfort and elegant flavor.

Why You’ll Love This Recipe:

  • Perfect Textural Harmony: Enjoy a cookie that is soft and chewy with crunchy pecans and crispy, buttery toffee bits in every bite.
  • Rich, Buttery Flavor: The combination of brown sugar and toffee creates a deep, caramel-like sweetness that is incredibly satisfying.
  • Simple Yet Impressive: With a classic mixing method and common ingredients, these cookies are easy to make but taste bakery-quality.
  • Crowd-Pleasing Favorite: The universally loved flavors of toffee and pecan make these a guaranteed hit at parties, potlucks, and cookie exchanges.

Ingredients:

  • 1 cup (2 sticks) unsalted butter, softened
  • 1 cup packed light brown sugar
  • ½ cup granulated sugar
  • 2 large eggs, at room temperature
  • 1 teaspoon vanilla extract
  • 2 ½ cups all-purpose flour
  • 1 teaspoon baking soda
  • ½ teaspoon salt
  • 1 cup toffee bits
  • 1 cup pecans, chopped and toasted

Instructions:

Step 1: Preheat and Prepare
Preheat your oven to 350°F (175°C). Line two baking sheets with parchment paper.

Step 2: Cream Butter and Sugars
In the bowl of a stand mixer fitted with the paddle attachment, or using a hand mixer, cream the softened butter, brown sugar, and granulated sugar together on medium speed for 2-3 minutes. The mixture should be light, fluffy, and pale in color.

Step 3: Add Eggs and Vanilla
Add the eggs one at a time, beating well after each addition until fully incorporated. Scrape down the sides of the bowl as needed. Mix in the vanilla extract.

Step 4: Combine Dry Ingredients
In a separate medium bowl, whisk together the all-purpose flour, baking soda, and salt.

Step 5: Incorporate Dry into Wet
With the mixer on low speed, gradually add the dry flour mixture to the wet ingredients. Mix until just combined, being careful not to overmix.

Step 6: Fold in Toffee and Pecans
Using a spatula, gently fold the toffee bits and toasted chopped pecans into the cookie dough until they are evenly distributed.

Step 7: Scoop and Bake
Using a cookie scoop or two spoons, drop rounded tablespoons of dough onto the prepared baking sheets, spacing them about 2 inches apart to allow for spreading.

Step 8: Bake to Perfection
Bake for 10-12 minutes, or until the edges are set and lightly golden brown. The centers may still look slightly soft.

Step 9: Cool
Allow the cookies to cool on the baking sheet for 5 minutes before transferring them to a wire rack to cool completely.

Tips:

  • Toast the Pecans: Toasting the pecans before chopping them is highly recommended. Spread them on a baking sheet and toast at 350°F (175°C) for 5-7 minutes, until fragrant. This dramatically enhances their nutty flavor.
  • Don’t Overbake: For a soft and chewy cookie, it’s better to slightly underbake them. They will continue to cook on the hot baking sheet after being removed from the oven.
  • Chill the Dough (Optional): For a thicker, chewier cookie, you can cover and chill the dough for 30-60 minutes before scooping and baking. This prevents excessive spreading.
  • Measure Flour Correctly: For accurate results, spoon the flour into your measuring cup and level it off with a knife. Scooping directly can pack in too much flour.

Storage Options:

  • Room Temperature: Store completely cooled cookies in an airtight container at room temperature for up to 5 days.
  • Freeze the Dough: Scooped cookie dough balls can be frozen solid on a baking sheet and then transferred to a freezer bag. Bake from frozen, adding 1-2 minutes to the baking time.
  • Freeze Baked Cookies: Fully baked and cooled cookies freeze very well. Layer them between parchment paper in an airtight container for up to 3 months. Thaw at room temperature.

Slow Cooker Creamy Alfredo Pasta

0

Slow Cooker Creamy Alfredo Pasta is a revolutionary take on the classic Italian-American dish, offering a truly hands-off approach to achieving a luxuriously smooth, rich, and garlicky sauce that clings perfectly to every strand of fettuccine. This recipe masterfully leverages the gentle, steady heat of the crockpot to slowly meld simple, high-quality ingredients—heavy cream, fresh Parmesan, and aromatic garlic—into a velvety, deeply flavorful Alfredo sauce that is far superior to any jarred version. The magic happens as the pasta cooks directly in this creamy bath, absorbing the savory flavors of the chicken broth and Parmesan while releasing its starches, which naturally thickens the sauce to a perfect, restaurant-quality consistency. The optional addition of diced cooked chicken transforms the dish into a complete, protein-packed meal, making it an ideal solution for a busy weeknight where convenience and comfort are paramount.

The true brilliance of this recipe lies in its ability to deliver a decadent, from-scratch pasta dish with minimal effort and no need for a separate pot. Unlike traditional Alfredo that requires constant whisking on the stovetop to prevent breaking, the slow cooker’s low heat gently coaxes the ingredients together, creating an emulsified sauce that is both stable and incredibly flavorful. The key is the occasional stir to ensure the pasta cooks evenly and doesn’t stick, a small task that yields a monumental payoff. The final result is a creamy, cheesy, and utterly comforting pasta that feels indulgent and special, yet is effortlessly simple to prepare. This Slow Cooker Creamy Alfredo Pasta is a game-changer for home cooks, proving that you can have the rich, homestyle taste of a labor-intensive sauce with the convenience of a “set it and forget it” appliance.

Why You’ll Love This Recipe:

  • Effortless Elegance: Achieve a rich, homemade Alfredo sauce without any stovetop whisking or worry about the sauce breaking.
  • One-Pot Wonder: The pasta cooks directly in the sauce, meaning incredible flavor and just one pot to clean.
  • Perfectly Creamy Sauce: The slow cooking process creates an unbelievably velvety and clingy sauce that coats every noodle.
  • Customizable Main Course: Easily add cooked chicken, shrimp, or vegetables to make it a complete and satisfying meal.

Ingredients:

  • 1 pound fettuccine pasta, broken in half
  • 2 cups heavy cream
  • 1 cup chicken broth
  • 1 cup freshly grated Parmesan cheese
  • 4 cloves garlic, minced
  • 1 teaspoon kosher salt
  • ½ teaspoon black pepper
  • ¼ teaspoon ground nutmeg
  • 2 tablespoons unsalted butter
  • 1 cup diced cooked chicken (optional)
  • Fresh parsley, chopped (for garnish)

Instructions:

Step 1: Combine Sauce Ingredients
To the insert of your slow cooker, add the heavy cream, chicken broth, grated Parmesan cheese, minced garlic, salt, pepper, and nutmeg. Whisk the mixture well until the ingredients are beginning to combine and the cheese is incorporated.

Step 2: Add Butter and Protein
Add the butter and the diced cooked chicken (if using) to the slow cooker. Stir gently to combine.

Step 3: Add the Pasta
Break the fettuccine in half and add it to the slow cooker. Use a spoon or tongs to submerge and stir the pasta, ensuring all the noodles are coated in the creamy liquid and are as submerged as possible.

Step 4: Slow Cook
Cover and cook on LOW for 2 to 3 hours. It is important to stir the pasta every 30-45 minutes to prevent the noodles from sticking together and to ensure even cooking.

Step 5: Final Stir and Serve
The pasta is done when the fettuccine is al dente and the sauce has thickened. Once cooked, give the pasta a final thorough stir to coat everything in the creamy sauce. The sauce will continue to thicken upon standing.

Step 6: Garnish and Enjoy
Serve immediately, garnished with a generous sprinkle of freshly chopped parsley.

Tips:

  • Use Freshly Grated Cheese: Pre-shredded Parmesan contains anti-caking agents that can make the sauce grainy. A block of Parmesan that you grate yourself will melt much more smoothly.
  • Stirring is Key: Do not skip stirring the pasta during the cooking process. This is crucial for preventing a clumpy, stuck-together mess and for encouraging the sauce to thicken evenly.
  • Watch the Cook Time: Pasta can go from perfectly al dente to mushy quickly. Begin checking for doneness at the 2-hour mark. The pasta should be tender but still have a slight bite.
  • Adjust Consistency: If the sauce is too thick after cooking, stir in a splash of warm chicken broth or cream. If it’s too thin, let it sit with the lid off for 10-15 minutes; it will continue to thicken.

Storage Options:

  • Refrigerator: Store leftovers in an airtight container in the refrigerator for up to 3 days. The sauce will thicken significantly when cold.
  • Reheating: Reheat gently in a skillet over low heat, adding a splash of cream or broth to loosen the sauce to its original creamy consistency. Microwaving is not recommended as it can cause the sauce to separate.
  • Freezing: Freezing is not recommended for this dish, as the dairy-based sauce will likely separate and become grainy upon thawing.