Banana Cake with Cream Cheese Frosting

0

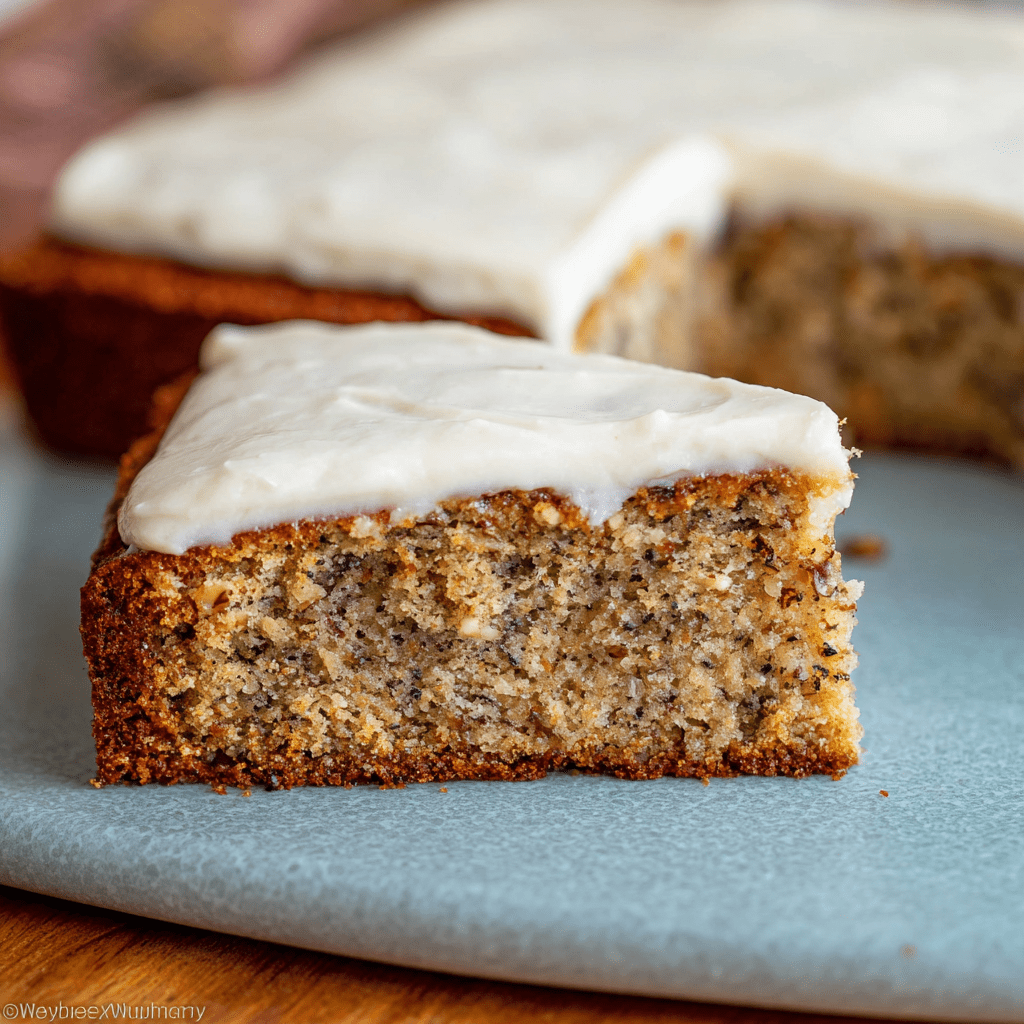
Banana Cake with Cream Cheese Frosting is the majestic, crowd-feeding finale to any gathering, a magnificent sheet cake that transforms overripe bananas into a moist, tender, and spiced masterpiece, all crowned with a tangy, luscious blanket of frosting. This recipe is a grand-scale celebration of classic baking, where the natural sweetness and intense flavor of deeply ripe bananas are amplified by the warm whisper of cinnamon, creating a cake base that is deeply aromatic and impossibly soft. The method is one of careful balance: creaming butter and sugars to a pale, airy fluff provides the structure, while alternating additions of the spiced flour mixture and rich buttermilk ensure a fine, even crumb that remains exceptionally moist. The sheer volume—baked in a professional-sized half-sheet pan—makes it the undisputed champion for potlucks, parties, and family reunions, guaranteeing a slice for everyone with minimal fuss.

The true brilliance of this cake lies in its perfect pairing with the frosting. The cream cheese frosting is not an afterthought but an essential component, its bright tang and creamy richness cutting through the cake’s dense sweetness to create a harmonious bite. The frosting itself is a masterclass in texture, beaten until ethereally light and fluffy, with a hint of cinnamon echoing the spice within the cake. As it chills, the cake’s flavors deepen and the frosting sets to a perfect, sliceable consistency. This is more than just a cake; it’s a nostalgic, comforting, and generously shareable treat that elevates the humble banana bread into a celebratory centerpiece, proving that the most beloved desserts are often those that marry humble ingredients with flawless, time-tested technique.

Why You’ll Love This Recipe:

  • Unbelievably Moist & Flavorful: Packed with ripe bananas and buttermilk for a supremely tender, aromatic crumb that stays moist for days.
  • Perfect for a Crowd: Bakes in a large half-sheet pan, yielding enough generous servings for any party or gathering.
  • Iconic Flavor Pairing: The tangy, creamy frosting perfectly balances the sweet, spiced banana cake for a match made in dessert heaven.
  • Make-Ahead Dream: Both the cake and frosting can be made ahead, and the flavors improve after a day in the fridge.
  • Foolproof & Forgiving: A straightforward, classic mixing method yields consistently spectacular results.

Ingredients:

For the Banana Cake:
4 large, very ripe bananas (about 2 cups mashed)
3 ½ cups (437g) all-purpose flour, spooned & leveled
1 ¼ teaspoons baking powder
1 ¼ teaspoons baking soda
1 teaspoon ground cinnamon
¼ teaspoon fine sea salt
¾ cup (1 ½ sticks / 170g) unsalted butter, softened
1 ¼ cups (250g) granulated sugar
½ cup (100g) packed light brown sugar
3 large eggs, at room temperature
2 teaspoons pure vanilla extract
1 ½ cups (360ml) buttermilk, at room temperature

For the Cream Cheese Frosting:
8 oz (226g) full-fat cream cheese, softened
½ cup (1 stick / 113g) unsalted butter, softened
1 teaspoon pure vanilla extract
¼ teaspoon ground cinnamon
⅛ teaspoon fine sea salt
3 cups (360g) powdered sugar, sifted

Instructions:

Step 1: Prepare the Pan and Oven
Preheat oven to 350°F (175°C). Grease the bottom and sides of a 13×18-inch half-sheet pan. For absolute certainty of release, line the bottom with parchment paper after greasing.

Step 2: Mix Dry Ingredients
In a large bowl, whisk together the flour, baking powder, baking soda, cinnamon, and salt. Set aside.

Step 3: Mash Bananas and Cream Wet Ingredients
In a medium bowl, mash the bananas with a fork until smooth. In the bowl of a stand mixer fitted with the paddle attachment, beat the softened butter on medium speed until creamy, about 1 minute. Add both sugars and beat on medium-high for 3-4 minutes, until light and fluffy. Scrape down the bowl. With the mixer on low, add the eggs one at a time, beating well after each. Beat in the vanilla. Add the mashed bananas and mix until combined.

Step 4: Combine Wet and Dry Ingredients
With the mixer on low, add about one-third of the dry ingredients, mixing until just combined. Pour in half of the buttermilk and mix. Repeat with another third of the flour, the remaining buttermilk, and finally the last of the flour. Mix only until no dry streaks remain; do not overmix.

Step 5: Bake
Pour the batter into the prepared sheet pan. Use an offset spatula to spread it into a perfectly even layer, reaching all corners. Bake for 25-35 minutes, rotating the pan halfway through. The cake is done when a toothpick inserted in the center comes out clean or with a few moist crumbs. The top will be golden brown.

Step 6: Cool Completely
Place the pan on a wire rack and let the cake cool completely in the pan, about 2 hours.

Step 7: Make the Frosting
In a clean mixer bowl, beat the softened cream cheese and butter together on medium speed until completely smooth and creamy, about 2 minutes. Beat in the vanilla, cinnamon, and salt. Reduce speed to low and gradually add the sifted powdered sugar. Once incorporated, increase speed to medium-high and beat for 2-3 minutes until very light and fluffy.

Step 8: Frost and Chill
Spread the frosting evenly over the completely cooled cake. For clean slices, cover and refrigerate the frosted cake for at least 1-2 hours to set the frosting. Use a large, sharp knife to cut into squares. Serve cool or at room temperature.

Tips:

  • Banana Ripeness is Key: Use bananas with completely black peels for the strongest, sweetest flavor and easiest mashing.
  • Room Temperature Ingredients: Ensure butter, eggs, and buttermilk are at room temperature for a smooth, evenly textured batter.
  • Don’t Overmix: Once you add the flour, mix only until the last streaks disappear. Overmixing leads to a tough cake.
  • Even Spreading: Taking time to spread the batter evenly ensures the cake bakes uniformly without thin, overcooked edges.
  • Frosting Consistency: If your frosting seems too soft to spread, refrigerate it for 20 minutes. If too thick, add a teaspoon of milk or cream.

Storage Options:

  • Refrigerator: This cake must be stored covered in the refrigerator due to the cream cheese frosting. It will keep beautifully for up to 5 days.
  • Freezing: You can freeze the unfrosted cake. Cool completely, wrap tightly in plastic and foil, and freeze for up to 3 months. Thaw overnight in the fridge. Frosting can also be frozen separately. Thaw both before frosting.
  • Make-Ahead: Bake and cool the cake up to 1 day ahead. Wrap tightly and store at room temperature. Make the frosting up to 2 days ahead and store covered in the fridge; let it come to a spreadable consistency before using.

Banana Cake with Cream Cheese Frosting is the ultimate shareable dessert—a moist, flavorful, and generously frosted treat that turns simple ingredients into a cause for celebration. It’s a recipe that promises and delivers pure, unadulterated joy with every single slice.

Guinness Beef Stew

0

Guinness Beef Stew is a magnificent, soul-warming ode to rustic Irish cooking, a dish where patience and humble ingredients coalesce into a deeply flavorful, hearty masterpiece. This recipe transcends ordinary stew by building layers of umami-rich foundation, starting with the gentle rendering of bacon fat, which is then used to sear chunks of beef chuck into a crusty, caramelized perfection. The true genius lies in the deglazing step, where a full bottle of Guinness Stout is poured into the pot, its malty sweetness and roasted bitterness dissolving the precious browned bits (fond) to create a complex, robust base. As the stew simmers for hours, the beer mellows and melds with rich beef broth, sweet carrots, earthy potatoes, and aromatic thyme, transforming into a rich, glossy gravy that clings lovingly to every tender morsel of beef and vegetable.

The brilliance of this stew is in its methodical technique and the transformative power of slow cooking. The flour, toasted after the onions and garlic, acts as both a thickener and a flavor enhancer, ensuring the gravy is silky and substantial. The long, gentle simmer is non-negotiable—it breaks down the tough collagen in the chuck roast into unctuous gelatin, rendering the meat fork-tender and infusing the entire pot with its richness. The final stir of frozen peas is a stroke of practical brilliance, adding a vibrant pop of color and sweetness without overcooking. This stew is more than a meal; it is an experience of comfort and community, perfect for gathering around on a cold day. It’s a robust, satisfying, and deeply flavorful dish that celebrates the art of slow cooking, promising warmth and contentment in every single spoonful.

Why You’ll Love This Recipe:

  • Deep, Complex Flavor: The Guinness adds a unique malty, slightly bitter depth that elevates the stew far beyond ordinary beef stew.
  • Unbelievably Tender Beef: The slow braise transforms economical chuck roast into melt-in-your-mouth, succulent pieces.
  • Hearty & Complete Meal: Packed with protein, potatoes, and vegetables, it’s a satisfying one-pot dinner that needs only crusty bread for dipping.
  • Perfect Make-Ahead Dish: Tastes even better the next day as the flavors continue to develop, making it ideal for meal prep or entertaining.
  • Cozy Comfort Food Perfection: The ultimate warm, nourishing, and deeply satisfying dish for chilly weather.

Ingredients:

For the Stew Base:
3 pounds beef chuck roast, cut into 1 ½-inch cubes, patted dry
1 teaspoon kosher salt
½ teaspoon freshly ground black pepper
4 slices thick-cut bacon, diced
1 tablespoon vegetable or avocado oil

For the Aromatics & Thickener:
1 large yellow onion, diced
3 cloves garlic, minced
⅓ cup all-purpose flour

For the Braising Liquid & Vegetables:
1 (12-ounce) bottle Guinness Draught Stout
4 cups low-sodium beef broth
2 tablespoons tomato paste
1 teaspoon dried thyme (or 3 sprigs fresh)
1 dried bay leaf
1 pound carrots, peeled and cut into 1-inch chunks
1 ½ pounds Yukon Gold potatoes, peeled and cut into 1 ½-inch chunks

For Finishing:
1 cup frozen peas
Additional salt and pepper, to taste
Fresh parsley, chopped (for garnish)

Instructions:

Step 1: Sear the Bacon and Beef
Season beef cubes generously with salt and pepper. In a large Dutch oven over medium heat, cook diced bacon until crisp. Remove with a slotted spoon, leaving the fat. Add oil to the bacon fat. Increase heat to medium-high. Working in batches to avoid crowding, sear the beef cubes on all sides until deeply browned (about 8 minutes per batch). Transfer to a plate.

Step 2: Build the Flavor Foundation
Reduce heat to medium. Add diced onion to the pot and cook until softened, about 5 minutes. Add garlic and cook for 1 minute until fragrant. Sprinkle the flour over the onions and cook, stirring constantly, for 2 minutes to form a light roux and cook out the raw flour taste.

Step 3: Deglaze with Guinness
Pour in the entire bottle of Guinness, scraping the bottom of the pot vigorously with a wooden spoon to release all the browned bits (fond). Allow it to simmer for 2-3 minutes, reducing slightly.

Step 4: Assemble and Braise
Stir in the beef broth and tomato paste until smooth. Add the seared beef (and any juices), bacon, carrots, potatoes, thyme, and bay leaf. Bring to a gentle simmer.

Step 5: Slow Simmer to Tenderness
Once simmering, cover the pot, reduce heat to low, and let it cook gently for 2 to 2 ½ hours. Stir occasionally. The stew is done when the beef is fork-tender and the potatoes are soft.

Step 6: Finish and Serve
Discard the bay leaf. Skim any excess fat from the surface if desired. Stir in the frozen peas and let them heat through for 5 minutes. Taste and adjust seasoning with salt and pepper. The stew should be thick and hearty. Garnish with fresh parsley and serve hot in deep bowls, ideally with crusty soda bread for sopping up the gravy.

Tips:

  • Pat the Beef Dry: This is crucial for achieving a proper sear, not steam.
  • Don’t Skip the Sear: Browning the beef builds foundational flavor (the Maillard reaction) that is essential for a rich stew.
  • Use a Good Beer: Guinness Draught is ideal. Avoid using a “stout” that is overly chocolatey or coffee-forward, as it can become bitter.
  • Low and Slow is Key: A gentle, patient simmer is what makes the beef tender. A rapid boil will make it tough.
  • Thicken to Preference: If you prefer a thicker stew, mix 1 tablespoon each of cornstarch and cold water into a slurry and stir it in during the last 10 minutes of cooking.

Storage Options:

  • Refrigerator: Cool completely and store in an airtight container for up to 4 days. Flavors improve overnight.
  • Reheating: Reheat gently on the stovetop over low heat, adding a splash of broth if it has thickened too much.
  • Freezing: This stew freezes beautifully for up to 3 months. Cool completely and freeze in portions. Thaw overnight in the refrigerator before reheating.
  • Make-Ahead: An excellent make-ahead meal. Prepare fully, cool, and reheat before serving.

Guinness Beef Stew is a celebration of patience and robust flavor. It’s a classic, foolproof recipe that yields a pot of pure comfort, perfect for sharing and savoring during the cozy months. It’s a culinary hug in a bowl.

5-Ingredient Slow Cooker Angel Chicken with Italian Dressing Mix

0

5-Ingredient Slow Cooker Angel Chicken is the ultimate testament to the magic of effortless cooking, a dish that transforms a handful of pantry staples into a creamy, savory, and deeply comforting meal with almost no hands-on effort. This recipe is a masterclass in slow-cooker alchemy, where boneless chicken bathes in a luxuriously simple sauce made from the harmonious blend of zesty Italian dressing mix, creamy condensed soup, and rich cream cheese. As it cooks low and slow, these elements melt and meld into a velvety, herb-infused gravy that permeates every fiber of the chicken, rendering it impossibly tender and flavorful. The Italian dressing mix is the ingenious flavor powerhouse, delivering a perfect punch of garlic, onion, and herbs that eliminates the need for measuring a dozen separate spices. The result is a dish that tastes thoughtfully complex but is astonishingly simple to assemble.

The brilliance of this recipe lies in its sheer accessibility and foolproof nature. It is the perfect solution for busy weeknights, new cooks, or anyone needing a guaranteed crowd-pleaser with minimal grocery shopping. The method is as simple as layering: chicken on the bottom, scattered with cream cheese cubes, and drowned in the soup mixture. The slow cooker does the rest, gently cooking the chicken to fall-apart tenderness while transforming the separate components into a cohesive, rich sauce. Shredding the chicken directly in the pot at the end allows it to soak up even more of the creamy goodness. Served over a bed of egg noodles, rice, or mashed potatoes to catch every drop of the incredible sauce, this Angel Chicken is a warm, satisfying embrace of a meal that proves the most rewarding dinners often come from the simplest recipes.

Why You’ll Love This Recipe:

  • Maximum Flavor, Minimal Effort: Only 5 simple ingredients and 5 minutes of prep yield a restaurant-quality creamy chicken dish.
  • True “Set It and Forget It” Cooking: Once assembled, the slow cooker does all the work, freeing you up for the entire day.
  • Unbelievably Tender Chicken: The slow, moist cooking environment guarantees chicken that shreds effortlessly and stays incredibly juicy.
  • Crowd-Pleasing Comfort Food: The creamy, herbaceous sauce and tender chicken are universally loved by both kids and adults.
  • Incredibly Versatile Base: Perfect over pasta, rice, potatoes, or even in a sandwich—the creamy sauce makes everything better.

Ingredients:

For the Slow Cooker:
2 pounds boneless, skinless chicken breasts or thighs
1 (0.7–1 ounce) packet dry Italian dressing seasoning mix
1 (10.5 ounce) can condensed cream of chicken soup (or cream of mushroom/celery)
1 (8 ounce) block full-fat cream cheese, softened and cut into 1-inch cubes
1/2 cup low-sodium chicken broth or water

For Serving:
Cooked egg noodles, white rice, or mashed potatoes
Fresh parsley, chopped (optional, for garnish)

Instructions:

Step 1: Layer the Chicken
Place the chicken breasts or thighs in a single layer at the bottom of a 4 to 6-quart slow cooker.

Step 2: Prepare the Sauce Mixture
In a medium bowl, whisk together the dry Italian dressing mix, the entire can of cream of chicken soup, and the chicken broth until relatively smooth. It’s okay if a few small lumps of soup remain.

Step 3: Assemble
Scatter the cubed cream cheese evenly over the chicken. Pour the prepared soup mixture over the top, trying to cover the cream cheese as much as possible.

Step 4: Cook Low and Slow
Cover and cook on the LOW setting for 4-6 hours, or on the HIGH setting for 2-3 hours. The dish is done when the chicken is cooked through and tender enough to shred easily with a fork. (Chicken thighs may take slightly longer).

Step 5: Shred and Combine
Using two forks, shred the chicken directly in the slow cooker pot. Stir everything thoroughly—the melted cream cheese and soup will combine with the cooking juices to form a rich, creamy sauce that coats the shredded chicken.

Step 6: Rest and Serve
Cover again and let it sit on the WARM setting for 10-15 minutes to allow the sauce to thicken slightly and the flavors to meld. Taste and add a pinch of salt or pepper only if needed (the soup and dressing mix contain salt). Serve hot over your chosen base and garnish with parsley if desired.

Tips:

  • Cream Cheese Softening: Ensure the cream cheese is truly softened at room temperature. Cold cream cheese won’t melt and incorporate as smoothly.
  • Chicken Choice: Chicken thighs will yield a richer, more forgiving, and slightly more flavorful result. Breasts are leaner; take care not to overcook them on HIGH.
  • No Peeking: Resist lifting the lid during cooking. Each peek releases heat and steam, adding significant time to the cook cycle.
  • Sauce Consistency: For a thicker sauce, mix 1 tablespoon of cornstarch with 2 tablespoons of cold water to make a slurry. Stir it into the hot chicken mixture after shredding, cover, and cook on HIGH for an additional 15-20 minutes.
  • Add Veggies: For a complete meal, add 1 cup of frozen peas, chopped broccoli florets, or sliced mushrooms during the last 30 minutes of cooking.

Storage Options:

  • Refrigerator: Store leftovers in an airtight container in the refrigerator for up to 4 days. The sauce will thicken when cold.
  • Reheating: Reheat gently in a saucepan over medium-low heat, adding a splash of broth or milk to loosen the sauce. You can also reheat in the microwave, stirring occasionally.
  • Freezing: This dish freezes well for up to 3 months. Cool completely and store in a freezer-safe container. Thaw overnight in the refrigerator before reheating.
  • Make-Ahead: You can combine the soup, broth, and dressing mix in a bowl, cover, and refrigerate overnight. Cube the cream cheese and store it separately. In the morning, layer everything in the slow cooker as directed.

5-Ingredient Slow Cooker Angel Chicken is the hero recipe your busy life needs. It delivers incredible, comforting flavor with barely any work, proving that a delicious, home-cooked dinner is always within reach.

No-Bake Keto Cheesecake

0

This No-Bake Keto Cheesecake is a magnificent triumph of low-carb dessert alchemy, delivering all the rich, creamy indulgence of a classic New York-style cheesecake without a single gram of sugar or traditional flour. The recipe masterfully constructs a decadent dessert in layers, beginning with an innovative crust of crushed keto-friendly cookies and roasted pecans bound with butter, which bakes in the freezer to a firm, crumbly, and deeply nutty base. The true showpiece is the filling—a cloud-like, impossibly smooth marriage of whipped heavy cream and full-fat cream cheese, sweetened with confectioners’ monk fruit and brightened with a touch of lemon juice and vanilla. By whipping the cream separately to stiff peaks before gently folding it into the sweetened cream cheese mixture, the recipe ensures an ethereally light, mousse-like texture that sets firm yet melts luxuriously on the tongue.

The brilliance of this cheesecake lies in its flawless technique and the patient alchemy of chilling. The extended set time—a full 12 hours or overnight—is non-negotiable, allowing the flavors to marry and the structure to solidify into a sliceable, creamy perfection. This makes it an ideal make-ahead masterpiece for entertaining, completely eliminating day-of stress. It is a dessert that feels profoundly celebratory and indulgent, yet aligns perfectly with a ketogenic lifestyle, proving that dietary discipline never has to mean sacrificing the profound joy of a perfect slice of cheesecake. Every element, from the salty-sweet crust to the bright, creamy filling, is designed for maximum satisfaction, making it a guaranteed crowd-pleaser for any occasion, regardless of dietary preferences.

Why You’ll Love This Recipe:

  • Unbelievably Rich & Creamy Texture: Achieves a luxuriously smooth, mousse-like filling that is both light and decadently satisfying.
  • True Keto-Friendly Indulgence: Uses monk fruit sweetener and keto cookies to create a dessert with virtually no net carbs that tastes incredibly authentic.
  • No Oven Required: Perfect for hot days or kitchens without proper baking equipment, simplifying the entire process.
  • Make-Ahead Perfection: Requires chilling overnight, making it the ultimate stress-free dessert for parties and holidays.
  • Customizable Foundation: The simple, creamy base is perfect for swirling in sugar-free chocolate, berry purees, or citrus zest.

Ingredients:

For the No-Bake Crust:
1 ½ cups (about 150g) Highkey Mini Chocolate Chip Cookies (or any sugar-free, keto-friendly shortbread-style cookie)
1 cup (about 100g) roasted pecans
4 tablespoons (½ stick / 57g) unsalted butter, melted

For the Cheesecake Filling:
1 ½ cups (360ml) cold heavy whipping cream
2 (8-ounce / 226g) packages full-fat cream cheese, fully softened to room temperature
1 cup (120g) confectioners-style monk fruit sweetener (see tip)
¼ cup (60g) full-fat sour cream, at room temperature
2 teaspoons fresh lemon juice
2 teaspoons pure vanilla extract
Pinch of fine sea salt

Instructions:

Step 1: Prepare the Springform Pan
Lightly grease the bottom and sides of a 9-inch springform pan. Line the bottom with a circle of parchment paper for guaranteed easy release.

Step 2: Make the Crust
In a food processor, pulse the keto cookies and roasted pecans until they resemble fine crumbs. Drizzle in the melted butter and pulse until the mixture is evenly moistened and holds together when pinched. Transfer the mixture to the prepared pan. Using the bottom of a glass or a measuring cup, press it very firmly and evenly into the base to form a compact crust. Place the pan in the freezer to set while you make the filling.

Step 3: Whip the Heavy Cream
In a large, chilled metal or glass bowl, using a hand mixer or stand mixer with the whisk attachment, beat the cold heavy whipping cream on medium-high speed until stiff, firm peaks form. This takes 4-5 minutes. Do not over-whip. Immediately place the bowl of whipped cream in the refrigerator.

Step 4: Make the Cream Cheese Base
In another large bowl, beat the softened cream cheese with an electric mixer on medium speed until completely smooth and lump-free, about 2 minutes. Add the confectioners monk fruit, sour cream, lemon juice, vanilla extract, and salt. Beat again on medium speed until the mixture is perfectly smooth, creamy, and well combined, scraping down the sides as needed.

Step 5: Fold and Combine
Retrieve the bowl of whipped cream from the refrigerator. Using a large flexible spatula, gently fold about one-third of the whipped cream into the cream cheese mixture to lighten it. Then, carefully fold in the remaining whipped cream until no white streaks remain and the mixture is homogenous. Be gentle to maintain as much air as possible.

Step 6: Assemble and Chill
Remove the crust from the freezer. Spoon the cheesecake filling over the crust and smooth the top into an even layer with an offset spatula.
Cover the pan tightly with plastic wrap. Refrigerate for a minimum of 12 hours, and ideally 24 hours, to allow the cheesecake to set fully.

Step 7: Serve
To serve, carefully run a thin knife around the edge of the pan before releasing the springform collar. Slice with a clean, hot knife (dipped in hot water and wiped dry) for neat slices. Garnish with fresh berries, a dollop of whipped cream, or a drizzle of sugar-free chocolate sauce if desired.

Tips:

  • Room Temperature is Critical: The cream cheese and sour cream must be fully softened to blend smoothly without lumps.
  • Sweetener Note: Confectioners-style monk fruit (powdered/icing style) blends seamlessly. Granular sweeteners may create a gritty texture.
  • Chill Your Bowl & Beaters: For best results when whipping the cream, chill your mixing bowl and beaters in the freezer for 15 minutes beforehand.
  • Don’t Rush the Chill: The long, undisturbed chilling time is what gives this cheesecake its perfect, sliceable texture. Patience is rewarded.
  • Crust Variations: You can use all nuts (like 2 ½ cups of almonds or pecans) or all keto cookies for the crust based on preference.

Storage Options:

  • Refrigerator: Store covered in the springform pan or in an airtight container in the refrigerator for up to 5 days.
  • Freezing: This cheesecake freezes exceptionally well. Wrap the whole cheesecake or individual slices tightly in plastic wrap, then in foil. Freeze for up to 2 months. Thaw overnight in the refrigerator before serving.
  • Make-Ahead: This is the quintessential make-ahead dessert. Prepare it 1-2 days before you need it for the best flavor and texture.

This No-Bake Keto Cheesecake is a celebration of smart, satisfying baking. It proves that with the right techniques and ingredients, you can create a spectacular, indulgent dessert that fits your lifestyle perfectly, offering a slice of pure, creamy joy with no compromise.

Garlic Shrimp Pasta

0

Garlic Shrimp Pasta is a sublime exercise in elegant simplicity, a restaurant-quality dish that conjures immense flavor from a handful of humble ingredients and comes together in less time than it takes to boil water. This recipe is a masterclass in building a luxurious, creamy pan sauce that clings to every strand of pasta, featuring plump, succulent shrimp bathed in a velvety emulsion of garlic-infused olive oil, white wine, cream, and Parmesan. The magic begins with the shrimp, quickly seared to a delicate pink perfection in a hot skillet, leaving behind a treasure of flavorful fond. Into this base, a generous amount of minced garlic is sautéed just until fragrant, its pungency mellowing into a sweet, nutty backbone for the entire dish. The sauce is then built layer by layer in the same pan, deglazing with broth and cream, and finished with a mound of grated Parmesan that melts into a rich, cohesive blanket.

The brilliance of this recipe lies in its impeccable timing and technique, ensuring each component shines. Cooking the shrimp first and setting them aside prevents overcooking, guaranteeing they remain tender and juicy when returned to the dish at the end. The reserved pasta water is the secret weapon—its starchy content helps emulsify the sauce, allowing it to coat the pasta in a glossy, clingy sheath rather than a greasy pool. A final brightening splash of fresh lemon juice and a shower of parsley cut through the richness, adding necessary acidity and freshness that elevates the dish from simply rich to perfectly balanced. This is a meal that feels indulgent and special, yet is deceptively straightforward to execute, proving that the most impressive dinners often arise from the most focused and respectful treatment of a few excellent ingredients.

Why You’ll Love This Recipe:

  • Restaurant-Quality in 30 Minutes: Achieves a luxuriously creamy, complex sauce with minimal effort and time.
  • Perfectly Cooked, Juicy Shrimp: The quick sear-and-remove method guarantees shrimp that are tender, not rubbery.
  • Creamy, Garlic-Infused Sauce: A velvety, Parmesano-Reggiano enriched sauce that perfectly coats every strand of pasta.
  • Balanced & Bright Flavors: The lemon juice and fresh parsley add a crucial burst of acidity and freshness that balances the rich sauce.
  • One-Pan Wonder (Plus Pot for Pasta): The sauce builds in the same skillet used to cook the shrimp, maximizing flavor and minimizing cleanup.

Ingredients:

For the Pasta & Shrimp:
12 ounces (340g) spaghetti, linguine, or fettuccine
1 pound (450g) large raw shrimp (16/20 or 21/25 count), peeled, deveined, tails removed
1/2 teaspoon kosher salt
1/2 teaspoon freshly ground black pepper
1/2 teaspoon smoked or sweet paprika
1/4 teaspoon red pepper flakes (optional)
2 tablespoons olive oil

For the Garlic Cream Sauce:
2 tablespoons unsalted butter
6 cloves garlic, finely minced or pressed
1/2 cup dry white wine (like Pinot Grigio or Sauvignon Blanc) or chicken broth
1 cup heavy cream or half-and-half
1 cup (about 100g) freshly grated Parmigiano-Reggiano cheese, plus more for serving
1/4 cup reserved pasta cooking water
Juice of 1/2 medium lemon (about 1-2 tablespoons)
1/4 cup fresh Italian parsley, finely chopped

Instructions:

Step 1: Cook the Pasta
Bring a large pot of generously salted water to a boil. Cook the pasta according to package directions until al dente. Just before draining, scoop out and reserve 1 cup of the starchy pasta water. Drain the pasta and set aside.

Step 2: Season and Sear the Shrimp
Pat the shrimp very dry with paper towels. In a bowl, toss them with salt, black pepper, paprika, and red pepper flakes. In a large skillet or Dutch oven, heat the 2 tablespoons of olive oil over medium-high heat until shimmering. Add the shrimp in a single layer and cook for 1-2 minutes per side, until just pink and opaque. Transfer the shrimp to a clean plate immediately.

Step 3: Build the Sauce
Reduce the heat to medium. In the same skillet, melt the butter. Add the minced garlic and cook, stirring constantly, for 30-60 seconds until fragrant but not browned. Pour in the white wine (or broth) to deglaze the pan, scraping up any browned bits from the bottom. Let it simmer for 2-3 minutes until reduced by half.

Step 4: Finish the Cream Sauce
Stir in the heavy cream and bring to a gentle simmer. Let it cook for 2-3 minutes to thicken slightly. Reduce the heat to low. Gradually whisk in the grated Parmesan cheese until fully melted and the sauce is smooth.

Step 5: Combine Pasta and Sauce
Add the drained pasta directly to the skillet with the sauce. Toss vigorously, adding the reserved pasta water a few tablespoons at a time until the sauce reaches a silky, clinging consistency. You may not need all the water.

Step 6: Final Assembly
Return the cooked shrimp and any accumulated juices to the skillet. Gently toss to combine and heat the shrimp through, about 1 minute. Remove from heat. Stir in the fresh lemon juice and chopped parsley.

Step 7: Serve Immediately
Divide among warm plates or bowls. Garnish with additional Parmesan cheese, a crack of black pepper, and a sprinkle of parsley. Serve immediately.

Tips:

  • Prep Everything First (Mise en Place): This dish comes together fast. Have all ingredients measured, chopped, and ready before you start cooking.
  • Don’t Overcook the Shrimp: They cook in just 2-4 minutes total. Remove them as soon as they turn pink and opaque to prevent toughness.
  • Freshly Grate Your Cheese: Pre-grated Parmesan contains anti-caking agents and won’t melt as smoothly into the sauce.
  • Reserve Pasta Water: The starchy water is essential for adjusting the sauce’s consistency and helping it adhere to the pasta.
  • Adjust Creaminess: For a lighter sauce, use half-and-half. For an extra rich sauce, use all heavy cream.

Storage Options:

  • Refrigerator: Store leftovers in an airtight container for up to 2 days. Note that the pasta will continue to absorb the sauce.
  • Reheating: Reheat gently in a skillet over low heat with a splash of cream, broth, or water to loosen the sauce. The microwave may cause the sauce to separate.
  • Freezing: Not recommended. The dairy-based sauce may separate upon thawing, and the shrimp can become rubbery.
  • Make-Ahead: You can peel and devein the shrimp and make the lemon-parsley garnish a day ahead. The sauce is best made fresh.

Garlic Shrimp Pasta is the epitome of quick, elegant, and deeply satisfying cooking. It’s a recipe that delivers sophistication on a weeknight timeline, a dish sure to impress both family and guests with its harmonious blend of briny seafood, pungent garlic, and luxurious cream.

Doritos Taco Salad

0

Doritos Taco Salad is a jubilant, iconic celebration of 90s potluck culture, a wildly flavorful and texturally spectacular dish that masterfully bridges the gap between a hearty meal and a fun, interactive snack. This recipe elevates the humble taco salad into a crave-worthy experience by incorporating the unmistakable, cheesy, tangy crunch of Nacho Cheese Doritos, which act as both a topping and an edible “crouton,” infusing every bite with their bold seasoning. The magic is built on a foundation of crisp iceberg lettuce, loaded with classic taco fixings—savory seasoned ground beef, sweet corn, earthy black beans, briny olives, fresh tomatoes, and a blanket of melted cheese. The crowning glory is the homemade Catalina-style dressing, a sweet-and-tangy emulsified vinaigrette with ketchup, honey, and spices that perfectly mimics the beloved bottled version, tying all the vibrant components together with its unmistakable, glossy sheen.

The brilliance of this salad lies in its strategic assembly and timing, ensuring maximum crunch and flavor in every forkful. By cooling the taco meat before adding it to the greens, you prevent wilting, preserving the lettuce’s refreshing crispness. The most critical rule is to add the crushed Doritos and dressing only immediately before serving, guaranteeing the chips maintain their signature crunch rather than dissolving into a soggy mass. This final toss transforms the bowl into a cohesive yet dynamic mixture where cool, crisp vegetables meet warm, savory beef and the loud, addictive crunch of the chips. It’s a dish that’s unapologetically fun, deeply satisfying, and engineered for crowd-pleasing success, delivering all the nostalgic joy of a fully-loaded taco in one spectacular, shareable bowl.

Why You’ll Love This Recipe:

  • Legendary Flavor & Crunch: The combination of Nacho Cheese Doritos with taco ingredients and sweet Catalina dressing is an iconic, irresistible taste sensation.
  • A Complete Meal in a Bowl: Packed with protein, veggies, and carbs, this hearty salad stands alone as a satisfying dinner.
  • Perfect for Gatherings: A massive, visually impressive bowl that’s ideal for potlucks, parties, and family dinners.
  • Customizable Foundation: Easily adapt with ground turkey, different beans, extra veggies, or your favorite cheese.
  • Homemade Dressing Magic: The easy, from-scratch Catalina dressing is far superior to store-bought and comes together in minutes.

Ingredients:

For the Homemade Catalina Dressing:
1/2 cup red wine vinegar
1/2 cup olive oil or vegetable oil
1/2 cup ketchup
2-3 tablespoons honey (adjust to taste)
1 teaspoon Worcestershire sauce
1 teaspoon paprika
1/2 teaspoon onion powder
1/4 teaspoon garlic powder
1/4 teaspoon salt
Pinch of black pepper

For the Salad:
1 pound lean ground beef (or ground turkey)
3 tablespoons taco seasoning (or 1 packet)
3/4 cup water
1 large head iceberg or romaine lettuce, chopped
1/2 green bell pepper, diced
1/2 cup sliced black olives, drained
1 cup halved grape or cherry tomatoes
1 (15.25 oz) can whole kernel corn, drained
1 (15 oz) can black beans, drained and rinsed
1 cup shredded cheddar or Monterey Jack cheese
2 cups (about 4 oz) Nacho Cheese Doritos, lightly crushed

Instructions:

Step 1: Make the Dressing
Add all dressing ingredients to a mason jar or a bowl with a tight-fitting lid. Seal and shake vigorously until completely emulsified and smooth. Taste and adjust sweetness with more honey if desired. Refrigerate until ready to use.

Step 2: Cook the Taco Meat
In a large skillet over medium-high heat, cook the ground beef until no pink remains. Drain excess fat. Stir in the taco seasoning and water. Bring to a simmer and cook for 5-7 minutes until the liquid is mostly absorbed. Remove from heat and let the meat cool for at least 10-15 minutes. (This prevents wilting the lettuce).

Step 3: Assemble the Salad Base
In an extra-large serving bowl, add the chopped lettuce. Layer the cooled taco meat, diced bell pepper, black olives, tomatoes, corn, black beans, and shredded cheese evenly over the top. Do not toss yet. Cover and refrigerate if not serving immediately.

Step 4: The Grand Finale – Serve!
Just moments before serving, add the crushed Doritos over the salad. Drizzle with about 3/4 of the dressing. Using salad tongs or two large spoons, toss everything together thoroughly until evenly coated. Add more dressing if desired. Serve immediately.

Tips:

  • Cool the Meat: This is the #1 rule to prevent a soggy, wilted salad. Let it cool completely.
  • Crush Doritos Gently: You want a mix of small pieces and larger shards for varied texture. Crush them in the bag or in a bowl with your hands.
  • Add Chips & Dressing Last: The Doritos will begin to soften within minutes of contact with the dressing. For the iconic crunch, toss and serve right away.
  • Drain Ingredients Well: Ensure the corn, beans, and olives are thoroughly drained to avoid excess moisture.
  • Customize Your Protein: Use seasoned shredded chicken, seasoned ground turkey, or plant-based crumbles as an easy swap.

Storage Options:

  • Make-Ahead Components: The dressing can be made up to 5 days ahead. The taco meat can be cooked, cooled, and refrigerated for up to 3 days. Chop vegetables (except tomatoes) and store separately for 1-2 days.
  • Leftovers: Store any leftover tossed salad in an airtight container in the refrigerator. Note that the Doritos will become soft, but the flavors will still be delicious.
  • Not Suitable for Freezing: This salad does not freeze well due to the fresh vegetables and dairy.
  • Serving Strategy: For parties, keep all components separate in bowls and let guests build their own salad, adding Doritos and dressing at the end.

Doritos Taco Salad is a nostalgic flavor explosion that’s guaranteed to bring smiles and empty bowls. It’s a playful, satisfying, and utterly delicious tribute to the classic American potluck, proving that sometimes the most memorable meals are also the most fun.

Easy Taco Dip

0

Easy Taco Dip is the undisputed champion of party appetizers, a vibrant, shareable fiesta in a dish that delivers all the addictive flavors of a fully-loaded taco in one irresistible, scoopable bite. This recipe masterfully layers cool, creamy, and crisp textures with bold, savory flavors, creating a visually stunning centerpiece that comes together with astonishing ease. The magic begins with a luxuriously smooth base of cream cheese and sour cream, infused with the zesty kick of homemade taco seasoning, providing a rich and tangy canvas that perfectly mimics the essence of taco night. This creamy foundation is then artfully crowned with a confetti of fresh toppings: crisp shredded lettuce, a blend of melted cheeses, briny black olives, juicy diced tomatoes, sharp green onions, and a final kick of sliced jalapeño. Each layer is chosen not just for its flavor, but for its ability to hold its texture and color, ensuring every scoop from chip to dip offers the perfect balanced mouthful.

The brilliance of this recipe lies in its foolproof assembly and endless customizability. It requires no cooking—just a quick mix of the base and a joyful layering of fresh ingredients. This makes it the ultimate last-minute lifesaver for any gathering, from game day and potlucks to casual weeknight snacking. Unlike baked versions, the cool, fresh vegetables retain their crunch, providing a delightful contrast to the creamy base. Serving it in a clear dish showcases its beautiful layers, making it as much a feast for the eyes as for the palate. It’s a dip that invites interaction, encouraging guests to dive in with a sturdy chip and create their perfect bite, guaranteeing it will be the first platter emptied and the most requested recipe at the party.

Why You’ll Love This Recipe:

  • Ultimate Crowd-Pleasing Appetizer: Combines all the beloved flavors of tacos in a fun, shareable dip format that disappears fast.
  • No-Cook & Effortless: Comes together in 15 minutes with just mixing and layering—perfect for last-minute entertaining.
  • Perfect Flavor & Texture Contrast: Enjoy the harmony of the cool, creamy base with the fresh, crunchy vegetable toppings.
  • Endlessly Customizable: Easily adapt with refried beans, ground beef, guacamole, or your favorite taco toppings.
  • Visually Impressive: The colorful, distinct layers make a beautiful presentation in a clear serving dish.

Ingredients:

For the Creamy Base:
8 ounces (226g) full-fat cream cheese, fully softened to room temperature
1 ½ cups (360g) full-fat sour cream
2 tablespoons homemade taco seasoning (or 1 packet store-bought)

For the Layered Toppings:
1 cup finely shredded iceberg or romaine lettuce
1 cup (about 100g) shredded Mexican cheese blend (cheddar, Monterey Jack, etc.)
½ cup sliced black olives, drained
¾ cup diced Roma tomatoes, seeds removed (about 2 tomatoes)
2 green onions, thinly sliced
1 small jalapeño, seeds removed for milder heat, thinly sliced
Optional: 1 cup additional toppings like seasoned ground beef, black beans, corn, or diced avocado

Instructions:

Step 1: Prepare the Creamy Base
In a medium mixing bowl, using a hand mixer or a sturdy whisk, beat the softened cream cheese until smooth. Add the sour cream and taco seasoning. Continue to beat on medium speed until the mixture is completely smooth, homogenous, and free of any lumps.

Step 2: Assemble the First Layer
Spread the creamy mixture evenly into the bottom of a 9-inch pie plate, a shallow serving dish, or an 8×8-inch baking dish. Use a spatula to create a smooth, level surface.

Step 3: Layer the Toppings in Order
Evenly sprinkle the shredded lettuce over the cream cheese layer. Next, sprinkle the shredded cheese blend over the lettuce. Scatter the sliced black olives evenly across the cheese. Then, add the diced tomatoes. Finally, garnish with the sliced green onions and jalapeño rings.

Step 4: Chill and Serve
Cover the dish loosely with plastic wrap and refrigerate for at least 30 minutes before serving. This allows the flavors to meld and the dip to firm up slightly for easier scooping. Serve chilled with a side of sturdy tortilla chips, Fritos, or fresh vegetable sticks.

Tips:

  • Soften Cream Cheese Thoroughly: This is the key to a smooth, lump-free base. Let it sit out for 1-2 hours before mixing.
  • Remove Tomato Seeds: Dicing tomatoes and removing the watery seeds and pulp prevents the dip from becoming soggy.
  • Shred Lettuce Finely: A fine shred ensures the lettuce is easy to scoop and integrates well with the other toppings.
  • Customize Your Layers: Add a base layer of refried beans before the cream cheese, or insert a layer of seasoned ground beef or turkey between the cream cheese and lettuce.
  • Make it Ahead: You can prepare the creamy base up to 2 days in advance. Store covered in the refrigerator. Assemble the full dip with fresh toppings up to 3 hours before serving to maintain the best texture.

Storage Options:

  • Refrigerator: Store leftovers, tightly covered with plastic wrap, in the refrigerator for up to 2 days. Note that the lettuce will soften and release moisture over time, so it’s best enjoyed fresh.
  • Not Suitable for Freezing: This dip does not freeze well due to the dairy and fresh vegetable components, which will separate and become watery upon thawing.
  • Component Prep: The cream cheese base can be made and stored separately for up to 2 days. Prep all vegetable toppings and store them in separate airtight containers in the fridge for quick assembly.

Easy Taco Dip is the quintessential party food hero—a no-stress, flavor-packed recipe that guarantees smiles and empty plates. It’s a testament to the idea that the simplest concepts, executed with care and fresh ingredients, often create the most memorable dishes.

Chicken Schnitzel

0

Chicken Schnitzel is the pinnacle of crispy, golden-brown comfort food, a dish that transforms simple chicken cutlets into a spectacularly crunchy, juicy, and elegant meal through a time-honored technique. This recipe masters the classic three-step breading process—flour, egg, and seasoned panko—which creates a flawless, shatteringly crisp exterior that locks in the chicken’s natural juices. The genius begins with the subtle addition of Dijon mustard to the egg wash, a chef’s secret that adds a whisper of tangy depth and helps the breadcrumbs adhere impeccably. Using Japanese-style panko breadcrumbs is non-negotiable; their light, airy, jagged flakes fry up into an extraordinarily crisp and craggy crust that is far superior to fine, traditional breadcrumbs, providing an unbeatable textural contrast to the tender chicken within.

The brilliance of this recipe lies in its precise method and the care taken at each step. Pounding the chicken to an even thickness ensures quick, uniform cooking, preventing dry edges and a raw center. Frying in a precise amount of hot oil—not deep-frying—allows the cutlets to cook efficiently while developing an even, golden crust without becoming greasy. The final rest on a wire rack, rather than paper towels, is a critical detail that preserves the crust’s crispness on all sides. Served immediately with a generous squeeze of fresh lemon and a sprinkle of vibrant herbs, Chicken Schnitzel is a dish of beautiful simplicity that feels both rustic and refined. It’s a guaranteed crowd-pleaser that delivers restaurant-quality results with fundamental kitchen skills, proving that perfection often lies in mastering the classics.

Why You’ll Love This Recipe:

  • Unbeatable Crispy Crust: The panko breadcrumb coating fries up to an incredibly light, golden, and shatteringly crisp texture.
  • Juicy, Tender Chicken Inside: Pounding the cutlets ensures quick, even cooking for perfectly moist results every time.
  • Quick & Impressive Weeknight Meal: Ready in under 30 minutes, yet impressive enough for company.
  • Versatile Foundation: Perfect on its own, in a sandwich, or topped with a fried egg (Jägerschnitzel-style).
  • Family-Friendly Favorite: Mild, crispy, and delicious, it’s a surefire hit with both kids and adults.

Ingredients:

For the Chicken & Breading Station:
4 chicken breast cutlets (about 1 ½ lbs total), pounded to ¼-inch thickness*
½ cup all-purpose flour
2 large eggs
2 teaspoons Dijon mustard
1 cup panko breadcrumbs
½ teaspoon kosher salt
½ teaspoon freshly ground black pepper
½ teaspoon garlic powder

For Frying & Serving:
Vegetable oil, canola oil, or peanut oil (about ½ inch deep in the skillet)
Lemon wedges, for serving
Fresh parsley or dill, chopped, for garnish

Instructions:

Step 1: Prepare the Breading Station
Set up three shallow dishes or plates. Place the flour in the first. In the second, whisk the eggs and Dijon mustard together until completely smooth. In the third, combine the panko breadcrumbs, salt, pepper, and garlic powder.

Step 2: Pound the Chicken
Place one chicken cutlet between two sheets of plastic wrap or in a large zip-top bag. Using a meat mallet, rolling pin, or heavy skillet, gently pound the chicken to an even ¼-inch thickness. Repeat with all cutlets. Pat them completely dry with paper towels.

Step 3: Bread the Chicken
Working with one cutlet at a time, dredge it thoroughly in the flour, shaking off any excess. Next, dip it into the egg mixture, allowing the excess to drip off. Finally, press it firmly into the panko mixture, coating both sides evenly. Press gently to ensure the crumbs adhere. Place the breaded cutlet on a clean plate or wire rack. Repeat with remaining chicken.

Step 4: Heat the Oil
Pour oil into a large, heavy skillet (cast iron is ideal) to a depth of about ½ inch. Heat over medium-high heat until the oil shimmers and reaches approximately 350°F (175°C). A breadcrumb dropped in should sizzle immediately.

Step 5: Fry the Schnitzel
Carefully add 1-2 breaded cutlets to the hot oil, ensuring they are not crowded. Fry for 3-4 minutes per side, until the coating is deep golden brown and crisp. Adjust heat as needed to maintain a steady sizzle without burning.

Step 6: Drain and Rest
Transfer the cooked schnitzel to a wire rack set over a baking sheet—do not place on paper towels, as this can steam the bottom and make it soggy. Sprinkle lightly with a pinch of salt while hot. Repeat with remaining chicken, adding more oil if needed and allowing it to reheat between batches.

Step 7: Serve Immediately
Serve the schnitzel hot, garnished with lemon wedges and a sprinkle of fresh herbs. Traditional sides include potato salad, German-style potatoes, or a simple green salad.

Tips:

  • Even Thickness is Key: Properly pounding the chicken ensures it cooks quickly and evenly, keeping it juicy.
  • Dry Chicken: Patting the chicken dry before breading is crucial for the flour and egg to adhere properly.
  • Hot Oil: Make sure the oil is fully heated before adding the chicken. Too cool, and it will be greasy; too hot, and the coating will burn before the chicken cooks through.
  • Don’t Crowd the Pan: Frying in batches maintains the oil temperature and allows for proper browning and crispness.
  • The Wire Rack: Using a wire rack to drain keeps the entire crust crisp, unlike paper towels which trap steam.

Storage Options:

  • Refrigerator: Store leftovers in an airtight container in the refrigerator for up to 3 days. The crust will soften.
  • Reheating: To recrisp, reheat on a wire rack set over a baking sheet in a 375°F (190°C) oven for 10-12 minutes. Avoid the microwave, which will make the coating soggy.
  • Freezing: Freeze unbreaded, pounded cutlets for up to 3 months. Thaw in refrigerator before breading and frying. You can also freeze breaded, uncooked cutlets: place on a parchment-lined tray until solid, then transfer to a freezer bag. Fry directly from frozen, adding a few extra minutes to the cooking time.
  • Make-Ahead: You can bread the cutlets and refrigerate them on a rack for up to 4 hours before frying.

Chicken Schnitzel is a celebration of texture and technique—a simple dish executed perfectly that never fails to delight. It’s a cornerstone recipe that belongs in every home cook’s repertoire, promising a deliciously crispy and satisfying meal any night of the week.

Shoepeg Salad

0

Shoepeg Salad is a quintessential summer side dish, a vibrant and refreshing celebration of garden-fresh vegetables bound together in a creamy, sweet-tart dressing that sings with simplicity and bright flavor. This recipe showcases the unique, petite kernels of white “shoepeg” corn—known for their tender crunch and delicate sweetness—as the star, surrounded by a confetti of crisp cucumber, juicy tomatoes, and colorful bell pepper. The magic lies in the harmony of textures and the effortless dressing, a minimalist blend of mayonnaise sharpened with a touch of white vinegar and just enough sugar to balance the acidity without overpowering the vegetables. Each ingredient is chosen for its ability to maintain integrity, resulting in a salad that is both visually stunning and satisfyingly crisp, even after a rest in the refrigerator.

The brilliance of this salad is its versatility and make-ahead convenience. It embodies the spirit of a classic “church supper” or potluck staple—easy to prepare in large quantities, resilient enough to travel, and universally appealing to all ages. Unlike heavier, mayo-laden salads, the dressing here is applied with a light hand, acting as a cohesive glaze rather than a thick blanket, allowing the natural sweetness of the corn and the fresh bite of the vegetables to shine through. The mandatory chill time is not merely for temperature; it allows the flavors to meld subtly, the sugar to dissolve fully, and the vegetables to relax into a perfect, cohesive dish. Served cold, Shoepeg Salad is the perfect bright, cool counterpoint to grilled meats, barbecue, or rich casseroles, offering a taste of sunny, carefree days with every crisp, flavorful spoonful.

Why You’ll Love This Recipe:

  • Crisp, Refreshing, & Bright: A light, crunchy vegetable salad that’s the perfect antidote to heavy, rich meals.
  • Effortless to Prepare: Requires only chopping, mixing, and chilling—no cooking involved.
  • Perfect Make-Ahead Dish: Actually tastes better after chilling, making it ideal for picnics, potlucks, and meal prep.
  • Crowd-Pleasing Versatility: A universally loved side that complements everything from burgers and hot dogs to fried chicken and steak.
  • Endlessly Customizable: Easily adapt by adding black beans, avocado, fresh herbs, or a dash of hot sauce.

Ingredients:

For the Salad:
3 (15-ounce) cans white shoepeg corn, well-drained (or 4 ½ cups fresh/frozen corn, cooked and cooled)
1 large English cucumber, seeds removed, diced (about 2 cups)
2 medium Roma tomatoes, seeds removed, diced (about 1 ½ cups)
1/2 large red bell pepper, finely diced (about ¾ cup)
5 green onions, thinly sliced (white and light green parts)

For the Dressing:
2/3 cup high-quality mayonnaise
1 ½ tablespoons white vinegar or apple cider vinegar
1 tablespoon granulated sugar
¾ teaspoon kosher salt, or to taste
¼ teaspoon freshly ground black pepper

Instructions:

Step 1: Prepare the Vegetables
Ensure all canned corn is thoroughly drained in a colander. Dice the cucumber, tomatoes (seeds removed to prevent excess moisture), and red bell pepper into uniform, small pieces. Thinly slice the green onions. Add all prepared vegetables to a large mixing bowl.

Step 2: Make the Dressing
In a separate small bowl, whisk together the mayonnaise, white vinegar, granulated sugar, salt, and black pepper until the sugar is completely dissolved and the mixture is smooth.

Step 3: Combine and Chill
Pour the dressing over the vegetable mixture. Using a large spatula, gently fold and stir until every piece is evenly and lightly coated with the dressing. Be careful not to crush the tender vegetables.

Step 4: Refrigerate to Marry Flavors
Cover the bowl tightly with plastic wrap or transfer the salad to an airtight container. Refrigerate for a minimum of 1 hour, but ideally 2-4 hours or overnight. This chilling time allows the flavors to blend beautifully and the salad to become thoroughly cold.

Step 5: Final Adjustments and Serve
Before serving, give the salad a good stir. Taste and adjust seasoning with an extra pinch of salt or pepper if needed. Serve chilled directly from the bowl.

Tips:

  • Drain Thoroughly: Properly draining the canned corn and removing seeds from the tomatoes are critical steps to prevent a watery salad.
  • Vegetable Consistency: Aim for a uniform, small dice on all vegetables for the best texture and to ensure the dressing coats everything evenly.
  • Dressing Flexibility: Start with the given dressing amount and add more mayonnaise by the tablespoon after chilling if you prefer a creamier salad. The vegetables will release a little liquid as they sit.
  • Fresh Herb Boost: Stir in ¼ cup of finely chopped fresh dill, cilantro, or parsley just before serving for a vibrant flavor lift.
  • Add Protein: Transform it into a light main dish by folding in 2 cups of chilled, shredded rotisserie chicken or 1 can of drained and rinsed black beans.

Storage Options:

  • Refrigerator: Store in an airtight container in the refrigerator for up to 3-4 days. The flavors continue to improve over the first 24 hours.
  • Make-Ahead: This salad is the ultimate make-ahead dish. Prepare it completely up to a day in advance.
  • Not for Freezing: Due to the high water content of the fresh vegetables and the mayonnaise-based dressing, this salad does not freeze well.
  • Serving Suggestion: For a beautiful presentation, serve in a clear glass bowl to showcase the colorful vegetables.

Shoepeg Salad is a timeless, no-fuss classic that delivers maximum flavor and refreshment with minimal effort. It’s a testament to the power of fresh, simple ingredients combined with care, resulting in a side dish that is as reliable as it is delicious.

Butter Toffee Pretzels

0

Butter Toffee Pretzels are the ultimate sweet-and-salty obsession, a dangerously addictive snack that masterfully transforms humble mini pretzels into glossy, crunchy, buttery toffee-coated treasures. This recipe is a study in perfect balance, where the inherent saltiness of the pretzel provides a savory counterpoint to a rich, homemade toffee coating. The magic happens in a saucepan, where brown sugar, butter, and corn syrup are boiled into a bubbling, amber-hued syrup. The addition of baking soda—a dramatic, foaming reaction—is the secret weapon, aerating the toffee and giving the final coating its signature crisp, light crunch that clings perfectly to every nook and cranny of the pretzel twists. A shower of Heath toffee bits added before baking melts into the coating, creating pockets of extra buttery toffee flavor and delightful texture.

The brilliance of this recipe lies in its low-and-slow baking technique and hands-on method. Baking at a very low temperature (200°F) for a full hour allows the toffee syrup to slowly caramelize and harden onto the pretzels without burning, while the frequent stirring ensures each piece is evenly enveloped in the sweet, buttery glaze. This process transforms the mixture from a sticky cluster into individual, perfectly coated, and gloriously crisp pretzel bites. As they cool, the toffee sets into a hard, snappy shell that delivers an immensely satisfying crunch with every bite. More than just a snack, these pretzels are a celebratory treat perfect for gifting, parties, or holiday gatherings, guaranteed to disappear from the bowl at lightning speed and create immediate requests for the recipe.

Why You’ll Love This Recipe:

  • Perfect Sweet & Salty Harmony: The ideal balance of rich, buttery toffee and savory pretzel that keeps you reaching for more.
  • Incredibly Addictive Crunch: The baking soda trick creates a uniquely light, crisp, and snappy toffee coating that’s utterly irresistible.
  • Surprisingly Simple to Make: Uses basic pantry ingredients and a straightforward stovetop-to-oven method with no fancy techniques.
  • Perfect for Gifting & Parties: Makes a huge batch that’s beautiful packaged in cellophane bags or jars for a thoughtful homemade gift.
  • Crowd-Pleasing Guarantee: A universal favorite that appeals to all ages, making it the perfect snack for any gathering.

Ingredients:

For the Pretzel Base & Coating:
10 cups (one 16-oz bag) mini pretzel twists
1 cup (200g) lightly packed light brown sugar
1/2 cup (1 stick / 113g) unsalted butter, cubed
1/4 cup (60ml) light corn syrup
1 teaspoon pure vanilla extract
1/2 teaspoon baking soda
1 (8 oz / 226g) bag Heath Toffee Bits (or almond toffee bits), divided
Non-stick cooking spray

Instructions:

Step 1: Preheat and Prepare Pan
Preheat your oven to 200°F (95°C). This low temperature is crucial. Liberally spray a large roasting pan or two large, rimmed baking sheets with non-stick cooking spray. Add the mini pretzel twists to the pan.

Step 2: Make the Toffee Syrup
In a medium-sized, heavy-bottomed saucepan, combine the brown sugar, cubed butter, and light corn syrup. Cook over medium heat, stirring constantly with a heatproof spatula or wooden spoon, until the butter melts and the mixture comes to a full, rolling boil.

Step 3: Boil and Aerate
Once boiling, set a timer and continue to boil, stirring constantly, for exactly 5 minutes. Remove the saucepan from the heat. Immediately and carefully whisk in the vanilla extract and then the baking soda. The mixture will foam up dramatically and become lighter in color—this is normal and essential for the right texture.

Step 4: Coat the Pretzels
Immediately pour the hot, foamy toffee mixture evenly over the pretzels in the prepared pan. Quickly sprinkle about half of the bag of toffee bits over the top. Using two large spoons or spatulas, gently and quickly toss and stir the pretzels until they are as evenly coated as possible. The mixture will be very sticky.

Step 5: Bake Low and Slow
Place the pan in the preheated oven. Bake for 1 hour, setting a timer to stir the pretzels thoroughly every 15 minutes. This ensures even coating and prevents clumping. After the final stir, sprinkle the remaining toffee bits over the top and return to the oven for the last 15 minutes.

Step 6: Cool and Break Apart
After 1 hour, remove the pan from the oven. Carefully spread the hot pretzel mixture out onto large sheets of parchment paper or a clean, non-stick surface (like a silicone mat). Use forks or spoons to separate any large clumps while still warm. Let the pretzels cool completely at room temperature. As they cool, the toffee will harden into a crisp shell.

Step 7: Store and Serve
Once completely cool and crisp, break apart any remaining clusters. Store in an airtight container at room temperature.

Tips:

  • Stir Constantly While Boiling: This prevents the sugar from burning on the bottom of the pan during the critical 5-minute boil.
  • Work Quickly After Adding Baking Soda: The foamy toffee begins to set as it cools. Pour it over the pretzels and start tossing immediately for the best coating.
  • Don’t Skip the Frequent Stirring: Stirring every 15 minutes during baking is the key to preventing giant, sticky clumps and ensuring each pretzel gets coated.
  • Separate While Warm: Take the time to separate the pretzels on the parchment paper while they’re still warm and pliable. Once the toffee hardens, they’ll be stuck together.
  • Add Nuts: For extra flavor and crunch, stir in 1 cup of roasted pecans or almonds with the pretzels before adding the toffee syrup.

Storage Options:

  • Room Temperature: Store in an airtight container or sealed bag at cool room temperature for up to 2 weeks. They retain their crunch beautifully.
  • Freezing: These freeze exceptionally well for up to 2 months. Place in a freezer-safe bag or container. They can be eaten straight from the freezer.
  • Gifting: Package in clear cellophane bags tied with ribbon, or in decorative jars or tins for a perfect homemade gift.
  • Make-Ahead: This is an ideal make-ahead recipe for holidays or parties, as the flavor and texture hold up perfectly.

Butter Toffee Pretzels are a legendary snack that defines addictive. They strike the perfect chord between simplicity and spectacular results, creating a treat that is impossible to put down and guaranteed to make you a culinary hero among friends and family.