Cheesy Scrambled Eggs

0

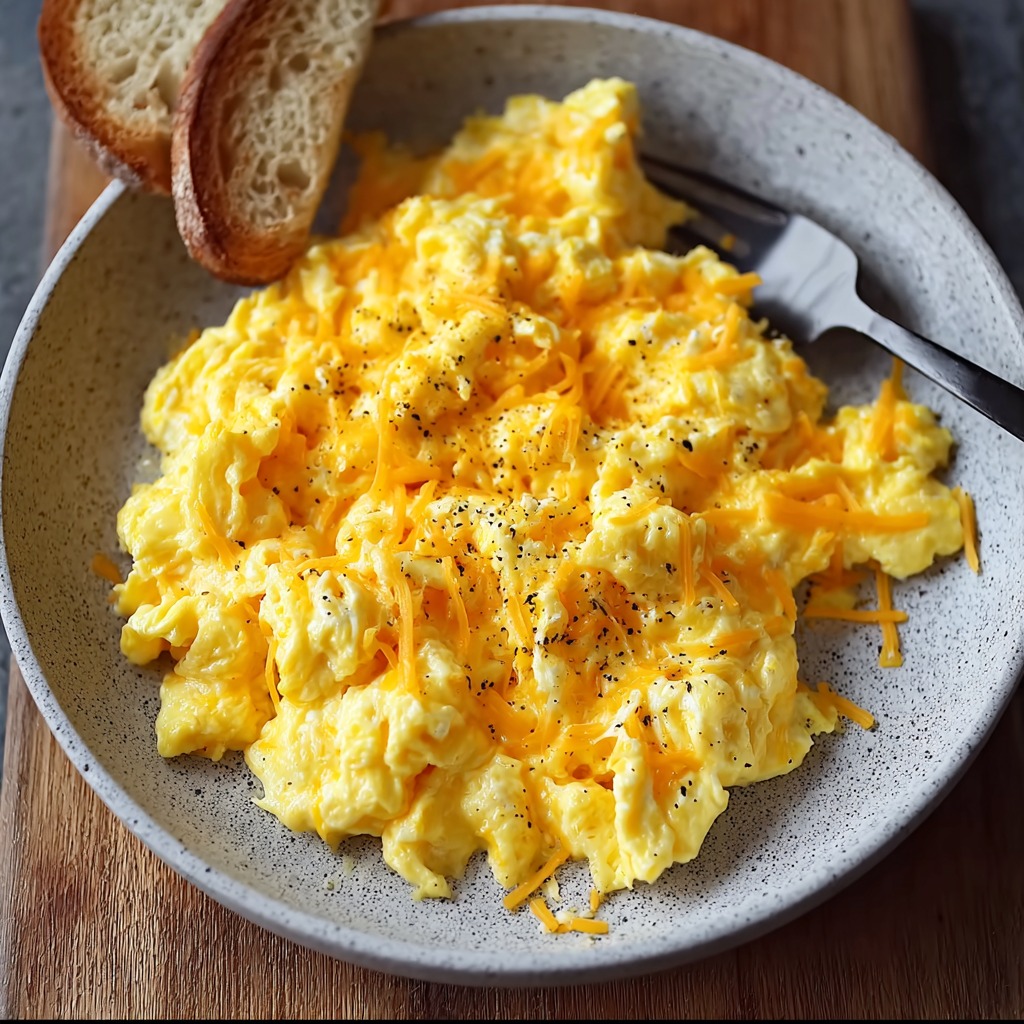
Cheesy Scrambled Eggs are the quintessential breakfast comfort food, a deceptively simple dish that, when executed with care, transforms humble ingredients into a luxurious, velvety, and deeply satisfying meal. This recipe is a masterclass in the gentle art of scrambling, moving beyond basic cooking to a technique that yields eggs which are tender, soft, and creamy, rather than dry and rubbery. The secret lies in patience and low heat: by cooking the eggs slowly over medium-low heat and stirring them with a purposeful gentleness, you allow the proteins to set gradually into delicate, moist curds. The addition of milk, whisked vigorously into the eggs, introduces air and a touch of extra fat, which contributes to a lighter, fluffier texture. This careful method creates the perfect canvas for the star ingredient—sharp cheddar cheese—which is folded in at the precise moment to melt into luscious, savory ribbons throughout the eggs.

The brilliance of this recipe is its focus on technique over complexity, proving that the best breakfasts come from respecting the ingredients and the process. Using a quality non-stick skillet and real butter not only prevents sticking but also infuses the eggs with a rich, nutty flavor that forms the foundation of the dish. Adding the cheese just before the eggs are fully set ensures it melts perfectly without overcooking the delicate curds or making them greasy. The result is a plate of scrambled eggs that are consistently soft, gloriously cheesy, and comforting in the most fundamental way. They are a perfect standalone meal, a sublime filling for a breakfast burrito, or an elegant side that turns any morning into a special occasion, demonstrating that true culinary satisfaction often comes from perfecting the basics.

Why You’ll Love This Recipe:

  • Velvety, Tender Texture: The low-and-slow cooking method ensures impossibly soft, creamy curds, never dry or rubbery.
  • Rich, Comforting Flavor: The combination of real butter and melted sharp cheddar cheese creates a deeply savory, luxurious taste.
  • Quick & Effortless: From start to finish in under 10 minutes, this is the perfect recipe for a satisfying breakfast any day of the week.
  • Endlessly Customizable: A perfect base for adding herbs, vegetables, or different cheeses to create your own signature scramble.
  • Crowd-Pleasing Simplicity: A universally adored dish that appeals to all ages, perfect for family breakfasts or serving guests.

Ingredients:

For the Egg Mixture:
4 large eggs, cold from the refrigerator
1/4 cup (60ml) whole milk or half-and-half
1/4 teaspoon fine sea salt, or to taste
1/8 teaspoon freshly ground black pepper, or to taste

For Cooking and Finishing:
1 tablespoon (14g) unsalted butter
1/2 cup (about 50g) shredded sharp cheddar cheese
Fresh chives or parsley, chopped, for garnish (optional)

Instructions:

Step 1: Prepare the Egg Mixture
Crack the eggs into a medium mixing bowl. Add the milk, salt, and pepper. Using a whisk or a fork, beat the mixture vigorously for 30-45 seconds until it is completely uniform in color, slightly increased in volume, and frothy on the surface. This incorporates air, which is key for fluffy eggs.

Step 2: Preheat the Pan
Place a 10-inch non-stick skillet over medium-low heat. Allow it to preheat for a full minute. Add the butter and swirl the pan until the butter melts and foams slightly, completely coating the bottom of the skillet.

Step 3: Cook Low and Slow
Pour the beaten egg mixture into the center of the skillet. Let it sit, undisturbed, for 20-30 seconds until you see a thin, cooked layer forming around the edges.

Step 4: Form the Curds
Using a silicone spatula or a wooden spoon, gently push the set edges toward the center of the pan. Tilt the pan to allow the uncooked, runny egg to flow into the empty space. Repeat this process—pausing for 10-15 seconds between folds—lifting, folding, and tilting, to create large, soft curds.

Step 5: Add the Cheese
When the eggs are about 80% set—still glossy and slightly runny in places—remove the skillet from the heat. The residual heat will finish the cooking. Immediately sprinkle the shredded cheddar cheese evenly over the eggs.

Step 6: Finish and Serve
Gently fold the cheese into the eggs once or twice, just until incorporated. Let the eggs rest in the hot pan for 30-60 seconds. They will finish setting into a soft, creamy consistency as the cheese melts. Transfer immediately to a warm plate to prevent further cooking. Garnish with fresh herbs if desired, and serve at once.

Tips:

  • Low Heat is Non-Negotiable: Cooking over medium-low or even low heat is the single most important factor for creamy, not rubbery, scrambled eggs. Patience is key.
  • Cold Eggs & a Hot Pan: Starting with cold eggs and a properly preheated pan helps control the cooking rate for more even results.
  • Don’t Over-Stir: Stir or fold the eggs just enough to form curds. Constant stirring will break them into tiny, dry pieces.
  • Cook Off the Heat: The eggs continue to cook from residual heat. Removing them from the burner just before they look fully done ensures they remain moist.
  • Cheese Varieties: Swap cheddar for Gruyère, pepper jack, or a sprinkle of feta. For extra creaminess, stir in a tablespoon of cream cheese with the cheddar.

Storage Options:

  • Not Recommended for Storage: Scrambled eggs are best enjoyed immediately after cooking. Their delicate texture and moisture deteriorate quickly upon storage.
  • If You Must Store: Place cooled leftovers in an airtight container in the refrigerator for up to 24 hours. Reheat very gently in a non-stick skillet over low heat with a tiny pat of butter, or in the microwave at 50% power in short bursts, stirring between each.
  • Meal Prep Alternative: For meal prep, it is better to store the uncooked, beaten egg mixture (without cheese) in a sealed container or jar in the refrigerator for up to 2 days. Cook fresh each morning for the best texture.

Cheesy Scrambled Eggs are a humble yet profound reminder that the simplest dishes, made with attention and respect for technique, can provide the deepest comfort and satisfaction. They are a daily luxury, a quick path to a perfect breakfast, and a fundamental skill that elevates the start of any day.

Zuppa Toscana Soup

0

Zuppa Toscana is a robust, soul-warming Italian-inspired soup that masterfully balances creamy richness with hearty, rustic ingredients, creating a deeply satisfying one-pot meal. This recipe captures the essence of Tuscan comfort food, building layers of flavor from the rendered fat of savory bacon and spicy Italian sausage. The genius of the dish lies in its harmonious contrasts: the creamy broth, enriched with a touch of heavy cream, perfectly complements the earthy, tender chunks of russet potato and the robust, slightly bitter bite of fresh kale. Each spoonful offers a symphony of textures and tastes, from the crispy, smoky bacon garnish to the savory crumbles of sausage and the velvety, peppery broth that ties it all together. It is a soup that feels both indulgent and nourishing, a testament to the power of simple, high-quality ingredients simmered to perfection.

Beyond its incredible flavor, Zuppa Toscana is a marvel of efficient, one-pot cooking. The process begins by cooking the bacon and sausage directly in the pot, using their rendered fats to sauté the aromatic base of onions and garlic, ensuring no flavor is wasted. The potatoes simmer directly in the rich chicken broth, absorbing the savory essence of the meats and aromatics as they cook. The final additions of kale and cream are carefully timed—the kale wilts just enough to become tender without losing its structure, and the cream is stirred in off the heat to prevent curdling, adding a luxurious silkiness without overwhelming the broth. Finished with a pinch of red pepper flakes for a subtle heat and a garnish of Parmesan cheese, this soup is a complete, restaurant-quality meal that is surprisingly simple to recreate at home, promising to become a cherished staple for cold nights and family gatherings alike.

Why You’ll Love This Recipe:

  • Rich, Complex Flavor in Every Bite: Enjoy the perfect harmony of smoky bacon, savory sausage, creamy broth, and earthy kale and potatoes.
  • Hearty, One-Pot Meal: A complete, protein-packed meal with minimal cleanup, perfect for a satisfying weeknight dinner.
  • Creamy Without Being Heavy: The touch of cream adds luxurious silkiness, but the broth remains the star, preventing the soup from feeling overly rich.
  • Customizable Heat Level: Use mild or hot Italian sausage and adjust the red pepper flakes to perfectly suit your preferred spice level.
  • Even Better as Leftovers: The flavors meld and deepen overnight, making this an ideal make-ahead dish for meal prep or easy lunches.

Ingredients:

For the Soup Base:
8 slices thick-cut bacon, chopped
1 lb Italian sausage (mild or hot), casings removed
1 small yellow onion, diced
4 cloves garlic, minced
4 large russet potatoes, peeled and cut into ½-inch cubes
6 cups low-sodium chicken broth
½ bunch (about 4-5 oz) lacinato (Tuscan) kale, stems removed, leaves torn into bite-sized pieces
1 cup heavy cream
1-2 pinches crushed red pepper flakes
Kosher salt and freshly ground black pepper, to taste

For Garnish:
Freshly grated Parmesan cheese
Reserved cooked bacon

Instructions:

Step 1: Render the Bacon
In a large Dutch oven or heavy-bottomed pot over medium heat, cook the chopped bacon until crisp, stirring occasionally. Using a slotted spoon, transfer the bacon to a paper towel-lined plate to drain, leaving the rendered fat in the pot.

Step 2: Brown the Sausage and Aromatics
Add the Italian sausage to the pot with the bacon fat. Cook, breaking it up with a wooden spoon, for 3-4 minutes until it begins to brown. Add the diced onion and continue cooking, stirring, for another 5-6 minutes until the sausage is fully browned and the onion is soft and translucent. Add the minced garlic and cook for 1 minute until fragrant.

Step 3: Add Potatoes and Broth
Add the cubed potatoes to the pot and stir to coat in the fats and flavors. Pour in the chicken broth, scraping up any browned bits (fond) from the bottom of the pot. Increase the heat to high and bring the soup to a boil.

Step 4: Simmer Until Potatoes are Tender
Once boiling, reduce the heat to medium-low to maintain a gentle simmer. Cook, uncovered, for 12-15 minutes, or until the potatoes are just fork-tender. Do not overcook, as they will continue to soften.

Step 5: Add Greens and Cream
Stir in the torn kale and about half of the reserved cooked bacon. Simmer for 3-4 minutes until the kale is wilted and tender. Reduce the heat to the lowest setting. Slowly stir in the heavy cream and add the crushed red pepper flakes. Heat through gently for 2-3 minutes—do not boil after adding the cream.

Step 6: Season and Serve
Taste the soup and season generously with kosher salt and black pepper as needed. Ladle into bowls and garnish with the remaining crispy bacon and a generous sprinkle of freshly grated Parmesan cheese. Serve immediately with crusty bread for dipping.

Tips:

  • Potato Choice: Russet potatoes are ideal as they break down slightly, naturally thickening the broth. For firmer potatoes, use Yukon Golds.
  • Kale Prep: Be sure to remove the tough central stems from the kale and tear the leaves into small pieces for easier eating.
  • Control the Fat: If your sausage is very fatty, you may want to drain some excess fat after browning the sausage and before adding the garlic.
  • Cream Concern: To prevent curdling, always temper the cream by adding it off direct heat or at the very end of cooking, and avoid boiling the soup afterward.
  • Spice to Taste: Start with a small pinch of red pepper flakes; you can always add more at the table.

Storage Options:

  • Refrigerator: Store cooled soup in an airtight container in the refrigerator for up to 4 days. The flavors improve over time.
  • Reheating: Reheat gently on the stovetop over medium-low heat until warmed through. Do not boil vigorously. If the soup has thickened, add a splash of broth or water.
  • Freezing: This soup can be frozen, but for best results, freeze it before adding the cream. The dairy can separate when frozen and thawed. Freeze the base soup for up to 3 months. Thaw overnight in the refrigerator, reheat, and then stir in the fresh cream just before serving.
  • Meal Prep: This soup is excellent for weekly meal prep. Divide into individual containers for easy grab-and-go lunches.

Zuppa Toscana is the epitome of hearty, flavorful, and comforting soup. It transforms humble ingredients into a restaurant-worthy meal that is both incredibly delicious and wonderfully straightforward to prepare, ensuring it will become a repeat favorite in your home.

Chocolate Peanut Butter Cookie Cups

0

Chocolate Peanut Butter Cookie Cups are a masterful minimalist creation, a dessert that distills the iconic, beloved flavor duo into a perfectly engineered two-bite masterpiece. This recipe is a study in elegant simplicity, where a rich, fudgy peanut butter cookie forms a sturdy yet tender cup, cradling a luxurious pool of silky dark chocolate ganache. The magic lies in the cookie base—a remarkable five-ingredient dough that leverages the natural oils in peanut butter to create a melt-in-your-mouth texture without any flour or butter. A touch of baking powder gives it the perfect lift and structure, while brown sugar (or its keto-friendly counterpart) adds a deep molasses-like sweetness that complements the salty, nutty peanut butter perfectly. Baking them in a mini muffin tin transforms each portion into a distinct edible vessel, ready to be filled.

The true brilliance of this recipe is its dual-phase technique and sophisticated finish. Creating an initial indentation before baking ensures the cup shape begins to form, but the critical second press—after a brief cooling period—perfectly carves out a pristine well for the ganache while the cookies are still malleable. The ganache itself is a lesson in perfection: just hot cream poured over finely chopped chocolate, then stirred after a patient rest into a glossy, velvety emulsion that sets to a firm yet creamy texture. The final result is a stunningly beautiful treat with a dramatic contrast between the crumbly, salty-sweet cookie and the smooth, rich chocolate center. It’s a dessert that feels gourmet and indulgent yet is deceptively straightforward to make, offering a flawless, crowd-pleasing bite every single time.

Why You’ll Love This Recipe:

  • The Ultimate Flavor Duo: Celebrates the perfect marriage of rich, salty peanut butter and smooth, decadent chocolate in every bite.
  • Minimalist, Accessible Ingredients: Made with simple pantry staples—no flour, no mixer, and no complex techniques required.
  • Elegant Individual Portions: The cute, uniform cups are perfect for parties, gifting, or portion control, and they look professionally made.
  • Customizable for Diets: Easily adapted for keto by using sugar-free chocolate and brown sugar substitute with no loss of texture or flavor.
  • Perfect Make-Ahead Dessert: Both components can be made ahead and assembled, and they store beautifully, making them ideal for entertaining.

Ingredients:

For the Peanut Butter Cookie Cups:
1 cup (260g) smooth, natural peanut butter (well-stirred)*
1 cup (200g) packed light brown sugar (or brown sugar monk fruit substitute for keto)
1 large egg, at room temperature
1 teaspoon pure vanilla extract
1 teaspoon baking powder
½ teaspoon fine sea salt

For the Chocolate Ganache Filling:
½ cup (85g) semi-sweet chocolate chips (or sugar-free chocolate chips for keto)
½ cup (120ml) heavy cream
Flaky sea salt, for garnish (optional)

Special Equipment:
24-cup mini muffin tin (silicone highly recommended)
½ teaspoon measuring spoon

Instructions:

Step 1: Preheat and Prepare Pan
Preheat your oven to 325°F (160°C). If using a metal muffin tin, grease it very thoroughly with butter or non-stick spray, or line with mini paper liners. A silicone pan requires no preparation and makes removal effortless.

Step 2: Make the Cookie Dough
In a medium mixing bowl, combine the peanut butter, brown sugar, egg, vanilla extract, baking powder, and salt. Stir vigorously with a sturdy spatula or spoon until a thick, smooth, and cohesive dough forms. It will have the consistency of a soft, play-dough-like cookie dough.

Step 3: Form the Cookie Cups
Scoop the dough by the level tablespoon and roll into balls. Place one ball into each cavity of the prepared mini muffin tin. Using your fingers, gently press the dough to fill the bottom. Take the back of a ½ teaspoon measuring spoon and press firmly into the center of each dough ball to create a deep, wide indentation, pushing the dough up the sides to form a cup shape.

Step 4: Bake
Bake for 12 to 15 minutes. The cookies are done when the edges are set and the centers have lost their shiny, wet appearance—they will still be soft. Do not overbake. The cookies will continue to set as they cool in the hot pan.

Step 5: Create the Wells
Remove the pan from the oven and let it cool on a wire rack for exactly 7-10 minutes. The cookies will still be warm and pliable. Using the same clean ½ teaspoon measuring spoon, gently but firmly press down and twist in the center of each cookie to redefine and perfect the well. This step is crucial for a neat cup shape. Allow the cookies to cool completely in the pan.

Step 6: Make the Ganache
While the cookies cool, prepare the ganache. Place the chocolate chips in a small heatproof bowl. In a saucepan, heat the heavy cream over medium heat until it is just beginning to simmer around the edges and is piping hot (do not boil). Immediately pour the hot cream over the chocolate chips. Cover the bowl with a plate and let it sit undisturbed for 3 minutes. After 3 minutes, remove the cover and stir slowly from the center outward until the mixture is completely smooth, glossy, and emulsified. Let the ganache cool at room temperature for 10-15 minutes to thicken slightly.

Step 7: Fill and Garnish
Once the cookie cups are completely cool, carefully remove them from the tin. Using a small spoon or a piping bag, fill each cup with the slightly cooled ganache, filling just to the top of the cookie rim. If desired, garnish each with a tiny pinch of flaky sea salt.

Step 8: Set and Serve
Allow the ganache to set at room temperature for about 1 hour, or place the tray in the refrigerator for 15-20 minutes to set quickly. Store and serve as directed below.

Tips:

  • Peanut Butter Note: Use a standard, no-stir creamy peanut butter like Jif or Skippy for best results. Natural peanut butter must be very well-stirred and is often too oily, which can affect texture.
  • Perfect Indentations: The ½ teaspoon measuring spoon is the ideal tool for creating uniformly sized wells both before and after baking.
  • Don’t Overbake: The cookies firm up significantly as they cool. Baking until just set ensures a tender, not crumbly, cup.
  • Ganache Consistency: For a thicker, firmer ganache that sets quickly, use a 1:1 ratio of chocolate to cream (increase chocolate to ¾ cup). For a softer, more fluid ganache, stick to the recipe.
  • Easy Removal: A silicone muffin pan is highly recommended. If using metal, running a small offset spatula or knife around the edge after the 10-minute cool-down helps release them cleanly.

Storage Options:

  • Room Temperature: Store assembled cookie cups in a single layer in an airtight container at cool room temperature for up to 3 days.
  • Refrigerator: For longer storage or a firmer texture, keep in the refrigerator for up to 1 week. The ganache will be firm when cold.
  • Freezing: These freeze exceptionally well. Place the unfilled, baked cookie cups in a freezer bag for up to 3 months. Thaw and fill with fresh ganache. You can also freeze fully assembled cups; thaw in the refrigerator overnight.
  • Make-Ahead: Bake the cookie cups and store them unfilled in an airtight container at room temperature for 2 days, or freeze. Make the ganache up to 3 days ahead and store covered in the refrigerator. Gently re-warm in 10-second bursts in the microwave, stirring until fluid again, before filling.

Chocolate Peanut Butter Cookie Cups are the epitome of a flawless, no-fuss yet impressive dessert. They deliver maximum flavor and satisfaction with elegant simplicity, proving that the most extraordinary treats often come from the humblest of ingredients.

Ham Casserole

0

Ham Casserole is the quintessential embodiment of comfort food alchemy, transforming simple pantry staples and leftover holiday ham into a rich, creamy, and deeply satisfying family meal. This recipe masterfully layers tender corkscrew-shaped cellentani pasta, savory diced ham, and crisp-tender broccoli florets in a velvety, double-cheese sauce that is infused with a sophisticated blend of aromatic herbs. The genius of the dish lies in its harmonious construction: a from-scratch sauce built on a classic roux of butter and flour, enriched with both sharp cheddar for tang and American cheese for an unparalleled meltability and creamy texture. This luxurious sauce clings to every nook of the pasta and coats each piece of ham and broccoli, ensuring that every forkful is a perfect, cohesive bite of creamy, cheesy, and savory goodness.

Beyond its incredible flavor, this casserole is a practical masterpiece, designed for efficiency and ease. By utilizing one pot for both the sauce and the final mixing, it minimizes cleanup while maximizing flavor development. The gentle sauté of onions and garlic with thyme, marjoram, and rosemary creates a fragrant foundation that elevates the entire dish beyond a simple cheese sauce. The quick steam of the broccoli preserves its vibrant color and bite, adding a necessary fresh contrast to the rich elements. Baked just until bubbly and golden on top, this casserole emerges from the oven as the ultimate crowd-pleaser—a complete, comforting, and generous meal that is as perfect for a busy weeknight as it is for a cozy Sunday supper, promising to warm the kitchen and please every palate at the table.

Why You’ll Love This Recipe:

  • The Ultimate Comfort Food: A creamy, cheesy, and hearty baked pasta dish that delivers deep satisfaction and nostalgia in every bite.
  • Brilliant Use for Leftover Ham: Transforms holiday leftovers or deli ham into a brand new, crave-worthy meal the whole family will love.
  • Creamy, Flavor-Packed Cheese Sauce: The combination of sharp cheddar and melty American cheese creates a luxurious, velvety sauce that clings perfectly to the pasta.
  • All-in-One Meal: Pasta, protein, and vegetables are baked together in a complete, balanced dish that requires no extra sides.
  • Easy and Forgiving: Simple techniques and common ingredients come together for a foolproof casserole that’s perfect for cooks of any level.

Ingredients:

For the Pasta and Vegetables:
12 ounces (340g) cellentani pasta (or cavatappi, fusilli)
2 cups fresh broccoli florets, cut into small bite-sized pieces
1 tablespoon olive oil

For the Aromatic Base:
1 medium yellow onion, finely chopped
2 cloves garlic, minced
1 teaspoon dried thyme
1 teaspoon dried marjoram
½ teaspoon crushed dried rosemary
½ teaspoon kosher salt
¼ teaspoon freshly ground black pepper

For the Cheese Sauce:
2 tablespoons unsalted butter
2 tablespoons all-purpose flour
2 ¼ cups whole milk, warmed
2 cups (8 oz / 226g) shredded sharp cheddar cheese, divided
3-4 slices (about 3 oz) American cheese, torn into pieces

For the Casserole:
2 ½ cups diced cooked ham (about 12 oz)

Instructions:

Step 1: Prep and Cook the Pasta
Preheat your oven to 350°F (175°C). Lightly grease a 9×13-inch baking dish. Bring a large pot of generously salted water to a boil. Cook the pasta according to package directions until just al dente (it will cook further in the oven). Drain well and set aside.

Step 2: Steam the Broccoli
While the pasta cooks, place the broccoli florets in a microwave-safe bowl with 2 tablespoons of water. Cover tightly with a microwave-safe plate or plastic wrap vented at one corner. Microwave on high for 2-3 minutes until bright green and crisp-tender. Drain immediately and set aside.

Step 3: Build the Aromatic Base
In the now-empty pasta pot (or a large Dutch oven), heat the olive oil over medium heat. Add the chopped onion and cook for 5-6 minutes, until softened and translucent. Reduce the heat to low. Add the minced garlic, dried thyme, marjoram, rosemary, salt, and pepper. Cook, stirring constantly, for 1 minute until very fragrant.

Step 4: Make the Roux and Sauce
Add the 2 tablespoons of butter to the pot and melt. Sprinkle in the flour and cook, stirring continuously, for 2 minutes over low heat to form a pale roux and cook out the raw flour taste. Gradually whisk in the warm milk, ensuring no lumps form. Increase the heat to medium and bring the mixture to a gentle simmer, whisking frequently, until it thickens enough to coat the back of a spoon, about 5-7 minutes.

Step 5: Create the Cheese Sauce
Remove the pot from the heat. Gradually add 1 ½ cups of the shredded cheddar cheese and all the American cheese pieces, stirring until completely melted and smooth after each addition. The sauce should be thick and velvety.

Step 6: Assemble the Casserole
To the pot of cheese sauce, add the drained pasta, steamed broccoli, and diced ham. Gently stir until every component is evenly coated with sauce. Transfer the entire mixture to the prepared baking dish and spread it into an even layer. Sprinkle the reserved ½ cup of cheddar cheese evenly over the top.

Step 7: Bake and Serve
Bake, uncovered, in the preheated oven for 15-20 minutes, or until the casserole is bubbling around the edges and the cheese on top is fully melted. For a more golden top, broil for the final 1-2 minutes, watching closely to prevent burning. Let the casserole stand for 5-10 minutes before serving to allow it to set slightly.

Tips:

  • Pasta Choice: The spiral shape of cellentani or cavatappi is ideal for capturing and holding the creamy sauce.
  • Don’t Overcook the Pasta: Cook it al dente, as it will continue to soften while baking in the sauce.
  • Warm Your Milk: Using milk that is at least room temperature (or gently warmed) prevents the sauce from becoming grainy when added to the roux.
  • Cheese Matters: The American cheese is key for a supremely creamy, non-greasy sauce. Sharp cheddar provides the essential tangy flavor.
  • Ham Options: Use leftover baked ham, a thick-cut ham steak, or even good-quality deli ham diced into chunks.

Storage Options:

  • Refrigerator: Store leftover casserole, covered tightly, in the refrigerator for up to 4 days.
  • Reheating: Reheat individual portions in the microwave. For larger amounts, reheat in a covered dish at 325°F (165°C) for 20-25 minutes, adding a splash of milk if the sauce seems too thick.
  • Freezing: This casserole freezes well before baking. Assemble completely but do not bake. Wrap tightly in plastic and foil. Freeze for up to 2 months. Thaw overnight in the refrigerator and bake as directed, adding 10-15 minutes to the bake time.
  • Make-Ahead: You can assemble the entire casserole up to 24 hours in advance. Cover and refrigerate. Bake as directed, adding 5-10 minutes to the baking time since it will be cold from the fridge.

Ham Casserole is the epitome of dependable, heartwarming home cooking. It takes simple, accessible ingredients and weaves them into a creamy, cheesy, and utterly comforting masterpiece that promises to become a beloved staple in your recipe collection.

Keto Bacon Cheeseburger with Chaffle Buns

0

This Keto Bacon Cheeseburger is a triumphant celebration of low-carb ingenuity, proving that you can indulge in the ultimate comfort food without compromise. The recipe ingeniously replaces traditional bread with savory, crispy-chewy “Chaffle” buns—a miraculous blend of egg, cheese, and almond flour that cooks in a waffle iron to create a sturdy, flavorful vessel with none of the carbs. These golden buns provide the perfect textural contrast to a juicy, perfectly seasoned beef patty, made from 80/20 ground beef to ensure maximum flavor and juiciness. Each component is thoughtfully crafted to adhere to keto principles while delivering the full, nostalgic experience of a classic diner-style bacon cheeseburger, complete with melty cheese, crisp lettuce, ripe tomato, and sharp red onion. It’s a masterful reimagining that satisfies both dietary goals and deep culinary cravings.

The brilliance of this recipe lies in its modular design and foolproof techniques, offering multiple cooking methods (grill, skillet, or air fryer) to achieve the perfect patty in any kitchen. The Chaffle buns are a revelation—easy to whip up, structurally sound enough to hold a loaded burger, and deliciously cheesy in their own right. By building the burger with fresh, crisp toppings, you add necessary brightness and crunch that cut through the rich, savory elements. This isn’t just a “substitute” burger; it’s a purpose-built, gourmet keto experience that stands on its own merits. It delivers the deeply satisfying ritual of assembling and biting into a towering, juicy burger, proving that a ketogenic lifestyle can be abundant, flavorful, and deeply comforting without a single sacrifice.

Why You’ll Love This Recipe:

  • Zero-Compromise Keto Comfort Food: Enjoy the full, indulgent experience of a classic bacon cheeseburger with virtually no net carbs.
  • Game-Changing Chaffle Buns: These easy, cheesy waffle buns are sturdy, delicious, and completely bread-free, making them the perfect keto vessel.
  • Juicy, Flavor-Packed Patties: Using 80/20 beef and a simple, potent seasoning blend guarantees a burger that’s succulent and full of flavor.
  • Multiple Cooking Methods: Clear instructions for grilling, pan-searing, or air frying ensure a perfect burger no matter your equipment.
  • Fully Customizable: Easily adjust cheese types, toppings, and seasoning to create your own signature keto burger masterpiece.

Ingredients:

For the Chaffle Buns (makes 6 mini waffles / 3 buns):
3 large eggs
1 cup (112g) shredded sharp cheddar cheese
1/4 cup (28g) blanched almond flour
1/2 teaspoon baking powder
Non-stick cooking spray or oil for the waffle iron

For the Burger Patties (makes 3):
1 lb 80/20 ground beef
1 tablespoon sugar-free burger sauce or keto-friendly Worcestershire sauce
2 teaspoons minced garlic
1/2 teaspoon kosher salt
1/2 teaspoon black pepper
1 tablespoon salted butter (for skillet method)

For Assembly & Toppings:
3 slices cheese (cheddar, American, Swiss, or pepper jack)
6 slices thick-cut bacon, cooked until crisp
6 large lettuce leaves (romaine or iceberg)
3 thick tomato slices
1/8 cup red onion, very thinly sliced
Optional: Sugar-free ketchup, mustard, mayo, or special sauce

Instructions:

Step 1: Make the Chaffle Buns
Preheat your mini waffle maker according to manufacturer instructions. In a medium mixing bowl, whisk the eggs. Add the shredded cheddar cheese, almond flour, and baking powder. Stir vigorously until a thick, cohesive batter forms. Lightly grease the hot waffle iron. For each chaffle, pour a scant 1/4 cup of batter into the center, close the lid, and cook for 3-4 minutes, or until golden brown, crispy on the edges, and steam has stopped emitting. Carefully remove and place on a wire rack. Repeat to make 6 chaffles (2 per burger). Let them cool slightly; they will firm up as they cool.

Step 2: Prepare the Burger Patties
In a large bowl, combine the ground beef, sugar-free sauce, minced garlic, salt, and pepper. Use your hands to mix gently until the seasonings are just incorporated; avoid overworking the meat. Divide the mixture into 3 equal portions. Form each portion into a ball, then flatten into a patty about 1/2-inch thick, making a slight indentation in the center with your thumb to prevent puffing. Season the outside of each patty lightly with additional salt and pepper.

Step 3: Cook the Burgers (Choose Your Method)

Grill Method: Preheat grill to high heat (about 400-450°F / 200-230°C). Place patties on clean grates. Grill for 4-5 minutes on the first side. Flip and grill for an additional 3-4 minutes for medium doneness. Add a cheese slice during the last minute to melt.

Cast Iron Skillet Method: Heat a large cast iron skillet over medium-high heat. Add the butter. Once hot, add the patties. Cook undisturbed for 4-5 minutes until a deep crust forms. Flip and cook for 3-4 more minutes for medium. Add cheese, remove the skillet from heat, cover loosely with foil, and let sit for 1 minute to melt the cheese.

Air Fryer Method: Preheat air fryer to 390°F (200°C). Place patties in the basket. Cook for 5 minutes, flip, then cook for another 5-6 minutes until desired doneness. Add cheese and close the air fryer for 1 minute to melt.

Step 4: Assemble the Burgers
Place one Chaffle on a plate. Top with a lettuce leaf, the cheeseburger patty, two slices of bacon, a tomato slice, and some red onion. Add your preferred keto-friendly sauces. Top with a second Chaffle. Serve immediately.

Tips:

  • Don’t Overmix the Beef: Handle the meat as little as possible when forming patties to ensure a tender, not tough, texture.
  • Patty Thickness: Keep patties uniform and about 1/2-inch thick for even cooking.
  • Rest the Meat: Let the cooked patty rest for 2-3 minutes before assembling to allow juices to redistribute.
  • Crispy Chaffles: For the crispiest buns, let them cool completely on a wire rack. Re-crisp in a toaster or air fryer for 1-2 minutes if made ahead.
  • Customize Your Sauce: Mix 1/4 cup keto mayo with 1 tbsp sugar-free ketchup, 1 tsp pickle relish (sugar-free), and a dash of garlic powder for a quick “special sauce.”

Storage Options:

  • Chaffle Buns: Store completely cooled chaffles in an airtight container in the refrigerator for up to 5 days, or freeze for up to 2 months. Reheat in a toaster or air fryer to restore crispness.
  • Cooked Patties: Store cooked, cooled burger patties in an airtight container in the refrigerator for up to 3 days. Reheat gently in a skillet or air fryer.
  • Meal Prep: Cook chaffles and patties ahead of time. Assemble burgers fresh for the best texture, reheating components separately.
  • Freezing Uncooked Patties: Shape patties, place parchment paper between them, and freeze in a sealed bag for up to 3 months. Thaw in the refrigerator before cooking.

The Keto Bacon Cheeseburger with Chaffle Buns is a landmark recipe in low-carb cooking. It successfully bridges the gap between dietary discipline and unabashed enjoyment, delivering a meal that is as nourishing to the body as it is satisfying to the soul. It’s proof that with a little creativity, you can have your burger and eat it too.

Bacon Wrapped Shrimp

0

Bacon Wrapped Shrimp is an iconic appetizer that transforms two simple ingredients into a luxurious, crowd-stopping bite, perfectly balancing the richness of smoky bacon with the sweet, delicate brininess of plump shrimp. This recipe elevates the classic beyond mere wrapping by employing a meticulous two-stage cooking process and a complex, glossy glaze. The genius begins with par-cooking the bacon, a critical step that renders out excess fat and ensures it becomes perfectly crisp in the oven without overcooking the tender shrimp. Each shrimp is then swaddled in this partially cooked bacon, creating a harmonious union where the rendered bacon fat bastes the shrimp, infusing it with smoky depth while keeping it remarkably juicy. The dish is then elevated to extraordinary heights by a homemade sweet, spicy, and savory glaze—a reduction of soy sauce, brown sugar, sriracha, ginger, and garlic—that is brushed on repeatedly during baking, creating a sticky, caramelized crust that amplifies every flavor.

The final masterstroke is a brief turn under the broiler, which adds a professional char and blisters the glaze, locking in a bold, restaurant-quality finish. This recipe is a study in contrasts and precision: the crisp bacon against the succulent shrimp, the sweet glaze against the salty soy and spicy heat, all achieved through careful timing. It is an impressive yet approachable dish that demonstrates how a few thoughtful techniques can turn a party staple into a gourmet experience. As an appetizer, it promises to be the first platter emptied, eliciting murmurs of approval with each perfectly balanced, gloriously glossy bite. It’s the ultimate make-ahead party trick that delivers maximum visual and gustatory impact.

Why You’ll Love This Recipe:

  • Perfect Flavor and Texture Harmony: Experience the unbeatable combo of crispy, salty bacon with tender, sweet shrimp, enhanced by a sticky, savory-sweet glaze.
  • Restaurant-Quality Presentation: The glossy, caramelized glaze and professional wrapping create an elegant appetizer that looks as incredible as it tastes.
  • Make-Ahead Friendly: You can par-cook the bacon, make the glaze, and even wrap the shrimp hours ahead, then simply bake and broil before serving.
  • Customizable Heat Level: Easily adjust the sriracha to make the glaze mild or fiery, tailoring it to any crowd’s preference.
  • Guaranteed Crowd-Pleaser: This is a universally beloved, impressive finger food perfect for holidays, parties, or a special dinner starter.

Ingredients:

For the Shrimp and Bacon:
1 1/2 pounds (about 24-30 count) large shrimp, peeled and deveined, tails left on
1 lb. semi thick-cut bacon, each slice cut in half crosswise

For the Sweet & Spicy Glaze:
1/4 cup low-sodium soy sauce
1/4 cup water
2 tablespoons packed light brown sugar
1-2 teaspoons sriracha sauce (adjust to taste)
2 tablespoons Worcestershire sauce
1 tablespoon fresh ginger, finely grated or minced
2/3 cup ketchup
3 cloves garlic, finely minced or pressed
1/4 teaspoon kosher salt
1/4 teaspoon freshly ground black pepper

Equipment:
Toothpicks, soaked in water for 30 minutes

Instructions:

Step 1: Par-Cook the Bacon
Preheat your oven to 375°F (190°C). Line a large, rimmed baking sheet with aluminum foil for easy cleanup. Arrange the halved bacon slices in a single layer on the sheet. Bake for 7-9 minutes, until the bacon is partially cooked and has rendered fat but is still pliable and not crisp. Transfer the bacon to a plate lined with paper towels to drain. Carefully pour the rendered bacon fat from the sheet into a heatproof bowl (discard or save for another use). Keep the foil-lined baking sheet for the shrimp.

Step 2: Prepare the Glaze
While the bacon cooks, combine all glaze ingredients—soy sauce, water, brown sugar, sriracha, Worcestershire, ginger, ketchup, garlic, salt, and pepper—in a small saucepan. Bring to a simmer over medium heat, then reduce heat to low. Cook, stirring occasionally, for 10-12 minutes until slightly thickened and reduced. Remove from heat and set aside. Reserve about 1/4 cup of glaze in a separate small bowl for final basting.

Step 3: Wrap the Shrimp
Pat the shrimp very dry with paper towels. Take one piece of par-cooked bacon and wrap it tightly around the center of one shrimp. Secure the bacon ends with a water-soaked toothpick, piercing through where the bacon overlaps. Repeat with remaining shrimp and bacon. Arrange the wrapped shrimp in a single layer on the reserved foil-lined baking sheet.

Step 4: Bake and Baste
Brush the wrapped shrimp generously with the warm glaze. Bake in the preheated 375°F (190°C) oven for 5 minutes. Remove the sheet from the oven. Using tongs, carefully flip each shrimp. Brush again generously with more glaze from the saucepan. Return to the oven and bake for an additional 2-4 minutes, or until the shrimp are just opaque and cooked through.

Step 5: Broil to Finish
Turn your oven to the BROIL setting on HIGH. Remove the baking sheet from the oven and brush the shrimp one final time with the reserved fresh glaze (not the glaze used for basting during baking). Place the baking sheet 4-6 inches under the broiler. Broil for 1-3 minutes, watching constantly and rotating the pan as needed, until the bacon is crisp and the glaze is caramelized and bubbling. Stay by the oven—the line between perfect caramelization and burning is very thin under a broiler.

Step 6: Serve Immediately
Remove from the oven and let cool for 2-3 minutes before serving. The toothpicks will be hot. Serve warm on a platter.

Tips:

  • Shrimp Size Matters: Use “Large” (26/30 count) or “Jumbo” (21/25 count) shrimp. Smaller shrimp will overcook by the time the bacon is done.
  • Par-Cooking is Essential: This ensures the bacon gets crispy while the shrimp stays tender. Skipping this step results in rubbery bacon or overcooked shrimp.
  • Dry the Shrimp Thoroughly: Any surface moisture will steam the shrimp and prevent the bacon from adhering and crisping properly.
  • Soak Toothpicks: Soaking prevents them from burning under the broiler.
  • Watch the Broiler Closely: Broiler intensities vary wildly. Check every 30 seconds to prevent burning your beautiful glaze.

Storage Options:

  • Make-Ahead: You can wrap the shrimp and store them covered on the baking sheet in the refrigerator for up to 6 hours before baking. The glaze can be made and refrigerated for up to 3 days; reheat gently before using.
  • Leftovers: Store any leftovers in an airtight container in the refrigerator for up to 2 days. Reheat in an air fryer or toaster oven at 375°F (190°C) for 3-4 minutes to help re-crisp the bacon. The microwave will make the bacon soggy.
  • Freezing: It is not recommended to freeze the assembled and cooked bacon-wrapped shrimp, as the texture of both components will suffer greatly upon thawing and reheating.

Bacon Wrapped Shrimp is the definitive party appetizer—a perfect bite that delivers sophistication, bold flavor, and textural perfection. It’s a recipe that rewards a little extra care with a truly spectacular result, guaranteeing your guests will be asking for your secret.

Vegetable Cream Cheese Spread

0

Vegetable Cream Cheese Spread is a vibrant and versatile culinary staple that elevates the simple act of spreading into a celebration of fresh, garden-inspired flavors and satisfying textures. This recipe transforms a standard block of cream cheese into a colorful, nutrient-packed, and irresistibly creamy condiment that is far more than just a bagel topping. The magic lies in the harmonious balance between the rich, tangy base of Philadelphia cream cheese and the bright, crisp confetti of finely grated carrots, chopped bell peppers, and aromatic green onions. Each vegetable is chosen not only for its color but for its unique contribution: the carrot adds a subtle sweetness and body, the bell pepper provides a juicy crunch and vibrant hue, and the green onion delivers a mild, savory sharpness. When bound together with a hint of garlic and onion powder, the result is a spread that is simultaneously luxurious and refreshing, rich yet light.

The brilliance of this recipe extends beyond its delightful taste to its incredible adaptability and make-ahead convenience. It is a blank canvas for customization—add diced cucumber for extra freshness, a pinch of smoked paprika for depth, or a spoonful of everything bagel seasoning for a savory kick. The optional addition of mayonnaise or sour cream fine-tunes the texture, allowing you to create anything from a thick, pipeable dip to a soft, effortlessly spreadable schmear. As it chills, the flavors meld and deepen, making it an ideal prepare-ahead option for busy mornings or entertaining. Whether used as a wholesome sandwich filler, a vibrant vegetable dip, or the star of a brunch platter, this Vegetable Cream Cheese Spread proves that with a little creativity, everyday ingredients can be transformed into something extraordinary and universally appealing.

Why You’ll Love This Recipe:

  • Vibrant Flavor and Color: The mix of fresh vegetables creates a beautiful, confetti-like appearance and a burst of fresh flavor in every bite.
  • Incredibly Versatile: Perfect on bagels, crackers, sandwiches, and as a veggie dip—it’s a multi-purpose spread you’ll use constantly.
  • Quick and Easy to Make: Requires no cooking, just simple mixing, and comes together in under 15 minutes of active time.
  • Customizable to Your Taste: Easily adjust the vegetable mix, herbs, and seasonings to create your own signature blend.
  • Make-Ahead Friendly: The flavor improves as it chills, making it a perfect prepare-ahead option for easy breakfasts or effortless entertaining.

Ingredients:

For the Cream Cheese Base:
1 block (8 oz / 226 g) Philadelphia original cream cheese, fully softened to room temperature
2–3 tablespoons mayonnaise or full-fat sour cream (optional, for extra creaminess and spreadability)

For the Vegetable Mix & Seasonings:
1/4 cup finely grated carrot (from about 1 small carrot)
1/4 cup finely chopped bell peppers (any color: red, yellow, or orange recommended)
2–3 green onions, finely sliced (white and light green parts)
1–2 tablespoons fresh parsley or chives, finely chopped
1/4 teaspoon garlic powder
1/4 teaspoon onion powder
1/4 teaspoon fine sea salt, or to taste
1/8 teaspoon freshly ground black pepper, or to taste

Instructions:

Step 1: Prepare and Dry the Vegetables
Wash and thoroughly dry all vegetables. Finely grate the carrot using the small holes of a box grater. Finely dice the bell pepper. Thinly slice the green onions. Finely chop the fresh herbs. Place the grated carrot and diced pepper on a clean kitchen towel or several layers of paper towels. Gently squeeze to remove as much excess moisture as possible. This critical step prevents a watery spread.

Step 2: Mix the Cream Cheese Base
In a medium mixing bowl, place the softened cream cheese. Using a sturdy silicone spatula, a wooden spoon, or a hand mixer on low speed, beat the cream cheese until it is completely smooth, creamy, and free of any lumps. If using mayonnaise or sour cream for a softer texture, add it now and mix until fully incorporated and uniform.

Step 3: Combine All Ingredients
Add the dried grated carrot, dried diced bell pepper, sliced green onions, and chopped herbs to the cream cheese base. Sprinkle the garlic powder, onion powder, salt, and black pepper over the top.

Step 4: Incorporate and Season
Using your spatula or spoon, fold and stir the mixture until all the vegetables and seasonings are evenly distributed throughout the cream cheese. Taste the spread and adjust the seasoning with more salt, pepper, or herbs to suit your preference.

Step 5: Chill to Blend Flavors
Transfer the spread to a serving bowl or an airtight storage container. Cover the surface directly with plastic wrap to prevent a skin from forming, then seal with a lid. Refrigerate for at least 1 hour, and ideally 2-3 hours, before serving. This resting time allows the flavors to meld beautifully and the spread to firm up to the perfect consistency.

Tips:

  • Room Temperature Cream Cheese: This is non-negotiable. Fully softened cream cheese blends smoothly and evenly, preventing a lumpy texture.
  • Remove Vegetable Moisture: Squeezing out liquid from the carrots and peppers is the secret to a thick, stable spread that won’t weep or separate.
  • Consistent Chop: Finely and uniformly chopping the vegetables ensures a pleasant texture and makes the spread easier to spread thinly.
  • Fresh Herbs are Best: While dried herbs can be used in a pinch (use 1/3 the amount), fresh chives or parsley provide a brighter, cleaner flavor.
  • Flavor Variations: Add 2 tablespoons of everything bagel seasoning, a teaspoon of lemon zest, a tablespoon of finely chopped sun-dried tomatoes, or a dash of hot sauce for different flavor profiles.

Storage Options:

  • Refrigerator: Store in an airtight container in the refrigerator for up to 5 days. The flavors will continue to develop over the first 24 hours.
  • Freezing: Freezing is not recommended for this spread, as the texture of the cream cheese and the water content in the vegetables will change significantly upon thawing, resulting in a grainy, separated consistency.
  • Meal Prep: This recipe is perfect for weekly meal prep. Make a batch on Sunday to have ready for quick breakfasts, lunches, and snacks throughout the week.
  • Serving Suggestion: For parties, you can pipe or scoop the spread into a serving bowl up to a day ahead, cover, and chill. Garnish with extra herbs just before serving.

Vegetable Cream Cheese Spread is a brilliant way to incorporate fresh vegetables into your day with effortless elegance. It’s a healthier, homemade alternative to store-bought versions, packed with real ingredients and customizable flavor. Enjoy the process of making it and the countless ways you’ll find to savor it.

Creamy Chicken Ranch Bacon Sliders on Hawaiian Rolls

0

Creamy Chicken Ranch Bacon Sliders on Hawaiian Rolls are the quintessential party food, a masterclass in transforming simple ingredients into an irresistibly shareable, flavor-packed meal that disappears as quickly as it is served. This recipe brilliantly reimagines the classic sandwich into a cohesive, pull-apart casserole where the entire tray bakes as one, allowing the sweet, pillowy Hawaiian rolls to soak up the rich, savory filling while their tops turn golden and crisp. The magic lies in the filling—a decadent combination of tender shredded chicken, tangy and herbaceous ranch dressing, sharp cheddar cheese, smoky bacon, and fresh green onions. As it bakes, this mixture melds into a warm, creamy, and gooey layer that perfectly contrasts the soft bread beneath and the buttery, seeded crust on top, creating a perfect bite in every single slider.

The true genius of this recipe is its flawless execution for a crowd with minimal effort. By keeping the rolls connected, you create a stunning, golden-brown centerpiece that is infinitely easier to assemble and serve than individual sandwiches. The final bake under a foil tent steams the sliders, ensuring the filling is heated through and the bread stays wonderfully soft, while the uncovered finish crisps the top to perfection. These sliders are the ultimate crowd-pleaser, equally at home on a game day spread, at a casual potluck, or as a fun and satisfying family dinner. They deliver the beloved, familiar flavors of a loaded chicken club sandwich in a format that is communal, comforting, and guaranteed to earn requests for the recipe from everyone at the table.

Why You’ll Love This Recipe:

  • The Ultimate Crowd-Pleaser: Combining chicken, bacon, ranch, and cheese on sweet rolls is a guaranteed hit for any gathering, from game day to potlucks.
  • Effortless for a Crowd: Baking the sliders as one connected tray is infinitely easier and faster than assembling individual sandwiches.
  • Perfect Flavor and Texture Harmony: Enjoy the contrast of the sweet, soft roll, the creamy, savory filling, and the buttery, crunchy poppy seed top.
  • Quick and Easy Assembly: Uses convenient, pre-cooked ingredients (rotisserie chicken, pre-cooked bacon) for a meal that comes together in under 30 minutes.
  • Customizable Base: The recipe is a perfect template—swap the ranch for BBQ sauce, the chicken for pulled pork, or the cheddar for pepper jack to create endless variations.

Ingredients:

For the Slider Filling:
12 Hawaiian sweet rolls (one standard package)
2 cups cooked chicken, shredded (from 1 rotisserie chicken or 2 large breasts)
1 cup ranch dressing
1 cup shredded sharp cheddar cheese
8 slices bacon, cooked until crisp and crumbled
1/4 cup green onions, thinly sliced (about 2-3 onions)

For the Topping:
1/4 cup (1/2 stick / 57g) unsalted butter, melted
1 tablespoon poppy seeds

Instructions:

Step 1: Preheat and Prepare the Rolls
Preheat your oven to 350°F (175°C). Without separating the individual rolls, slice the entire slab of Hawaiian rolls in half horizontally using a long serrated knife, creating a top “lid” and a bottom base. Place the bottom half of the rolls into a 9×13-inch baking dish or onto a parchment-lined baking sheet.

Step 2: Mix the Filling
In a large mixing bowl, combine the shredded chicken, ranch dressing, shredded cheddar cheese, crumbled bacon, and sliced green onions. Stir until everything is evenly coated and combined.

Step 3: Assemble the Sliders
Spoon the chicken mixture onto the bottom half of the rolls in the baking dish. Using a spatula or the back of a spoon, spread it into a completely even layer, reaching all the way to the edges. Carefully place the top half of the rolls over the filling, aligning them with the bottom.

Step 4: Apply the Butter Topping
In a small bowl, combine the melted butter and poppy seeds. Using a pastry brush, generously and evenly brush this mixture over the top of all the rolls, ensuring the butter soaks into the seams.

Step 5: Bake
Cover the entire baking dish tightly with aluminum foil. Bake in the preheated oven for 15 minutes. This covered time steams the sliders, warming the filling through and softening the bread.

Step 6: Crisp the Top
Remove the aluminum foil and return the dish to the oven. Bake for an additional 5-10 minutes, or until the tops of the rolls are a deep, golden brown and the cheese in the filling is visibly bubbly at the edges.

Step 7: Serve
Remove from the oven and let the sliders cool in the pan for 5 minutes. This allows the filling to set slightly for cleaner slicing. Use a sharp knife to cut along the seams of the rolls, separating them into individual sliders. Serve warm.

Tips:

  • Shred Chicken Finely: For the best texture that’s easy to bite through in a slider, shred your chicken finely with two forks or in a stand mixer.
  • Don’t Skimp on the Butter Brush: The butter and poppy seed topping is crucial for flavor and that beautiful, glossy, crisp finish.
  • Customize the Filling: Add 1/2 cup of frozen corn (thawed) or a drained 4-oz can of diced green chiles for extra flavor. For a kick, use spicy ranch dressing or add a 1/4 teaspoon of garlic powder to the butter.
  • Check for Doneness: The sliders are ready when the top is golden and you can see the filling bubbling gently around the edges of the pan.
  • Make-Ahead: You can assemble the entire pan (through Step 4) up to 24 hours in advance. Cover tightly and refrigerate. Add 5-10 minutes to the initial covered bake time if baking straight from the refrigerator.

Storage Options:

  • Refrigerator: Store any leftover sliders in an airtight container in the refrigerator for up to 3 days.
  • Reheating: Reheat individual sliders in the microwave for 30-45 seconds until warm. For a group, reheat the entire tray, covered with foil, in a 325°F (165°C) oven for 10-15 minutes.
  • Freezing: It is not recommended to freeze the fully assembled and baked sliders, as the texture of the rolls and creamy filling will deteriorate. However, you can freeze the cooked chicken filling alone for up to 2 months. Thaw in the refrigerator before assembling.
  • Prep Components: Cook and shred the chicken, cook and crumble the bacon, and slice the green onions up to 2 days ahead for ultra-fast assembly.

Creamy Chicken Ranch Bacon Sliders on Hawaiian Rolls are the epitome of fun, flavorful, and fuss-free feeding. They turn a simple sandwich into a celebratory, shareable event, delivering maximum satisfaction with minimal effort. Perfect for any occasion that calls for delicious, crowd-friendly food.

Cranberry Cream Cheese Swirl Loaf

0

This Cranberry Cream Cheese Swirl Loaf is an exquisite fusion of a tender, buttery breakfast cake and a rich, creamy cheesecake, all wrapped into one stunningly beautiful loaf. The recipe masterfully layers a moist, tart cranberry-studded batter with a luscious sweet cream cheese filling, creating a marbled masterpiece that offers a perfect symphony of textures and flavors in every slice. The genius lies in the assembly: spreading half the vibrant pink-speckled batter, carefully blanketing it with the smooth cream cheese layer, and finishing with the remaining batter. As it bakes, these layers meld just enough to create a cohesive loaf while maintaining their distinct identities, resulting in a striking visual swirl when sliced. The optional vanilla glaze adds the final touch of sweetness and a professional bakery-style finish, making this loaf as much a feast for the eyes as it is for the palate.

Beyond its elegant appearance, this loaf is a testament to the power of balanced flavors. The bright, tangy pop of the cranberries cuts through the richness of the cream cheese and the sweet, delicate crumb of the sour cream cake, preventing the dessert from feeling overly heavy. The use of sour cream (or Greek yogurt) in the batter is the secret to an incredibly moist, tender texture that stays fresh for days. This recipe is deceptively simple, requiring no special techniques beyond basic mixing and layering, yet it yields a result that feels celebratory and special. It’s the perfect centerpiece for a holiday brunch, a thoughtful homemade gift, or a luxurious afternoon treat with tea or coffee, proving that the most impressive creations often come from harmonizing a few classic ingredients with care and intention.

Why You’ll Love This Recipe:

  • Stunning Marbled Presentation: The beautiful swirl of creamy filling through the cranberry-studded loaf creates an impressive, professional look.
  • Perfect Balance of Flavors: Enjoy the harmonious contrast of tart cranberries, sweet cake, and rich, tangy cream cheese in every single bite.
  • Exceptionally Moist and Tender: The sour cream in the batter guarantees a soft, velvety crumb that stays fresh for days.
  • Versatile for Any Occasion: Equally perfect for a special holiday breakfast, an elegant dessert, or a thoughtful homemade gift.
  • Simple Technique, Spectacular Result: Uses straightforward mixing and layering methods to create a loaf that feels gourmet.

Ingredients:

For the Bread Batter:
½ cup (1 stick / 113g) unsalted butter, softened to room temperature
1 cup (200g) granulated sugar
2 large eggs, at room temperature
1 teaspoon pure vanilla extract
2 cups (250g) all-purpose flour, spooned and leveled
1 teaspoon baking powder
½ teaspoon baking soda
½ teaspoon fine sea salt
1 cup (240g) full-fat sour cream or plain whole-milk Greek yogurt, at room temperature
1 ½ cups fresh cranberries or dried cranberries

For the Cream Cheese Filling:
8 oz (226g) full-fat cream cheese, softened to room temperature
¼ cup (50g) granulated sugar
1 large egg, at room temperature
½ teaspoon pure vanilla extract

For the Optional Glaze:
½ cup (60g) powdered sugar, sifted
1–2 tablespoons milk, cream, or lemon juice
½ teaspoon vanilla extract

Instructions:

Step 1: Prepare the Oven and Pan
Preheat your oven to 350°F (175°C). Grease a 9×5-inch metal loaf pan thoroughly with butter or non-stick spray, then dust with flour, tapping out the excess. For foolproof removal, line the pan with parchment paper, leaving an overhang on the two long sides.

Step 2: Prepare the Cranberries
If using dried cranberries, place them in a small heatproof bowl and cover with very hot water. Let them soak for 10 minutes to plump up, then drain thoroughly and pat dry with a paper towel. If using fresh cranberries, rinse, pat dry, and toss them with 1 tablespoon of the measured flour from the batter ingredients. This prevents them from sinking during baking.

Step 3: Make the Cream Cheese Filling
In a medium bowl using a hand mixer or a sturdy whisk, beat the softened cream cheese on medium speed until completely smooth, about 1 minute. Add the ¼ cup sugar, egg, and ½ teaspoon vanilla. Beat again until the mixture is homogeneous, creamy, and free of any lumps. Set aside.

Step 4: Prepare the Bread Batter
In a large mixing bowl, cream together the softened butter and 1 cup of granulated sugar on medium-high speed until the mixture is light, fluffy, and pale in color, about 3-4 minutes. Beat in the eggs one at a time, ensuring each is fully incorporated before adding the next. Mix in the 1 teaspoon of vanilla extract.

Step 5: Combine Dry and Wet Ingredients
In a separate bowl, whisk together the flour, baking powder, baking soda, and salt. With the mixer on low speed, add about one-third of the dry ingredients to the butter mixture, mixing just until combined. Follow with half of the sour cream. Repeat with another third of the flour, the remaining sour cream, and finally the last of the flour mixture. Mix only until no dry streaks remain; do not overmix. Using a spatula, gently fold in the prepared cranberries.

Step 6: Assemble the Loaf
Spread slightly more than half of the cranberry batter evenly into the bottom of the prepared loaf pan. Using a small offset spatula or the back of a spoon, carefully spoon and spread the cream cheese filling over the batter layer, ensuring it reaches the edges of the pan. Dollop the remaining cranberry batter over the top. Gently spread it to cover the cream cheese layer as completely as possible. The layers will swirl together slightly during baking.

Step 7: Bake
Bake in the preheated oven for 55 to 70 minutes. The loaf is done when the top is golden brown and a toothpick or skewer inserted into the cake portion (avoiding the cream cheese center) comes out clean or with a few moist crumbs. If the top is browning too quickly after 40 minutes, tent it loosely with aluminum foil.

Step 8: Cool and Glaze
Allow the loaf to cool in the pan on a wire rack for 20 minutes. Then, using the parchment overhang, lift it out of the pan and place it directly on the rack to cool completely. For the optional glaze, whisk together the sifted powdered sugar, 1 tablespoon of liquid, and vanilla until smooth. Add more liquid, a teaspoon at a time, until a thick but pourable consistency is reached. Drizzle over the completely cooled loaf. Let the glaze set for 15 minutes before slicing.

Tips:

  • Room Temperature is Key: Ensure your butter, eggs, sour cream, and cream cheese are truly at room temperature for a smooth, lump-free batter and filling.
  • Don’t Overmix: Once you add the flour, mix only until just combined. Overmixing develops gluten and leads to a tough, dense loaf.
  • Test for Doneness Carefully: The cream cheese layer will remain soft. Test only the cake portion with a toothpick to determine if the loaf is fully baked.
  • Cool Completely: This loaf is very tender and the cream cheese layer needs time to set. Slicing it while warm will result in a messy, gummy texture.
  • Flour the Cranberries: Tossing fresh or rehydrated dried cranberries in a bit of flour is a simple trick to keep them suspended in the batter instead of sinking to the bottom.

Storage Options:

  • Room Temperature: Store the glazed or unglazed loaf, tightly wrapped in plastic wrap or in an airtight container, at cool room temperature for up to 2 days.
  • Refrigerator: For longer storage, refrigerate for up to 5 days. Let slices come to room temperature for the best texture and flavor, or warm gently in the microwave.
  • Freezing: This loaf freezes beautifully. Wrap the completely cooled, unglazed loaf tightly in plastic wrap and then in foil. Freeze for up to 3 months. Thaw overnight in the refrigerator and bring to room temperature before glazing and serving.
  • Make-Ahead: You can prepare the cream cheese filling and store it covered in the refrigerator for up to 24 hours before assembling and baking. Let it come to room temperature before using.

Cranberry Cream Cheese Swirl Loaf is a celebration of texture and taste, a guaranteed showstopper that delivers elegance and comfort in every slice. It’s a rewarding bake that proves simple ingredients, when layered with care, can create something truly magical.

Braised Beef Short Ribs with Red Wine Gravy

0

Braised Beef Short Ribs with Red Wine Gravy is the quintessential celebration of patience in cooking, a dish that transforms a humble, tough cut of meat into an experience of unparalleled luxury and deep, soul-satisfying flavor. This recipe is a masterclass in the art of low-and-slow braising, a technique where time and moisture work in concert to break down dense connective tissue, rendering the short ribs so tender they surrender to the gentle pull of a fork, while concentrating their beefy essence into a rich, complex sauce. The process begins with a strategic coating—a flour and spice blend that not only promotes a magnificent, dark crust during searing but also acts as the foundational thickener for the eventual gravy. The ritual of deglazing the pot with red wine after browning is the critical step that captures every caramelized, flavorful bit (the fond), weaving that depth directly into the braising liquid where it will gently perfume the meat for hours.

The brilliance of this dish lies in its harmonious, layered cooking method and the profound simplicity of its ingredients. As the ribs bathe in a blend of beef broth, wine, and Worcestershire sauce alongside hearty chunks of onion and carrot, the oven’s gentle, enveloping heat performs its magic. The vegetables melt into the sauce, contributing natural sweetness and body, while the meat becomes impossibly succulent. The final transformation occurs on the stovetop, where a quick cornstarch slurry transforms the aromatic braising liquid into a glossy, velvety gravy worthy of the magnificent meat it accompanies. Served together, the falling-off-the-bone short ribs, tender vegetables, and luxurious gravy create a complete, elegant meal that speaks of care, tradition, and the deep, comforting reward that comes from cooking with time and intention.

Why You’ll Love This Recipe:

  • Unbelievably Tender, Fall-Apart Meat: The long, slow braise transforms the short ribs into the most succulent, flavorful beef you’ll ever taste.
  • Restaurant-Quality Results at Home: This dish feels special-occasion worthy, delivering sophisticated flavors and presentation with straightforward techniques.
  • Deep, Complex Sauce: The layered steps of searing, deglazing, and braising build a rich, multi-dimensional gravy that is the soul of the dish.
  • Make-Ahead Perfection: This recipe tastes even better the next day, making it an ideal choice for stress-free entertaining.
  • A Complete, Comforting Meal: Protein, vegetables, and sauce all cook together in one pot, yielding a beautifully balanced and satisfying dinner.

Ingredients:

For the Rib Coating and Sear:
¼ cup all-purpose flour
1 tablespoon packed brown sugar
½ teaspoon garlic powder
½ teaspoon onion powder
½ teaspoon ground cumin
¼ teaspoon ground cayenne pepper
2 lbs bone-in beef short ribs, trimmed of excess surface fat
Kosher salt and freshly ground black pepper
2-3 tablespoons unsalted butter

For the Braise:
½ cup dry red wine (such as Cabernet Sauvignon or Merlot)
2 tablespoons Worcestershire sauce
1 (14.5 ounce) can low-sodium beef broth
2 medium yellow onions, peeled and quartered
3 large carrots, peeled and cut into 2-inch chunks

For the Gravy:
1½ tablespoons cornstarch
1½ tablespoons cold water
Kosher salt and freshly ground black pepper, to taste
Fresh parsley or thyme, for garnish (optional)

Instructions:

Step 1: Preheat and Prepare the Coating
Preheat your oven to 325°F (165°C). In a large resealable plastic bag or shallow dish, combine the flour, brown sugar, garlic powder, onion powder, cumin, and cayenne pepper. Season the short ribs generously on all sides with kosher salt and black pepper. Add the ribs to the flour mixture, sealing the bag and shaking vigorously (or turning in the dish) until evenly coated. Shake off any excess flour.

Step 2: Sear the Short Ribs
In a large Dutch oven or heavy-bottomed, oven-safe pot with a lid, melt 2 tablespoons of butter over medium-high heat. Once hot and foaming, add the coated short ribs in a single layer, ensuring they are not crowded (work in batches if necessary). Sear undisturbed for 3-4 minutes per side, until a deep, brown crust forms. Transfer the browned ribs to a plate. Add the remaining butter if the pot looks dry for the second batch.

Step 3: Deglaze and Build the Braising Liquid
Reduce the heat to medium. Carefully pour the red wine into the hot pot. Using a wooden spoon, scrape up all the browned bits (fond) from the bottom. Let it simmer for 1-2 minutes to reduce slightly. Stir in the Worcestershire sauce and beef broth.

Step 4: Assemble and Braise
Return the seared short ribs and any accumulated juices to the pot. Tuck the quartered onions and carrot chunks around the meat. The liquid should come about halfway up the sides of the ribs; if it seems low, add a bit of water. Bring the liquid to a gentle simmer on the stovetop.

Step 5: Slow Cook in the Oven
Once simmering, cover the pot tightly with its lid or a double layer of heavy-duty aluminum foil. Carefully transfer it to the preheated oven. Braise for 2 to 2 ½ hours, until the meat is extremely tender and pulling away from the bone.

Step 6: Rest the Meat and Prepare the Gravy
Using tongs, carefully transfer the short ribs and vegetables to a serving platter. Tent loosely with foil to keep warm. For the gravy, skim any excess fat from the surface of the braising liquid remaining in the pot. Place the pot over medium heat on the stovetop and bring to a simmer. In a small bowl, whisk the cornstarch and cold water into a smooth slurry. While whisking constantly, slowly pour the slurry into the simmering liquid. Cook, stirring frequently, for 3-5 minutes until the gravy has thickened to a rich, coating consistency. Season to taste with salt and pepper.

Step 7: Serve
Spoon the thickened red wine gravy over the plated short ribs and vegetables. Garnish with fresh herbs if desired. Serve immediately, ideally with creamy mashed potatoes, polenta, or crusty bread to soak up every drop of the incredible gravy.

Tips:

  • The Sear is Crucial: Take the time to develop a deep, dark crust on the ribs. This Maillard reaction is the primary source of the sauce’s complex flavor.
  • Choose the Right Wine: Use a dry red wine you would enjoy drinking. Avoid “cooking wine,” as it contains added salt and inferior flavor.
  • Low and Slow is Key: Do not increase the oven temperature to speed up the process. The connective tissue needs time at a low temperature to properly break down and gelatinize.
  • Skim the Fat: For a cleaner, more refined gravy, let the braising liquid sit for 5 minutes after removing the ribs, then use a spoon to skim the fat layer from the surface before thickening.
  • Check for Doneness: The ribs are done when a fork inserts into the meat with almost no resistance and the meat easily pulls from the bone.

Storage Options:

  • Refrigerator: Store the cooled short ribs, vegetables, and gravy together in an airtight container for up to 4 days. The flavors improve over time.
  • Reheating: Reheat gently, covered, in a 300°F (150°C) oven for 20-25 minutes, or on the stovetop over low heat until warmed through. Add a splash of water or broth if the gravy has thickened too much.
  • Freezing: This dish freezes exceptionally well for up to 3 months. Cool completely and store in a freezer-safe container. Thaw overnight in the refrigerator before reheating.
  • Make-Ahead: This is an ideal make-ahead dish. Complete the entire recipe, cool, and refrigerate for 1-2 days. The fat will solidify on top, making it easy to remove before reheating, resulting in an even more luxurious sauce.

Braised Beef Short Ribs with Red Wine Gravy is the epitome of heartwarming, elegant comfort food. It is a rewarding culinary project that teaches fundamental techniques and delivers a spectacular, memorable meal—a true testament to the power of patient cooking.