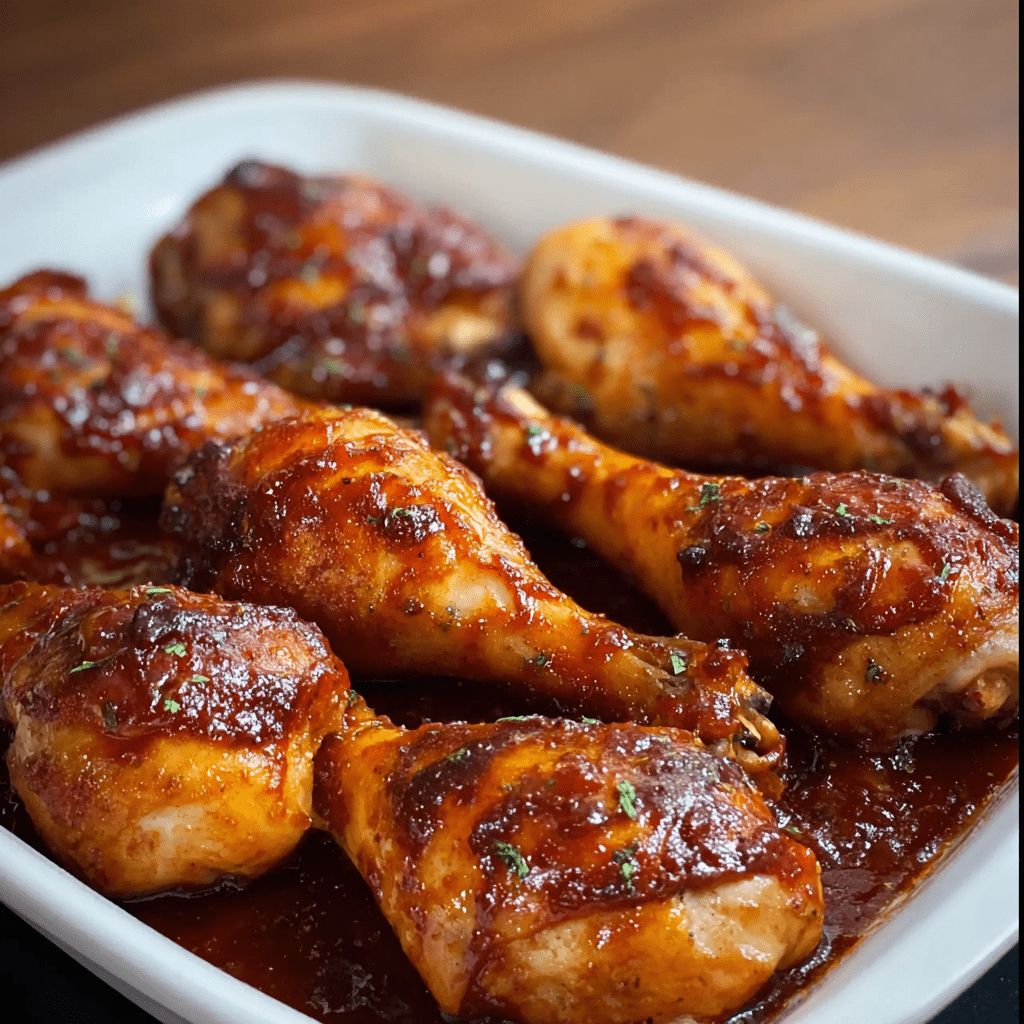
Creamy Ranch Chicken

0

Creamy Ranch Chicken is the kind of dinner recipe that makes weeknights feel special without requiring hours in the kitchen. Juicy, pan-seared chicken breasts are bathed in a rich, savory sauce made with cream of chicken soup, sour cream, milk, and a generous helping of Ranch seasoning. It’s a dish packed with flavor, offering a balance of creamy, tangy, and herbaceous notes, and it pairs effortlessly with comfort-food staples like mashed potatoes, rice, or roasted vegetables.

The magic of this recipe is how easily it comes together. Slicing the chicken into thinner cutlets ensures a quick and even sear, giving each piece a golden crust that locks in moisture. Then, the sauce simmers gently in the same pan, picking up all the flavor from the chicken. The end result is a smooth, velvety Ranch-infused gravy that soaks beautifully into everything on your plate. Whether you’re cooking for your family or meal prepping for the week, this dish offers reliable comfort with bold flavor.

Why You’ll Love This Recipe

• Creamy, savory, and packed with bold Ranch flavor

• Quick enough for weeknights, impressive enough for guests

• Uses simple ingredients and one skillet

• Customizable with your favorite vegetables or sides

• Leftovers reheat beautifully

Ingredients

• 2 large boneless, skinless chicken breasts

• 2 teaspoons Italian seasoning

• Salt and pepper, to taste

• 2 tablespoons butter, melted

• 2 tablespoons olive oil (or substitute vegetable or canola oil)

• 1 can (10.5 oz) cream of chicken soup

• 1½ cups milk

• 1 cup sour cream, at room temperature

• ½ teaspoon onion powder

• 1 ounce Ranch seasoning mix (about 3 tablespoons)

Instructions

Step 1: Prepare the Chicken

Slice each chicken breast horizontally into 2 to 3 thin cutlets, about ½ inch thick. Use a meat mallet or tenderizer to pound the pieces evenly if needed.

Season both sides with Italian seasoning, salt, and pepper.

Brush one side of each piece with the melted butter.

Step 2: Sear the Chicken

Heat 2 tablespoons of olive oil in a large skillet over medium-high heat.

When the oil is hot, place the chicken buttered side down in the skillet. Cook for about 4 to 5 minutes per side, or until the surface develops a golden-brown crust and the chicken is cooked through.

Transfer the cooked chicken to a plate and cover loosely with foil. Repeat with remaining chicken, adding more oil as needed.

Step 3: Make the Sauce

In the same skillet, remove any excess oil, leaving about 1 tablespoon behind to preserve the flavor.

Reduce the heat to medium and add the following to the pan:

Cream of chicken soup

Milk

Sour cream

Onion powder

Ranch seasoning mix

Whisk everything together until the mixture is smooth and fully combined.

Bring to a gentle bubble, then reduce heat to low. Simmer for about 5 minutes, stirring occasionally, until the sauce thickens slightly.

Step 4: Return Chicken to the Skillet

Nestle the cooked chicken pieces into the sauce. Spoon some of the sauce over each cutlet to ensure they’re well coated.

Partially cover the skillet with a lid and let everything simmer for 10 minutes, allowing the flavors to meld and the sauce to thicken further.

Step 5: Serve

Remove the skillet from heat and let it rest for 2 to 3 minutes.

Serve hot with a generous spoonful of creamy Ranch sauce over each piece of chicken.

Perfect Side Dishes

• Mashed potatoes

• Buttered egg noodles

• Steamed green beans or broccoli

• Roasted carrots or asparagus

• Garlic bread or crusty rolls

Tips for Success

Pound the chicken evenly: This helps it cook faster and more uniformly.

Use full-fat sour cream: It gives the sauce the richest texture and flavor.

Warm the sour cream slightly: Bringing it to room temperature prevents curdling when added to the sauce.

Don’t skip searing: It builds the base flavor for the sauce and locks in moisture.

Use homemade or low-sodium cream of chicken soup if you prefer to control salt levels.

Storage and Reheating

Refrigerator: Store in an airtight container for up to 4 days.

Freezer: Store cooled portions in freezer-safe containers for up to 2 months. Thaw overnight in the fridge.

Reheat: Warm over low heat in a skillet or microwave, adding a splash of milk if the sauce has thickened too much.

Variations

Add vegetables: Stir in sautéed mushrooms, spinach, or peas for a one-pan meal.

Spicy twist: Add crushed red pepper flakes or a splash of hot sauce.

Cheesy version: Sprinkle with shredded cheddar or mozzarella before the final simmer.

Low-carb option: Serve over cauliflower mash or zucchini noodles.

Creamy Ranch Chicken is the kind of easy comfort food that hits the spot every time. With its rich, tangy sauce and tender pan-seared chicken, it’s a versatile recipe that you’ll want to keep in rotation all year long. Whether you’re feeding picky eaters or cooking for a crowd, it delivers big flavor with minimal effort.

Fried Egg Sandwich

0

The Fried Egg Sandwich is a breakfast classic that’s as simple as it is satisfying. Made with gooey melted cheese, thinly sliced deli ham, and a rich, runny egg nestled between two slices of golden, buttery bread, this sandwich hits all the right notes. It’s warm, savory, and comforting—perfect for slow mornings, quick lunches, or even a cozy dinner when you’re craving something easy and indulgent. What sets this version apart is the double cheese—both white and yellow American—which adds creamy richness, and the thin layer of ham that brings a smoky-salty balance to the silky egg yolk.

Unlike scrambled egg sandwiches that tend to be more uniform, this sandwich celebrates texture. You get the softness of the bread’s center, the crunch of the toasted outside, and that irresistible yolk that seeps into every bite. It’s quick to make and customizable—swap the ham for bacon, add some hot sauce, or layer in sliced avocado for a modern twist. Whatever your preference, this sandwich delivers cozy satisfaction in minutes.

Why You’ll Love This Recipe

• Ready in under 15 minutes

• Melty cheese, savory ham, and runny egg in every bite

• Minimal ingredients, maximum flavor

• Great for breakfast, brunch, or a quick dinner

• Can be customized to fit your taste

Ingredients

• 2 slices white bread

• 1 slice white American cheese

• 1 slice yellow American cheese

• 2 slices thinly sliced deli ham

• 1 large egg

• 1 tablespoon melted butter

• Kosher salt and fresh ground black pepper

Instructions

Step 1: Assemble the Sandwich

Lay the two slices of white bread flat on your prep surface.

Place 1 slice of white American cheese on one slice of bread and 1 slice of yellow American cheese on the other.

Top each cheese slice with 1 slice of thinly sliced ham.

Have this sandwich ready to go, as you’ll need it as soon as the egg is cooked.

Step 2: Fry the Egg

Heat a small non-stick skillet over medium heat.

Crack the egg into the skillet and cook over easy—the white should be fully set, while the yolk remains runny.

Season the egg with kosher salt and fresh ground black pepper.

Once done, gently transfer the egg onto the side of the sandwich with the white American cheese.

Bring the two sides of the sandwich together to close, placing the ham-and-cheese slice over the egg. Be careful not to press down, or the yolk may break.

Step 3: Toast the Sandwich

Heat a clean skillet or griddle over medium-low heat.

Brush one outer side of the sandwich with melted butter and place it butter-side down in the skillet.

Brush the top side with the remaining melted butter.

Cover the skillet loosely with aluminum foil to help the cheese melt evenly.

Cook until the bottom is golden brown, then flip carefully and cook the other side until it is also golden and the cheese is fully melted. This should take about 3–4 minutes per side, depending on your pan and stove.

Step 4: Serve Immediately

Remove from the skillet and let the sandwich sit for a minute before slicing in half. This helps the cheese set slightly while keeping the yolk intact.

Serve warm, with a side of fruit, a small salad, or enjoy it solo as a satisfying, one-handed meal.

Tips for Success

Don’t press the sandwich while cooking—you want to preserve that luscious yolk.

Use medium-low heat to avoid burning the bread before the cheese melts.

Covering the skillet helps trap heat and melt the cheese more evenly.

Use freshly cracked black pepper for a punchier flavor.

Want extra crunch? Toast the inside of the bread lightly before assembling.

Storage and Reheating

Fried egg sandwiches are best enjoyed fresh because of the runny yolk and crisped bread. However, if you need to:

Refrigerator: Wrap the sandwich in foil and store for up to 24 hours.

Reheat: Warm in a toaster oven at 350°F for 5–7 minutes until heated through and crisped on the outside. Microwaving is not recommended, as it can make the bread soggy and overcook the egg.

Variations

Spicy Kick: Add a few dashes of hot sauce or sriracha.

Green Boost: Slip in a few spinach leaves or avocado slices.

Swap the Meat: Use bacon, turkey, or leave it vegetarian with extra cheese.

Bread Upgrade: Try sourdough, brioche, or a crusty roll for different textures.

This Fried Egg Sandwich recipe proves that something simple can still be utterly delicious. With just a few basic ingredients and 15 minutes, you’ll have a golden, gooey, and deeply satisfying sandwich that’s sure to hit the spot any time of day.

Kung Pao Chicken

0

Kung Pao Chicken is a classic Chinese stir-fry dish that’s beloved for its perfect harmony of flavors—savory, sweet, spicy, and tangy—all balanced in one delicious bite. Originating from the Sichuan province, this dish traditionally combines tender pieces of marinated chicken with crunchy peanuts, vegetables, and dried red chilies in a rich, glossy sauce. It’s one of those dishes that feels both comforting and exciting, especially when served hot over a bed of steamed rice.

What makes Kung Pao Chicken so satisfying is its combination of textures and flavors. The chicken is marinated until juicy and flavorful, then seared until golden. Bright bell peppers and green onions add crunch and color, while garlic, ginger, and dried chilies bring layers of spice and depth. A finishing toss in the signature sauce made with soy sauce, hoisin, vinegar, and sugar ties everything together with a sweet-savory glaze. It’s quick, bold, and better than takeout.

Why You’ll Love This Recipe

• Restaurant-quality stir-fry at home

• Full of bold, layered flavor

• Quick and easy—ready in under 40 minutes

• Customizable spice level

• Great served with rice or noodles

Ingredients

Chicken Marinade

• 1½ tablespoons Shaoxing wine or dry sherry

• 1 tablespoon low-sodium soy sauce

• 2 teaspoons cornstarch

• 1½ lbs boneless skinless chicken breast, cut into bite-sized pieces

Kung Pao Sauce

• 3 tablespoons low-sodium soy sauce

• 2 tablespoons Shaoxing wine or dry sherry

• 1 tablespoon balsamic vinegar

• 1 tablespoon hoisin sauce

• 2 teaspoons granulated sugar

• 3 tablespoons water

• 1 tablespoon cornstarch

Kung Pao Stir Fry

• 3 tablespoons vegetable oil

• 1 red bell pepper, diced

• 1 green bell pepper, diced

• 3 cloves garlic, minced

• 1 tablespoon grated fresh ginger

• 2–4 dried red chilies, seeded and chopped

• 4 green onions, cut into ¾-inch pieces

• ½ cup unsalted roasted peanuts

Instructions

Step 1: Marinate the Chicken

In a medium bowl, whisk together Shaoxing wine, soy sauce, and cornstarch. Add the chicken pieces and toss to coat. Let the chicken marinate at room temperature for 30 minutes to tenderize and infuse flavor.

Step 2: Prepare the Sauce

In another medium bowl, whisk together the soy sauce, Shaoxing wine, balsamic vinegar, hoisin sauce, sugar, water, and cornstarch. Set the sauce aside—it will be used to finish the dish.

Step 3: Cook the Chicken

Heat 2 tablespoons vegetable oil in a large skillet or wok over medium-high heat. Add the marinated chicken in a single layer, being careful not to overcrowd the pan.

Cook until the chicken is golden brown on one side, then flip and cook the other side until the chicken is fully cooked through. Work in batches if necessary to avoid steaming. Transfer the cooked chicken to a plate and loosely cover with foil to keep warm.

Step 4: Stir Fry the Vegetables

Add the remaining 1 tablespoon vegetable oil to the same skillet or wok. Raise the heat to medium-high.

Add the diced red and green bell peppers, and stir fry for about 1 minute to soften slightly. Reduce the heat to low and add the minced garlic, grated ginger, dried red chilies, green onions, and peanuts.

Stir constantly for 1 minute to avoid burning and to let the aromatics bloom.

Step 5: Add the Sauce and Combine

Whisk the sauce once more to recombine any settled starch. Pour it into the skillet with the vegetables.

Cook over medium heat, stirring frequently, until the sauce thickens and becomes glossy—about 2–3 minutes.

Return the cooked chicken to the pan and toss to coat it thoroughly in the sauce. Cook for another 2 minutes to warm the chicken through and meld the flavors.

Step 6: Serve

Serve the Kung Pao Chicken immediately over steamed white rice, fried rice, or noodles. Garnish with extra green onions, sesame seeds, or a drizzle of chili oil if desired.

Tips for Success

Use high heat for a quick stir fry: Cooking quickly over high heat helps preserve the crunch of vegetables and gives the chicken a great sear.

Adjust heat by chili count: Use 2 chilies for mild, 4+ for spicy. You can also add chili oil or crushed red pepper for extra kick.

Use Shaoxing wine if possible: This adds authentic flavor, but dry sherry is a fine substitute.

Prep ahead: Have everything chopped and ready before cooking—this dish comes together fast.

Try different proteins: This sauce and stir-fry method works well with shrimp, pork, or tofu.

Storage and Reheating

Refrigerator: Store leftovers in an airtight container for up to 4 days.

Freezer: Cool completely and store in a freezer-safe bag or container for up to 2 months. Thaw in the fridge overnight before reheating.

Reheat: Warm in a skillet over medium heat or microwave in 30-second intervals, stirring between each.

Kung Pao Chicken is the kind of dish that delivers on all fronts—flavor, texture, and satisfaction. Once you try it homemade, you may never go back to the takeout version. Whether for a quick dinner or impressing guests, this recipe is a keeper.

8-Can Chicken Taco Soup

0

8-Can Chicken Taco Soup is the ultimate in quick, hearty, and no-fuss comfort food. As the name suggests, this crowd-pleasing soup comes together with just eight pantry staples, most of which are canned—making it an excellent option for busy weeknights, meal prep, or whenever you need a warm, flavorful meal with minimal effort. With beans, corn, tomatoes, chicken, and bold taco seasoning, each spoonful is packed with Southwest-inspired flavor, a satisfying blend of protein, fiber, and spice. It’s cozy, filling, and completely customizable based on what you have on hand.

What makes this soup especially great is its versatility. Whether you use canned chicken or leftover rotisserie, add in diced green chiles for extra heat, or stir in some shredded cheese at the end, it’s nearly impossible to mess up. The optional spices deepen the flavor, and with toppings like avocado, sour cream, and crunchy tortilla chips, each bowl can be personalized to suit every taste.

Why You’ll Love This Recipe

• One-pot, dump-and-stir simplicity

• Ready in 30 minutes with no chopping required

• Budget-friendly and perfect for pantry cooking

• Packed with protein and fiber for a satisfying meal

• Delicious with or without garnishes

Ingredients

• 1 (15 oz) can pinto beans, rinsed and drained

• 1 (15 oz) can black beans, rinsed and drained

• 1 (15 oz) can sweet corn kernels, drained

• 1 (14.5 oz) can diced tomatoes (with juice)

• 1 (12.5 oz) can chicken breast, drained and shredded

• ½ (10 oz) can green enchilada sauce (or use full can for extra flavor)

• 1 (4 oz) can diced green chiles (optional, for heat)

• 1 (14 oz) can low-sodium chicken broth

• 1 (1 oz) packet taco seasoning

• ½ teaspoon cumin (optional)

• ½ teaspoon chili powder (optional)

• ½ teaspoon garlic powder (optional)

• ½ teaspoon onion powder (optional)

• Kosher salt and freshly ground black pepper, to taste

Instructions

Step 1: Combine the Ingredients

In a large stockpot or Dutch oven over medium-high heat, add the pinto beans, black beans, corn, diced tomatoes with juice, shredded canned chicken, green enchilada sauce, diced green chiles, and chicken broth.

Stir to combine everything evenly.

Step 2: Add the Seasoning

Stir in the packet of taco seasoning.

For added depth of flavor, add the cumin, chili powder, garlic powder, and onion powder if using.

Season to taste with kosher salt and black pepper.

Step 3: Simmer

Bring the soup to a gentle boil.

Once boiling, reduce the heat to medium-low and let it simmer uncovered for 20–30 minutes, stirring occasionally to prevent sticking.

If the soup becomes too thick, simply add more chicken broth or water to reach your desired consistency.

Step 4: Serve and Garnish

Ladle the hot soup into individual serving bowls.

Top with a dollop of sour cream, a handful of tortilla chips, and a few slices of avocado.

Other optional garnishes include chopped fresh cilantro, shredded cheese, green onions, or a squeeze of lime juice for a pop of acidity.

Tips for Success

Adjust to your spice level: Use mild enchilada sauce and skip the green chiles for a milder soup. Add hot sauce or extra chili powder if you like it spicier.

Use fresh ingredients if you prefer: Substitute fresh or frozen corn, cooked shredded chicken, or home-cooked beans if desired.

Add veggies or grains: Bulk it up with cooked rice, quinoa, or extra vegetables like zucchini or bell pepper.

Make it creamy: Stir in a bit of cream cheese or a splash of half-and-half before serving for a creamier texture.

Go meatless: Omit the chicken and use vegetable broth for a satisfying vegetarian version.

Storage and Reheating

Refrigerator: Store leftovers in an airtight container for up to 4 days.

Freezer: Cool completely and store in freezer-safe containers or bags for up to 3 months. Thaw overnight in the refrigerator before reheating.

Reheat: Warm over medium heat on the stovetop or microwave individual servings in a covered dish until hot, stirring occasionally.

8-Can Chicken Taco Soup is proof that a flavorful, satisfying dinner doesn’t have to be complicated. With easy pantry ingredients and big, bold flavor, it’s a recipe you’ll turn to again and again—especially when time is short and hunger is high.

Baked Zucchini Fritters

0

Baked Zucchini Fritters are a healthy, crispy, and flavorful twist on the classic pan-fried version. Made with simple ingredients like shredded zucchini, garlic, eggs, and fresh herbs, these fritters are light yet satisfying, and perfect for a quick side dish, appetizer, or even a meatless main course. Baking them instead of frying cuts down on oil and mess, while still delivering a golden, slightly crispy texture with a soft, savory interior. Whether served warm or cold, they’re versatile and easy to enjoy with your favorite sauces or dips.

Zucchini is a naturally moist vegetable, so a key to great fritters is squeezing out the excess liquid—this ensures they hold together and crisp up nicely in the oven. A touch of fresh parsley (or dill or scallions if you prefer) adds brightness, while garlic brings a gentle punch of flavor. The result is a dish that’s not only delicious but a great way to use up an abundance of summer zucchini.

Why You’ll Love This Recipe

• Healthier alternative to fried fritters

• Crisp on the outside, tender on the inside

• Versatile enough for snacks, meals, or party appetizers

• Freezer-friendly and great for meal prep

Ingredients

• 2 pounds zucchini, shredded (about 6 cups)

• 2 cloves garlic, grated

• 2 large eggs

• ½ cup all-purpose flour

• ½ cup chopped parsley (or dill or green onions)

• Salt and pepper, to taste

Instructions

First Step: Prep the Zucchini

In a large bowl, add the shredded zucchini. Sprinkle with 1 teaspoon salt, stir, and let it sit for 10 minutes. This will help draw out excess moisture from the zucchini.

In a separate bowl, whisk together the eggs, flour, grated garlic, and chopped parsley. Add salt and pepper to taste.

Second Step: Squeeze Out the Moisture

Using clean hands or a clean kitchen towel, squeeze as much liquid as possible from the salted zucchini. Do this in batches to ensure you remove as much moisture as you can. Add the squeezed zucchini into the bowl with the egg and flour mixture.

Stir everything together until well combined. The batter should be thick and slightly sticky.

Third Step: Shape the Fritters

Preheat the oven to 400°F (200°C).

Line two large baking trays with parchment paper.

Using a large ice cream scoop or spoon, scoop out portions of the batter and place them on the prepared trays. Flatten each scoop slightly with the back of the scoop or a spoon to form fritters about ½ inch thick.

Fourth Step: Bake

Place the trays in the oven and bake for 10 to 12 minutes.

Flip each fritter carefully using a spatula and return them to the oven to bake for another 10 to 12 minutes, or until both sides are lightly golden and the edges are slightly crisp.

Remove from the oven and let cool for a few minutes before serving.

Serving Suggestions

Serve the fritters hot or cold with your choice of dipping sauce such as sour cream, Greek yogurt, tzatziki, or a spicy aioli. They pair well with a simple side salad or even in wraps.

Tips for Success

Drain the zucchini well: Excess moisture is the enemy of crisp fritters. Be thorough in squeezing out the water.

Try other herbs: Dill, chives, or scallions all work beautifully in place of parsley.

Use a non-stick baking sheet or parchment: This helps prevent sticking and promotes even browning.

Want extra crispiness? Brush the tops lightly with oil before baking or place under the broiler for the last 1–2 minutes.

Make it gluten-free: Swap all-purpose flour for a gluten-free flour blend.

Storage and Reheating

Refrigerator: Store leftovers in an airtight container for up to 4 days.

Freezer: Cool completely and freeze in a single layer on a tray. Once frozen, transfer to a freezer bag or container and store for up to 2 months.

Reheat: Bake at 375°F for 10 minutes or until heated through, or reheat in a skillet to re-crisp the edges.

Baked Zucchini Fritters are a delicious and wholesome way to enjoy seasonal zucchini. They’re simple to make, endlessly customizable, and a guaranteed crowd-pleaser whether served at dinner, brunch, or your next get-together.

Stuffed Pepper Casserole

0

Stuffed Pepper Casserole takes everything you love about classic stuffed peppers—savory ground beef, tender bell peppers, rice, and melty cheese—and turns it into an easy, one-pan comfort food meal. This hearty and satisfying dish offers all the flavors of traditional stuffed peppers without the hassle of hollowing out and stuffing individual peppers. Instead, everything comes together in one skillet, making it perfect for busy weeknights when you want something quick, nourishing, and crowd-pleasing. The combination of ground beef, tomatoes, garlic, and Italian seasoning gives the dish a rich, savory base, while the rice simmers right in the pan, soaking up all the flavor. Bell peppers and onions add a touch of sweetness and crunch, and a gooey layer of cheddar and mozzarella cheese melted on top seals the deal. It’s a dish that’s both nostalgic and family-friendly, and it reheats beautifully—making it a great option for leftovers or meal prep.

Why You’ll Love This Recipe

• One-pan meal—easy to cook and clean up

• Packed with the flavors of classic stuffed peppers

• Melty cheese topping makes it extra comforting

• Ideal for meal prep or feeding a hungry family

Ingredients

• 1 pound ground beef

• 2 bell peppers, chopped

• 1 onion, finely chopped

• 3 cloves garlic, minced

• 1 tablespoon Worcestershire sauce

• 1 (15 oz) can low sodium beef broth

• 1 (15 oz) can diced tomatoes

• 1 cup uncooked long grain white rice

• 1 tablespoon Italian seasoning

• 1 teaspoon salt

• ½ teaspoon black pepper

• ¾ cup shredded mozzarella cheese

• ¾ cup shredded cheddar cheese

How To Make Stuffed Pepper Casserole

Step 1: Brown the Beef and Sauté the Veggies

In a large skillet over medium heat, add the ground beef and cook, breaking it apart with a spatula. When the beef is mostly browned, add in the chopped bell peppers and finely chopped onion. Cook for 5–10 minutes, stirring occasionally, until the vegetables begin to soften.

Step 2: Add Garlic and Build the Flavor

Add the minced garlic and cook for 1–2 minutes, just until fragrant. Stir in the Worcestershire sauce, giving the mixture a rich, savory base.

Step 3: Add Rice, Tomatoes, and Seasonings

Add the beef broth, diced tomatoes (with their juice), uncooked white rice, Italian seasoning, salt, and black pepper. Stir everything together until evenly combined. Bring the mixture to a gentle boil.

Step 4: Simmer

Once boiling, reduce the heat to low. Cover the skillet with a lid and let it simmer for about 20 minutes, stirring once halfway through. Check that the rice is tender and has absorbed most of the liquid.

Step 5: Stir in Cheese

Once the rice is cooked, stir in half of the mozzarella and cheddar cheese until it’s melted and fully incorporated into the casserole.

Step 6: Add Cheese Topping

Sprinkle the remaining mozzarella and cheddar cheese evenly over the top of the casserole. Cover the skillet again and allow the cheese to melt for 2–3 minutes. Optional: If your skillet is oven-safe, you can place it under the broiler for 1–2 minutes to quickly melt and brown the cheese topping.

Step 7: Serve and Enjoy

Remove the skillet from heat. Spoon into bowls or plates and serve warm.

Tips for Success

• Use a deep skillet or Dutch oven: This dish creates a good amount of volume with the rice and liquid, so be sure your pan can hold everything.

• Use fresh or frozen bell peppers: Any color works—red, yellow, or green. For variety, try a mix.

• Check the rice as it cooks: If your skillet runs hot or you lose a lot of steam, you may need to add a splash more broth toward the end.

• Make it spicier: Add red pepper flakes, diced jalapeños, or a dash of hot sauce to the beef mixture if you like a little heat.

• Make it vegetarian: Swap the ground beef for plant-based meat or canned lentils, and use vegetable broth instead of beef broth.

Storage and Make-Ahead Tips

• Refrigerator: Store leftovers in an airtight container for up to 4 days. Reheat in the microwave or in a covered pan on the stove over low heat.

• Freezer: Cool completely, then store in freezer-safe containers for up to 2 months. Thaw overnight in the fridge before reheating.

• Meal prep: Make a full batch and portion into containers for lunches throughout the week—it reheats beautifully and tastes even better the next day.

Stuffed Pepper Casserole is a satisfying twist on a beloved classic that delivers all the flavor with none of the fuss. It’s wholesome, cheesy, and made to feed a crowd—or give you plenty of leftovers. Whether you serve it with a side salad or enjoy it as-is, it’s sure to become a staple in your comfort food rotation.

Philly Cheesesteak Pasta

0

Philly Cheesesteak Pasta is a hearty, skillet-style dish that takes all the iconic flavors of the classic sandwich and turns them into a comforting, cheesy pasta dinner. Featuring seasoned ground beef, sautéed onions and peppers, tender mushrooms, and melty Provolone cheese, this recipe is the perfect fusion of sandwich and pasta night. It’s rich, savory, and packed with flavor—and the best part? It all comes together in one pan, making cleanup a breeze.

The dish uses French onion soup and Worcestershire sauce to deepen the flavor, mimicking the caramelized onion richness found in an authentic Philly cheesesteak. Provolone cheese adds a creamy, melty finish that ties everything together. Perfect for weeknight dinners or potluck meals, this Philly Cheesesteak Pasta is sure to be a new family favorite.

Why You’ll Love This Recipe

• One-skillet meal for easy prep and cleanup

• Melty, savory, and loaded with classic cheesesteak flavors

• Great way to use ground beef in a fun, creative way

• Comforting, hearty, and satisfying

Ingredients

• 1½ pounds lean ground beef

• 1 yellow onion, chopped

• 2 tablespoons butter

• 1 small can sliced mushrooms, drained

• 1 green bell pepper, chopped

• 1 can French onion soup

• ⅓ pound Provolone cheese, cut into small cubes

• 8 ounces penne pasta, cooked according to package directions and drained

• Salt and black pepper, to taste

• 1 tablespoon cornstarch

• 2 tablespoons Worcestershire sauce


Instructions

Step 1: Cook the Pasta

Cook the penne pasta according to the package instructions until al dente.

Drain and set aside.

Step 2: Brown the Ground Beef

In a large skillet over medium heat, crumble and brown the ground beef until fully cooked.

Drain the beef and transfer it to a clean dish. Set aside.

Step 3: Sauté the Vegetables

In the same skillet, melt 2 tablespoons of butter over medium heat.

Add the drained mushrooms and cook for 2–3 minutes until softened.

Stir in the chopped green pepper and chopped onion, sautéing for another 5–6 minutes until tender and fragrant.

Step 4: Build the Sauce

Reduce the heat to low.

Add the Worcestershire sauce and the can of French onion soup to the skillet with the vegetables.

In a small bowl, mix 1 tablespoon cornstarch with a few tablespoons of water until smooth, then stir it into the skillet.

Whisk the mixture gently and let it simmer until the sauce begins to thicken—about 2–3 minutes.

Step 5: Combine and Finish

Return the cooked ground beef to the skillet and stir to coat with the sauce.

Add the drained pasta and mix everything until well combined and evenly coated.

Scatter the cubed Provolone cheese over the top and cover the skillet with a lid.

Let it sit for 3–5 minutes, or until the cheese is fully melted and gooey.

Step 6: Season and Serve

Stir everything together gently to distribute the melted cheese throughout the pasta.

Taste and add salt and black pepper as needed.

Serve hot, garnished with extra cheese or chopped parsley if desired.


Tips for Success

Use good-quality Provolone: A deli block will melt better than pre-shredded cheese and give a more authentic cheesesteak taste.

Don’t overcook the pasta: Slightly undercooked pasta will hold up better in the sauce and finish cooking in the skillet.

For extra richness: Stir in a splash of heavy cream or a bit of cream cheese with the sauce before adding the beef and pasta.

Make it spicy: Add red pepper flakes or a diced jalapeño for heat.

Swap the meat: Ground turkey or chicken also works well in this dish if you want a lighter version.


Storage Options

Refrigerator: Store leftovers in an airtight container for up to 4 days. Reheat on the stove or in the microwave with a splash of water or broth to loosen the sauce.

Freezer: Freeze in a sealed container for up to 2 months. Thaw in the refrigerator overnight before reheating.


Philly Cheesesteak Pasta is the best of both worlds: hearty and cheesy like the original sandwich, but with the comforting twist of pasta. Whether you’re cooking for a hungry crowd or just want something satisfying and low-effort, this dish will leave everyone asking for seconds.

Homemade Caramel Cake

0

Homemade Caramel Cake is a Southern classic that delivers rich, buttery layers of vanilla cake wrapped in a deep, velvety caramel frosting. It’s the kind of dessert that’s both nostalgic and indulgent—perfect for holidays, birthdays, or Sunday dinners when you want to impress and comfort all at once. This recipe features two moist cake layers made with buttermilk and real butter, which provide a tender crumb and subtle tang. But the real star of the show is the caramel frosting, cooked low and slow until it’s thick, smooth, and bursting with golden flavor.

The beauty of a caramel cake lies in its balance: the cake is sweet but not overwhelming, and the frosting has that signature toasty, almost smoky flavor from cooked sugar that sets it apart from other frostings. Whether you’re an experienced baker or making your first from-scratch cake, this step-by-step guide will walk you through the process so you end up with a show-stopping dessert that’s worthy of a family tradition.

Why You’ll Love This Recipe

• Classic Southern dessert with bold caramel flavor

• Moist, tender vanilla cake made from scratch

• Rich caramel frosting that’s smooth and spreadable

• Great for celebrations, holidays, or anytime you need something special

Cake Ingredients

• 2½ cups sifted all-purpose flour

• ¼ teaspoon sea salt

• 2 cups granulated sugar

• 1 cup (2 sticks) unsalted butter

• 1 cup water

• 1 teaspoon baking soda

• ½ cup buttermilk

• 2 large eggs

• 1 teaspoon vanilla extract


Frosting Ingredients

• 3 cups granulated sugar

• ½ cup unsalted butter, softened

• 1 cup heavy cream

• A pinch of sea salt

• 2 teaspoons vanilla extract


How To Make Homemade Caramel Cake

Step 1: Prep Your Pans

Preheat your oven to 350°F (175°C).

Grease two 9-inch cake pans with butter, then dust with flour or line the bottoms with parchment paper. Set aside.

Step 2: Sift and Mix the Dry Ingredients

In a large bowl, sift together 2½ cups of all-purpose flour and ¼ teaspoon sea salt.

Add the 2 cups of sugar and stir until well combined.

Step 3: Melt the Butter and Water

In a medium saucepan, combine 1 cup (2 sticks) butter with 1 cup water.

Bring to a gentle boil over medium heat, then remove from the heat.

Pour the hot butter-water mixture into the flour mixture and whisk until smooth.

Step 4: Add the Wet Ingredients

To the bowl, add 1 teaspoon baking soda, ½ cup buttermilk, 2 large eggs, and 1 teaspoon vanilla extract.

Whisk until the batter is fully smooth and all ingredients are evenly incorporated.

Step 5: Bake the Cakes

Divide the batter evenly between the two prepared cake pans.

Bake for 25 minutes, checking after 15–20 minutes with a toothpick or cake tester. The cakes are done when the tester comes out clean and the tops spring back gently to the touch.

Be careful not to overbake—the cake should be light, moist, and golden.

Step 6: Cool the Cake Layers

Remove the pans from the oven and allow the cakes to cool in the pans for 30 minutes on a wire rack.

Once partially cooled, invert the cakes onto wire racks lined with parchment paper and let them cool completely before frosting.


Make the Caramel Frosting

Step 1: Cook the Sugar and Butter

In a large, heavy-bottomed saucepan, combine 3 cups granulated sugar and ½ cup softened butter.

Heat over medium heat, stirring constantly, until the sugar begins to melt and the mixture is smooth and bubbling. This will take about 5–7 minutes.

Step 2: Add Cream and Finish the Caramel

Carefully stir in 1 cup heavy cream (it will bubble, so pour slowly).

Continue cooking and stirring until the mixture thickens slightly, about 5–8 more minutes.

Remove from heat, then stir in a pinch of sea salt and 2 teaspoons vanilla extract.

Let the frosting cool for 5–10 minutes, just enough to thicken but still be spreadable.


Assemble the Cake

Place one fully cooled cake layer on a cake plate or serving stand.

Spread a generous amount of caramel frosting over the top of the first layer.

Add the second cake layer and frost the top and sides with the remaining caramel.

Use a spatula to create soft swirls or a smooth finish—however rustic or polished you like.

Let the cake rest for at least 30 minutes at room temperature before slicing to allow the caramel to set.


Tips for Success

Use a heavy-bottomed pan for the frosting: It helps prevent burning and ensures even cooking.

Don’t rush the caramel: Stir constantly and cook over medium heat to avoid scorching the sugar.

Let the frosting cool slightly before using: It will thicken as it sits, so wait until it’s spreadable but not too stiff.

Make ahead: The cake layers can be baked and frozen for up to 1 month. Thaw before frosting.

Store covered at room temperature: Keeps well for 2–3 days, or refrigerate for up to 5 days.


Serving Suggestions

Slice generously and serve with a scoop of vanilla ice cream or a dollop of whipped cream for an extra indulgent touch. This cake is also lovely with a cup of coffee or sweet tea on the side.


Homemade Caramel Cake is one of those time-honored desserts that never go out of style. It’s sweet, rich, and deeply satisfying—a true Southern treasure that brings joy to any table. Once you taste that silky caramel frosting over soft, buttery cake, you’ll understand why this recipe is a keeper.

Old-Fashioned Bread Pudding with Vanilla Sauce

0

Old-Fashioned Bread Pudding with Vanilla Sauce is the kind of cozy dessert that brings back memories of Sunday dinners, family gatherings, and recipes passed down through generations. This classic Southern-style treat is wonderfully simple—made with stale bread, milk, eggs, sugar, and warm spices—yet incredibly comforting. The bread bakes into a rich custard-like texture, with sweet raisins tucked between the golden cubes. It’s slightly crisp on top, tender in the middle, and deeply satisfying.

What truly takes this dessert over the top is the homemade vanilla sauce, a silky blend of butter, sugars, and cream that’s drizzled generously over each warm serving. The contrast of the buttery sauce with the cinnamon- and vanilla-scented pudding is utterly irresistible. Whether you serve it straight from the oven or slightly cooled, this bread pudding is perfect for holidays, potlucks, or a simple weeknight indulgence. It’s humble, heartwarming, and always hits the spot.

Why You’ll Love This Recipe

• Classic comfort dessert using pantry staples

• Buttery, sweet vanilla sauce adds richness

• Perfect use for leftover or stale bread

• Easy to prepare, with warm and nostalgic flavors

Ingredients

For the Bread Pudding:

• 4 cups stale white bread, cubed into 1-inch pieces

• ½ cup raisins

• 2 cups whole milk

• ¼ cup butter

• ½ cup granulated sugar

• 2 large eggs, lightly beaten

• 1 tablespoon vanilla extract

• ½ teaspoon ground nutmeg

For the Vanilla Sauce:

• ½ cup butter

• ½ cup white sugar

• ½ cup packed brown sugar

• ½ cup heavy cream

• 1 tablespoon vanilla extract

Instructions

Step 1: Preheat and Prepare

Preheat the oven to 350°F (175°C).

Grease a 1½-quart baking dish with butter and set aside.

Step 2: Prepare the Bread and Raisins

Place the cubed bread and raisins in a large mixing bowl.

If your bread isn’t stale, you can lightly toast it in the oven for 5–10 minutes to dry it out slightly.

Step 3: Make the Milk Mixture

In a small saucepan, heat the 2 cups of whole milk and ¼ cup butter over medium heat until the butter melts completely.

Do not boil—just heat until steaming. Pour the warm milk mixture over the bread and raisins.

Let the mixture sit for 10 minutes to allow the bread to absorb the liquid and soften.

Step 4: Add Eggs and Flavorings

After soaking, gently stir in the ½ cup sugar, lightly beaten eggs, 1 tablespoon vanilla extract, and nutmeg.

Mix just enough to combine the ingredients evenly. Avoid overmixing so the bread keeps some texture.

Step 5: Bake

Pour the mixture into the prepared baking dish and spread evenly.

Bake for 40–50 minutes, or until the top is golden brown and the center is set. A knife inserted in the center should come out clean.

While the pudding bakes, prepare the vanilla sauce.

Step 6: Make the Vanilla Sauce

In a medium saucepan over medium heat, melt ½ cup butter.

Add the ½ cup white sugar and ½ cup brown sugar, stirring until the mixture becomes smooth and begins to bubble—about 5–8 minutes.

Slowly pour in the ½ cup heavy cream, stirring constantly. Let the sauce simmer gently for 2–3 minutes, or until slightly thickened.

Remove from heat and stir in 1 tablespoon vanilla extract. Keep warm.

Step 7: Serve

Once the bread pudding is done baking, let it cool slightly for 5–10 minutes.

Spoon into individual bowls and drizzle generously with warm vanilla sauce.

Serve immediately and enjoy the comforting, nostalgic flavors.

Tips for Success

Use day-old bread: Slightly stale bread holds up better and absorbs the custard without becoming mushy.

Customize the mix-ins: Swap raisins for chopped dates, dried cranberries, or even chocolate chips.

Make it spiced: Add a dash of cinnamon or allspice along with the nutmeg for extra warmth.

For a boozy twist: Add a splash of bourbon or rum to the vanilla sauce after removing it from the heat.

Want a crispier top? Sprinkle a little extra sugar over the pudding before baking.

Storage Options

Refrigerator: Store leftover bread pudding in an airtight container for up to 4 days. Reheat in the microwave or oven.

Freezer: Bread pudding freezes well. Wrap tightly in plastic and foil, or store in an airtight container for up to 2 months. Thaw in the fridge and warm before serving.

Vanilla sauce storage: Store in a sealed container in the fridge for up to 1 week. Reheat gently on the stovetop or microwave, adding a splash of cream if it thickens too much.

Old-Fashioned Bread Pudding with Vanilla Sauce is the kind of timeless dessert that never goes out of style. Warm, comforting, and surprisingly easy to make, it’s a sweet reminder that simple ingredients can create something truly special.

Southern Stewed Potatoes

0

Southern Stewed Potatoes are a simple, humble dish that speaks volumes about Southern comfort food tradition. Creamy, buttery, and richly flavored with optional bacon grease, this dish transforms basic pantry staples—like potatoes, flour, and milk—into a warm, starchy side that’s hearty enough to stand on its own or sit perfectly beside just about any main dish. The gentle simmering and thickened broth give the potatoes a velvety, almost gravy-like coating that soaks into every bite, delivering old-school comfort with every spoonful.

This dish is a staple in many Southern kitchens not because it’s fancy, but because it’s dependable, delicious, and soul-satisfying. It’s ideal served alongside fried chicken, meatloaf, pork chops, or green beans and cornbread. It’s the kind of food you might remember from your grandmother’s table—no-frills, but packed with flavor and care. It’s budget-friendly, filling, and just plain good.

Why You’ll Love This Recipe

• Classic comfort food with minimal ingredients

• Thick, creamy texture without heavy cream

• Easy to prepare and budget-friendly

• Customizable with bacon grease, onions, or herbs

Ingredients

• 7 medium potatoes, peeled and cubed into 1-inch chunks

• 3 tablespoons butter

• ½ cup milk

• ½ cup water

• 2 tablespoons flour

• 1 pinch dried onion flakes (or 2–3 tablespoons finely diced onion)

• Salt and black pepper, to taste

• 2 tablespoons bacon grease (optional, but highly recommended)

Instructions

Step 1: Cook the Potatoes

Peel the potatoes and cut them into even 1-inch cubes.

Place the cubed potatoes in a large pot and cover them with cold water, about 2 inches above the potatoes.

Bring the water to a boil over medium-high heat.

Once boiling, reduce the heat to medium-low and simmer the potatoes for 10–15 minutes, or until fork-tender but not falling apart.

Drain the potatoes gently—do not rinse, as you want to retain some of the starch for thickening.

Step 2: Make the Thickening Slurry

In a small bowl or cup, whisk together 2 tablespoons of flour and ½ cup of water until smooth and no lumps remain.

This slurry will thicken the potato broth and give the dish its signature creamy texture.

Step 3: Thicken the Broth

Return the drained potatoes to the pot over low heat.

Slowly stir in the flour and water slurry.

Let the mixture simmer for 2–3 minutes, stirring gently, until the broth begins to thicken slightly.

Step 4: Add the Milk and Butter

Add ½ cup of milk and 3 tablespoons of butter to the pot.

Continue stirring gently to avoid breaking the potatoes too much. You want some to stay chunky while others break down a bit to thicken the sauce naturally.

Step 5: Season and Add Flavor

Add onion flakes or fresh finely diced onion, along with salt and pepper to taste.

For extra richness and a traditional flavor boost, stir in 2 tablespoons of bacon grease (optional but highly recommended).

Simmer for 5–10 more minutes, stirring occasionally, until the sauce is creamy and coats the potatoes evenly.

Taste and adjust seasoning as needed.

Step 6: Serve Warm

Spoon the stewed potatoes into bowls or serve as a side dish on a plate.

Garnish with chopped parsley, chives, or an extra pat of butter if desired.

Tips for Success

Don’t overcook the potatoes: You want them soft but still holding their shape. Overcooked potatoes may become mushy.

Use starchy potatoes like Russets: They help naturally thicken the broth and create that rich, creamy texture.

Stir gently: The goal is a creamy dish with some intact chunks and some broken-down pieces.

Add bacon bits: If you love bacon, crumble some crispy pieces on top just before serving.

Use evaporated milk for extra richness: This adds a more old-fashioned taste and makes the broth even creamier.

Storage Options

Refrigerator: Store leftovers in an airtight container for up to 4 days. Reheat on the stovetop with a splash of milk or water to loosen the sauce if needed.

Freezer: Not recommended. The texture of the potatoes can change and become grainy after freezing and thawing.

Make-ahead tip: You can boil the potatoes in advance and store them in the fridge. Assemble the dish with the thickener and finish on the stove just before serving.

Southern Stewed Potatoes are more than a side dish—they’re a tribute to simple, soulful cooking. With their buttery texture and creamy, savory sauce, these potatoes are a comforting presence at any table, especially when served alongside your favorite Southern mains. Whether you’re recreating a memory or making your own tradition, this recipe will have everyone coming back for seconds.