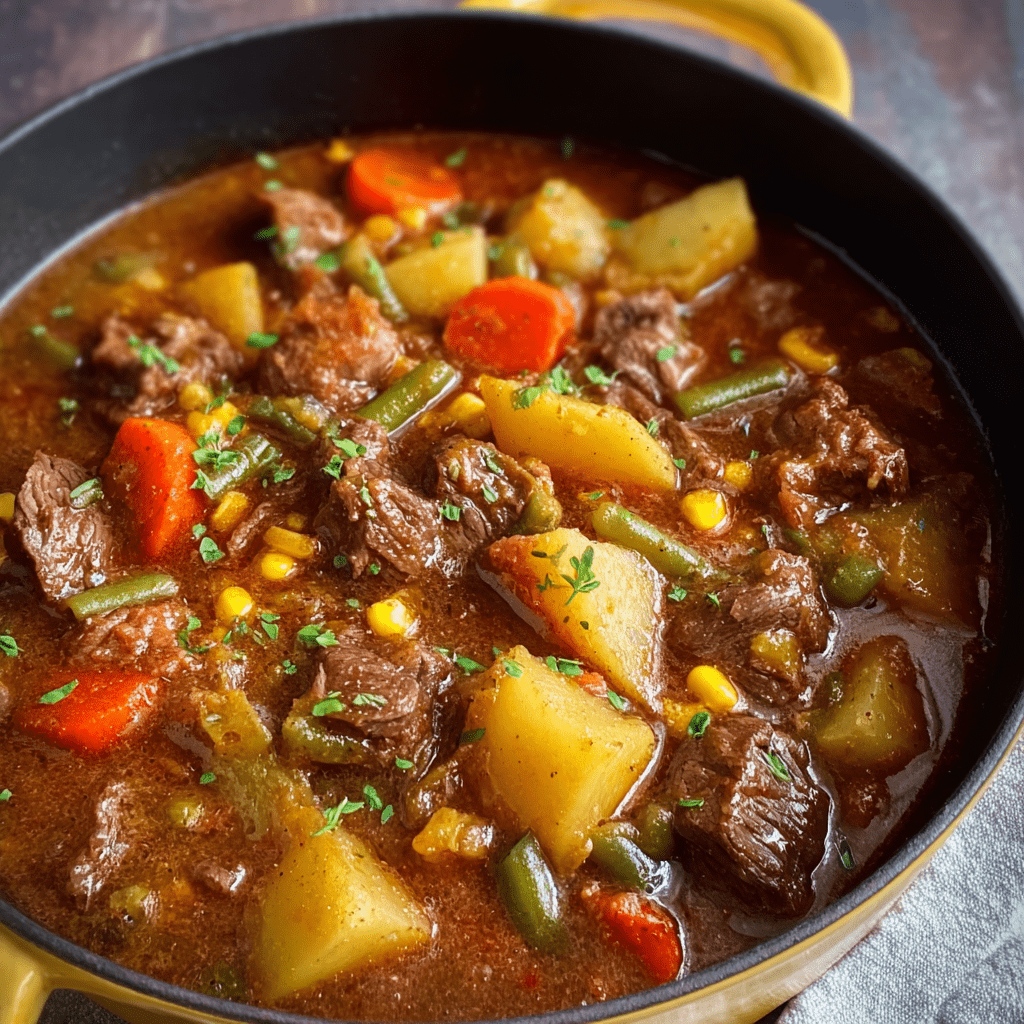
Lobster Tail Recipe

0

Lobster tails are a luxurious and elegant seafood dish that is surprisingly easy to prepare. This recipe highlights the delicate, sweet flavor of lobster meat while enhancing it with a buttery, garlic-infused basting sauce. Perfect for special occasions, date nights, or whenever you want to treat yourself, these broiled lobster tails are a showstopper on any table.

The preparation method of butterflying the lobster tail not only makes it visually appealing but also ensures even cooking. The rich, seasoned butter mixture seeps into every bite, complemented by a hint of citrus from the lemon juice and the smoky warmth of paprika. With minimal effort and simple ingredients, you can create a restaurant-quality dish right in your kitchen.

Why You’ll Love This Recipe

Elegant Presentation: The butterflied lobster tails are as visually stunning as they are delicious.

Rich and Flavorful: The buttery garlic sauce enhances the natural sweetness of the lobster.

Quick to Prepare: With just a few steps, you can have gourmet lobster tails ready in under 30 minutes.

Ingredients

For the Lobster Tails:

• 4 (10-oz) lobster tails, fresh or thawed if frozen

For the Butter Basting Sauce:

• 1/4 cup salted butter, melted (1/2 stick)

• 2 cloves garlic, crushed

• 2 teaspoons lemon juice

• 1/2 teaspoon smoked paprika

• 1 pinch cayenne pepper (optional, for a subtle kick)

Instructions

Step 1: Thaw the Lobster Tails (If Needed)

1. If using frozen lobster tails, thaw them overnight in the refrigerator.

2. Alternatively, place them in a sealed bag and submerge them in cold water for about 30 minutes.

Step 2: Prepare the Oven

1. Preheat your oven to Broil mode at 500°F (260°C).

2. Adjust the oven rack so the lobster tails will sit 4 to 5 inches below the broiler.

Step 3: Butterfly the Lobster Tails

1. Using kitchen shears, cut lengthwise down the center of the shell, stopping just before the tail fin.

2. Gently spread the shell open and lift the lobster meat upward, separating it from the shell while keeping it attached at the tail fin.

3. Arrange the butterflied tails on a baking sheet.

Step 4: Make the Butter Sauce

1. In a small bowl, whisk together the melted butter, crushed garlic, lemon juice, smoked paprika, and cayenne pepper (if using).

Step 5: Baste the Lobster Tails

1. Using a pastry brush or spoon, generously coat the exposed lobster meat with the butter mixture.

2. Ensure each tail is evenly covered for maximum flavor.

Step 6: Broil the Lobster Tails

1. Place the baking sheet under the preheated broiler.

2. Broil until the lobster meat is opaque and lightly browned, about 1 minute per ounce. For 10-ounce lobster tails, this will take approximately 10 minutes. Watch closely to avoid overcooking.

Step 7: Serve the Lobster Tails

1. Remove the lobster tails from the oven and let them rest for 2-3 minutes.

2. Garnish with fresh herbs such as parsley or dill, and serve with extra melted butter for dipping if desired.

Tips

Thaw Properly: If using frozen lobster, ensure it is fully thawed to achieve even cooking.

Butterfly for Even Cooking: Cutting the shell and lifting the meat ensures a more consistent cook and a beautiful presentation.

Monitor Closely: Lobster cooks quickly, so keep a close eye on it to avoid overcooking. The meat should be opaque and slightly firm to the touch.

Storage Options

Refrigeration: Store leftover lobster tails in an airtight container in the refrigerator for up to 2 days.

Reheating: Gently reheat in a 300°F oven or microwave on low to avoid drying out.

Freezing: Freeze cooked lobster tails in a freezer-safe container for up to 3 months. Thaw and reheat as needed.

This Lobster Tail recipe offers an easy yet impressive way to enjoy the luxurious flavors of lobster. Perfectly broiled and basted in a garlic-butter sauce, it’s a dish that turns any meal into a special occasion.

Butter Pecan Cookies

0

Butter Pecan Cookies are a delightful combination of buttery richness and nutty sweetness, making them an irresistible treat for cookie lovers. Each bite features a tender, melt-in-your-mouth texture with the crunch of toasted pecans, creating a balance of flavors that’s both comforting and satisfying. Whether you’re enjoying these cookies with a cup of coffee or sharing them as part of a dessert platter, they’re sure to become a new favorite.

This recipe is simple enough for beginner bakers while delivering a professional-level result. Toasted pecans are mixed into a buttery cookie dough, and each cookie is topped with a pecan half for an elegant finish. These cookies are perfect for holiday baking, gift-giving, or anytime you crave a classic treat with a nutty twist.

Why You’ll Love This Recipe

Rich and Buttery Flavor: The butter base makes these cookies irresistibly tender and flavorful.

Perfectly Nutty: Chopped pecans add crunch and depth, while pecan halves on top make for a beautiful presentation.

Easy to Make: With simple ingredients and straightforward steps, these cookies are a joy to bake.

Ingredients

For the Cookie Dough:

• 1 cup chopped pecans

• 7 tablespoons unsalted butter

• 1/3 cup granulated sugar

• 1 cup brown sugar

• 2 eggs

• 1 tablespoon pure vanilla extract

• 2 cups all-purpose flour

• 1/2 teaspoon baking soda

• A pinch of salt

For the Topping:

• Pecan halves

Instructions

Step 1: Preheat the Oven

1. Preheat your oven to 350°F (175°C).

2. Line two baking sheets with parchment paper to prevent sticking and ensure easy cleanup.

Step 2: Toast the Pecans

1. Spread the chopped pecans in a single layer on a baking sheet.

2. Toast in the preheated oven for 5-7 minutes, or until fragrant and lightly browned. Set aside to cool.

Step 3: Mix the Wet Ingredients

1. In a large mixing bowl, cream together the butter, granulated sugar, and brown sugar using an electric mixer. Beat until the mixture is light and creamy, about 2-3 minutes.

2. Add the eggs one at a time, followed by the vanilla extract. Beat for another 2 minutes until fully incorporated.

Step 4: Combine the Dry Ingredients

1. In a separate bowl, whisk together the flour, baking soda, and a pinch of salt.

2. Gradually add the dry ingredients to the wet mixture, mixing on low speed until just combined.

Step 5: Add the Pecans

1. Gently fold in the toasted chopped pecans, ensuring they are evenly distributed throughout the dough.

Step 6: Shape the Cookies

1. Use a medium cookie scoop or a tablespoon to form dough balls.

2. Place the dough balls onto the prepared baking sheets, spacing them about 2 inches apart.

Step 7: Add the Topping

1. Press a pecan half gently into the top of each dough ball.

Step 8: Bake the Cookies

1. Bake in the preheated oven for 10-15 minutes, or until the edges are golden brown and the centers are set.

2. Remove from the oven and allow the cookies to cool on the baking sheet for 2-3 minutes before transferring them to a wire rack to cool completely.

Tips

Room Temperature Ingredients: Ensure the butter and eggs are at room temperature for easier mixing and a smoother dough.

Toasting the Pecans: Toasting enhances the nutty flavor, so don’t skip this step!

Check for Doneness: Look for lightly golden edges as a sign the cookies are ready.

Storage Options

Room Temperature: Store cookies in an airtight container for up to 5 days.

Freezing Dough: Freeze unbaked cookie dough balls on a baking sheet, then transfer to a freezer-safe bag for up to 3 months. Bake directly from frozen, adding an extra 1-2 minutes to the bake time.

Freezing Baked Cookies: Store baked cookies in a freezer-safe container for up to 2 months. Thaw at room temperature before serving.

Butter Pecan Cookies are the perfect blend of buttery sweetness and nutty goodness. Share them with loved ones or savor them as a comforting treat any time of year!

Deviled Ham Salad

0

Deviled Ham Salad is a delightful spread combining finely chopped ham, creamy mayonnaise, and tangy sweet pickle relish. This retro classic is versatile, easy to prepare, and bursting with flavor. Perfect as a filling for sandwiches or paired with premium crackers, it’s an excellent choice for picnics, quick lunches, or a sophisticated appetizer.

This salad offers a harmonious balance of creamy and tangy notes, making it a crowd-pleaser. With just three main ingredients and a few minutes of preparation, this dish is as simple as it is delicious.

Why You’ll Love This Recipe

Quick and Simple: Takes minutes to make with minimal ingredients.

Versatile: Serve it as a spread, filling, or dip.

Perfect Make-Ahead Dish: Stays fresh for up to a week when stored properly.

Ingredients

• 3 ½ to 4 cups finely chopped ham

• ½ cup premium mayonnaise

• ⅓ cup sweet pickle relish

Instructions

Step 1: Combine the Ingredients

1. In a large mixing bowl, add the finely chopped ham, mayonnaise, and sweet pickle relish.

2. Stir the ingredients together until the mixture is well blended and creamy.

Step 2: Adjust to Taste

1. Taste the salad and adjust as needed.

• For a creamier texture, add more mayonnaise.

• For a sweeter or tangier flavor, incorporate additional sweet pickle relish.

Step 3: Serve and Enjoy

1. Serve immediately as a spread for sandwiches or with crackers.

2. For a more elegant presentation, garnish with fresh parsley or a sprinkle of paprika.

Tips

Chop Finely: Ensure the ham is finely chopped for a smoother, more cohesive texture.

Customize the Flavor: Add a pinch of Dijon mustard, hot sauce, or smoked paprika for a flavor twist.

Premium Ingredients: Use high-quality mayonnaise and ham for the best taste.

Storage Options

Refrigeration: Store the Deviled Ham Salad in an airtight container in the refrigerator for up to one week.

Serving Again: Stir before serving to redistribute any liquid and maintain uniformity.

Deviled Ham Salad is a nostalgic yet versatile dish that’s as delicious as it is simple to prepare. Perfect for any occasion, it’s a timeless classic you’ll enjoy time and again!

Chocolate Chip Cookie Dough Brownies

0

Chocolate Chip Cookie Dough Brownies are the ultimate indulgence, combining the rich fudginess of brownies with the irresistible sweetness of cookie dough. Topped with an optional chocolate drizzle, these layered bars are perfect for anyone who loves the best of both desserts. They’re a decadent treat for special occasions, parties, or simply satisfying a serious chocolate craving.

The brownie base offers a deep chocolate flavor, while the cookie dough layer provides a soft and creamy contrast, studded with miniature chocolate chips. Together, they create a dessert that’s as impressive to look at as it is to eat.

Why You’ll Love This Recipe

Double the Treats: Combines brownies and cookie dough in one dessert.

Rich and Decadent: A chocolate lover’s dream with layers of sweetness.

Showstopper: Perfect for special occasions and guaranteed to impress.

Ingredients

For the Brownie Layer:

• 4 ounces unsweetened chocolate, finely chopped

• 1 cup (2 sticks) salted butter, melted

• 2 cups light brown sugar, packed

• 4 large eggs

• 2 teaspoons vanilla extract

• 1 cup all-purpose flour

• ½ cup miniature chocolate chips

For the Cookie Dough Layer:

• ¾ cup (1½ sticks) salted butter, at room temperature

• ¾ cup light brown sugar, packed

• ¾ cup granulated white sugar

• 3 tablespoons milk

• 1½ teaspoons vanilla extract

• 1½ cups all-purpose flour (see Notes)

• 1½ cups miniature chocolate chips

Optional Topping:

• ½ cup semisweet chocolate chips

• 1 teaspoon shortening

Instructions

Preparation of the Brownie Layer

1. Preheat Oven and Prep Pan: Preheat the oven to 325°F. Grease a 9×13-inch baking pan with nonstick spray.

2. Melt Chocolate: Place the chopped chocolate in a medium glass bowl. Microwave in 30-second intervals, stirring after each, until smooth. Let cool slightly.

3. Mix Wet Ingredients: In a large mixing bowl, whisk together the melted butter and brown sugar. Add the eggs and vanilla extract, whisking until fully combined.

4. Combine and Fold: Stir the melted chocolate into the butter mixture until smooth. Add the flour, mixing just until combined. Fold in the miniature chocolate chips.

5. Bake: Pour the batter into the prepared pan and bake for 25–35 minutes. Check for doneness with a toothpick inserted into the center—it should come out clean. Let the brownie layer cool completely.

Preparation of the Cookie Dough Layer

1. Cream Butter and Sugars: In a medium bowl, beat the butter, brown sugar, and white sugar with an electric mixer until light and fluffy.

2. Add Wet Ingredients: Mix in the milk and vanilla extract until smooth.

3. Combine and Fold: Gradually add the flour, mixing just until combined. Fold in the miniature chocolate chips.

Assembly

1. Layer Cookie Dough: Spread the cookie dough evenly over the cooled brownie layer.

2. Chill: Refrigerate until the cookie dough is firm, or freeze for faster results.

3. Slice: Use a sharp knife to cut the chilled brownies into squares. Wipe the knife clean between cuts for neat edges.

Optional Topping

1. Melt Chocolate: Microwave the semisweet chocolate chips with the shortening, stirring until smooth.

2. Drizzle: Transfer the melted chocolate to a small zip-sealed bag, snip a corner, and drizzle over the brownies. Add extra chocolate chips for garnish, if desired.

Tips

Flour Preparation: To ensure safe consumption, heat-treat the flour by spreading it on a baking sheet and baking at 350°F for 5 minutes.

Layering Tip: Spread the cookie dough gently to avoid lifting the brownie layer.

Storage: Store the brownies in an airtight container in the refrigerator for up to a week.

Storage Options

Refrigeration: Keep in an airtight container for up to 7 days. Serve chilled or let them come to room temperature before serving.

Freezing: Freeze individual brownies wrapped in plastic wrap and aluminum foil for up to 2 months. Thaw in the refrigerator or at room temperature.

Chocolate Chip Cookie Dough Brownies are a dessert that combines two favorites into one irresistible treat. Whether enjoyed as a casual indulgence or a party centerpiece, they’re bound to be a hit!

Classic Crepes

0

Classic crepes are a versatile and delicious staple, perfect for both sweet and savory dishes. Their light, thin texture makes them ideal for rolling, folding, or stacking with your favorite fillings. Whether topped with fresh fruits and whipped cream, drizzled with chocolate sauce, or filled with savory ingredients like ham and cheese, these crepes bring elegance and simplicity to any meal.

This recipe is quick and easy to prepare, requiring just a few basic ingredients and minimal effort. With a silky batter and a non-stick pan, you’ll achieve perfectly golden crepes every time.

Why You’ll Love This Recipe

Quick and Simple: Easy to prepare with just a handful of pantry staples.

Versatile: Pair with endless sweet or savory fillings.

Perfect Texture: Thin and light, with a slightly golden, tender finish.

Ingredients

• 1 cup plain flour

• 1 cup milk

• 3 eggs

• ¼ teaspoon salt

• 2 tablespoons melted butter

Instructions

Step 1: Prepare the Batter

1. Sift the flour into a medium mixing bowl to remove any lumps and ensure a smooth batter.

2. Add the milk, eggs, salt, and melted butter to the bowl with the flour.

3. Beat or whisk the ingredients together until smooth and well combined.

4. Let the batter rest for 10 minutes to allow the flour to hydrate and any air bubbles to settle.

Step 2: Heat the Pan

1. Preheat a non-stick crepe pan or skillet over medium-high heat.

2. Lightly grease the pan if necessary (though the melted butter in the batter should suffice).

Step 3: Cook the Crepes

1. Pour about ⅓ cup of batter into the preheated pan.

2. Swirl the pan immediately to spread the batter into a thin, even layer.

3. Cook over medium-low heat for 1-2 minutes, or until the surface looks dry and the edges start to lift slightly.

Step 4: Flip the Crepe

1. Use a flat-bladed knife or spatula to release the edges of the crepe.

2. Gently flip the crepe and cook the other side for 1-2 minutes until pale golden.

Step 5: Keep Warm and Repeat

1. Transfer the cooked crepe to a plate and cover to keep warm.

2. Repeat with the remaining batter, stacking the crepes as they finish cooking.

Tips

Swirl Quickly: Pour and swirl the batter immediately to ensure an even, thin layer.

Rest the Batter: Letting the batter rest improves texture and reduces air bubbles.

Non-Stick Essentials: Use a good-quality non-stick pan for best results.

Storage Options

Refrigeration: Store leftover crepes in an airtight container in the refrigerator for up to 3 days. Separate them with parchment paper to prevent sticking.

Freezing: Freeze cooked crepes stacked with parchment paper between each layer in a freezer-safe bag for up to 2 months. Thaw at room temperature before reheating.

Classic crepes are a delightful addition to any meal, from a sweet breakfast to a savory dinner. Their light and flexible texture makes them a canvas for endless culinary creativity!

Raspberry and White Chocolate Chip Cookies

0

Raspberry and White Chocolate Chip Cookies are a delightful treat that combines the tart sweetness of raspberries with the creamy richness of white chocolate. These cookies are soft and chewy with bursts of fruity flavor marbled throughout the dough. The hint of lemon zest adds a refreshing citrus note, perfectly balancing the sweetness of the chocolate and the slight tartness of the raspberries.

Whether for an afternoon snack, a holiday gift, or just to satisfy a sweet tooth, these cookies are a sophisticated twist on a classic favorite. They’re easy to prepare and visually stunning, with vibrant streaks of red and chunks of creamy white chocolate in every bite.

Why You’ll Love This Recipe

Unique Flavor Pairing: The combination of tart raspberries and sweet white chocolate is irresistible.

Visually Stunning: The marbled red streaks from the raspberries make these cookies stand out.

Soft and Chewy Texture: Perfectly baked with a tender center and crisp edges.

Ingredients

• 1 cup + 1 tablespoon frozen raspberries

• ⅔ cup unsalted butter, softened

• ⅓ cup caster sugar (superfine sugar)

• ⅓ cup light brown sugar, packed

• Zest of one lemon

• 1 large egg

• 1 ¾ cups all-purpose flour

• ½ teaspoon baking soda

• ½ teaspoon fine sea salt

• 1 cup white chocolate, finely chopped

Instructions

Step 1: Prepare Raspberries and Preheat Oven

1. Place the frozen raspberries on a plate to defrost slightly for 10-15 minutes.

2. Preheat your oven to 375°F (190°C) or 340°F (170°C) for fan ovens.

3. Line two large baking sheets with parchment paper.

Step 2: Cream Butter and Sugars

1. In a mixing bowl, combine the softened butter, caster sugar, and light brown sugar.

2. Using an electric mixer, beat the mixture until creamy and light.

3. Add the lemon zest and egg, beating until fully incorporated.

Step 3: Incorporate Dry Ingredients

1. Sift the all-purpose flour, baking soda, and fine sea salt into the butter mixture.

2. Mix with a wooden spoon until just combined, being careful not to overmix.

Step 4: Add White Chocolate and Raspberries

1. Gently fold the finely chopped white chocolate into the dough.

2. Carefully fold in the slightly defrosted raspberries, allowing them to break slightly and create marbled streaks in the dough.

Step 5: Shape the Cookies

1. Divide the dough into two portions. From each portion, scoop out golf ball-sized pieces.

2. Arrange the dough balls on the prepared baking sheets, leaving ample space between each as they will spread during baking.

3. Lightly press down on each ball to slightly flatten.

Step 6: Bake and Cool

1. Bake the cookies in the preheated oven for 15-17 minutes, or until the edges are golden brown and the centers remain slightly soft.

2. Let the cookies cool on the baking sheets for 5 minutes before transferring them to a cooling rack to cool completely.

3. Repeat the process with the remaining dough.

Tips

Use Frozen Raspberries: Frozen raspberries work best as they don’t bleed excessively into the dough.

Zest with Care: Ensure you only zest the lemon’s yellow layer to avoid the bitter white pith.

Avoid Overmixing: Gently fold in the raspberries to maintain a marbled appearance.

Storage Options

Room Temperature: Store in an airtight container for up to 3 days.

Refrigeration: Extend freshness by storing in the refrigerator for up to 5 days.

Freezing: Freeze the unbaked dough balls on a tray, then transfer to a freezer-safe container. Bake from frozen, adding an extra 2-3 minutes to the baking time.

Raspberry and White Chocolate Chip Cookies are a delightful way to enjoy the combination of fruit and chocolate in cookie form. Their bright flavors and beautiful appearance make them a treat worth savoring!

Homemade Cheesy Garlic Breadsticks

0

Cheesy Garlic Breadsticks are a quick and delicious appetizer or side dish that pairs perfectly with pasta, pizza, or salads. Made with simple ingredients like prepared pizza dough, garlic butter, and melted cheese, these breadsticks are baked to golden perfection for a soft and cheesy treat.

Crisp edges, gooey cheese, and the irresistible aroma of garlic make this recipe a family favorite that’s perfect for weeknight dinners or game-day snacks. Serve with warm marinara sauce for dipping to complete the experience.

Why You’ll Love This Recipe

Quick and Easy: Ready in under 20 minutes with minimal prep.

Cheesy and Garlicky: A perfect balance of melted cheese and fragrant garlic.

Crowd-Pleaser: Great for parties, family meals, or as a simple snack.

Ingredients

• 1 (10 oz) can prepared pizza crust

• 1 tablespoon butter, melted

• 1 clove garlic, finely minced

• ½ cup mozzarella cheese, grated

• 1 tablespoon Parmesan cheese, grated

• 1 tablespoon dried basil

• Salt and pepper, to taste

Instructions

Step 1: Preheat the Oven

1. Preheat your oven to 425°F (220°C).

2. Line a baking sheet with parchment paper for easy cleanup.

Step 2: Prepare the Garlic Butter

1. In a small bowl, mix the melted butter with the minced garlic. Set aside.

Step 3: Assemble the Breadsticks

1. Unroll the prepared pizza dough onto the lined baking sheet.

2. Brush the dough evenly with the garlic butter mixture.

3. Sprinkle the mozzarella cheese, Parmesan cheese, and dried basil evenly over the dough.

4. Season with a pinch of salt and pepper to taste.

Step 4: Cut the Dough

1. Use a pizza cutter to cut the dough lengthwise into 7 long strips and crosswise into 3 strips to form breadstick shapes.

2. Do not separate the strips; leave them intact for baking.

Step 5: Bake

1. Place the baking sheet in the preheated oven and bake for 10–12 minutes, or until the breadsticks are light golden brown and the cheese is melted and bubbly.

Step 6: Serve

1. Recut along each strip to separate the breadsticks.

2. Remove from the baking sheet and serve warm with marinara sauce for dipping.

Tips

Add More Flavor: Sprinkle red pepper flakes or Italian seasoning for an extra kick.

Use Fresh Garlic: Finely mince fresh garlic for a more aromatic flavor compared to garlic powder.

Cheese Variations: Try a blend of mozzarella, cheddar, and provolone for a richer flavor.

Storage Options

Refrigeration: Store leftovers in an airtight container in the refrigerator for up to 2 days. Reheat in the oven for a crisp texture.

Freezing: Freeze baked breadsticks for up to 1 month. Reheat directly in the oven at 375°F (190°C) until warm.

Homemade Cheesy Garlic Breadsticks are the perfect addition to any meal, offering a warm, cheesy, and garlicky treat that everyone will love. Simple to make and full of flavor, they’re sure to become a regular on your table!

Cheesy Meatball Casserole

0

Cheesy Meatball Casserole is a comforting and indulgent dish that combines tender, flavorful meatballs with a rich marinara cream sauce, all topped with golden, bubbly cheese. It’s the perfect meal for family dinners, potlucks, or any time you crave a hearty, satisfying dish.

With layers of savory meatballs, creamy sauce, and gooey cheese, this casserole is a guaranteed crowd-pleaser. Serve it with crusty bread, a fresh salad, or even over pasta for a complete and delicious meal.

Why You’ll Love This Recipe

Rich and Flavorful: A combination of marinara, cream, and cheese ensures bold, satisfying flavors.

Easy to Make: Simple ingredients and straightforward steps make this dish perfect for weeknight dinners.

Versatile: Serve as-is, with bread, or over pasta for a complete meal.

Ingredients

For the Meatballs:

• 500g (1 lb) ground beef

• ¼ cup breadcrumbs

• 1 egg

• 2 garlic cloves, minced

• 2 tbsp chopped parsley

• 1 tsp paprika

• 1 tsp black pepper

• ½ tsp salt

For the Sauce:

• 2 cups marinara sauce (store-bought or homemade)

• 1 cup heavy cream

• ½ tsp dried oregano

• ½ tsp garlic powder

• Salt and pepper, to taste

For the Topping:

• 2 cups shredded mozzarella cheese

• ½ cup grated Parmesan cheese

• 2 tbsp chopped chives or parsley (optional garnish)

Instructions

Step 1: Prepare the Meatballs

1. In a large mixing bowl, combine the ground beef, breadcrumbs, egg, minced garlic, parsley, paprika, black pepper, and salt.

2. Mix thoroughly until all ingredients are evenly incorporated.

3. Roll the mixture into small meatballs, about 1 inch in diameter.

Step 2: Cook the Meatballs

1. Heat a drizzle of oil in a skillet over medium heat.

2. Sear the meatballs on all sides until browned but not fully cooked, about 5 minutes.

3. Remove the meatballs from the skillet and set aside.

Step 3: Prepare the Sauce

1. In the same skillet, add marinara sauce, heavy cream, oregano, garlic powder, salt, and pepper.

2. Stir well and let the sauce simmer for about 5 minutes until slightly thickened.

Step 4: Assemble the Casserole

1. Preheat your oven to 190°C (375°F).

2. Pour half of the sauce mixture into a casserole dish, spreading it evenly across the bottom.

3. Arrange the seared meatballs over the sauce.

4. Pour the remaining sauce over the meatballs to cover them.

Step 5: Add the Cheese Topping

1. Sprinkle the shredded mozzarella and Parmesan cheese evenly over the casserole.

2. Place the casserole dish in the oven and bake for 20–25 minutes, or until the cheese is golden and bubbling.

Step 6: Garnish and Serve

1. Remove the casserole from the oven and let it rest for 5 minutes.

2. Garnish with chopped chives or parsley, if desired.

3. Serve warm, paired with crusty bread, pasta, or a fresh side salad.

Tips

Make Ahead: Assemble the casserole up to a day in advance, cover, and refrigerate. Bake when ready to serve.

Customize the Protein: Substitute ground beef with ground turkey, chicken, or pork for a lighter or different flavor.

Extra Flavor: Add a pinch of red pepper flakes to the sauce for a spicy kick.

Storage Options

Refrigeration: Store leftovers in an airtight container in the refrigerator for up to 3 days. Reheat in the oven or microwave before serving.

Freezing: Freeze the assembled casserole (before baking) for up to 2 months. Thaw in the refrigerator overnight and bake as directed.

Cheesy Meatball Casserole is a cozy, flavorful dish that’s sure to become a family favorite. Its creamy sauce, cheesy topping, and tender meatballs make it an irresistible choice for any occasion!

Slow Cooker Hot Tub Beer Brats

0

Slow Cooker Hot Tub Beer Brats are a flavorful and easy way to prepare juicy, tender bratwursts infused with the rich taste of beer, onions, and garlic. Perfect for game days, cookouts, or a comforting dinner, this recipe delivers a satisfying blend of savory and hearty flavors.

The slow cooking process allows the brats to soak up all the delicious broth and beer, while the optional skillet browning adds a caramelized finish. Serve them in toasted buns with your favorite toppings for an irresistible meal.

Why You’ll Love This Recipe

Rich Flavor: Beer, garlic, and butter create a delicious broth that infuses every bite of the brats.

Effortless Preparation: The slow cooker does most of the work, making this an easy, hands-off recipe.

Customizable Toppings: Pair with sauerkraut, mustard, or onions for endless flavor combinations.

Ingredients

• 1 package bratwurst (5–6 brats)

• 1 large onion, thinly sliced

• 2 cloves garlic, minced

• 1 bottle beer (your favorite kind)

• 1 teaspoon garlic powder

• Salt and pepper, to taste

• 4 tablespoons butter, sliced

• 14 oz chicken broth

• Hoagie rolls or brat buns, for serving

Instructions

Step 1: Prepare the Ingredients

1. Place the bratwursts in the slow cooker.

2. Add the sliced onions and minced garlic, spreading them evenly around the brats.

3. For an extra layer of flavor, brown the brats in a hot skillet for 2–3 minutes per side before adding them to the slow cooker.

Step 2: Season and Add Liquids

1. Sprinkle garlic powder over the ingredients and dot with butter slices.

2. Pour in the beer and chicken broth, ensuring the brats are partially submerged.

3. Season with a pinch of salt and pepper.

Step 3: Slow Cook the Brats

1. Cover the slow cooker with the lid and set it to low heat.

2. Cook for 4–6 hours, or until the brats are tender and infused with the flavorful broth.

Step 4: Optional Browning

1. For added texture and caramelization, remove the cooked brats from the slow cooker and brown them in a hot skillet for 2–3 minutes per side.

Step 5: Serve

1. Place the brats in hoagie rolls or brat buns.

2. Top with the softened onions and garlic from the slow cooker.

3. Add your favorite toppings, such as mustard, sauerkraut, or sliced onions.

Tips

Beer Selection: Use your favorite beer—lager, ale, or even a dark stout—for different flavor profiles.

Toasted Buns: Toast the buns before serving for extra texture and flavor.

Add Heat: For a spicy kick, add sliced jalapeños or a dash of hot sauce to the brats before serving.

Storage Options

Refrigeration: Store leftover brats and onions in an airtight container in the refrigerator for up to 3 days. Reheat gently in the microwave or on the stovetop.

Freezing: Freeze cooked brats and onions in a freezer-safe container for up to 2 months. Thaw in the refrigerator overnight and reheat before serving.

Slow Cooker Hot Tub Beer Brats are an easy, delicious way to enjoy tender, flavorful bratwursts. Whether for a party, barbecue, or simple family dinner, this recipe is sure to satisfy everyone at the table!

Best Ever Guacamole

0

Guacamole is a creamy, zesty, and perfectly spiced dip that’s a must-have for any gathering, taco night, or snack session. Made with ripe avocados, fresh lime juice, and a medley of flavorful seasonings, this guacamole recipe is packed with bright, bold flavors.

The addition of diced onions, Roma tomatoes, and cilantro provides a satisfying texture and a burst of freshness, while the subtle kick from cumin and cayenne adds depth and heat. Serve it with tortilla chips or use it as a topping for tacos, burritos, or salads—it’s guaranteed to be a crowd-pleaser.

Why You’ll Love This Recipe

Fresh and Flavorful: A perfect balance of creamy avocado, tangy lime, and zesty spices.

Quick and Easy: Ready in just minutes, with simple ingredients you likely already have.

Versatile: Serve as a dip, a topping, or even a spread for sandwiches.

Ingredients

• 3 ripe avocados, halved, pitted, and peeled

• 1 lime, juiced

• ½ teaspoon salt

• ½ teaspoon ground cumin

• ½ teaspoon ground cayenne pepper

• ½ medium onion, finely diced

• 2 Roma tomatoes, seeded and diced

• 1 tablespoon chopped cilantro

• 1 clove garlic, minced

Instructions

Step 1: Prepare the Avocados

1. Scoop the avocado pulp into a large bowl.

2. Add the lime juice and toss to coat. Drain off any excess juice, reserving it for later use.

Step 2: Mash and Season

1. Use a potato masher or a fork to mash the avocados to your desired consistency—smooth or slightly chunky.

2. While mashing, add the salt, cumin, and cayenne pepper to season the guacamole.

Step 3: Add the Mix-Ins

1. Gently fold in the diced onions, tomatoes, chopped cilantro, and minced garlic until evenly combined.

2. Stir in 1 tablespoon of the reserved lime juice for an extra burst of flavor.

Step 4: Rest and Serve

1. Let the guacamole rest at room temperature for about 1 hour to allow the flavors to meld.

2. Serve fresh with tortilla chips, as a taco topping, or alongside your favorite Mexican dishes.

Tips

Choose Ripe Avocados: Look for avocados that yield slightly to gentle pressure for the best texture and flavor.

Adjust the Heat: Add more cayenne or a finely diced jalapeño if you prefer spicier guacamole.

Prevent Browning: Press plastic wrap directly onto the surface of the guacamole before refrigerating to minimize air exposure.

Make It Your Own: Add extras like diced mango, roasted corn, or crumbled queso fresco for a creative twist.

Storage Options

Refrigeration: Store in an airtight container in the refrigerator for up to 2 days. Press plastic wrap against the surface to prevent browning.

Freezing: Guacamole can be frozen for up to 3 months, though the texture may change slightly. Thaw in the refrigerator and stir before serving.

Best Ever Guacamole is a classic, crowd-pleasing recipe that’s sure to elevate any meal or gathering. Creamy, fresh, and bursting with flavor, it’s the perfect addition to your recipe collection!