Bacon Maple Glazed Pork Tenderloin

0

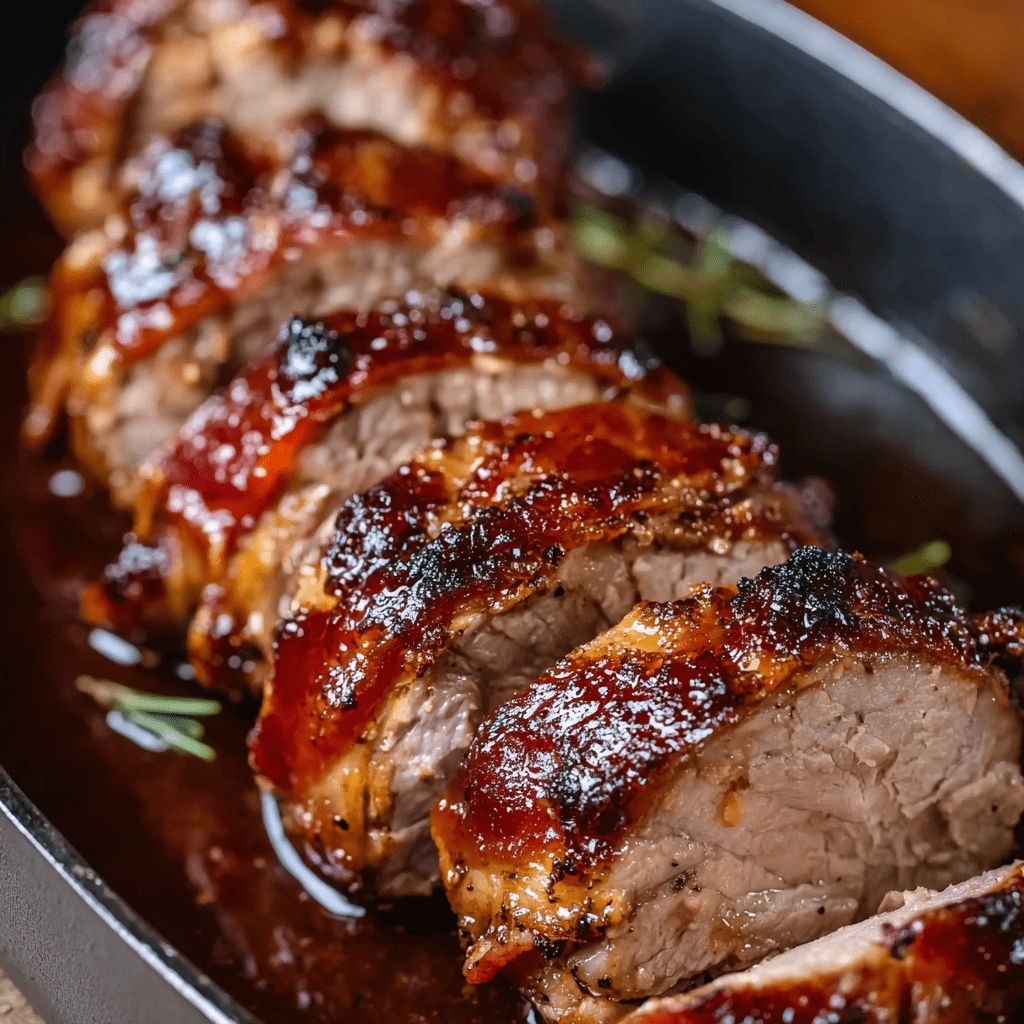
Bacon Maple Glazed Pork Tenderloin is an impressive yet deceptively simple dish that transforms a lean cut of pork into a succulent, flavor-packed centerpiece perfect for a special dinner. This recipe masterfully combines the savory, smoky richness of bacon with a sweet, tangy, and complex glaze made from pure maple syrup, Dijon mustard, and a touch of apple cider vinegar. The process of wrapping the tenderloin in bacon not only infuses it with smoky flavor but also acts as a self-basting mechanism, ensuring the pork remains incredibly juicy and moist throughout cooking. The initial sear in a hot skillet renders the bacon and creates a beautiful caramelized crust, while the finish in the oven gently cooks the pork to a perfect, tender medium. It’s a restaurant-quality meal that is straightforward enough for a weeknight but elegant enough for entertaining guests.

The true brilliance of this recipe lies in the balance of its glaze and the precision of its cooking method. The glaze is a perfect harmony of flavors: the maple syrup provides a deep, autumnal sweetness, the Dijon mustard adds a sharp, tangy counterpoint, and the apple cider vinegar brightens the entire mixture, preventing it from being cloying. As the pork roasts, this glaze caramelizes onto the bacon, creating a sticky, glossy, and irresistible coating. Using an oven-safe skillet is key, as it allows you to seamlessly transition from stovetop searing to oven roasting, capturing all the delicious rendered bacon fat and fond from the sear to create a built-in sauce. Allowing the pork to rest after roasting is a critical final step, letting the juices redistribute throughout the meat for the most tender and flavorful slices imaginable.

Why You’ll Love This Recipe:

• Impressive Presentation: The bacon-wrapped roast looks stunning and tastes even better, making it perfect for a dinner party.
• Perfect Flavor Balance: The sweet, smoky, savory, and tangy notes of the glaze complement the pork beautifully.
• Foolproof Juiciness: The bacon wrapping bastes the lean tenderloin, guaranteeing a moist result every time.
• Surprisingly Simple: With just a few steps and minimal active cooking time, this recipe delivers maximum impact with minimal effort.

Ingredients:

  • 1 pork tenderloin (1 to 1.5 pounds)
  • 6 slices bacon (thin-cut works best for wrapping)
  • 1/4 cup pure maple syrup
  • 2 tablespoons Dijon mustard
  • 1 tablespoon apple cider vinegar
  • 1 teaspoon garlic powder
  • Salt and freshly ground black pepper, to taste
  • 1 tablespoon olive oil
  • Toothpicks, for securing bacon

Instructions:

Step 1: Preheat Oven and Prepare Pork
• Preheat your oven to 375°F (190°C). Pat the pork tenderloin completely dry with paper towels. This ensures a good sear.
• Season the tenderloin generously on all sides with salt, pepper, and the garlic powder.

Step 2: Wrap with Bacon
• Wrap the bacon slices around the seasoned pork tenderloin in a spiral, slightly overlapping each piece. The bacon should cover the length of the tenderloin.
• Use toothpicks inserted at an angle to secure the ends of the bacon strips and prevent them from unraveling during cooking.

Step 3: Make the Glaze
• In a small bowl, whisk together the pure maple syrup, Dijon mustard, and apple cider vinegar until smooth and well combined.

Step 4: Sear the Pork
• Heat the olive oil in a large, oven-safe skillet (such as cast iron or stainless steel) over medium-high heat.
• Once the oil is shimmering, carefully place the bacon-wrapped tenderloin in the skillet. Sear for 2-3 minutes on each side, including the ends if possible, until the bacon is crispy and browned. Use tongs to turn the pork gently.

Step 5: Glaze and Roast
• Brush a generous amount of the maple glaze over the entire surface of the seared pork.
• Transfer the skillet directly from the stovetop to the preheated oven.
• Roast for 20-25 minutes, or until the internal temperature of the pork reaches 145°F (63°C) when measured with a meat thermometer inserted into the thickest part.

Step 6: Rest and Serve
• Carefully remove the skillet from the oven (remember the handle will be extremely hot). Transfer the pork tenderloin to a cutting board and let it rest for 5 minutes. This allows the juices to be reabsorbed.
• Remove the toothpicks. Slice the tenderloin into ½-inch to 1-inch thick medallions.
• Drizzle with the remaining glaze from the bowl (not the skillet drippings, which will be very fatty) and serve immediately.

Tips:

• Use an Oven-Safe Skillet: This is crucial for a seamless transition from stovetop to oven and captures all the flavorful drippings.
• Don’t Skip the Sear: Searing is essential for rendering the bacon fat, crisping the bacon, and building a flavorful crust.
• Use a Meat Thermometer: This is the most reliable way to achieve perfectly cooked, juicy pork without guessing. Overcooking will result in dry meat.
• Let it Rest: Resisting the urge to slice immediately is key to a juicy outcome. The internal temperature will also continue to rise by about 5 degrees during resting (carryover cooking).

Storage Options:

• Refrigerator: Store leftovers in an airtight container in the refrigerator for up to 3 days.
• Reheating: Reheat slices gently in a skillet over low heat to preserve the texture of the bacon. The microwave can be used but may make the bacon soft.
• Freezing: It is not recommended to freeze this dish after cooking, as the texture of the pork can become compromised.

Bacon Maple Glazed Pork Tenderloin is a spectacular dish that effortlessly combines ease of preparation with gourmet results. Its winning combination of flavors and textures is sure to make it a regular in your recipe rotation. Enjoy

Slow Cooker 3-Ingredient BBQ Pulled Pork

0

Slow Cooker 3-Ingredient BBQ Pulled Pork is the ultimate testament to the power of simplicity, a recipe that delivers astonishingly tender, flavorful, and satisfying results with minimal effort and just a handful of ingredients. This method revolves around the slow cooker’s magic, transforming a tough, inexpensive cut of pork shoulder into a succulent, fall-apart masterpiece through hours of gentle, low-heat cooking. The sliced onion forms a foundational “flavor pillow” that steams and caramelizes, infusing the pork with a subtle sweetness and preventing it from sticking, while a full bottle of your favorite BBQ sauce creates a rich, tangy, and deeply penetrating glaze. It’s the perfect solution for busy weeks, game day gatherings, or any time you need to feed a crowd without hovering over the stove, proving that you don’t need a long list of spices to create a truly memorable and delicious meal.

The true genius of this dish lies in its incredible versatility and foolproof nature. The long, slow cooking process renders the marbled fat within the pork shoulder, basting the meat from the inside out and ensuring every single strand is moist and incredibly easy to shred. Once cooked, the pork is shredded directly in the pot, allowing it to soak up every last drop of the concentrated, savory-sweet cooking liquid and softened onions. This creates a pulled pork that is perfectly sauced and ready to be served in countless ways. Whether piled high on soft buns for a classic sandwich, served over a bed of rice, stuffed into baked potatoes, or used as a topping for nachos, this pulled pork is a blank canvas for your culinary creativity. It’s a dependable, no-fuss recipe that consistently yields fantastic results, making it a cornerstone of easy, comfort-food cooking.

Why You’ll Love This Recipe:

• Unbelievably Simple: With only three core ingredients and five minutes of prep, this is the definition of easy, set-it-and-forget-it cooking.
• Foolproof and Forgiving: The slow cooker does all the work, tenderizing the pork perfectly without any risk of overcooking.
• Incredibly Versatile: The perfect base for sandwiches, tacos, rice bowls, salads, and more.
• Feeds a Crowd: This recipe makes a generous amount, ideal for parties, potlucks, or a week of easy meals.

Ingredients:

  • 3–4 pounds pork shoulder (also called Boston butt)
  • 1 medium onion (white, yellow, or sweet), thinly sliced
  • 1 bottle (18 ounces) of your favorite BBQ sauce
  • Soft buns, rice, or baked potatoes, for serving

Instructions:

Step 1: Create the Onion Base
• Scatter the thinly sliced onion evenly across the bottom of your slow cooker insert. This creates a natural rack that adds flavor and prevents the pork from burning on the bottom.

Step 2: Add the Pork
• Place the entire pork shoulder roast directly on top of the bed of onions. There is no need to trim the fat, as it will render and add incredible flavor and moisture. Season the outside of the pork lightly with salt and pepper if desired, though the BBQ sauce provides plenty of flavor.

Step 3: Apply the BBQ Sauce
• Pour the entire bottle of BBQ sauce directly over the pork shoulder, using a spoon or spatula to spread it evenly over the top and sides, ensuring the roast is fully covered.

Step 4: Slow Cook to Perfection
• Cover the slow cooker with its lid. Cook on LOW for 7-8 hours or on HIGH for 4-5 hours. The pork is done when it is extremely tender and shreds easily with a fork.

Step 5: Shred and Combine
• Carefully remove the cooked pork shoulder from the slow cooker and place it on a large cutting board. Using two forks, shred the meat by pulling it apart. It should fall apart with very little effort.
• If there is a large layer of excess fat, you can discard it at this stage.
• Return all the shredded pork to the slow cooker and stir it into the remaining sauce and onions until thoroughly combined. Let it sit for 10-15 minutes on the “Warm” setting to absorb the flavors.

Step 6: Serve
• Serve the pulled pork warm, using a slotted spoon for serving if you prefer less sauce. Pile it onto soft buns, over a bed of rice, or with your favorite sides.

Tips:

• No Peeking: Resist the urge to lift the lid during the cooking process. Each time you do, you release a significant amount of heat and steam, which can increase the total cooking time.
• Customize the Flavor: Feel free to add other ingredients to the pot before cooking, such as a few minced garlic cloves, a teaspoon of smoked paprika, or a splash of apple cider vinegar for extra tang.
• Skim the Fat: For a leaner result, you can skim the excess fat from the surface of the sauce in the slow cooker after removing the pork but before adding the shredded meat back in.
• Crisp It Up: For added texture, spread the shredded pork on a baking sheet and broil for 2-3 minutes until the edges are slightly caramelized and crispy.

Storage Options:

• Refrigerator: Store leftover pulled pork in an airtight container in the refrigerator for up to 4 days.
• Freezing: This pork freezes exceptionally well. Portion it into freezer-safe bags or containers along with some of the sauce and freeze for up to 3 months. Thaw overnight in the refrigerator before reheating.
• Reheating: Reheat gently in a saucepan on the stovetop over low heat, adding a splash of water or broth if it seems dry. The microwave also works well for single portions.

Slow Cooker 3-Ingredient BBQ Pulled Pork is the ultimate easy, versatile, and crowd-pleasing recipe that belongs in every home cook’s arsenal. Its simplicity is its greatest strength, delivering maximum flavor with minimal effort. Enjoy

Oatmeal Raspberry Crumble Bars

0

These Oatmeal Raspberry Crumble Bars are the perfect intersection of simplicity and sublime flavor, featuring a buttery, oat-filled crust and topping sandwiching a layer of sweet-tart raspberry preserves. Unlike many bar cookies that require multiple steps and bowls, this recipe uses one straightforward mixture for both the base and the crumbly topping, making the assembly process remarkably efficient. The combination of old-fashioned oats and brown sugar creates a hearty, chewy texture with deep caramel notes, while the raspberry jam provides a vibrant, fruity center that cuts through the richness. Baked until golden brown, these bars strike a beautiful balance between a sturdy, satisfying snack and a decadent dessert, perfect for lunchboxes, potlucks, or an afternoon treat with coffee or tea.

The brilliance of this recipe lies in its method. By melting the butter rather than creaming it, you achieve a dough that is easy to press and crumble without the need for a mixer. Gently warming the jam before spreading is a small but crucial step that makes it easier to distribute evenly without tearing the delicate base layer. Allowing the bars to cool completely is non-negotiable; this patience allows the fruit layer to set and the crumb to firm up, ensuring you get clean, perfect squares rather than a messy, crumbly slab. The result is a bar that is visually appealing with its rustic, golden topping and peekaboo ribbon of red jam, offering a delightful contrast of textures in every bite. It’s a timeless, foolproof recipe that is as enjoyable to make as it is to eat.

Why You’ll Love This Recipe:

One-Bowl Simplicity: The entire crust and topping comes from a single mixture, minimizing cleanup.
Perfect Texture: A firm, chewy base with a delightful crumbly topping and a soft, fruity center.
Versatile Filling: Easily adaptable with your favorite jam, preserves, or even fruit pie filling.
Excellent for Making Ahead: These bars hold up beautifully for days and are perfect for gifting or packing.

Ingredients:

  • 1 ½ cups old-fashioned rolled oats
  • 1 ¾ cups all-purpose flour, spooned and leveled
  • ⅔ cup packed light brown sugar
  • 1 teaspoon baking powder
  • ½ teaspoon salt
  • 1 large egg, beaten
  • 3/4 cup (1 ½ sticks) unsalted butter, melted and slightly cooled
  • 1 teaspoon vanilla extract
  • 1 (12-ounce) jar raspberry preserves or jam

Instructions:

Step 1: Preheat Oven and Prepare Pan
• Preheat your oven to 350°F (175°C). Grease a 7×11-inch or an 8×8-inch baking dish with butter, or line it with parchment paper, leaving an overhang on two sides for easy removal.

Step 2: Combine the Dry Ingredients
• In a large bowl, whisk together the old-fashioned oats, all-purpose flour, packed light brown sugar, baking powder, and salt.

Step 3: Create the Oatmeal Mixture
• Pour the slightly cooled melted butter, beaten egg, and vanilla extract over the dry ingredients.
• Stir with a spatula or fork until the mixture is completely combined and crumbly. It should hold together when pressed.

Step 4: Assemble the Base and Filling
• Transfer a little more than half of the oatmeal mixture (about 55-60%) into the prepared baking dish. Press it down firmly and evenly into a compact layer.
• In a small saucepan, warm the raspberry preserves over low heat for just a minute or two, stirring until loosened. This makes it much easier to spread. Alternatively, you can microwave it in a heat-safe bowl for 20-30 seconds.
• Using an offset spatula or the back of a spoon, carefully spread the warmed raspberry preserves over the pressed base, leaving a small bare border around the edges.

Step 5: Add the Topping and Bake
• Take the remaining oatmeal mixture and crumble it evenly over the entire surface of the raspberry layer.
• Bake for 25-30 minutes, or until the topping is a light golden brown.

Step 6: Cool Completely
• Place the pan on a wire rack and allow the bars to cool completely in the pan. This is essential for them to set properly and is the key to getting clean slices.

Step 7: Slice and Serve
• Once completely cool, use the parchment paper to lift the entire block out of the pan. Place it on a cutting board and slice into squares or bars with a sharp knife.

Tips:

Press the Base Firmly: Taking the time to create a solid, compact base layer prevents the jam from seeping through during baking.
Don’t Skip Warming the Jam: This simple step prevents a torn base and ensures a perfectly even layer of fruit.
Cooling is Crucial: Cutting into warm bars will result in a crumbly mess. For the cleanest slices, be patient and let them cool fully.
Customize Your Bars: Feel free to use any flavor of jam you love—apricot, strawberry, blackberry, or even a seeded raspberry jam for more texture.

Storage Options:

Room Temperature: Store the bars in an airtight container at room temperature for up to 3 days.
Refrigerator: For longer storage, up to 1 week, keep them in the refrigerator. Let them come to room temperature for the best texture.
Freezing: These bars freeze exceptionally well. Wrap individual bars or the entire block tightly in plastic wrap and foil. Freeze for up to 3 months. Thaw at room temperature.

Oatmeal Raspberry Crumble Bars are a humble yet utterly satisfying treat that combines simple ingredients into a classic, beloved dessert. They are a dependable recipe that promises delicious results every single time. Enjoy

Baked Apple Fritter Bites

0

Baked Apple Fritter Bites offer all the warm, spiced comfort of classic apple fritters in a delightfully poppable, baked form that’s perfect for sharing. These tender, cake-like morsels are bursting with fresh apple flavor, thanks to a double dose of both unsweetened applesauce and finely diced Honeycrisp or Gala apples. The batter comes together quickly and bakes into golden puffs that are then transformed by a unique two-step glazing process: first, a thin apple cider glaze is brushed on and broiled until bubbly and caramelized, creating a crisp, shiny shell; then, a second layer of glaze is added for an extra burst of sweetness. This clever technique mimics the sugary crackle of a fried fritter while keeping these treats wonderfully light and approachable. They’re an irresistible addition to any brunch table or cozy breakfast, filling your kitchen with the inviting aroma of cinnamon and baked apples.

What makes these fritter bites truly special is their perfect balance of texture and flavor. The interior remains incredibly moist and fluffy from the applesauce, while each bite delivers little bursts of soft, warm apple. The broiling step is the secret to achieving that professional-looking, glossy finish with a subtle caramelized depth you wouldn’t expect from a baked good. Allowing them to rest after the final glaze application lets the sweetness settle into a perfectly set coating that’s neither too hard nor too sticky. These fritters are best enjoyed the day they’re made, ideally still slightly warm, when the contrast between the crisp, sugary exterior and the soft, spiced interior is at its most delightful. They’re a guaranteed crowd-pleaser that proves you don’t need a deep fryer to create an unforgettable apple fritter experience.

Why You’ll Love This Recipe:

• Baked Not Fried: Enjoy all the flavor of traditional fritters with a lighter texture and less mess
• Double Apple Goodness: Packed with both applesauce and fresh diced apples for maximum flavor
• Caramelized Glaze: The broiling technique creates a professional, crackly topping that mimics fried fritters
• Quick & Easy: Ready in under 30 minutes with simple ingredients and minimal cleanup

Ingredients:

  • Nonstick cooking spray
  • 1 ½ cups all-purpose flour
  • 2 teaspoons baking powder
  • ½ teaspoon kosher salt
  • 2 teaspoons ground cinnamon
  • ¼ cup unsalted butter, melted
  • ¼ cup granulated sugar
  • 1 large egg
  • ½ teaspoon vanilla extract
  • ½ cup unsweetened applesauce
  • 1 ½ cups Honeycrisp or Gala apples, finely diced (about 2 medium apples)
  • 2 cups powdered sugar
  • ⅓ cup + 2 tablespoons apple cider or apple juice

Instructions:

Step 1: Preheat and Prepare
• Preheat oven to 400°F (200°C). Grease a large baking sheet with nonstick spray or line with parchment paper.

Step 2: Mix Dry Ingredients
• In a medium bowl, whisk together flour, baking powder, salt, and cinnamon until well combined.

Step 3: Combine Wet Ingredients
• In a large bowl, whisk melted butter and sugar until combined. Add egg, vanilla, and applesauce, whisking until smooth.

Step 4: Create Batter
• Add dry ingredients to wet mixture and stir until just combined. Gently fold in diced apples.

Step 5: Form and Bake
• Drop tablespoon-sized scoops of batter onto prepared baking sheet, spacing about 2 inches apart.
• Bake for 10 minutes until puffed and lightly golden.

Step 6: Prepare Glaze
• While fritters bake, whisk powdered sugar and apple cider until smooth and pourable.

Step 7: First Glaze and Broil
• Remove fritters from oven and turn broiler to high.
• Brush warm fritters with half the glaze. Broil for 2-4 minutes, rotating pan frequently, until glaze bubbles and caramelizes.

Step 8: Final Glaze and Rest
• Remove from oven and immediately brush with remaining glaze.
• Let fritters rest for 15 minutes before serving to allow glaze to set.

Tips:

• Watch Closely Under Broiler: The glaze can burn quickly – stay nearby and rotate pan frequently
• Use Fresh, Crisp Apples: Firm varieties like Honeycrisp or Gala hold their shape best during baking
• Don’t Overmix: Stir batter until just combined for tender fritters
• Serve Warm: Enjoy within a few hours of baking for best texture

Storage Options:

• Room Temperature: Store in single layer in airtight container for up to 2 days
• Reheating: Refresh in toaster oven at 350°F for 3-4 minutes to crisp glaze
• Freezing: Freeze unglazed baked fritters, then glaze and broil when ready to serve

Baked Apple Fritter Bites deliver all the cozy satisfaction of traditional fritters in a fun, shareable format that’s perfect for breakfast treats, brunch gatherings, or afternoon snacks. The clever broiled glaze creates a professional-looking finish that will have everyone asking for your secret!

Spiced Pumpkin Cupcakes with Cinnamon Cream Cheese Frosting

0

Spiced Pumpkin Cupcakes with Cinnamon Cream Cheese Frosting are the epitome of autumn in a single, perfect bite. These cupcakes feature an incredibly moist, tender, and finely crumbed cake that is deeply infused with the warm, comforting flavors of cinnamon, ginger, nutmeg, and cloves. The pumpkin puree not only provides a rich, earthy sweetness but also ensures the cupcakes remain exceptionally soft for days. Topped with a luxuriously smooth and tangy cinnamon cream cheese frosting, each cupcake achieves a sublime balance between the spiced cake and the creamy, slightly sharp frosting. They are a festive and irresistible treat, perfect for Halloween parties, Thanksgiving dessert tables, or simply as a delightful way to celebrate the cozy flavors of the fall season.

The genius of this recipe lies in its straightforward method and the harmony of its ingredients. By whisking the oil, eggs, and brown sugar directly into the pumpkin puree, you create a wet mixture that is effortlessly homogenous, guaranteeing a uniform texture in every cupcake. The careful integration of the dry ingredients in three parts prevents overmixing, which is the key to a light and fluffy crumb rather than a dense, tough cake. The frosting is a classic cream cheese base elevated with a whisper of cinnamon, which complements the pumpkin spice blend beautifully. Allowing the cupcakes to cool completely is a non-negotiable step for a flawless frosting application, as the warmth of the cake would otherwise cause the rich frosting to melt and slide right off. Topped with a piece of candy corn, these cupcakes are not only delicious but also a visually charming representation of the season.

Why You’ll Love This Recipe:

• Unbelievably Moist: The combination of pumpkin puree and vegetable oil creates a cupcake that stays supremely soft and moist.
• Perfectly Spiced: A warm, aromatic blend of spices that is fragrant and flavorful without being overpowering.
• Heavenly Frosting: The tangy, creamy, and cinnamony frosting is the perfect complement to the spiced pumpkin cake.
• Festive and Fun: Easy to decorate for any autumn holiday, making them a hit with both kids and adults.

Ingredients:

For the Pumpkin Cupcakes:

  • 1 cup all-purpose flour, spooned and leveled
  • 1 teaspoon baking powder
  • ½ teaspoon baking soda
  • ½ teaspoon salt
  • 1 teaspoon ground cinnamon
  • ½ teaspoon ground ginger
  • ⅛ teaspoon ground nutmeg
  • ⅛ teaspoon ground cloves
  • ⅛ teaspoon ground allspice
  • 1 cup pure pumpkin puree (not pumpkin pie filling)
  • ½ cup vegetable oil (or canola oil)
  • 2 large eggs, at room temperature
  • ⅔ cup packed brown sugar (light or dark)
  • 1 teaspoon pure vanilla extract

For the Cinnamon Cream Cheese Frosting:

  • ½ cup (1 stick) unsalted butter, softened to room temperature
  • 8 ounces full-fat cream cheese, softened to room temperature
  • 1 teaspoon pure vanilla extract
  • ½ teaspoon ground cinnamon
  • 4 cups powdered sugar (confectioners’ sugar), sifted

For Garnish (Optional):

  • Candy corn

Instructions:

Step 1: Preheat Oven and Prepare Pan
• Preheat your oven to 350°F (175°C). Line a standard 12-cup muffin pan with paper cupcake liners.

Step 2: Combine the Dry Ingredients
• In a medium bowl, whisk together the flour, baking powder, baking soda, salt, cinnamon, ginger, nutmeg, cloves, and allspice. This ensures the leavening agents and spices are evenly distributed.

Step 3: Combine the Wet Ingredients
• In a separate large bowl, whisk together the pumpkin puree, vegetable oil, room-temperature eggs, packed brown sugar, and vanilla extract until the mixture is smooth and well combined.

Step 4: Mix Wet and Dry Ingredients
• Add the dry flour mixture to the wet pumpkin mixture in three separate additions, folding gently with a spatula after each addition until just combined. Be careful not to overmix; a few streaks of flour are okay.

Step 5: Fill and Bake
• Divide the batter evenly among the 12 prepared cupcake liners, filling each about ⅔ full.
• Bake for 18-22 minutes, or until a toothpick inserted into the center of a cupcake comes out clean or with a few moist crumbs attached.

Step 6: Cool Completely
• Allow the cupcakes to cool in the pan for 5 minutes before transferring them to a wire rack to cool completely. The cupcakes must be at room temperature before frosting.

Step 7: Prepare the Frosting
• In the bowl of a stand mixer fitted with the paddle attachment (or using a hand mixer), beat the softened butter and cream cheese together on medium-high speed until the mixture is completely smooth, creamy, and free of lumps.
• Beat in the vanilla extract and ground cinnamon until incorporated.
• With the mixer on low speed, gradually add the sifted powdered sugar, one cup at a time, until fully incorporated. Once all the sugar is added, increase the speed to medium-high and beat for 1-2 minutes until the frosting is light and fluffy.

Step 8: Frost and Decorate
• Once the cupcakes are completely cool, pipe or spread the frosting onto them using an offset spatula or a piping bag fitted with your favorite tip.
• If desired, garnish with a piece of candy corn on top of each cupcake.

Tips:

• Room Temperature is Key: Using room-temperature eggs, butter, and cream cheese is crucial for a smooth batter and a lump-free, creamy frosting.
• Do Not Overmix: Overmixing the batter after adding the flour will develop gluten and lead to tough, dense cupcakes. Mix until the ingredients are just combined.
• Sift the Powdered Sugar: Sifting the powdered sugar for the frosting prevents lumps and results in an ultra-smooth texture.
• Cool Completely: Frosting a warm cupcake will cause the frosting to melt and become a runny mess. Patience is essential.

Storage Options:

• Refrigerator: Due to the cream cheese frosting, these cupcakes must be stored in an airtight container in the refrigerator for up to 5 days.
• Bring to Room Temperature: For the best flavor and texture, let the refrigerated cupcakes sit at room temperature for 30-60 minutes before serving.
• Freezing (Unfrosted): The unfrosted cupcakes freeze very well. Wrap them individually in plastic wrap and place in a freezer bag for up to 2 months. Thaw at room temperature and frost before serving.

Spiced Pumpkin Cupcakes with Cinnamon Cream Cheese Frosting are a timeless autumn treat that perfectly captures the warm, comforting essence of the season. They are sure to become a cherished yearly tradition. Enjoy

Mexican Tortilla Casserole

0

Mexican Tortilla Casserole is the ultimate comfort food for a crowd, a layered masterpiece that brings all the beloved flavors of your favorite tacos and burritos into one easy-to-serve, cheesy, and satisfying dish. This recipe is a brilliant fusion of textures and tastes, featuring layers of seasoned ground beef, creamy refried beans, fluffy rice, sweet corn, and zesty salsa, all nestled between soft flour tortillas and smothered in a blanket of melted cheddar cheese. Baked until the cheese is bubbly and the edges are golden, this casserole is a hearty, all-in-one meal that is perfect for busy weeknights, potlucks, or any gathering where you need to feed a hungry group with minimal fuss. It’s a versatile and forgiving recipe that welcomes customization, making it a dependable favorite in any home cook’s repertoire.

The beauty of this casserole lies in its methodical layering, which ensures every slice is packed with a perfect balance of all the components. By building the dish in a springform or round pan, you create a stunning, cake-like presentation that reveals beautiful, distinct layers when sliced. The process begins by creating a savory foundation with taco-seasoned beef and onions, then carefully assembling the ingredients to prevent a soggy bottom and ensure even cooking. The initial covered baking time allows the flavors to meld and the heat to penetrate through all the layers, while the final uncovered bake creates that irresistible, golden-brown cheese crust on top. Allowing the casserole to rest for a few minutes after baking is crucial, as it lets the layers set, making it much easier to cut into neat wedges. Served with cool, fresh garnishes, this casserole is a festive, crowd-pleasing meal that delivers maximum flavor with straightforward preparation.

Why You’ll Love This Recipe:

• Feeds a Crowd: This substantial casserole is designed to serve a family or group with ease, and it makes excellent leftovers.
• Incredibly Versatile: Easily adapt the fillings to include black beans, shredded chicken, or different types of cheese.
• Make-Ahead Friendly: The entire casserole can be assembled hours in advance and refrigerated until ready to bake, making it perfect for entertaining.
• Family-Friendly Favorite: The familiar, comforting flavors are a guaranteed hit with both adults and children.

Ingredients:

  • 1 lb ground beef (or ground turkey)
  • 1/2 cup yellow onion, finely diced
  • 1 packet (1 oz) taco seasoning mix
  • 2 cups shredded cheddar cheese, divided
  • 1 can (16 oz) refried beans, warmed
  • 1 cup prepared white rice
  • 1/2 can (about 7 oz) Mexican blend corn, drained
  • 4-5 large (10-inch) flour tortillas
  • 8 oz chunky salsa (mild, medium, or hot)
  • Cooking spray

For Serving (Optional):

  • Sour cream, chopped cilantro, diced tomatoes, shredded lettuce, sliced jalapeños

Instructions:

Step 1: Preheat Oven and Prepare Pan
• Preheat your oven to 350°F (175°C). Generously spray a 9-inch springform pan, a round cake pan, or a 9×13-inch casserole dish with cooking spray.

Step 2: Cook the Meat Filling
• In a large skillet over medium-high heat, cook the ground beef until browned, breaking it up with a spoon. Add the diced onion and cook until softened, about 5 minutes. Drain off any excess fat.
• Stir in the taco seasoning mix and the amount of water specified on the packet. Simmer for 3-5 minutes, until the liquid has mostly reduced. Remove from heat.

Step 3: Warm the Refried Beans
• Gently warm the refried beans in a small saucepan or in the microwave. This makes them much easier to spread evenly over the tortillas.

Step 4: Assemble the First Layer
• Place one flour tortilla in the bottom of the prepared baking dish. If using a 9×13-inch dish, you may need to trim or overlap tortillas to cover the bottom.
• Spread one-third of the warmed refried beans evenly over the tortilla.
• Spoon one-third of the seasoned ground beef mixture over the beans.
• Sprinkle with a portion of the shredded cheddar cheese.

Step 5: Assemble the Second Layer
• Place a second tortilla on top.
• Spread half of the prepared rice evenly over the tortilla.
• Spoon half of the salsa over the rice.
• Sprinkle half of the drained corn over the salsa.
• Top with another portion of shredded cheddar cheese.

Step 6: Assemble the Third and Final Layers
• Place a third tortilla on top.
• Spread another one-third of the refried beans, followed by another one-third of the meat mixture, and another sprinkle of cheese.
• Place the final tortilla on top. Spread the remaining refried beans, meat mixture, corn, rice, and salsa over the top.
• Finish with the remaining shredded cheddar cheese, covering the entire surface.

Step 7: Bake
• Cover the baking dish tightly with aluminum foil. Bake for 40 minutes.
• Remove the foil and bake for an additional 10-15 minutes, or until the cheese is completely melted, bubbly, and lightly browned around the edges.

Step 8: Rest and Serve
• Remove the casserole from the oven and let it stand for 5-10 minutes. This allows the layers to set, making it easier to slice.
• If using a springform pan, carefully run a knife around the edge before releasing the clamp. Slice into wedges or squares and serve with your favorite garnishes.

Tips:

• Prevent Soggy Bottoms: Warming the refried beans and draining the beef and corn well are key steps to prevent excess moisture.
• Customize Your Layers: Feel free to add a layer of sliced black olives, sautéed bell peppers, or a can of drained and rinsed black beans.
• Tortilla Size: If your tortillas are smaller than your pan, it’s fine to tear them into pieces to fill in any gaps and create a solid layer.
• Let it Rest: The resting period is not optional; it is essential for clean slices.

Storage Options:

• Refrigerator: Store leftovers in an airtight container in the refrigerator for up to 4 days.
• Reheating: Reheat individual portions in the microwave. For larger portions, reheat in a 350°F (175°C) oven until warmed through.
• Freezing: Assemble the casserole but do not bake. Wrap tightly in plastic wrap and foil and freeze for up to 2 months. Thaw overnight in the refrigerator before baking as directed.

Mexican Tortilla Casserole is a hearty, flavorful, and incredibly convenient dish that brings the fiesta to your table with minimal effort. It’s a guaranteed crowd-pleaser that will have everyone asking for seconds. Enjoy

Southern Sausage Biscuits

0

Southern Sausage Biscuits are a hearty, hand-held meal that masterfully combines the flaky, buttery comfort of a classic biscuit with a savory, juicy filling of seasoned roast beef and melted provolone cheese. This recipe cleverly uses refrigerated biscuit dough as a convenient and reliable base, which is stretched and wrapped around a generous stack of deli roast beef and a slice of provolone. The magic, however, lies in the deeply flavorful garlic-herb butter glaze that is brushed over the top before baking, infusing the biscuits with a rich, aromatic crust. Baked until golden brown and puffed, these biscuits are served with a simple side of warm beef broth for dipping, creating a comforting and satisfying experience that is reminiscent of a deconstructed, gourmet pot roast in biscuit form.

The true genius of this dish is its simplicity and the way it elevates humble ingredients into something truly special. The process of sealing the filling inside the biscuit dough creates a self-contained pocket of steam during baking, which melts the cheese and warms the beef, making the interior wonderfully gooey and tender. The butter and Worcestershire sauce glaze not only adds a glossy, appealing finish but also soaks into the biscuit as it bakes, keeping it moist and packing every bite with umami flavor. The warm beef broth for dipping is the final masterstroke, adding an extra layer of savory depth and moisture that ties the entire dish together. Perfect for a substantial breakfast, a quick lunch, or a comforting dinner, these biscuits are a crowd-pleasing solution that feels both indulgent and familiar.

Why You’ll Love This Recipe:

All-in-One Comfort Food: A complete, savory meal neatly packaged in a flaky biscuit.
Incredibly Easy: Uses pre-made dough for a shortcut that doesn’t sacrifice flavor.
Perfect for a Crowd: Easy to assemble and bake in one dish, making it ideal for feeding a family or for potlucks.
The Dipping Broth: The warm beef broth for dipping elevates the experience from a simple biscuit to a gourmet treat.

Ingredients:

  • 1 can (16.3 oz) refrigerated biscuit dough (8-count grand size)
  • 8 slices deli roast beef
  • 8 slices provolone cheese
  • 1/4 cup butter, melted
  • 1 tablespoon Worcestershire sauce
  • 1 teaspoon garlic powder
  • 1 teaspoon onion powder
  • 1/2 teaspoon dried thyme
  • 1/2 teaspoon dried rosemary
  • 1/2 teaspoon salt
  • 1/2 teaspoon black pepper
  • 1 cup beef broth, for serving

Instructions:

Step 1: Preheat Oven and Prepare Pan
• Preheat your oven to 350°F (175°C). Grease a 9×13-inch baking dish or a similar-sized oven-safe skillet with butter or non-stick cooking spray.

Step 2: Assemble the Biscuits
• Separate the refrigerated biscuit dough into 8 biscuits. Place each biscuit on a clean work surface and flatten it slightly with the palm of your hand to create a 4-5 inch circle.
• Place one slice of roast beef in the center of each biscuit, folding it if necessary to fit. Top the beef with one slice of provolone cheese.
• Carefully gather the edges of the biscuit dough up and over the filling. Pinch the seams firmly to seal, forming a stuffed ball. Place the biscuit ball seam-side down in the prepared baking dish. Repeat with the remaining biscuits.

Step 3: Prepare the Herb Butter Glaze
• In a small bowl, combine the melted butter, Worcestershire sauce, garlic powder, onion powder, dried thyme, dried rosemary, salt, and black pepper. Stir until well combined.

Step 4: Glaze and Bake
• Using a pastry brush, generously brush the herbed butter mixture over the top and sides of each assembled biscuit ball. Reserve any leftover glaze.
• Place the baking dish in the preheated oven and bake for 20-25 minutes, or until the biscuits are puffed, deep golden brown, and cooked through. For an extra glossy finish, you can brush with the remaining glaze halfway through baking.

Step 5: Prepare the Dipping Broth
• While the biscuits are baking, pour the beef broth into a small saucepan. Heat over medium heat until it is warm and steaming. Do not boil.

Step 6: Serve
• Remove the biscuits from the oven and let them cool in the pan for 2-3 minutes before serving. Serve the biscuits warm with the warm beef broth on the side for dipping.

Tips:

Seal Tightly: Ensuring a good seal on the biscuits is crucial to prevent the cheese from leaking out during baking.
Don’t Overcrowd: Place the biscuit balls in the baking dish with a little space between them to allow for even baking and rising.
Fresh Herbs: If you have them, 1 teaspoon each of fresh chopped thyme and rosemary can be used in place of the dried herbs for a more vibrant flavor.
Customize the Fillings: Feel free to experiment with different fillings like sliced ham and Swiss cheese, or cooked sausage and cheddar.

Storage Options:

Refrigerator: Store leftover biscuits in an airtight container in the refrigerator for up to 3 days.
Reheating: Reheat in a 350°F (175°C) oven for 10 minutes or until warmed through to restore the biscuit’s texture. The microwave will work but will soften the crust.
Freezing: The unbaked, assembled biscuit balls freeze well. Place them on a parchment-lined sheet to freeze solid, then transfer to a freezer bag. Bake from frozen, adding 5-10 minutes to the baking time.

Southern Sausage Biscuits are a deliciously inventive and satisfying meal that turns simple ingredients into a memorable dining experience. The combination of the flaky biscuit, savory filling, and rich dipping broth is simply irresistible. Enjoy

Chicken and Broccoli Stir Fry

0

Chicken and Broccoli Stir Fry is a cornerstone of quick and healthy cooking, a vibrant one-pan meal that delivers restaurant-quality flavor in the comfort of your own kitchen. This recipe masterfully balances tender, lightly crispy chicken and crisp-tender broccoli in a glossy, savory-sweet sauce that is far superior to any takeout version. The sauce is the true hero—a harmonious blend of low-sodium soy sauce, aromatic ginger and garlic, a touch of honey for sweetness, and a hint of sriracha for a subtle kick, all thickened to a perfect, clingy consistency with cornstarch. It’s a dish that proves a wholesome, delicious dinner doesn’t require hours of effort, but rather a handful of fresh ingredients and a solid, reliable technique.

The secret to this stir-fry’s success lies in its methodical, high-heat cooking process. By coating the chicken in cornstarch and searing it in batches, you create a delicate, golden crust that locks in juices and provides a wonderful textural contrast to the sauce. The broccoli is quickly blanched-steamed directly in the pan with a splash of water, a technique that preserves its bright green color and satisfying crunch without the need for a separate pot. By building the dish in stages—chicken first, then vegetables, then sauce—you ensure each component is cooked to perfection before being reunited in the skillet for a final toss. Served over a bed of fluffy rice, this stir-fry is a complete, balanced, and endlessly customizable meal that will become a reliable favorite in your weekly dinner rotation.

Why You’ll Love This Recipe:

• Healthier Than Takeout: You control the ingredients, resulting in a dish that is lower in sodium and free of unnecessary additives.
• Quick and Efficient: Ready in about 30 minutes, making it perfect for a busy weeknight.
• Perfectly Balanced Sauce: The sauce strikes an ideal balance of savory, sweet, tangy, and spicy notes.
• Customizable: Easily adapt it with your favorite vegetables like bell peppers, snap peas, or carrots.

Ingredients:

For the Stir Fry Sauce:

  • 1 cup low-sodium chicken broth
  • 3 tablespoons low-sodium soy sauce
  • 1 tablespoon rice vinegar
  • 1 tablespoon fresh ginger, grated
  • 2 tablespoons honey or mirin
  • 3 cloves garlic, minced
  • 1 teaspoon sriracha or chili paste (adjust to taste)
  • ½ teaspoon sesame oil
  • 1 ½ teaspoons cornstarch

For the Chicken and Broccoli:

  • 1 lb. boneless, skinless chicken breasts or thighs, cut into 1-inch bite-size pieces
  • Kosher salt and fresh ground black pepper, to taste
  • 2 tablespoons cornstarch
  • 3 tablespoons vegetable oil (or other high-heat oil), divided
  • 1 small yellow onion, cut into half-moon strips
  • 1 lb. broccoli, cut into small florets
  • Cooked white or brown rice, for serving

Instructions:

Step 1: Prepare the Sauce
• In a medium bowl or liquid measuring cup, whisk together the chicken broth, soy sauce, rice vinegar, grated ginger, honey, minced garlic, sriracha, sesame oil, and 1 ½ teaspoons of cornstarch. Whisk until the cornstarch is fully dissolved. Set aside.

Step 2: Coat and Cook the Chicken
• Pat the chicken pieces dry with paper towels and season with salt and pepper. Place the 2 tablespoons of cornstarch in a large zip-top bag or a bowl. Add the chicken and toss until all pieces are lightly and evenly coated.
• Heat 1 tablespoon of vegetable oil in a large skillet or wok over medium-high heat. Add the chicken in a single layer, working in batches to avoid overcrowding. Cook for 3-4 minutes per side, until golden brown and cooked through. Transfer the cooked chicken to a clean plate.

Step 3: Cook the Vegetables
• Add the remaining 1 tablespoon of oil to the same skillet. Add the sliced onion and cook for 1-2 minutes, stirring, until it begins to soften.
• Add the broccoli florets to the skillet with the onion. Cook for another 1-2 minutes, stirring frequently.
• Add 2 tablespoons of water to the skillet and immediately cover it with a lid or aluminum foil. Let the broccoli steam for 1-2 minutes, until it is bright green and crisp-tender. Transfer the vegetables to the plate with the chicken.

Step 4: Thicken the Sauce
• Give the reserved sauce a good whisk to recombine any settled cornstarch. Pour it into the hot skillet.
• Cook over medium heat, stirring constantly, until the sauce comes to a simmer and thickens into a glossy glaze, about 2-3 minutes.

Step 5: Combine and Serve
• Return the cooked chicken, onions, and broccoli to the skillet. Toss everything gently to coat evenly in the sauce and heat through, about 1-2 minutes.
• Remove from heat and serve immediately over cooked rice.

Tips:

• The Cornstarch Coating: This is the key to getting restaurant-style chicken with a slight crust that helps the sauce adhere. Don’t skip this step.
• High Heat is Key: Ensure your skillet is properly heated before adding the chicken and vegetables. This creates a good sear and prevents the ingredients from stewing in their own juices.
• Prep Everything in Advance: Stir-fries come together very quickly. Have all your ingredients chopped, measured, and within arm’s reach before you turn on the stove.
• Customize Your Veggies: Feel free to add other vegetables like sliced carrots (add with the onions), bell peppers, or snap peas (add with the broccoli).

Storage Options:

• Refrigerator: Store leftovers in an airtight container in the refrigerator for up to 3 days.
• Reheating: Reheat gently in a skillet on the stovetop over medium-low heat, adding a splash of chicken broth or water to loosen the sauce if it has thickened too much. The microwave also works well.
• Freezing: This dish can be frozen, though the texture of the broccoli may become softer. Freeze in an airtight container for up to 2 months. Thaw in the refrigerator before reheating.

Chicken and Broccoli Stir Fry is a classic, reliable recipe that delivers on its promise of being fast, healthy, and packed with flavor. It’s a versatile foundation for countless delicious meals. Enjoy

Monterey Sausage Pie

0

Monterey Sausage Pie is a hearty, savory breakfast or brunch casserole cleverly disguised as a pie, offering a deliciously simple and satisfying meal that comes together with minimal effort. This recipe transforms basic ingredients—pork sausage, eggs, cheese, and a simple baking mix—into a robust, quiche-like dish with a wonderfully rich and savory character. The star of the show is the Monterey Jack cheese, which melts beautifully into the filling, providing a mild, creamy tang that perfectly complements the seasoned pork sausage and aromatic garlic. With a texture that is both sturdy and custardy, this pie is the ultimate comfort food, ideal for a weekend family breakfast, a potluck brunch, or even a simple “breakfast-for-dinner” solution that is sure to please a crowd.

The brilliance of this recipe lies in its method. By browning the sausage with garlic directly in a skillet and then transferring it to the pie plate, you build a deep, savory foundation without dirtying extra bowls. The topping is a simple batter made by whisking together milk, eggs, and biscuit mix, which creates a magical crustless structure as it bakes, rising slightly around the edges to form a golden-brown “crust” while the center sets into a tender, fluffy custard. The final sprinkle of cheese added in the last few minutes of baking creates a gorgeous, melted, cheesy top layer. Allowing the pie to stand for ten minutes after baking is a critical step that allows the layers to set firmly, ensuring you get clean, beautiful slices every time. It’s a foolproof, one-dish wonder that delivers maximum flavor and satisfaction.

Why You’ll Love This Recipe:

• Incredibly Easy: Uses simple ingredients and a straightforward method for a stress-free meal any time of day.
• All-in-One Dish: Everything mixes and bakes in a single pie plate, meaning easy preparation and cleanup.
• Crowd-Pleasing Comfort Food: The combination of sausage, cheese, and a fluffy egg base is a universally loved flavor profile.
• Versatile Meal: Perfect for breakfast, brunch, lunch, or a casual dinner served with a side salad.

Ingredients:

  • 1 pound bulk pork sausage (mild or hot, based on preference)
  • 3 teaspoons minced garlic
  • 2 ½ cups shredded Monterey Jack cheese, divided
  • 1 ⅓ cup milk (whole or 2%)
  • 3 large eggs
  • ¾ cup biscuit/baking mix (such as Bisquick)
  • ¾ teaspoon rubbed sage
  • ¼ teaspoon black pepper
  • Non-stick cooking spray or butter, for greasing

Instructions:

Step 1: Preheat Oven and Prepare Pan
• Preheat your oven to 400°F (200°C). Generously grease a 9-inch deep-dish pie plate with non-stick cooking spray or butter.

Step 2: Cook the Sausage and Garlic
• In a large skillet over medium heat, cook the bulk pork sausage, breaking it up with a spoon, until it is fully cooked and no longer pink. Drain off any excess grease.
• Add the minced garlic to the skillet with the sausage and cook for 1 minute longer, stirring constantly, until fragrant.

Step 3: Layer the Pie Base
• Remove the skillet from the heat. Stir 2 cups of the shredded Monterey Jack cheese into the warm sausage mixture until the cheese begins to melt slightly.
• Transfer the cheesy sausage mixture to the prepared pie plate, spreading it into an even layer.

Step 4: Prepare the Topping
• In a medium bowl, combine the milk, eggs, biscuit mix, rubbed sage, and black pepper. Whisk vigorously until the mixture is smooth and all ingredients are fully incorporated.

Step 5: Assemble and Bake
• Pour the milk and egg mixture evenly over the sausage and cheese layer in the pie plate.

Step 6: Bake Until Set
• Place the pie plate in the preheated oven and bake for 20-25 minutes. The pie is done when the edges are golden brown and a knife inserted near the center comes out clean.

Step 7: Add Final Cheese Topping
• Carefully remove the pie from the oven. Sprinkle the remaining ½ cup of shredded Monterey Jack cheese evenly over the top.
• Return the pie to the oven and bake for an additional 1-2 minutes, or just until the cheese is melted and bubbly.

Step 8: Rest Before Serving
• Remove the pie from the oven and place it on a wire rack. Let it stand for 10 minutes before slicing and serving. This allows the custard to set, making it easier to cut into neat wedges.

Tips:

• Deep-Dish Pie Plate: Using a deep-dish plate is important to prevent the filling from overflowing during baking.
• Customize the Add-Ins: Feel free to add ½ cup of diced onions or bell peppers to the skillet when cooking the sausage for extra flavor and texture.
• Check for Doneness: Oven temperatures can vary. Start checking at the 20-minute mark. The center should be fully set and not jiggly.
• Make it Ahead: You can prepare the sausage layer and the wet mixture the night before. Store separately in the refrigerator. In the morning, assemble the pie and bake as directed, adding a few extra minutes to the baking time if needed.

Storage Options:

• Refrigerator: Store any leftover pie in an airtight container in the refrigerator for up to 3 days.
• Reheating: Reheat individual slices in the microwave for 60-90 seconds or in a 350°F (175°C) oven until warmed through.
• Freezing: This pie freezes well. Cool completely, wrap tightly in plastic wrap and foil, and freeze for up to 2 months. Thaw overnight in the refrigerator before reheating.

Monterey Sausage Pie is a dependable, delicious, and hearty dish that effortlessly combines breakfast favorites into a single, impressive pie. It’s a recipe you’ll turn to again and again for its simplicity and crowd-pleasing results. Enjoy

Brown Sugar Bacon Little Smokies

0

Brown Sugar Bacon Little Smokies are the undisputed champion of party appetizers, a deceptively simple yet utterly addictive treat that disappears from the platter within minutes. This recipe elevates humble cocktail sausages into a gourmet-level bite by wrapping them in a blanket of smoky, salty bacon and encrusting them in a glaze of sweet, caramelized brown sugar. The magic happens in the oven, where the bacon renders and crisps while the brown sugar melts into a sticky, glossy coating that clings to every nook and cranny. The result is a perfect symphony of flavors and textures in a single bite: the juicy, savory sausage, the crisp, salty bacon, and the rich, sweet crunch of the caramelized sugar. They are the ultimate set-it-and-forget-it party food, requiring just three main ingredients and minimal effort for maximum reward.

The genius of this recipe lies in its foolproof method and universal appeal. The act of wrapping each sausage not only makes them look irresistible but also ensures that the flavor of the bacon infuses the smokie throughout the baking process. Coating them in brown sugar by shaking them in a bag is a brilliantly efficient technique that guarantees even coverage without any mess. As they bake, the sugar and bacon drippings mingle to create a deeply flavorful, bubbling glaze in the bottom of the pan. A final optional blast under the broiler adds an extra layer of crispness and caramelization that takes them from great to extraordinary. These little smokies are a guaranteed hit at game day gatherings, holiday parties, potlucks, or any occasion that calls for a crowd-pleasing, finger-licking-good appetizer.

Why You’ll Love This Recipe:

• Irresistible Flavor Combination: The classic sweet and salty duo of brown sugar and bacon is a guaranteed winner.
• Effortless Preparation: With just three main ingredients and easy assembly, this is a stress-free recipe for any host.
• Perfect Party Food: This recipe yields a large quantity of bite-sized appetizers that are easy to eat while mingling.
• Make-Ahead Friendly: You can assemble the wrapped smokies hours in advance and keep them refrigerated until ready to bake.

Ingredients:

  • 16 oz package Little Smokies sausages (beef or pork)
  • 1 lb thin-cut bacon, each slice cut crosswise into thirds
  • ¾ cup brown sugar, packed (light or dark)
  • Freshly ground black pepper, to taste
  • Toothpicks, for securing

Instructions:

Step 1: Preheat Oven and Prepare Pan
• Preheat your oven to 350°F (175°C). Lightly grease a 9×13-inch baking dish or a rimmed baking sheet. For effortless cleanup, line the pan with aluminum foil and then lightly grease the foil.

Step 2: Prepare the Smokies
• Drain the Little Smokies from their liquid and pat them completely dry with paper towels. This helps the bacon and sugar adhere better.
• Wrap each sausage with one of the short bacon pieces. Secure the bacon in place by inserting a toothpick through the seam.

Step 3: Coat in Brown Sugar
• Place the packed brown sugar into a large zip-top bag. Add a batch of the bacon-wrapped sausages (about 10-12 at a time), seal the bag, and shake gently until they are evenly coated in the sugar.

Step 4: Assemble and Season
• Arrange the sugar-coated smokies in a single layer in the prepared baking dish, ensuring they are not touching. This allows the heat to circulate evenly, helping the bacon crisp up.
• Generously grind fresh black pepper over the top of each smokie. The pepper adds a subtle, savory spice that beautifully cuts through the sweetness.

Step 5: Bake to Perfection
• Bake for 30-35 minutes, or until the bacon is fully cooked and has reached your desired level of crispness. The brown sugar will be melted, bubbly, and caramelized.

Step 6: Optional Crisping Step
• For extra-crispy bacon, switch the oven to the broil setting for the last 2-3 minutes of cooking. Watch them closely to prevent the sugar from burning. The bacon will crisp up quickly.

Step 7: Serve
• Remove the pan from the oven. Let the smokies cool for just a minute or two before serving—the sugar will be extremely hot. Serve warm directly from the pan or on a serving platter.

Tips:

• Use Thin-Cut Bacon: Thin-cut bacon is essential as it will crisp up properly in the baking time without overcooking the sausage inside.
• Pat Dry: Do not skip patting the sausages dry. Any moisture will prevent the sugar from sticking and create a watery sauce instead of a glaze.
• Space Them Out: Placing the smokies so they aren’t crowded is key to crispy bacon. If they are too close, they will steam instead of bake.
• Broiler Caution: If using the broiler, do not walk away! The high heat can turn the sugar from perfectly caramelized to burnt in seconds.

Storage Options:

• Refrigerator: Store any leftovers in an airtight container in the refrigerator for up to 3 days.
• Reheating: Reheat on a baking sheet in a 350°F (175°C) oven for about 10 minutes, or until warmed through. The microwave will make the bacon soft.
• Make-Ahead: You can wrap the sausages in bacon and store them in an airtight container in the refrigerator for up to 24 hours before coating in sugar and baking. Coat them in sugar just before baking to prevent it from dissolving.

Brown Sugar Bacon Little Smokies are the ultimate easy, addictive, and always-popular appetizer. Their perfect balance of sweet, salty, and smoky flavors makes them a timeless classic that will be requested at every gathering. Enjoy