Salted Honey Pistachio Cookies

0

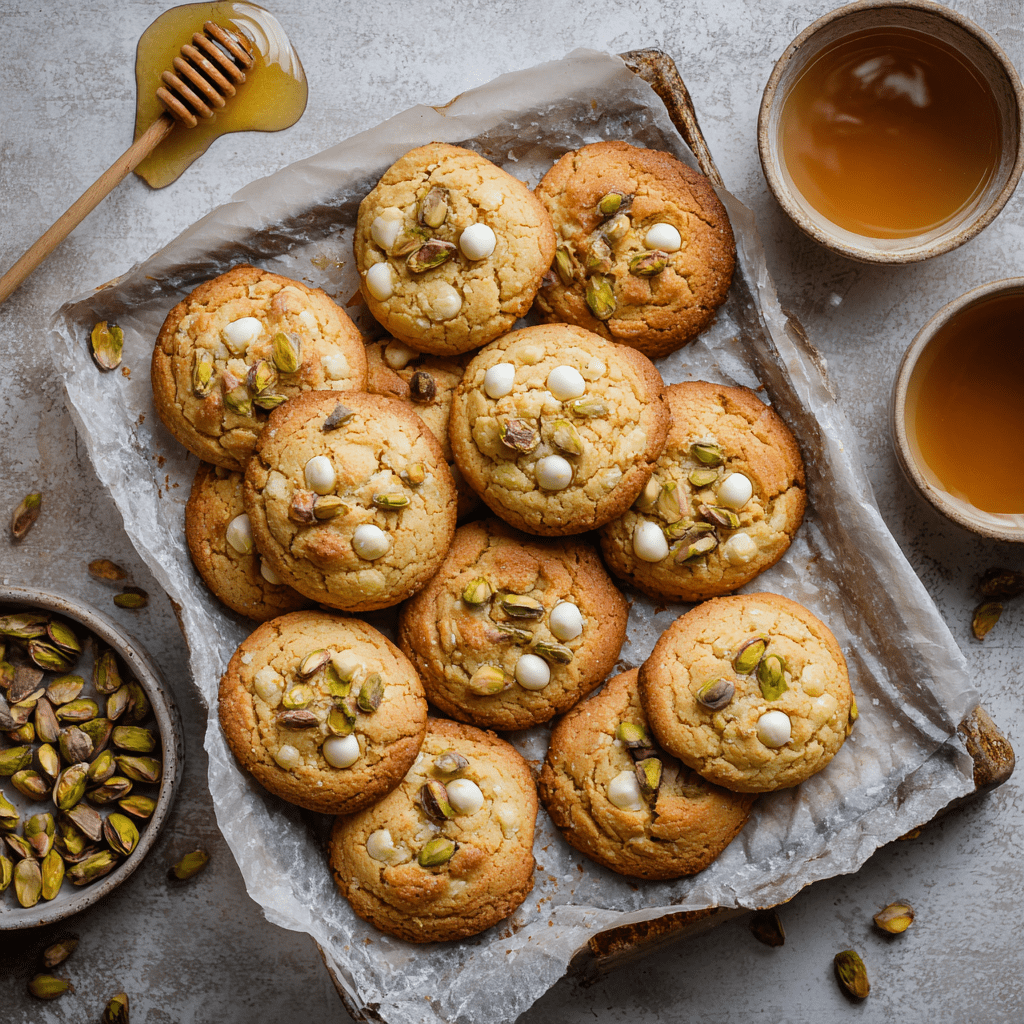
Salted Honey Pistachio Cookies are a sophisticated and unforgettable treat that elevates the classic chocolate chip cookie to new heights of flavor and texture. This recipe hinges on the deep, nutty complexity of brown butter, which forms a rich foundation that is beautifully complemented by the floral sweetness of honey and the savory crunch of roasted pistachios. The addition of white chocolate chips introduces creamy pockets of sweetness that balance the salty, nutty elements perfectly. Each cookie boasts a crisp edge that gives way to a wonderfully chewy center, a texture achieved by slightly underbaking them to preserve a soft, almost gooey interior. The final sprinkle of flaky sea salt just out of the oven is not merely a garnish but an essential component, heightening every other flavor and creating a truly addictive sweet-and-salty experience.

The process of browning the butter is the soul of this recipe, transforming it from a simple ingredient into an aromatic powerhouse with notes of toffee and hazelnut. This extra step, while simple, imbues the entire cookie dough with a warmth and depth that standard melted butter cannot achieve. The honey not only contributes its distinct flavor but also works with the brown sugar to ensure the cookies remain moist and chewy for days. The vibrant green pistachios provide a delightful crunch and a visually stunning contrast to the golden cookie dough and white chocolate chips. These cookies are a testament to the power of quality ingredients and thoughtful technique, resulting in a confection that is both rustic and elegant, perfect for holiday cookie plates, gift-giving, or simply as a special treat with an afternoon coffee.

Why You’ll Love This Recipe:

• Complex Flavor Profile: The combination of brown butter, honey, pistachios, and sea salt creates a multi-layered taste experience that is sophisticated and unique.
• Perfect Texture: Crispy on the outside, chewy on the inside, with delightful crunchy bits from the pistachios.
• Impressively Gourmet: These cookies look and taste like they came from a high-end bakery, yet they are achievable for any home baker.
• Aromatic and Irresistible: The smell of brown butter and honey baking will fill your kitchen with an incredible aroma.

Ingredients:

  • 1 cup (226g) unsalted butter
  • 1/2 cup (100g) light brown sugar, packed
  • 1/4 cup (50g) granulated sugar
  • 1/2 cup (170g) honey
  • 1 large egg, at room temperature
  • 1 tablespoon pure vanilla extract
  • 1 teaspoon coarse sea salt (for the dough)
  • 1 teaspoon baking soda
  • 2 1/2 cups (312g) all-purpose flour
  • 1 cup (125g) roasted, salted pistachios, roughly chopped
  • 1 cup (170g) white chocolate chips
  • Flaky sea salt, for sprinkling (such as Maldon)

Instructions:

Step 1: Brown the Butter
• Place the butter in a light-colored medium saucepan over medium heat. Melt the butter completely, then continue to cook, swirling the pan occasionally. The butter will foam and crackle. After a few minutes, the crackling will subside, and you will see brown specks forming at the bottom of the pan. Once it develops a nutty aroma and turns a deep amber color (about 5-6 minutes total), immediately remove it from the heat to prevent burning.
• Pour the browned butter, including the brown bits, into a heat-safe bowl. Allow it to cool for 20-30 minutes. It should still be liquid but no longer hot to the touch.

Step 2: Preheat and Prepare
• While the butter cools, preheat your oven to 350°F (175°C). Line two large baking sheets with parchment paper.

Step 3: Combine Wet Ingredients
• In the bowl of a stand mixer fitted with the paddle attachment (or using a hand mixer), combine the cooled brown butter, brown sugar, and granulated sugar. Mix on medium speed for about 1 minute until well combined. The mixture will be gritty and liquid.
• Add the honey, room-temperature egg, vanilla extract, 1 teaspoon of coarse sea salt, and baking soda. Beat for another minute on medium speed until the mixture is smooth and fully emulsified.

*Step 4: Incorporate Dry Ingredients and Mix-Ins*
• Reduce the mixer speed to low. Gradually add the all-purpose flour, mixing just until the last streaks of flour disappear. Do not overmix.
• Use a spatula to gently fold in the chopped pistachios and white chocolate chips until they are evenly distributed throughout the dough.

Step 5: Portion the Dough
• Using a medium cookie scoop (about 2 tablespoons), portion the dough onto the prepared baking sheets, spacing the balls about 2 inches apart to allow for spreading.

Step 6: Bake to Perfection
• Bake one sheet at a time in the center of the preheated oven for 8-9 minutes. The cookies are done when the edges are set and lightly golden, but the centers still look soft, puffy, and slightly underbaked.
• Crucial Step: Immediately upon removing the cookies from the oven, gently tap the baking sheet on the counter to deflate them slightly and create a chewier texture. Then, while they are still hot, sprinkle each cookie with a pinch of flaky sea salt.

Step 7: Cool and Serve
• Allow the cookies to cool on the baking sheet for 5-10 minutes before transferring them to a wire rack to cool completely. This allows them to set up properly.

Tips:

• Use a Light-Colored Pan: A light-colored saucepan allows you to easily monitor the color change of the butter as it browns, preventing it from burning.
• Room Temperature Egg: Using a room-temperature egg prevents it from cooking when mixed into the warm brown butter and ensures a smoother, more homogeneous dough.
• Don’t Overbake: The key to a chewy center is taking the cookies out when they still look a bit underdone in the middle. They will continue to cook on the hot baking sheet.
• Chilling the Dough (Optional): For a thicker, slightly denser cookie, you can cover and chill the dough for 30-60 minutes before scooping and baking.

Storage Options:

• Room Temperature: Store cooled cookies in an airtight container at room temperature for up to 5 days.
• Freezing Dough: The cookie dough balls freeze excellently. Place scooped balls on a parchment-lined sheet, freeze until solid, then transfer to a freezer bag. Bake from frozen, adding 1-2 minutes to the baking time.
• Freezing Baked Cookies: Fully baked cookies can also be frozen in an airtight container for up to 3 months. Thaw at room temperature.

Salted Honey Pistachio Cookies are a masterclass in balancing flavors and textures. The effort taken to brown the butter is repaid tenfold in the depth and richness of each delicious bite. Enjoy!

Georgia’s Loaded Baked Beans

0

Georgia’s Loaded Baked Beans are the ultimate potluck and barbecue side dish, a hearty, smoky, and irresistibly flavorful upgrade to the classic canned version. This recipe transforms humble beans into a thick, savory, and slightly sweet casserole that is packed with texture and depth. It starts by building a foundation of crispy, rendered bacon and sautéed onions and garlic, creating a rich flavor base that infuses every bite. A trio of beans—pork and beans, kidney beans, and black beans—provides a wonderful variety of sizes and textures, while a homemade sauce blending barbecue sauce, ketchup, brown sugar, and spices ties everything together with a perfect balance of tangy, sweet, and smoky notes. Baked until bubbly and caramelized on top, these beans are a satisfying side dish that often steals the show.

The genius of this recipe lies in its layered approach to flavor. By cooking the bacon first and using its rendered fat to sauté the aromatics, you ensure that the entire dish is imbued with a deep, smoky savoriness. The sauce is a masterful combination where the Worcestershire adds umami depth, the mustard provides a subtle tang, and the smoked paprika enhances the bacony, smoky profile. The slow bake in the oven is crucial, as it allows the flavors to meld together beautifully and the sauce to thicken, concentrating its richness. These beans are more than a side; they are a robust, comforting dish that pairs perfectly with grilled meats, hot dogs, and burgers, but are substantial enough to stand on their own. They are a guaranteed crowd-pleaser that will have everyone asking for the recipe.

Why You’ll Love This Recipe:

• The Ultimate Crowd-Pleaser: This dish is always a hit at potlucks, barbecues, and family gatherings, disappearing fast from the table.
• Deep, Smoky Flavor: The combination of bacon, smoked paprika, and barbecue sauce creates an incredibly rich and complex flavor profile.
• Perfect Make-Ahead Dish: The flavor actually improves if made a day ahead, making it perfect for stress-free entertaining.
• Hearty and Satisfying: Packed with protein and fiber, this is a substantial side dish that can easily serve as a main course.

Ingredients:

  • 1 pound bacon, diced
  • 1 large yellow onion, chopped
  • 2 cloves garlic, minced
  • 2 cans (28 ounces each) pork and beans (do not drain)
  • 1 can (15 ounces) kidney beans, drained and rinsed
  • 1 can (15 ounces) black beans, drained and rinsed
  • 1/2 cup your favorite barbecue sauce
  • 1/4 cup ketchup
  • 1/4 cup packed brown sugar (light or dark)
  • 1 tablespoon Worcestershire sauce
  • 1 tablespoon yellow mustard
  • 1 teaspoon smoked paprika
  • Salt and freshly ground black pepper, to taste

Instructions:

Step 1: Cook the Bacon and Aromatics
• In a large skillet or Dutch oven over medium heat, cook the diced bacon until it is brown and crispy. Using a slotted spoon, remove the bacon and set it aside on a paper towel-lined plate, leaving the rendered bacon drippings in the skillet.
• Add the chopped onion to the hot bacon drippings and sauté for 5-6 minutes, until softened and translucent. Add the minced garlic and cook for 1 more minute, stirring constantly, until fragrant.

Step 2: Combine the Beans and Bacon
• In a large 3-quart baking dish or oven-safe Dutch oven, combine the two cans of pork and beans (with their sauce), the drained and rinsed kidney beans, and the drained and rinsed black beans. Add the cooked bacon and the sautéed onion and garlic mixture. Stir to combine.

Step 3: Prepare the Sauce
• In a medium bowl, whisk together the barbecue sauce, ketchup, brown sugar, Worcestershire sauce, yellow mustard, smoked paprika, salt, and pepper. Pour this sauce over the bean mixture and stir until everything is evenly coated.

Step 4: Preheat and Bake Covered
• Preheat your oven to 350°F (175°C). Cover the baking dish tightly with aluminum foil.
• Bake for 45 minutes. This covered baking time allows the beans to heat through thoroughly and the flavors to meld together.

Step 5: Finish Baking Uncovered
• Carefully remove the foil from the baking dish. Return the dish to the oven and bake, uncovered, for an additional 15-20 minutes. This final step allows the sauce to thicken and the top to become slightly caramelized.

Step 6: Rest and Serve
• Remove the beans from the oven and let them cool for about 10 minutes before serving. This allows the sauce to set slightly. Serve warm.

Tips:

• Bacon Choice: For a smokier flavor, use a hickory-smoked bacon. For a sweeter contrast, a maple-flavored bacon works wonderfully.
• Bean Varieties: Feel free to customize the bean mix. Pinto beans, cannellini beans, or great northern beans are all excellent alternatives or additions.
• Spice Level: For a spicy kick, add a few dashes of hot sauce to the sauce mixture, or use a spicy barbecue sauce.
• Dutch Oven Method: If using a Dutch oven on the stovetop, you can complete the first two steps in the same pot, then transfer it directly to the oven for baking, minimizing cleanup.

Storage Options:

• Refrigerator: Store leftovers in an airtight container in the refrigerator for up to 5 days. The flavors will continue to develop, making them even more delicious the next day.
• Reheating: Reheat gently in a saucepan on the stovetop over low heat, adding a splash of water if the sauce has thickened too much. Alternatively, reheat in the microwave, stirring occasionally.
• Freezing: This dish freezes very well. Cool completely and transfer to a freezer-safe container. Freeze for up to 3 months. Thaw overnight in the refrigerator before reheating.

Georgia’s Loaded Baked Beans are a hearty, flavor-packed side dish that elevates a classic to new heights. Their smoky, savory, and sweet profile makes them the perfect companion for any grilled meal and a guaranteed favorite at any table. Enjoy

Southern Pecan Pie

0

Southern Pecan Pie is more than just a dessert; it is a cherished icon of American baking, a symbol of warmth, hospitality, and rich tradition, particularly in the South. This recipe delivers the classic, quintessential version—a deep, amber-colored filling that is simultaneously rich, sweet, and custardy, encasing a generous layer of toasted, buttery pecans, all housed within a flaky, tender pie crust. The filling achieves a perfect balance of textures, firming to a soft set that is dense without being heavy, while the pecans on top become beautifully roasted during baking, adding a delightful crunch to every slice. It’s a pie that commands attention on any holiday table, from Thanksgiving to Christmas, and is guaranteed to evoke a sense of comfort and celebration with its timeless, decadent flavor.

The magic of a great pecan pie lies in its beautiful simplicity and the chemical reaction that occurs during baking. The combination of eggs, corn syrup, and sugar creates a filling that is inherently sweet but is masterfully balanced by the savory, slightly bitter notes of the pecans and the depth of brown sugar and vanilla. The corn syrup is essential not just for sweetness, but for providing a smooth, non-crystalline texture that is the hallmark of a perfect slice. As the pie bakes, the pecans rise to the top, forming a gorgeous, natural mosaic, while the filling sets firmly beneath. Allowing the pie to cool completely is not a suggestion but a requirement, as this cooling period is when the filling achieves its final, sliceable yet lusciously gooey consistency. This pie is a testament to the fact that the most beloved desserts are often those that honor tradition with flawless execution.

Why You’ll Love This Recipe:

• Timeless and Classic: This is the traditional, foolproof pecan pie recipe that has been loved for generations.
• Perfect Texture: Achieves the ideal balance of a firm, custardy filling and a crunchy, toasted pecan topping.
• Surprisingly Simple: With mostly pantry staples, the recipe is straightforward and requires no special skills beyond patience for cooling.
• The Ultimate Holiday Dessert: Its rich, decadent nature makes it the perfect centerpiece for Thanksgiving, Christmas, or any special occasion.

Ingredients:

  • 1 (9-inch) unbaked or frozen deep-dish pie crust, thawed if frozen
  • 2 ½ cups pecans, coarsely chopped (plus whole halves for topping, optional)
  • 3 large eggs, at room temperature
  • 1 cup light or dark corn syrup
  • ¾ cup packed light or dark brown sugar
  • 3 tablespoons unsalted butter, melted and slightly cooled
  • 1 teaspoon pure vanilla extract
  • 1 teaspoon ground cinnamon
  • ½ teaspoon salt

Instructions:

Step 1: Preheat Oven and Prepare Crust
• Preheat your oven to 350°F (175°C). If using a homemade or store-bought refrigerated pie crust, fit it into a 9-inch pie plate and crimp the edges. Place the unbaked pie shell on a baking sheet; this makes it easier to handle and catches any potential drips.

Step 2: Add the Pecans
• Spread the coarsely chopped pecans evenly over the bottom of the unbaked pie shell. For a more decorative top, you can reserve ½ cup of pecan halves and arrange them in a circular pattern on top of the chopped pecans.

Step 3: Prepare the Filling
• In a large bowl, whisk the eggs until they are well beaten and uniform in color. Add the corn syrup, packed brown sugar, melted (and slightly cooled) butter, vanilla extract, ground cinnamon, and salt.
• Whisk the mixture vigorously until all ingredients are completely smooth and well combined. It is important that the brown sugar is fully dissolved and incorporated.

Step 4: Combine and Bake
• Carefully pour the filling mixture over the pecans in the pie shell. The pecans will float to the top, which is perfect. Gently tap the pie plate on the counter to release any air bubbles.

Step 5: Bake to Perfection
• Place the pie (on the baking sheet) into the preheated oven. Bake for 55-60 minutes. The pie is done when the edges are set and puffed, but the center still has a slight, gentle jiggle when you nudge the pan—similar to Jell-O. The crust should be a deep golden brown.

Step 6: Cool Completely
• This is the most critical step. Remove the pie from the oven and place it on a wire cooling rack. Allow it to cool completely, for at least 2-3 hours, or until it reaches room temperature. This cooling time is non-negotiable, as it allows the filling to set properly. Cutting into a warm pecan pie will result in a runny mess.

Step 7: Serve
• Once completely cool, slice the pie with a sharp knife. Serve as is, or with a dollop of whipped cream or a scoop of vanilla ice cream.

Tips:

• Prevent a Burnt Crust: If the edges of your pie crust begin to brown too quickly during baking, tent them with strips of aluminum foil or a pie crust shield for the remaining baking time.
• Room Temperature Eggs: Using room temperature eggs helps them incorporate more smoothly into the filling, ensuring an even texture.
• Toasting Pecans (Optional but Recommended): For a deeper, nuttier flavor, spread the pecans on a baking sheet and toast them in the 350°F oven for 5-7 minutes before chopping and adding to the pie shell. Let them cool slightly first.
• The Jiggle Test: Trust the jiggle test over a specific timer. Ovens vary, and the perfect pecan pie is slightly underbaked rather than overbaked, which can make the filling tough and watery.

Storage Options:

• Room Temperature: The pie can be kept, covered loosely with foil or plastic wrap, at room temperature for up to 2 days.
• Refrigerator: For longer storage, refrigerate the pie for up to 5 days. The texture is best served at room temperature, so remove it from the fridge about an hour before serving.
• Freezer: Baked pecan pie freezes very well. Wrap the cooled pie tightly in plastic wrap and then foil. Freeze for up to 2 months. Thaw overnight in the refrigerator before serving.

Southern Pecan Pie is a masterpiece of simplicity and flavor, a dessert that embodies the very spirit of celebration and comfort. Its rich, sweet, and nutty profile is a timeless treasure that never fails to impress. Enjoy

Chocolate Peanut Butter Haystacks

0

Chocolate Peanut Butter Haystacks are a delightfully simple, no-bake confection that delivers an irresistible combination of sweet, salty, crunchy, and chewy textures in every single bite. This classic treat brilliantly combines creamy peanut butter and rich butterscotch chips into a smooth, velvety base that perfectly coats crisp chow mein noodles and salty peanuts, creating a cluster that resembles a whimsical haystack. The final drizzle of melted chocolate adds a layer of decadent flavor and a beautiful finished appearance. These haystacks are the epitome of easy dessert perfection, requiring no oven, no fancy equipment, and just a few minutes of active preparation, making them an ideal project for novice cooks, a fun activity to do with children, or a last-minute lifesaver when you need a quick and crowd-pleasing sweet treat.

The genius of this recipe lies in its foolproof method and its universally loved flavor profile. The microwave melts the chips and peanut butter into a seamless, glossy mixture that acts as both a glue and a flavor powerhouse, binding the crunchy elements together. The chow mein noodles provide an uniquely light and airy crunch that is far more interesting than typical cereal, while the peanuts add a robust, savory saltiness that cuts through the sweetness and prevents the treat from being cloying. As they set at room temperature, the haystacks transform into a firm yet tender cookie that is easy to handle and absolutely addictive. They are a timeless potluck staple, a holiday cookie plate favorite, and a guaranteed hit that proves the most delicious creations are often the simplest.

Why You’ll Love This Recipe:

• No-Bake and Effortless: Requires zero baking and comes together in under 15 minutes, with no special skills or tools needed.
• Irresistible Texture and Flavor: Offers a perfect symphony of creamy, crunchy, salty, and sweet in one delightful mouthful.
• Perfect for All Ages: A fantastic recipe to make with kids, as it involves simple stirring and dropping.
• Great for Gifting: These haystacks are beautiful, portable, and stay fresh, making them perfect for cookie boxes, party favors, or neighbor gifts.

Ingredients:

  • 1 cup semi-sweet chocolate chips
  • 1 cup butterscotch chips
  • 1 cup creamy peanut butter (not natural style)
  • 4 cups chow mein noodles
  • 1 cup salted peanuts

Instructions:

Step 1: Prepare the Baking Sheets
• Line two large baking sheets with parchment paper or wax paper. This prevents the haystacks from sticking and makes for easy cleanup.

Step 2: Melt the Butterscotch and Peanut Butter Mixture
• In a large, microwave-safe bowl, combine the butterscotch chips and the creamy peanut butter.
• Microwave on high power for 60 seconds. Remove the bowl and stir well. Return to the microwave and heat in additional 20-30 second intervals, stirring vigorously after each interval, until the mixture is completely smooth and fluid.

Step 3: Melt the Chocolate Chips
• In a separate, smaller microwave-safe bowl, place the semi-sweet chocolate chips.
• Microwave on high power for 60 seconds. Stir. Continue heating in 15-20 second intervals, stirring after each, until the chocolate is completely melted and smooth.

Step 4: Combine the Base
• To the large bowl with the smooth butterscotch and peanut butter mixture, add the chow mein noodles and the salted peanuts.
• Using a rubber spatula, gently fold the ingredients together until the noodles and peanuts are evenly and thoroughly coated. Be careful not to break the noodles excessively.

Step 5: Form the Haystacks
• Using two spoons or a small cookie scoop, drop tablespoon-sized mounds of the mixture onto the prepared baking sheets, spacing them about an inch apart. You can form them into loose, rustic “haystack” shapes.

Step 6: Drizzle with Chocolate
• Using a spoon, drizzle the melted chocolate over the top of each haystack. Alternatively, you can transfer the melted chocolate to a small zip-top bag, snip off a tiny corner, and pipe the drizzle for more control.

Step 7: Set and Harden
• Allow the haystacks to cool at room temperature until the coating is completely firm and set. This will take between 30 minutes to 1 hour. For faster setting, you can place the trays in the refrigerator for 15-20 minutes.

Step 8: Serve and Enjoy
• Once firm, peel the haystacks from the parchment paper and serve. Store any leftovers in an airtight container.

Tips:

• Use Fresh Chow Mein Noodles: Ensure your chow mein noodles are fresh and crisp. Stale noodles will result in a soft, less enjoyable texture.
• Stir Vigorously: When melting the chips, stirring thoroughly after each microwave interval is key. The residual heat will often melt the remaining lumps without requiring more microwave time, preventing the mixture from burning.
• Gentle Folding: Fold the noodles and peanuts into the melted mixture gently to avoid crushing the noodles into tiny pieces. You want to maintain their structural integrity.
• Customize Your Add-Ins: Feel free to substitute the peanuts with other mix-ins like raisins, crispy rice cereal, or shredded coconut.

Storage Options:

• Room Temperature: Store haystacks in a single layer in an airtight container at cool room temperature for up to 5 days. Place parchment paper between layers if stacking is necessary.
• Refrigerator: For longer storage or in warmer climates, they can be stored in the refrigerator for up to 2 weeks. Let them come to room temperature for a few minutes for the best texture and flavor.
• Freezer: These haystacks freeze exceptionally well. Place them in a single layer on a baking sheet to freeze solid, then transfer to a freezer-safe bag or container. They will keep for up to 3 months. Thaw at room temperature.

Chocolate Peanut Butter Haystacks are a timeless, no-fuss treat that delivers maximum satisfaction with minimal effort. Their incredible crunch and perfect sweet-and-salty balance make them an unforgettable favorite for any occasion. Enjoy

Pancake Sausage Casserole

0

Pancake Sausage Casserole is the ultimate breakfast convenience, a ingenious dish that transforms the classic morning duo of fluffy pancakes and savory sausage into a hearty, all-in-one bake that is perfect for feeding a crowd. This recipe brilliantly layers a simple, sweet pancake batter with crumbled, cooked breakfast sausage, creating a satisfying contrast of flavors and textures in every single bite. The magic happens in the oven, where the batter rises around the sausage, baking into a golden, cake-like layer that is subtly infused with the maple syrup drizzled over the top. It’s the perfect solution for weekend brunches, holiday mornings, or even breakfast-for-dinner, offering all the comforting flavors you love without the need to stand over a griddle, flipping pancakes one by one.

What makes this casserole truly special is its incredible versatility and make-ahead potential. The preparation is straightforward and forgiving, making it an ideal project for novice cooks or a fun recipe to prepare with family. The optional addition of cinnamon to the batter introduces a warm, spiced note that beautifully complements the maple and sausage. As it bakes, the casserole puffs up slightly, with the top becoming lightly golden and crisp while the interior remains moist and tender. The result is a dish that is both familiar and novel—a cross between a savory bread pudding, a fluffy pancake, and a satisfying sausage patty, all baked into a convenient, sliceable format. It’s a guaranteed crowd-pleaser that will have everyone coming back for seconds.

Why You’ll Love This Recipe:

• Feeds a Crowd Effortlessly: Bake a entire breakfast at once in a single dish, perfect for family gatherings, holidays, or house guests.
• No More Flipping Pancakes: Enjoy all the flavor of pancakes without the hassle of cooking them individually on a griddle.
• Perfect Make-Ahead Breakfast: Assemble the casserole the night before, cover, and refrigerate, then simply bake it in the morning for a stress-free meal.
• Customizable Base: Easily adapt this recipe by adding ingredients like shredded cheese, diced apples, or blueberries to the batter.

Ingredients:

  • 1 pound breakfast sausage (mild or spicy, based on preference)
  • 2 cups complete “just-add-water” pancake mix
  • 1 1/2 cups milk (whole or 2% recommended for richness)
  • 2 large eggs
  • 1 teaspoon vanilla extract
  • 1/2 cup pure maple syrup (plus more for serving)
  • 1/4 cup unsalted butter, melted
  • 1 teaspoon ground cinnamon (optional)
  • Butter or non-stick cooking spray, for greasing

Instructions:

Step 1: Preheat the Oven and Prepare the Dish
• Preheat your oven to 350°F (175°C). This temperature is ideal for cooking the casserole through without over-browning the top too quickly. Generously grease a 9×13-inch baking dish with butter or non-stick cooking spray.

Step 2: Cook the Sausage
• In a skillet over medium heat, cook the breakfast sausage, breaking it up with a spoon or spatula into small crumbles. Cook until it is evenly browned and no longer pink. Drain the excess fat thoroughly in a colander. This step is crucial to prevent a greasy casserole.

Step 3: Prepare the Pancake Batter
• In a large mixing bowl, combine the pancake mix, milk, eggs, vanilla extract, and the optional teaspoon of cinnamon. Whisk together until the ingredients are just combined. It is important not to overmix; a few small lumps are perfectly fine and will ensure a tender texture.

Step 4: Assemble the Casserole in Layers
• Pour approximately half of the prepared pancake batter into the bottom of the greased baking dish, spreading it into an even layer.
• Evenly distribute the drained, cooked sausage crumbles over the layer of batter.
• Carefully pour the remaining half of the pancake batter over the sausage layer, trying to cover it as evenly as possible. It’s okay if some sausage peaks through.

Step 5: Add the Sweet Topping
• Drizzle the ½ cup of maple syrup evenly over the entire top of the casserole. Then, drizzle the ¼ cup of melted butter over the syrup.

Step 6: Bake to Golden Perfection
• Place the baking dish in the preheated oven. Bake for 30-35 minutes. The casserole is done when the top is a deep golden brown, the edges are pulling away from the sides of the pan, and a toothpick or knife inserted into the center of the pancake layer comes out clean.

Step 7: Cool and Serve
• Remove the casserole from the oven and let it cool on a wire rack for 5-10 minutes before slicing. This allows it to set slightly, making it easier to cut into neat squares. Serve warm with extra maple syrup on the side.

Tips:

• Avoid Overmixing: Overmixing the pancake batter will develop the gluten in the flour, leading to a tough, dense casserole instead of a light and fluffy one. Mix until the dry ingredients are just moistened.
• Drain the Sausage Well: Taking the time to drain the cooked sausage on paper towels after browning will significantly improve the final texture of your casserole.
• Test for Doneness: Oven temperatures can vary. Start checking for doneness at the 30-minute mark. The center should be fully set and not jiggly.
• Make it Ahead: For an easy morning, assemble the entire casserole (through step 5), cover it tightly with plastic wrap, and refrigerate overnight. In the morning, let it sit at room temperature for 20 minutes while the oven preheats, then bake as directed.

Storage Options:

• Refrigerator: Store any leftover casserole in an airtight container in the refrigerator for up to 3 days.
• Reheating: Reheat individual portions in the microwave for 60-90 seconds until warmed through. For a crisper top, reheat in a toaster oven or conventional oven at 350°F (175°C) for 5-10 minutes.
• Freezing: This casserole freezes very well. Cool completely, then cut into individual portions. Wrap each portion tightly in plastic wrap and then foil. Freeze for up to 2 months. Reheat from frozen in the microwave (remove foil) or in the oven.

Pancake Sausage Casserole is the ultimate breakfast game-changer, combining convenience, comfort, and crowd-feeding power into one delicious, sliceable dish. It’s a surefire way to make any morning feel special. Enjoy

Garlic Butter Chicken Bites with Savory Parmesan Linguine

0

Garlic Butter Chicken Bites with Savory Parmesan Linguine is a restaurant-quality dish that delivers maximum flavor with minimal effort, making it the perfect choice for an impressive yet achievable weeknight dinner. This recipe transforms simple chicken breast into golden, juicy morsels that are seared to perfection and then enveloped in a luxuriously simple pan sauce made from melted butter, freshly minced garlic, and fragrant Italian seasoning. The sauce, rich with the rendered fond from the chicken, clings to every strand of al dente linguine, creating a cohesive and deeply savory dish. The final flourish of freshly grated Parmesan cheese and a sprinkle of bright parsley not only adds layers of salty, umami depth and freshness but also creates a beautiful presentation that belies its straightforward preparation.

The genius of this recipe lies in its efficient, one-pan approach that builds layers of flavor directly in the skillet. By cooking the pasta separately and then finishing it in the sauce, you achieve the ideal texture—firm yet tender pasta that has absorbed the garlicky, buttery essence of the chicken cooking juices. The key is to create a sauce in the same pan used to brown the chicken, ensuring not a single drop of flavor is lost. The Parmesan cheese, stirred in off the heat, melts into the residual warmth of the pasta and sauce, creating a creamy, velvety coating without any need for heavy cream. This dish is a masterclass in balancing rich, savory elements with fresh, herbal notes, resulting in a comforting, elegant, and universally appealing meal that feels both indulgent and wholesome.

Why You’ll Love This Recipe:

• Restaurant-Quality at Home: Achieves a sophisticated, complex flavor profile with simple, accessible ingredients and quick techniques.
• One-Pan Efficiency: Cooking the chicken and sauce in a single skillet maximizes flavor and minimizes cleanup.
• Incredibly Versatile: Easily adaptable with different herbs, a squeeze of lemon juice, or the addition of vegetables like spinach or sun-dried tomatoes.
• Quick and Impressive: Ready in the time it takes to boil pasta, making it perfect for a busy weeknight or a last-minute dinner guest.

Ingredients:

  • 1 lb chicken breast, boneless, skinless, cut into 1-inch bite-sized pieces
  • 2 tbsp olive oil
  • 4 tbsp unsalted butter
  • 4 cloves garlic, minced
  • 1 tsp Italian seasoning
  • salt, to taste
  • black pepper, to taste
  • 8 oz linguine pasta
  • 1/2 cup Parmesan cheese, freshly grated (plus more for serving)
  • 2 tbsp fresh parsley, chopped (for garnish)

Instructions:

Step 1: Cook the Pasta
• Bring a large pot of generously salted water to a rolling boil. Add the linguine and cook according to package directions until it is al dente, meaning it still has a slight bite to it. Reserve about ½ cup of the starchy pasta water before draining. Drain the pasta and set it aside.

Step 2: Cook the Chicken
• Pat the chicken pieces completely dry with paper towels. This is essential for achieving a golden-brown sear instead of steaming.
• In a large skillet, heat the olive oil over medium-high heat. Once the oil is shimmering, add the chicken in a single layer, ensuring the pieces are not crowded (work in batches if necessary). Season generously with salt, pepper, and the Italian seasoning.
• Cook without moving for 2-3 minutes to allow a golden crust to form, then flip and cook for another 3-4 minutes, or until the chicken is cooked through and golden brown on all sides. Remove the chicken to a clean plate.

Step 3: Create the Garlic Butter Sauce
• Reduce the heat to medium. In the same skillet, add the unsalted butter. Once melted, add the minced garlic. Cook for 1-2 minutes, stirring constantly, until the garlic is incredibly fragrant but not browned. Browning the garlic will make it bitter.

Step 4: Combine and Finish the Dish
• Return the cooked chicken and any accumulated juices back to the skillet. Add the drained linguine directly into the skillet with the garlic butter sauce. Using tongs, toss everything together until the pasta is evenly coated and glistening.
• Remove the skillet from the heat. Sprinkle the freshly grated Parmesan cheese over the pasta and chicken. Toss continuously until the cheese has melted into the residual heat, creating a creamy sauce that coats every element. If the sauce seems too thick, add a small splash of the reserved pasta water to loosen it.

Step 5: Garnish and Serve
• Taste and adjust seasoning with more salt or pepper if needed. Transfer to serving plates or a large platter. Garnish generously with chopped fresh parsley and an extra sprinkle of Parmesan cheese. Serve immediately.

Tips:

• The Power of Pasta Water: The starchy water reserved from cooking the pasta is liquid gold. It helps emulsify the butter and cheese into a smooth, restaurant-quality sauce that clings perfectly to the linguine.
• Freshly Grated Parmesan: For the best melting and flavor, always grate your own Parmesan cheese from a block. Pre-shredded cheese contains anti-caking agents that can make the sauce grainy.
• Don’t Crowd the Pan: overcrowding the skillet when browning the chicken will cause it to steam instead of sear. Cook in batches if your skillet isn’t large enough to hold the chicken in a single layer without touching.
• Add Vegetables: Sauté sliced mushrooms, cherry tomatoes, or spinach in the skillet after cooking the chicken and before making the sauce for a more complete meal.

Storage Options:

• Refrigerator: Store leftovers in an airtight container in the refrigerator for up to 3 days. The pasta will absorb the sauce, so it will be less saucy upon reheating.
• Reheating: Reheat gently in a skillet over low heat, adding a small splash of chicken broth, milk, or water to help loosen the sauce and restore creaminess. The microwave can also be used, though it may dry out the chicken slightly.
• Freezing: Freezing is not recommended, as the dairy-based sauce is likely to separate and the pasta will become very soft upon thawing.

Garlic Butter Chicken Bites with Savory Parmesan Linguine is a flawless, foolproof recipe that proves you don’t need complex ingredients to create a truly memorable and delicious meal. It’s a guaranteed crowd-pleaser that will earn a permanent spot in your culinary repertoire. Enjoy

Silky Smooth Custard Dessert

0

Silky Smooth Custard Dessert, often known as Crème Renversée or a classic baked custard, is the epitome of elegant simplicity in the world of desserts. This timeless recipe celebrates the pure, unadulterated harmony of just a few essential ingredients: rich milk, wholesome eggs, and sweet sugar, all brought together with the warm fragrance of vanilla. The result is a dessert of breathtakingly delicate texture—a custard so impossibly smooth and tender it literally melts on the tongue, leaving behind a clean, sweet, and comforting flavor that is both sophisticated and deeply nostalgic. Unlike its cousin, crème brûlée, this dessert forgoes a torched sugar top for a pure, velvety experience that highlights the perfection of its technique.

The magic of this custard lies entirely in its gentle preparation. The key to its signature silkiness is a low, slow bake in a water bath, which provides a humid and evenly distributed heat that cooks the egg proteins without curdling them. This method ensures the custard sets without a single bubble or grain, achieving a consistency that is firm yet quiveringly delicate. The optional dusting of nutmeg adds a classic, warm aroma that perfectly complements the sweet vanilla. This dessert is a testament to the fact that true luxury doesn’t require complexity; it requires patience and care. It’s the perfect make-ahead treat for a dinner party, as it needs time to chill and set, allowing its flavors to deepen and its texture to become even more perfect.

Why You’ll Love This Recipe:

• Unparalleled Texture: The water bath method guarantees a flawlessly smooth, melt-in-your-mouth consistency that is simply divine.
• Elegantly Simple: With only a handful of pantry staples, you can create a dessert that feels luxurious and special.
• Make-Ahead Perfection: This dessert must be chilled, making it an ideal prepare-ahead option for stress-free entertaining.
• Endlessly Adaptable: This classic base is a canvas for flavors; enjoy it pure or experiment with citrus zest, almond extract, or a berry compote on the side.

Ingredients:

  • 2 cups whole milk (for the richest texture)
  • 3 large eggs, at room temperature
  • ½ cup granulated sugar
  • 1 teaspoon high-quality vanilla extract or vanilla bean paste
  • ¼ teaspoon fine sea salt
  • ¼ teaspoon freshly grated nutmeg (optional, for topping)
  • Hot water, for the water bath

Instructions:

Step 1: Preheat the Oven and Prepare the Ramekins
• Preheat your oven to 320°F (160°C). This lower temperature is critical for gentle, even cooking without curdling. Place 4-6 ramekins or oven-safe custard cups in a deep baking dish. A 9×13-inch pan works perfectly.

Step 2: Warm the Milk
• In a saucepan over medium-low heat, warm the milk until it is just steaming and small bubbles appear around the edges. Do not let it boil. The goal is to heat it through to help it blend more easily with the eggs. Alternatively, you can warm it in a microwave-safe jug for 1-2 minutes.

Step 3: Whisk the Egg Base
• In a medium bowl, combine the eggs, sugar, vanilla extract, and salt. Whisk vigorously until the mixture is completely smooth, pale yellow, and the sugar has begun to dissolve. Avoid whisking to the point of creating a froth or too many air bubbles.

Step 4: Temper the Eggs
• This is the most crucial step for preventing scrambled eggs. While whisking the egg mixture constantly, very slowly drizzle in the warm milk in a thin, steady stream. Continue whisking until the two mixtures are fully and smoothly incorporated.

Step 5: Strain for Smoothness
• Place a fine-mesh sieve over a large liquid measuring cup or a bowl with a spout. Pour the custard mixture through the strainer. This step catches any undissolved bits of egg white or chalaza, guaranteeing the signature silky-smooth texture.

Step 6: Assemble the Water Bath
• Divide the strained custard evenly among the ramekins. If using, sprinkle the top of each with a pinch of freshly grated nutmeg.
• Carefully place the baking dish with the ramekins on the pulled-out oven rack. Pour hot water from a kettle into the baking dish around the ramekins until it reaches halfway up their sides. This creates the gentle steam heat of the bain-marie.

Step 7: Bake to Perfection
• Bake for 35-40 minutes. The custards are done when the edges are firmly set but the center still has a slight, gentle jiggle when you tap the pan. A knife inserted near the center should come out clean.

Step 8: Cool and Chill
• Using tongs, carefully remove the ramekins from the water bath and place them on a wire cooling rack. Allow them to cool to room temperature.
• Once cool, cover each ramekin with plastic wrap and refrigerate for at least 4 hours, or preferably overnight. This chilling time is essential for the custard to fully set and for the flavors to meld beautifully.

Step 9: Serve
• Serve the custard chilled directly from the refrigerator. For an extra touch, you can run a thin knife around the edge and invert it onto a plate to serve, though it is traditionally enjoyed straight from the ramekin.

Tips:

• Room Temperature Eggs: Using room temperature eggs helps them blend more smoothly with the warm milk, reducing the risk of curdling.
• Straining is Non-Negotiable: Do not skip straining the custard base. It is the single most important step for achieving a perfectly silky texture.
• Gentle Water Bath: Ensure the water is hot, not boiling, when you add it to the pan. Pouring boiling water can splash into the custards and affect their texture.
• Avoid Overbaking: The custard will continue to set as it cools. Removing it from the oven while the center is still slightly jiggly prevents a rubbery, overcooked texture.

Storage Options:

• Refrigerator: This custard must be stored in the refrigerator. Keep the ramekins covered with plastic wrap for up to 3 days.
• Freezing: Freezing is not recommended, as it will cause the custard to separate and become watery upon thawing, completely ruining its delicate texture.

Silky Smooth Custard Dessert is a humble masterpiece—a lesson in technique that rewards patience with a flawless, elegant, and deeply satisfying final product. It is a true testament to the beauty of simple, well-executed cooking. Enjoy

French Onion Funeral Potatoes

0

French Onion Funeral Potatoes are a spectacular and indulgent twist on the classic Midwestern comfort casserole, masterfully merging its creamy, cheesy goodness with the deep, caramelized, and savory flavors of French onion soup. This recipe elevates the humble potluck staple into a gourmet experience by replacing the traditional canned soup base with a rich, homemade creamy sauce infused with sautéed onions, garlic, and a sophisticated blend of spices. The pièce de résistance is the crowning glory of freshly fried, impossibly crispy onion rings that blanket the top, providing a breathtaking textural contrast to the luxurious and velvety potato mixture beneath. It’s a dish that is simultaneously nostalgic and excitingly new, offering the ultimate in comfort food elegance that is worthy of any holiday table, special occasion, or as the most memorable side dish at any gathering.

The genius of this recipe lies in its layers of flavor and texture. The base starts with frozen hash browns for convenience, which are transformed by a sauce built on a roux, ensuring a from-scratch depth that far surpasses any shortcut version. The addition of cayenne and dry mustard powder adds a subtle, warm complexity that cuts through the richness. However, the true showstopper is the homemade crispy onion topping. While store-bought fried onions are a common choice, taking the extra step to fry your own fresh onions results in a topping that is exponentially more flavorful, fragrant, and crisp, mirroring the essence of a perfect French onion soup gratin. This casserole is a labor of love that pays dividends in flavor, creating a side dish so compelling it will undoubtedly steal the spotlight.

Why You’ll Love This Recipe:

• Gourmet Comfort Food: expertly combines the homey appeal of funeral potatoes with the sophisticated, savory depth of French onion soup.
• Incredible Textural Contrast: Features a luxuriously creamy and soft interior beneath a canopy of shatteringly crisp, golden-brown fresh onion rings.
• From-Scratch Flavor: A homemade sauce and freshly fried onions create a flavor profile that is far superior to any version using canned or packaged ingredients.
• The Ultimate Crowd-Pleaser: This dish is guaranteed to be the most talked-about item at any potluck, holiday dinner, or family gathering.

Ingredients:

For the Potato Mixture:

  • 2 pounds (32 ounces) frozen cubed hash browns, thawed and excess moisture removed
  • 4 tablespoons (1/2 stick) unsalted butter, melted
  • 2 cups sharp cheddar cheese, freshly shredded
  • 1 1/2 cups sour cream (full-fat recommended)

For the Creamy Sauce:

  • 4 tablespoons (1/2 stick) unsalted butter
  • 1 small yellow onion, finely diced
  • 2 teaspoons fresh garlic, minced
  • 1/4 cup all-purpose flour
  • 1 teaspoon kosher salt
  • 1/2 teaspoon freshly ground black pepper
  • 1/2 teaspoon cayenne pepper (adjust to taste)
  • 1/2 teaspoon dried mustard powder
  • 1/2 cup chicken broth, at room temperature
  • 1/2 cup whole milk, at room temperature

For the Crispy Onion Topping:

  • 2 large yellow onions, thinly sliced and separated into rings (about 4 cups)
  • 4 cups vegetable oil (or other neutral high-heat oil like peanut or canola), for frying
  • Kosher salt, for sprinkling

Instructions:

Step 1: Preparation
• Preheat your oven to 350°F (175°C). Generously coat a 9×13-inch baking dish with cooking spray or butter.
• Ensure the frozen hash browns are completely thawed. Spread them on a clean kitchen towel or several layers of paper towels and press firmly to remove as much excess moisture as possible. This step is crucial for preventing a watery casserole.

Step 2: Prepare the Potato Mixture
• In a very large mixing bowl, combine the dried, thawed hash browns, 4 tablespoons of melted butter, shredded cheddar cheese, and sour cream. Stir gently until all ingredients are evenly distributed and the potatoes are well coated. Set the bowl aside.

Step 3: Make the Creamy Sauce
• In a medium non-stick skillet or saucepan over medium heat, melt the 4 tablespoons of butter. Add the finely diced yellow onion and sauté for 3-5 minutes, until softened and translucent.
• Add the minced garlic and cook for an additional 1 minute, stirring constantly until fragrant.
• Sprinkle the flour, kosher salt, black pepper, cayenne pepper, and dried mustard powder over the onion mixture. Cook for 1 full minute, stirring continuously to form a roux and cook out the raw flour taste.
• Gradually whisk in the room-temperature chicken broth and milk, ensuring no lumps form. Continue to cook, whisking constantly, until the sauce thickens significantly to a gravy-like consistency, about 2-3 minutes.

Step 4: Combine and Assemble
• Pour the hot creamy sauce over the potato mixture. Using a spatula, fold the sauce into the potatoes until everything is evenly and thoroughly coated.
• Transfer the entire mixture to the prepared baking dish, spreading it out into a smooth, even layer.

Step 5: Bake the Casserole
• Bake the casserole, uncovered, in the preheated oven for 45-50 minutes, or until the edges are bubbly and the center is hot and set.

Step 6: Prepare the Crispy Onion Topping
• While the casserole bakes, prepare the onions. Line a large baking sheet with a double layer of paper towels.
• In a large, heavy-bottomed Dutch oven or pot, heat the vegetable oil to 350°F (175°C). Use a candy thermometer to monitor the temperature accurately.
• Working in small batches (about 1 cup of onions per batch), carefully add the onion rings to the hot oil. Fry for 2-5 minutes, stirring occasionally with a spider strainer or slotted spoon, until they are a uniform golden brown.
• Immediately remove the fried onions from the oil and transfer them to the paper towel-lined baking sheet. Sprinkle generously with kosher salt while they are still hot and oily. Repeat the process until all onions are fried, allowing the oil to return to 350°F between each batch.

Step 7: Final Assembly and Serve
• Once the casserole is finished baking, remove it from the oven. Immediately top it evenly with the freshly fried crispy onions.
• Serve the casserole hot, ensuring each portion gets a generous amount of the crispy onion topping.

Tips:

• Thawing Hash Browns: The best way to thaw hash browns is in the refrigerator overnight. For a quicker method, spread them on a baking sheet and place them in a cold oven for about an hour.
• Moisture is the Enemy: Pressing the thawed hash browns thoroughly is the most important step to avoid a soggy casserole. Don’t rush this.
• Room Temperature Liquids: Using room-temperature broth and milk prevents the hot roux from seizing up and helps create a perfectly smooth sauce.
• Oil Temperature: Maintaining the correct oil temperature (350°F) is key. If the oil is too cool, the onions will be greasy; if too hot, they will burn before crisping.

Storage Options:

• Refrigerator: Store leftover casserole (without the crispy onion topping) in an airtight container in the refrigerator for up to 3 days.
• Reheating: Reheat portions in the oven at 350°F (175°C) until warmed through to preserve the best texture. The microwave will make the potatoes soft.
• Make-Ahead: The casserole can be assembled completely (without baking and without the onion topping) up to 24 hours in advance. Cover and refrigerate. Bake as directed, adding 5-10 minutes to the baking time since it will be cold from the fridge. Fry the onions fresh right before serving.
• Freezing: It is not recommended to freeze this casserole after baking, as the dairy-based sauce may separate upon thawing and reheating.

French Onion Funeral Potatoes are a breathtakingly delicious homage to two classic dishes, creating a side dish that is far greater than the sum of its parts. It’s a guaranteed showstopper that promises an unforgettable culinary experience. Enjoy

Creamy Crack Chicken Pasta

0

Creamy Crack Chicken Pasta is the undisputed champion of comfort food, a one-skillet wonder that earns its “crack” namesake through an irresistibly addictive, creamy, and savory sauce you simply won’t be able to stop eating. This recipe masterfully combines tender, seasoned chicken, crispy bacon, and hearty pasta enveloped in a luxuriously smooth sauce built from cream cheese, cheddar, and the iconic flavor of ranch seasoning. It’s a complete, crowd-pleasing meal that delivers the satisfying richness of a decadent restaurant-style pasta dish with the straightforward, approachable process of a weeknight dinner. The name might be playful, but the flavor is seriously profound, offering a perfect balance of smoky, cheesy, tangy, and savory notes in every single bite.

What truly sets this dish apart is its incredible efficiency and depth of flavor achieved in one pan. By cooking the chicken first, you create a flavorful fond on the bottom of the skillet that becomes the foundation for the sauce. The magic happens when chicken broth is added to this pan, deglazing it and incorporating all those delicious browned bits into the sauce. The ranch dressing mix is the secret weapon, infusing the sauce with its herbaceous and tangy profile without the need for a dozen separate spices. Finally, the combination of cream cheese for tangy richness and cheddar for sharp, gooey texture creates a velvety sauce that clings perfectly to every noodle and piece of chicken. It’s the ultimate solution for a busy night when you crave something indulgent, comforting, and guaranteed to elicit requests for seconds.

Why You’ll Love This Recipe:

• Irresistibly Addictive Flavor: The combination of ranch, bacon, cheese, and chicken creates a uniquely savory and crave-worthy sauce that lives up to its name.
• One-Pan Wonder: Cooking the chicken and building the sauce in the same skillet maximizes flavor and minimizes cleanup.
• Family-Friendly Favorite: This is a guaranteed hit with both adults and kids, pleasing even the pickiest of eaters.
• Quick and Easy Weeknight Meal: Ready in about 30 minutes, this is a lifesaver on busy evenings when you need something delicious on the table fast.

Ingredients:

  • 1 pound boneless, skinless chicken breasts
  • 1 tbsp olive oil
  • 1 tsp smoked paprika
  • Salt and pepper, to taste
  • 16 oz pasta (penne, shells, or rotini work well)
  • 8 oz cream cheese, softened
  • 1 cup chicken broth
  • 1 packet (1 oz) ranch dressing mix
  • 1 cup milk (whole or 2% recommended)
  • 1 cup shredded sharp cheddar cheese
  • 1/2 cup cooked and crumbled bacon (about 6 slices)
  • Chopped fresh parsley, for garnish

Instructions:

Step 1: Cook the Pasta
• Bring a large pot of generously salted water to a rolling boil. Add the pasta and cook according to package directions until al dente. Drain well and return to the pot. Set aside.

Step 2: Season and Cook the Chicken
• Pat the chicken breasts dry with paper towels. Season both sides generously with smoked paprika, salt, and pepper.
• Heat the olive oil in a large skillet over medium heat. Add the chicken breasts and cook for 6-7 minutes per side, or until golden brown on the outside and cooked through (internal temperature of 165°F). Remove the chicken to a clean cutting board and let it rest for a few minutes before dicing into bite-sized pieces.

Step 3: Create the Sauce Base
• Without cleaning the skillet, reduce the heat to medium-low. Pour in the chicken broth. Use a whisk to scrape up all the browned bits (the fond) from the bottom of the pan. This is packed with flavor.

Step 4: Make the Creamy Ranch Sauce
• Add the softened cream cheese to the skillet. Whisk continuously until the cream cheese has completely melted into the broth, creating a smooth base. Whisk in the entire packet of ranch dressing mix until fully incorporated.

Step 5: Finish the Sauce
• Slowly pour in the milk, whisking constantly. Allow the sauce to simmer gently for 2-3 minutes, stirring occasionally, until it begins to thicken slightly. Reduce the heat to low and gradually add the shredded cheddar cheese, stirring until it is completely melted and the sauce is smooth and creamy.

Step 6: Combine and Serve
• Add the diced cooked chicken and the drained pasta to the skillet with the sauce. Toss everything together until the pasta and chicken are evenly coated. Gently stir in the crumbled bacon.
• Let the pasta heat through for 1-2 minutes over low heat to allow the flavors to meld. Taste and adjust seasoning with more salt or pepper if needed.

Step 7: Garnish and Enjoy
• Serve immediately, garnished generously with chopped fresh parsley for a pop of color and freshness.

Tips:

• Soften the Cream Cheese: This is the most critical step for a lump-free sauce. Take the cream cheese out of the fridge at least an hour before you start cooking.
• Don’t Skip the Fond: The browned bits left from cooking the chicken are essential for building a deep, flavorful sauce. Deglazing the pan with broth ensures you capture every bit of that flavor.
• Reserve Pasta Water: Before draining, save about ½ cup of the starchy pasta water. If your sauce is too thick after combining, add a splash of this water to loosen it up perfectly.
• Low-Sodium Options: If you are sensitive to salt, consider using a low-sodium chicken broth and a reduced-sodium ranch seasoning packet.

Storage Options:

• Refrigerator: Store leftovers in an airtight container in the refrigerator for up to 3 days. The sauce will thicken considerably as it cools.
• Reheating: Reheat gently on the stovetop over low heat, adding a small splash of milk or chicken broth to help loosen the sauce back to a creamy consistency. The microwave also works well; heat in 60-second intervals, stirring in between.
• Freezing: Freezing is not recommended due to the dairy-based sauce, which may separate and become grainy upon thawing.

Creamy Crack Chicken Pasta is the epitome of comfort food—rich, satisfying, and packed with flavor in every single bite. It’s a foolproof recipe that is guaranteed to become a regular in your weekly dinner rotation. Enjoy

Scalloped Potatoes and Ham Recipe

0

Scalloped Potatoes and Ham is the epitome of comfort food, a hearty and complete casserole that transforms simple ingredients into a creamy, cheesy, and deeply satisfying meal. This recipe elevates the classic scalloped potato dish by incorporating layers of savory diced ham, creating a one-pan wonder that is perfect for a family dinner, a holiday brunch, or a potluck gathering. The magic begins with a homemade creamy sauce, infused with the aromatic flavors of sautéed onion, garlic, and fresh thyme, which blankets every thin slice of potato and piece of ham. As it bakes, the sauce thickens, the potatoes become meltingly tender, and the top develops a golden, bubbly cheese crust that is utterly irresistible.

What sets this dish apart is its from-scratch sauce, which offers a far superior flavor and texture than any shortcut version. The process of creating a roux with butter and flour, then slowly whisking in broth and milk, results in a velvety, luxurious base that is both rich and balanced. The addition of a hint of paprika and a touch of optional cayenne pepper adds a subtle warmth and complexity that cuts through the richness. Layering the ingredients ensures that every single bite is packed with flavor, from the tender potatoes and smoky ham to the gooey, melted cheese. This casserole is the ultimate solution for using up leftover holiday ham, but it is so delicious that it’s worth cooking ham specifically to make it. It’s a timeless, crowd-pleasing dish that promises warmth and comfort with every forkful.

Why You’ll Love This Recipe:

• The Ultimate Comfort Food: Creamy, cheesy, and packed with hearty potatoes and ham—it’s the definition of a satisfying meal.
• Perfect for Leftovers: An exceptional and delicious way to use up leftover baked ham after a holiday dinner.
• Feeds a Crowd: This large casserole is designed to serve a family with plenty for seconds, or to be the star of any potluck table.
• Make-Ahead Friendly: The casserole can be assembled a day in advance and baked when needed, making it perfect for stress-free entertaining.

Ingredients:

  • ⅓ cup butter
  • 1 medium onion, finely chopped
  • 3 cloves garlic, minced
  • 3 tablespoons all-purpose flour
  • 1 cup low-sodium chicken broth
  • 2 cups whole milk or 2%
  • 2 teaspoons fresh thyme leaves, plus more for garnish
  • ½ teaspoon kosher salt
  • ½ teaspoon freshly ground black pepper
  • ¼ teaspoon paprika
  • ⅛ teaspoon cayenne pepper (optional, for a subtle kick)
  • 3 lbs. Yukon gold potatoes, sliced ⅛ inch thick
  • 2 cups cooked ham, diced
  • 1 cup shredded sharp cheddar cheese
  • 1 cup shredded Monterey Jack cheese

Instructions:

Step 1: Preheat and Prepare
• Preheat your oven to 375°F (190°C). Generously spray a 9×13-inch baking dish with nonstick cooking spray. This prevents sticking and makes for easy cleanup.

Step 2: Sauté the Aromatics
• In a large saucepan or Dutch oven, melt the butter over medium heat. Add the finely chopped onion and cook for 6-7 minutes, stirring occasionally, until softened and translucent. Reduce the heat to medium-low and add the minced garlic. Cook for 1 minute, stirring constantly, until fragrant.

Step 3: Create the Roux
• Sprinkle the flour over the onion and garlic mixture. Cook for 2 minutes, stirring constantly. This cooks out the raw flour taste and creates a roux, which will thicken the sauce.

Step 4: Make the Cream Sauce
• Slowly pour in the chicken broth and milk, whisking constantly to prevent any lumps from forming. Continue to cook, whisking frequently, until the sauce has thickened and coats the back of a spoon, about 5-7 minutes.

Step 5: Season the Sauce
• Remove the saucepan from the heat. Whisk in the fresh thyme, kosher salt, black pepper, paprika, and cayenne pepper (if using). Taste and adjust seasoning if necessary.

Step 6: Layer the Casserole
• Spread a few tablespoons of the cream sauce evenly over the bottom of the prepared baking dish. This prevents the bottom layer from sticking.
• Arrange a single layer of one-third of the potato slices over the sauce. Top with one-third of the diced ham, then pour one-third of the remaining cream sauce evenly over the top.
• Repeat this process two more times, creating three complete layers of potatoes, ham, and sauce, ending with a layer of sauce.

Step 7: Bake Covered
• Cover the baking dish tightly with aluminum foil. Place it in the preheated oven and bake for 1 hour. The foil traps steam, which is essential for properly cooking the potatoes until they are tender.

Step 8: Add Cheese and Finish Baking
• Carefully remove the foil. In a bowl, combine the shredded cheddar and Monterey Jack cheeses. Sprinkle the cheese blend evenly over the top of the casserole.
• Return the dish to the oven, uncovered, and bake for an additional 20-25 minutes, or until the cheese is completely melted, bubbly, and lightly browned in spots, and the potatoes are easily pierced with a knife.

Step 9: Rest and Serve
• Remove the casserole from the oven. Garnish with additional fresh thyme. It is crucial to let the casserole rest, loosely covered with the foil, for 15-20 minutes before serving. This allows the sauce to thicken slightly and makes serving much easier.

Tips:

• Slice Potatoes Evenly: Use a mandoline slicer to achieve uniformly thin (⅛-inch) potato slices. This ensures they all cook at the same rate.
• Low-Sodium Broth: Using low-sodium broth is recommended because the ham and cheese will add their own saltiness, giving you better control over the final seasoning.
• Don’t Skip the Resting Time: Allowing the casserole to rest after baking is not optional; it is essential for the layers to set, preventing a soupy mess when serving.
• Potato Choice: Yukon Gold potatoes are ideal because they hold their shape well and have a naturally buttery flavor that complements the sauce.

Storage Options:

• Refrigerator: Store leftover casserole in an airtight container in the refrigerator for up to 4 days.
• Reheating: Reheat individual portions in the microwave. For larger portions, reheat, covered, in a 350°F (175°C) oven until warmed through, adding a splash of milk if the sauce seems too thick.
• Freezer: This casserole freezes well before baking. Assemble it completely (without baking), wrap tightly in plastic wrap and foil, and freeze for up to 2 months. Thaw overnight in the refrigerator and bake as directed, adding extra time if needed.

Scalloped Potatoes and Ham is a classic, beloved casserole that delivers the ultimate in creamy, cheesy, savory comfort. It’s a dependable and delicious recipe that is guaranteed to bring everyone to the table. Enjoy!