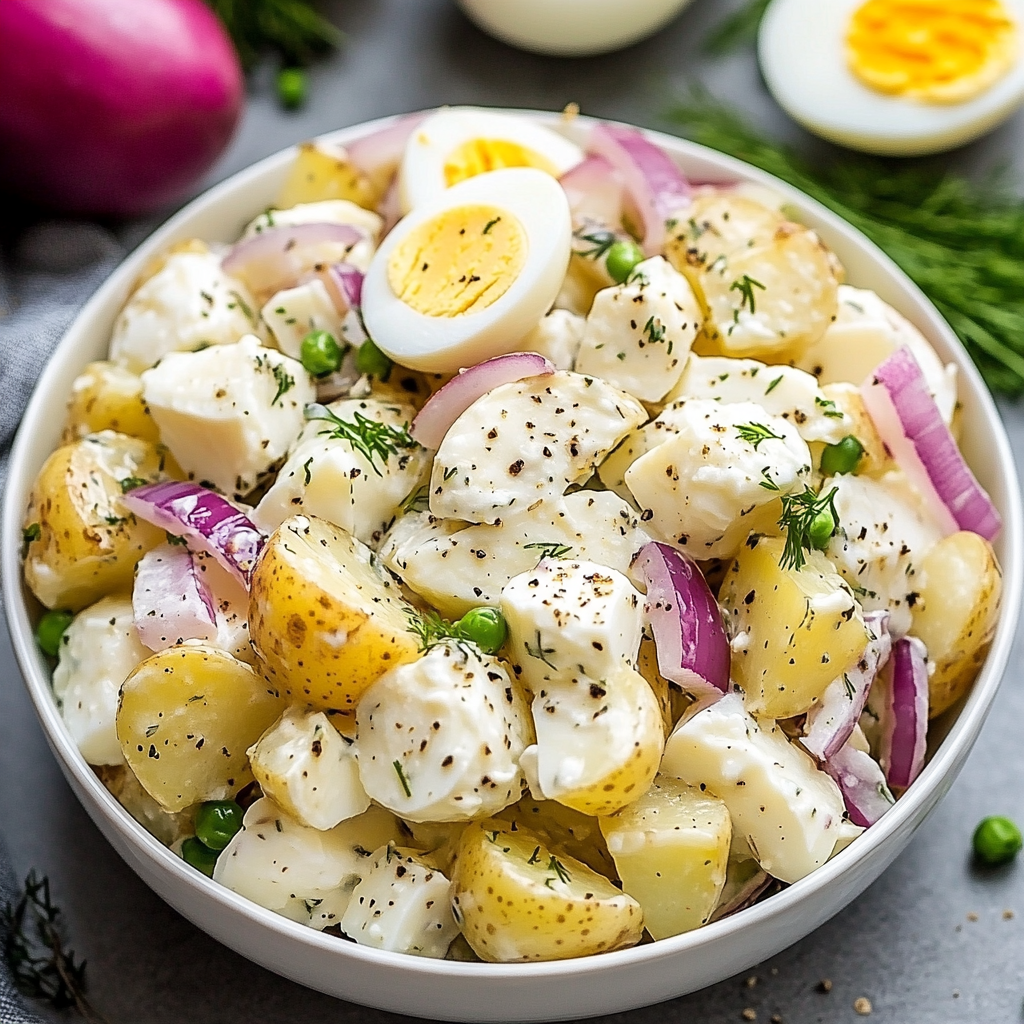
Chocolate Brownie Cake

0

Chocolate Brownie Cake is the ultimate dessert for chocolate lovers. Combining the richness of brownies with the fluffiness of cake, this decadent treat is topped with a smooth, glossy ganache that takes it to the next level. Perfect for celebrations, dinner parties, or simply indulging in a chocolate craving, this recipe delivers a moist, fudgy, and irresistible cake every time.

With its simple preparation and show-stopping presentation, Chocolate Brownie Cake is a guaranteed crowd-pleaser. The combination of cake mix and brownie mix ensures a dessert that’s both easy to make and hard to resist.

Why You’ll Love This Recipe

Rich and Decadent: A perfect blend of fudgy brownies and soft cake.

Simple to Make: Uses convenient mixes to streamline the baking process.

Elegant Presentation: The ganache topping adds a professional touch.

Ingredients

For the Cake:

• 1 box chocolate cake mix

• 1 box fudge brownie mix

• 4 large eggs

• 1 ¼ cups water

• 1 cup oil

For the Ganache:

• 1 cup heavy whipping cream

• 12 oz semi-sweet chocolate morsels

Instructions

Step 1: Preheat and Prepare Pan

1. Preheat your oven to 350°F (175°C).

2. Coat a bundt pan with baker’s spray or butter and flour to prevent sticking.

Step 2: Make the Cake Batter

1. In a large mixing bowl, sift together the chocolate cake mix and fudge brownie mix to remove any lumps.

2. Add eggs, water, and oil to the dry ingredients.

3. Whisk for about 2 minutes until the batter is smooth and well combined.

Step 3: Bake the Cake

1. Pour the batter into the prepared bundt pan, spreading it evenly.

2. Bake in the preheated oven for 50-55 minutes, or until a toothpick inserted into the center comes out clean or with a few moist crumbs.

3. Let the cake cool in the pan for 5 minutes before transferring it to a cooling rack. Allow it to cool completely, at least 30 minutes.

Step 4: Prepare the Ganache

1. Heat the heavy whipping cream in a microwave-safe bowl for about 2 minutes, or until it just starts to boil.

2. Add the chocolate morsels to the hot cream and let sit for 5 minutes to soften.

3. Whisk the mixture until it is smooth and glossy.

Step 5: Decorate the Cake

1. Once the cake is fully cooled, place it on a serving plate.

2. Pour the ganache over the top, allowing it to cascade down the sides. Use a spatula to spread the ganache evenly, if needed.

Tips

Perfect Texture: Don’t overbake the cake—check it at 50 minutes to avoid dryness.

Room Temperature Ingredients: Ensure eggs are at room temperature for a smoother batter.

Ganache Consistency: If the ganache is too thick, add a splash of warm cream to thin it out.

Add Toppings: Sprinkle chopped nuts, chocolate shavings, or sea salt over the ganache for added flavor and texture.

Storage Options

Refrigerator: Store the cake in an airtight container for up to 5 days. Let it come to room temperature before serving.

Freezing: Wrap the unfrosted cake tightly in plastic wrap and freeze for up to 3 months. Thaw in the refrigerator overnight and add the ganache before serving.

Chocolate Brownie Cake is a rich, chocolatey dessert that combines the best of two worlds. Whether you’re celebrating a special occasion or simply treating yourself, this cake will make every moment sweeter!

Italian Cream Cake

0

Italian Cream Cake is a luscious Southern classic that combines a moist, buttery cake with a rich cream cheese frosting. Enhanced with shredded coconut and pecans, this dessert offers a delightful blend of textures and flavors. Each bite delivers a perfect harmony of sweetness, nuttiness, and creaminess, making it a crowd-pleaser for any occasion.

This multi-layered cake is not only stunning to behold but also incredibly satisfying to eat. Whether it’s for a birthday, holiday gathering, or simply to treat yourself, this Italian Cream Cake is sure to impress both in taste and presentation.

Why You’ll Love This Recipe

Rich and Flavorful: Packed with coconut, pecans, and cream cheese frosting for a burst of flavor.

Elegant Presentation: A beautiful multi-layered cake that’s perfect for special occasions.

Customizable: Add more decorations or adjust flavors to suit your preference.

Ingredients

For the Cake:

• 2 ⅔ cups (333 g) all-purpose flour

• 2 cups (400 g) granulated sugar

• 1 tsp baking powder

• ½ tsp baking soda

• 1 tsp table salt

• 12 tbsp (170 g) unsalted butter, softened and cut into 12 pieces

• 1 ½ cups (354 ml) buttermilk, room temperature

• 2 large eggs, room temperature

• 1 tsp vanilla extract

• ½ tsp almond extract

• 1 cup (120 g) sweetened shredded coconut

• 1 cup (113 g) coarsely chopped pecans

For the Frosting:

• 1 cup (226 g) unsalted butter, softened

• 16 oz (453 g) cream cheese, softened

• 1 ½ tsp vanilla extract

• ½ tsp almond extract

• ¼ tsp table salt

• 8 cups (1000 g) powdered sugar

For Decoration (Optional):

• ½ cup (60 g) pecan halves, finely chopped

• ½ cup (40 g) toasted coconut, finely chopped

Instructions

Step 1: Preheat and Prepare Pans

1. Preheat your oven to 350°F (175°C).

2. Grease and flour three 8-inch round cake pans. Line the bottoms with parchment paper for easy removal.

Step 2: Make the Cake Batter

1. In a large bowl or stand mixer, combine flour, sugar, baking powder, baking soda, and salt. Stir until well mixed.

2. With the mixer on medium speed, add softened butter one piece at a time, mixing until the batter resembles sandy crumbs.

3. In a separate bowl, whisk together buttermilk, eggs, vanilla extract, and almond extract.

4. Gradually add the wet ingredients to the dry ingredients, mixing on low speed until fully incorporated. Scrape down the sides and bottom of the bowl as needed.

5. Fold in shredded coconut and chopped pecans using a spatula.

Step 3: Bake the Cakes

1. Divide the batter evenly among the prepared pans.

2. Bake on the center rack for 30 minutes, or until a toothpick inserted into the center comes out clean or with moist crumbs.

3. Cool the cakes in their pans for 10–15 minutes, then run a knife around the edges and invert onto a cooling rack. Let cool completely before frosting.

Step 4: Prepare the Frosting

1. Beat softened butter and cream cheese in a large mixing bowl until creamy and smooth.

2. Add vanilla extract, almond extract, and salt, then mix to combine.

3. Gradually add powdered sugar on low speed until fully incorporated. Scrape down the bowl and mix again until the frosting is smooth and creamy.

Step 5: Assemble the Cake

1. Level the cake layers if necessary. Place one layer on a serving platter and spread a thick, even layer of frosting on top. Repeat with the second and third layers.

2. Apply a thin crumb coat of frosting around the entire cake and refrigerate for 15 minutes.

3. Remove the cake from the refrigerator and frost the outside evenly. Use the remaining frosting to pipe decorative swirls on top (optional).

Step 6: Decorate the Cake

1. Mix finely chopped pecans and toasted coconut. Press the mixture halfway up the sides of the cake for decoration.

2. Sprinkle the tops of the swirls lightly with the pecan-coconut mixture for an elegant finish.

Tips

Room Temperature Ingredients: Ensure all wet ingredients are at room temperature for a smoother batter and frosting.

Parchment Paper: Line the pans with parchment for easier removal and perfect layers.

Even Layers: Use a scale to divide the batter evenly among pans for uniform layers.

Make Ahead: Bake the cakes and prepare the frosting a day ahead. Assemble and frost the cake on the day of serving.

Storage Options

Refrigerator: Store the assembled cake in the refrigerator for up to 5 days. Allow to come to room temperature before serving.

Freezing: Wrap unfrosted cake layers tightly in plastic wrap and freeze for up to 2 months. Thaw in the refrigerator before frosting and assembling.

This Italian Cream Cake is an irresistible dessert that’s as impressive as it is delicious. With its delicate crumb, rich frosting, and decadent flavors, it’s sure to be the star of any celebration!

Banana Smoothie

0

A Banana Smoothie is a refreshing and creamy treat, perfect for breakfast, a midday snack, or even a healthy dessert. With a blend of ripe bananas, frozen pineapple, and creamy Greek yogurt, this smoothie strikes the perfect balance of sweetness and tanginess. The addition of a dash of cinnamon adds a warm, aromatic note, elevating the flavor profile of this simple yet delicious beverage.

This smoothie is not only satisfying but also highly nutritious. Packed with potassium from the bananas, protein from the Greek yogurt, and a dose of tropical flavor from the pineapple, it’s a wholesome drink that’s as good for your body as it is for your taste buds. Easy to make and customizable, it’s a recipe you’ll want to keep on repeat.

Why You’ll Love This Recipe

Quick and Easy: Ready in just minutes with minimal prep.

Nutrient-Packed: Loaded with natural sugars, protein, and vitamins.

Customizable: Adapt the recipe to suit your taste or dietary preferences.

Ingredients

• ½ cup milk (any kind)

• ½ cup plain Greek yogurt

• 2 large ripe bananas, frozen and sliced

• 1 cup frozen pineapple

• Dash of ground cinnamon

Optional: Whipped cream (like Reddi-Wip) for garnish

Instructions

Step 1: Prepare the Ingredients

1. Ensure the bananas are peeled, sliced, and frozen for a thick and creamy smoothie.

2. Measure out the milk, Greek yogurt, and frozen pineapple.

Step 2: Blend

1. Add the milk, Greek yogurt, frozen bananas, and frozen pineapple to a blender.

2. Blend on high speed until smooth and creamy, scraping down the sides if needed.

Step 3: Pour and Garnish

1. Pour the smoothie into glasses.

2. Garnish with a dollop of whipped cream, if desired, and a sprinkle of ground cinnamon for an extra touch of flavor.

Step 4: Serve

1. Serve immediately with a straw or spoon for a refreshing and satisfying treat.

Tips

Thicker Smoothie: Add less milk for a thicker, spoonable smoothie.

Extra Sweetness: Add a drizzle of honey or maple syrup if your bananas aren’t very ripe.

Add Greens: Blend in a handful of spinach or kale for a nutrient boost.

Storage Options

Refrigeration: Store any leftover smoothie in an airtight container in the refrigerator for up to 24 hours. Shake or stir well before drinking.

Freezing: Freeze the smoothie in ice cube trays for a grab-and-go option; simply re-blend with a splash of milk when ready to enjoy.

This Banana Smoothie is a creamy, tropical delight that’s both nourishing and delicious. Perfect for any time of day, it’s a simple recipe you’ll keep coming back to!

Sautéed Mushroom and Broccoli Stir-Fry

0

Sautéed Mushroom and Broccoli Stir-Fry is a quick, healthy, and versatile dish perfect for any meal. The earthy mushrooms and crisp-tender broccoli florets are cooked to perfection, then tossed in a simple soy sauce seasoning that highlights their natural flavors. This dish is great as a side or a light main course when paired with rice or noodles.

The beauty of this stir-fry lies in its simplicity. It requires minimal ingredients and can be customized with your favorite vegetables or spices. The optional addition of garlic adds a savory depth, while sesame seeds provide a delightful crunch and visual appeal. This recipe is perfect for weeknights when you need something fast, nutritious, and delicious.

Why You’ll Love This Recipe

Quick and Easy: Ready in under 20 minutes, making it perfect for busy nights.

Healthy and Light: Packed with fiber and nutrients from fresh broccoli and mushrooms.

Customizable: Easily adapt the recipe with additional veggies or spices to suit your taste.

Ingredients

• 300 grams broccoli, cut into florets

• 300 grams mushrooms, sliced

• 2 tablespoons olive oil

• 3 cloves garlic, minced (optional)

• 2 tablespoons soy sauce

• Salt and pepper, to taste

• Sesame seeds (optional, for garnish)

Instructions

Step 1: Prepare the Ingredients

1. Wash the broccoli florets thoroughly and slice the mushrooms.

2. Mince the garlic if you’re using it for added flavor.

Step 2: Heat the Oil

1. Heat 2 tablespoons of olive oil in a large skillet or wok over medium-high heat until shimmering.

Step 3: Sauté the Garlic (Optional)

1. If using garlic, add it to the skillet and sauté for about 30 seconds until fragrant. Be careful not to let it burn, as burnt garlic can taste bitter.

Step 4: Add the Broccoli

1. Add the broccoli florets to the skillet. Stir-fry for about 3-4 minutes, stirring occasionally, until the broccoli starts to soften but remains bright green.

Step 5: Add the Mushrooms

1. Add the sliced mushrooms to the skillet. Stir-fry for another 4-5 minutes, mixing frequently, until the mushrooms release their moisture and are cooked through, and the broccoli becomes tender.

Step 6: Season the Stir-Fry

1. Pour in 2 tablespoons of soy sauce and season with salt and pepper to taste.

2. Stir everything well to coat the vegetables evenly with the sauce.

Step 7: Finish Cooking

1. Allow the stir-fry to cook for an additional 1-2 minutes, letting the flavors meld together.

Step 8: Serve and Garnish

1. Remove the skillet from heat and transfer the stir-fry to a serving dish.

2. Sprinkle sesame seeds on top for a touch of nuttiness and garnish, if desired.

Tips

Choose Fresh Vegetables: Fresh broccoli and mushrooms ensure the best texture and flavor.

Adjust Cooking Time: Keep an eye on the broccoli to avoid overcooking—it should remain slightly crisp.

Enhance the Flavor: Add a teaspoon of sesame oil at the end of cooking for extra depth.

Storage Options

Refrigeration: Store leftovers in an airtight container in the refrigerator for up to 3 days.

Reheating: Reheat in a skillet over medium heat or microwave until warmed through.

Freezing: This stir-fry is best enjoyed fresh, as the texture of the vegetables may change when frozen.

Sautéed Mushroom and Broccoli Stir-Fry is a delicious and nutritious dish that pairs perfectly with any meal. Quick to make and bursting with flavor, it’s sure to become a staple in your kitchen!

Apple Pecan Cake with Caramel Glaze

0

Apple Pecan Cake with Caramel Glaze is a dessert that combines the warm, comforting flavors of fall with a decadently rich caramel topping. This moist cake features finely chopped Granny Smith apples for a tart contrast to the sweet pecans, making every bite a balance of flavor and texture. Finished with a buttery caramel glaze that seeps into the cake, this dessert is irresistible and perfect for any occasion, from holiday gatherings to casual family dinners.

The simplicity of the recipe, combined with its stunning presentation, makes it a go-to for bakers of all levels. The caramel glaze not only enhances the flavor but also elevates the cake’s appearance, making it a centerpiece-worthy dish. Serve it warm with a dollop of whipped cream or a scoop of vanilla ice cream for an unforgettable treat.

Why You’ll Love This Recipe

Rich and Moist Texture: The oil and apples keep the cake soft and moist, while the pecans add a delightful crunch.

Decadent Caramel Glaze: The buttery glaze enhances the flavor and provides a stunning finish.

Perfect for Fall: Featuring apples, pecans, and cinnamon, this cake is a celebration of autumn flavors.

Ingredients

For the Cake:

• 1½ cups cooking oil

• 2 cups granulated sugar

• 4 large eggs

• 3 cups all-purpose flour

• 1 teaspoon baking soda

• ½ teaspoon cinnamon

• 1 teaspoon salt

• 2 teaspoons vanilla extract

• 3½ cups Granny Smith apples, peeled and finely chopped (about 3-4 apples)

• 1 cup pecans, finely chopped

For the Caramel Glaze:

• ¾ cup unsalted butter (1½ sticks)

• 1 cup light brown sugar

• ¼ cup whole milk

• 1 teaspoon vanilla extract

Instructions

Step 1: Preheat and Prepare the Pan

1. Preheat your oven to 325°F (163°C).

2. Grease and flour a tube pan or two loaf pans thoroughly to prevent sticking.

Step 2: Mix the Batter

1. In a large bowl, combine the cooking oil, granulated sugar, and eggs. Beat until creamy and smooth.

2. In a separate medium bowl, sift together the flour, baking soda, cinnamon, and salt.

3. Gradually add the dry ingredients to the wet mixture, mixing until just combined. Avoid overmixing to ensure a tender cake.

Step 3: Add Flavorings and Add-ins

1. Stir in the vanilla extract for a rich aroma.

2. Fold in the chopped apples and pecans, ensuring they are evenly distributed for a consistent texture.

Step 4: Bake the Cake

1. Pour the batter into the prepared pan(s).

2. Bake for about 1 hour, checking for doneness at the 50-minute mark. Insert a toothpick into the center; if it comes out clean, the cake is ready.

3. Let the cake cool in the pan for 10-15 minutes before transferring it to a wire rack.

Step 5: Prepare the Caramel Glaze

1. In a small saucepan, melt the butter over low heat.

2. Stir in the brown sugar and milk, then bring the mixture to a boil over low heat. Reduce to a simmer and cook for 10 minutes, stirring constantly, until the glaze thickens slightly.

3. Remove from heat and stir in the vanilla extract. Let the glaze cool slightly until pourable.

Step 6: Glaze the Cake

1. Once the cake has cooled slightly, place it on a serving plate.

2. Pour the caramel glaze evenly over the cake, allowing it to drip down the sides for a beautiful presentation.

Tips

Use Fresh Apples: Granny Smith apples add a tart contrast to the sweet glaze. Other firm apples like Honeycrisp or Fuji work well too.

Chop Pecans Finely: Smaller pieces ensure they are evenly distributed in the cake.

Test for Doneness Early: Start checking the cake 5-10 minutes before the recommended bake time to avoid overbaking.

Storage Options

Room Temperature: Store the cake in an airtight container for up to 2 days.

Refrigeration: Extend freshness by storing in the refrigerator for up to 5 days. Bring to room temperature before serving.

Freezing: Wrap individual slices tightly in plastic wrap and store in a freezer-safe container for up to 2 months. Thaw in the refrigerator overnight before enjoying.

Apple Pecan Cake with Caramel Glaze is a dessert that impresses with its flavor and simplicity. Its moist, spiced layers and rich caramel topping make it the perfect centerpiece for your next gathering!

One Pot Broccoli Cheese Orzo

0

One Pot Broccoli Cheese Orzo is the perfect comfort food that combines creamy, cheesy goodness with the earthy freshness of broccoli. This hearty dish is a quick, delicious way to bring a nutritious yet indulgent meal to your table. Each bite is packed with tender orzo pasta, perfectly cooked broccoli, and a rich cheddar cheese sauce that ties everything together.

The beauty of this recipe lies in its simplicity: everything cooks in one pot, making cleanup a breeze. It’s an ideal option for busy weeknights or when you’re craving something warm and satisfying. With its blend of flavors and creamy texture, this dish is a hit with both kids and adults.

Why You’ll Love This Recipe

One-Pot Wonder: Minimal cleanup with everything cooked in a single pot.

Nutritious and Flavorful: Packed with fresh broccoli and the rich taste of sharp cheddar.

Comfort Food at Its Best: Creamy, cheesy, and perfect for cozy evenings.

Ingredients

• 8 ounces sharp cheddar cheese, finely shredded (about 2 packed cups)

• 1 pound fresh broccoli crowns

• 1 large yellow onion

• 6 cloves garlic, minced

• 2 tablespoons olive oil

• 1 3/4 teaspoons kosher salt, divided

• 1/2 teaspoon freshly ground black pepper, divided

• 1 1/2 teaspoons dry ground mustard

• 1/8 teaspoon ground cayenne pepper (optional)

• 1 pound dried orzo pasta

• 1 carton (32 ounces) low-sodium vegetable or chicken broth (approximately scant 4 cups)

• 1 cup whole or 2% milk

• 2 tablespoons unsalted butter

Instructions

Step 1: Prepare Cheese and Broccoli

1. Shred the sharp cheddar cheese using the smaller holes of a box grater to yield about 2 packed cups.

2. Trim the stem end from the broccoli crowns, separate the florets into 1 to 1 1/2-inch pieces, and dice the stems into 1/4 to 1/2-inch pieces.

Step 2: Chop the Aromatics

1. Finely chop the onion until you have about 2 cups.

2. Mince the garlic cloves to yield about 4 teaspoons.

Step 3: Sauté Vegetables

1. Heat the olive oil in a large Dutch oven or heavy-bottomed pot over medium heat until shimmering.

2. Add the chopped onion and diced broccoli stems, then season with 1 teaspoon of kosher salt and 1/4 teaspoon of black pepper. Stir occasionally and cook until the onion is translucent and stems are almost tender, about 5 to 7 minutes.

Step 4: Cook the Broccoli Florets

1. Add the broccoli florets to the pot, along with the remaining 3/4 teaspoon kosher salt, 1/4 teaspoon black pepper, ground mustard, and cayenne pepper (if using).

2. Stir well and cook until the florets are vibrant green, about 3 to 5 minutes.

Step 5: Add Garlic and Orzo

1. Stir in the minced garlic and cook, stirring constantly, for about 30 seconds until fragrant.

2. Add the dried orzo pasta, stirring constantly for about 1 minute to toast slightly.

Step 6: Deglaze and Simmer

1. Pour in the broth, stirring to combine and scraping up any browned bits from the pot’s bottom.

2. Bring the mixture to a boil over high heat, then reduce the heat to maintain a gentle simmer.

3. Stir frequently, cooking the orzo until almost al dente and most of the liquid is absorbed, about 6 to 8 minutes (or according to package instructions).

Step 7: Add Milk and Cheese

1. Stir in the milk and continue simmering until the orzo is al dente but still saucy, about 1 minute.

2. Remove the pot from heat and stir in the butter and shredded cheddar cheese until fully melted and the sauce is glossy.

Step 8: Rest and Serve

1. Let the dish sit for 5 minutes to allow the sauce to thicken.

2. Serve warm and enjoy the creamy, cheesy goodness!

Tips

Shred Your Own Cheese: Pre-shredded cheese may not melt as smoothly as freshly shredded.

Don’t Overcook the Broccoli: Cooking the florets just until vibrant green keeps their texture and flavor intact.

Adjust Spices: Add more cayenne for a spicier kick or omit it for a milder dish.

Storage Options

Refrigeration: Store leftovers in an airtight container in the refrigerator for up to 3 days.

Reheating: Gently reheat on the stove over low heat, adding a splash of milk or broth to maintain creaminess.

Freezing: This dish is best enjoyed fresh but can be frozen for up to 2 months. Thaw overnight in the refrigerator before reheating.

One Pot Broccoli Cheese Orzo is a creamy, cheesy delight that’s as easy to make as it is delicious. Perfect for weeknight dinners or cozy gatherings, it’s a dish that will quickly become a household favorite!

Homestyle Bacon and Cheese Quiche

0

Homestyle Bacon and Cheese Quiche is the ultimate comfort food, combining rich, creamy custard with savory bacon and melted cheddar cheese. Encased in a flaky pie crust, this quiche is perfect for brunch, lunch, or even dinner. Its versatility makes it a go-to recipe for hosting guests or enjoying a cozy meal at home. Pair it with a crisp salad or fresh fruit, and you’ve got a complete, satisfying dish.

The beauty of this quiche lies in its simplicity and customizability. The classic combination of smoky bacon and sharp cheddar cheese creates a harmonious flavor profile, while the creamy egg mixture binds everything together beautifully. You can also experiment with other ingredients like spinach, mushrooms, or different types of cheese to make it your own. Best of all, it’s a one-pan wonder that comes together quickly and bakes to golden perfection.

Why You’ll Love This Recipe

Classic Comfort Food: The timeless pairing of bacon and cheese is always a crowd-pleaser.

Perfect for Any Meal: Versatile enough for breakfast, brunch, or dinner.

Customizable: Add vegetables or swap out cheeses for a unique twist.

Ingredients

For the Quiche:

• 1 9-inch pie crust (homemade or store-bought)

• 8 slices bacon, chopped

• 1 cup shredded cheddar cheese

• 4 large eggs

• 1 cup heavy cream

• 1/2 cup whole milk

• 1/4 teaspoon salt

• 1/4 teaspoon black pepper

• 1/4 teaspoon ground nutmeg

For Garnish:

• 2 tablespoons fresh parsley, chopped (optional)

Instructions

Step 1: Preheat the Oven

1. Preheat your oven to 375°F (190°C).

2. If using a store-bought crust, fit it into a 9-inch pie pan. For a homemade crust, roll out the dough, press it into the pan, and crimp the edges for a decorative finish.

Step 2: Cook the Bacon

1. In a skillet over medium heat, cook the chopped bacon until crispy and golden brown.

2. Transfer the bacon to a paper towel-lined plate to remove excess grease.

Step 3: Assemble the Quiche Layers

1. Sprinkle half of the shredded cheddar cheese evenly over the bottom of the crust.

2. Spread the crispy bacon evenly on top of the cheese layer.

Step 4: Prepare the Egg Mixture

1. In a medium bowl, whisk together the eggs, heavy cream, whole milk, salt, pepper, and ground nutmeg until smooth and well combined.

Step 5: Pour and Top

1. Carefully pour the egg mixture over the cheese and bacon layers in the crust.

2. Sprinkle the remaining shredded cheddar cheese on top. Garnish with chopped parsley, if desired.

Step 6: Bake the Quiche

1. Place the quiche in the preheated oven and bake for 35-40 minutes, or until the top is golden brown and the center is set.

2. Test doneness by inserting a knife into the center—it should come out clean.

Step 7: Cool and Serve

1. Remove the quiche from the oven and let it cool slightly for 5-10 minutes before slicing.

2. Serve warm, accompanied by a fresh green salad or fruit for a balanced meal.

Tips

Blind Baking the Crust: For a crispier crust, blind bake the pie crust for 10 minutes before adding the filling.

Check for Doneness: The quiche is ready when the center no longer jiggles and a knife inserted comes out clean.

Make Ahead: You can prepare the quiche filling in advance and refrigerate it until ready to bake.

Storage Options

Refrigeration: Store leftover quiche in an airtight container in the refrigerator for up to 3 days.

Freezing: Freeze baked quiche slices in a freezer-safe container for up to 3 months. Reheat in the oven at 350°F until warmed through.

Reheating: Warm leftover quiche in a 300°F oven for about 10-15 minutes to maintain its texture.

Homestyle Bacon and Cheese Quiche is a rich, savory dish that’s easy to make and hard to resist. Perfect for serving guests or indulging in a quiet meal, it’s a recipe you’ll come back to time and time again.

Lobster Tail Recipe

0

Lobster tails are a luxurious and elegant seafood dish that is surprisingly easy to prepare. This recipe highlights the delicate, sweet flavor of lobster meat while enhancing it with a buttery, garlic-infused basting sauce. Perfect for special occasions, date nights, or whenever you want to treat yourself, these broiled lobster tails are a showstopper on any table.

The preparation method of butterflying the lobster tail not only makes it visually appealing but also ensures even cooking. The rich, seasoned butter mixture seeps into every bite, complemented by a hint of citrus from the lemon juice and the smoky warmth of paprika. With minimal effort and simple ingredients, you can create a restaurant-quality dish right in your kitchen.

Why You’ll Love This Recipe

Elegant Presentation: The butterflied lobster tails are as visually stunning as they are delicious.

Rich and Flavorful: The buttery garlic sauce enhances the natural sweetness of the lobster.

Quick to Prepare: With just a few steps, you can have gourmet lobster tails ready in under 30 minutes.

Ingredients

For the Lobster Tails:

• 4 (10-oz) lobster tails, fresh or thawed if frozen

For the Butter Basting Sauce:

• 1/4 cup salted butter, melted (1/2 stick)

• 2 cloves garlic, crushed

• 2 teaspoons lemon juice

• 1/2 teaspoon smoked paprika

• 1 pinch cayenne pepper (optional, for a subtle kick)

Instructions

Step 1: Thaw the Lobster Tails (If Needed)

1. If using frozen lobster tails, thaw them overnight in the refrigerator.

2. Alternatively, place them in a sealed bag and submerge them in cold water for about 30 minutes.

Step 2: Prepare the Oven

1. Preheat your oven to Broil mode at 500°F (260°C).

2. Adjust the oven rack so the lobster tails will sit 4 to 5 inches below the broiler.

Step 3: Butterfly the Lobster Tails

1. Using kitchen shears, cut lengthwise down the center of the shell, stopping just before the tail fin.

2. Gently spread the shell open and lift the lobster meat upward, separating it from the shell while keeping it attached at the tail fin.

3. Arrange the butterflied tails on a baking sheet.

Step 4: Make the Butter Sauce

1. In a small bowl, whisk together the melted butter, crushed garlic, lemon juice, smoked paprika, and cayenne pepper (if using).

Step 5: Baste the Lobster Tails

1. Using a pastry brush or spoon, generously coat the exposed lobster meat with the butter mixture.

2. Ensure each tail is evenly covered for maximum flavor.

Step 6: Broil the Lobster Tails

1. Place the baking sheet under the preheated broiler.

2. Broil until the lobster meat is opaque and lightly browned, about 1 minute per ounce. For 10-ounce lobster tails, this will take approximately 10 minutes. Watch closely to avoid overcooking.

Step 7: Serve the Lobster Tails

1. Remove the lobster tails from the oven and let them rest for 2-3 minutes.

2. Garnish with fresh herbs such as parsley or dill, and serve with extra melted butter for dipping if desired.

Tips

Thaw Properly: If using frozen lobster, ensure it is fully thawed to achieve even cooking.

Butterfly for Even Cooking: Cutting the shell and lifting the meat ensures a more consistent cook and a beautiful presentation.

Monitor Closely: Lobster cooks quickly, so keep a close eye on it to avoid overcooking. The meat should be opaque and slightly firm to the touch.

Storage Options

Refrigeration: Store leftover lobster tails in an airtight container in the refrigerator for up to 2 days.

Reheating: Gently reheat in a 300°F oven or microwave on low to avoid drying out.

Freezing: Freeze cooked lobster tails in a freezer-safe container for up to 3 months. Thaw and reheat as needed.

This Lobster Tail recipe offers an easy yet impressive way to enjoy the luxurious flavors of lobster. Perfectly broiled and basted in a garlic-butter sauce, it’s a dish that turns any meal into a special occasion.

Butter Pecan Cookies

0

Butter Pecan Cookies are a delightful combination of buttery richness and nutty sweetness, making them an irresistible treat for cookie lovers. Each bite features a tender, melt-in-your-mouth texture with the crunch of toasted pecans, creating a balance of flavors that’s both comforting and satisfying. Whether you’re enjoying these cookies with a cup of coffee or sharing them as part of a dessert platter, they’re sure to become a new favorite.

This recipe is simple enough for beginner bakers while delivering a professional-level result. Toasted pecans are mixed into a buttery cookie dough, and each cookie is topped with a pecan half for an elegant finish. These cookies are perfect for holiday baking, gift-giving, or anytime you crave a classic treat with a nutty twist.

Why You’ll Love This Recipe

Rich and Buttery Flavor: The butter base makes these cookies irresistibly tender and flavorful.

Perfectly Nutty: Chopped pecans add crunch and depth, while pecan halves on top make for a beautiful presentation.

Easy to Make: With simple ingredients and straightforward steps, these cookies are a joy to bake.

Ingredients

For the Cookie Dough:

• 1 cup chopped pecans

• 7 tablespoons unsalted butter

• 1/3 cup granulated sugar

• 1 cup brown sugar

• 2 eggs

• 1 tablespoon pure vanilla extract

• 2 cups all-purpose flour

• 1/2 teaspoon baking soda

• A pinch of salt

For the Topping:

• Pecan halves

Instructions

Step 1: Preheat the Oven

1. Preheat your oven to 350°F (175°C).

2. Line two baking sheets with parchment paper to prevent sticking and ensure easy cleanup.

Step 2: Toast the Pecans

1. Spread the chopped pecans in a single layer on a baking sheet.

2. Toast in the preheated oven for 5-7 minutes, or until fragrant and lightly browned. Set aside to cool.

Step 3: Mix the Wet Ingredients

1. In a large mixing bowl, cream together the butter, granulated sugar, and brown sugar using an electric mixer. Beat until the mixture is light and creamy, about 2-3 minutes.

2. Add the eggs one at a time, followed by the vanilla extract. Beat for another 2 minutes until fully incorporated.

Step 4: Combine the Dry Ingredients

1. In a separate bowl, whisk together the flour, baking soda, and a pinch of salt.

2. Gradually add the dry ingredients to the wet mixture, mixing on low speed until just combined.

Step 5: Add the Pecans

1. Gently fold in the toasted chopped pecans, ensuring they are evenly distributed throughout the dough.

Step 6: Shape the Cookies

1. Use a medium cookie scoop or a tablespoon to form dough balls.

2. Place the dough balls onto the prepared baking sheets, spacing them about 2 inches apart.

Step 7: Add the Topping

1. Press a pecan half gently into the top of each dough ball.

Step 8: Bake the Cookies

1. Bake in the preheated oven for 10-15 minutes, or until the edges are golden brown and the centers are set.

2. Remove from the oven and allow the cookies to cool on the baking sheet for 2-3 minutes before transferring them to a wire rack to cool completely.

Tips

Room Temperature Ingredients: Ensure the butter and eggs are at room temperature for easier mixing and a smoother dough.

Toasting the Pecans: Toasting enhances the nutty flavor, so don’t skip this step!

Check for Doneness: Look for lightly golden edges as a sign the cookies are ready.

Storage Options

Room Temperature: Store cookies in an airtight container for up to 5 days.

Freezing Dough: Freeze unbaked cookie dough balls on a baking sheet, then transfer to a freezer-safe bag for up to 3 months. Bake directly from frozen, adding an extra 1-2 minutes to the bake time.

Freezing Baked Cookies: Store baked cookies in a freezer-safe container for up to 2 months. Thaw at room temperature before serving.

Butter Pecan Cookies are the perfect blend of buttery sweetness and nutty goodness. Share them with loved ones or savor them as a comforting treat any time of year!

Deviled Ham Salad

0

Deviled Ham Salad is a delightful spread combining finely chopped ham, creamy mayonnaise, and tangy sweet pickle relish. This retro classic is versatile, easy to prepare, and bursting with flavor. Perfect as a filling for sandwiches or paired with premium crackers, it’s an excellent choice for picnics, quick lunches, or a sophisticated appetizer.

This salad offers a harmonious balance of creamy and tangy notes, making it a crowd-pleaser. With just three main ingredients and a few minutes of preparation, this dish is as simple as it is delicious.

Why You’ll Love This Recipe

Quick and Simple: Takes minutes to make with minimal ingredients.

Versatile: Serve it as a spread, filling, or dip.

Perfect Make-Ahead Dish: Stays fresh for up to a week when stored properly.

Ingredients

• 3 ½ to 4 cups finely chopped ham

• ½ cup premium mayonnaise

• ⅓ cup sweet pickle relish

Instructions

Step 1: Combine the Ingredients

1. In a large mixing bowl, add the finely chopped ham, mayonnaise, and sweet pickle relish.

2. Stir the ingredients together until the mixture is well blended and creamy.

Step 2: Adjust to Taste

1. Taste the salad and adjust as needed.

• For a creamier texture, add more mayonnaise.

• For a sweeter or tangier flavor, incorporate additional sweet pickle relish.

Step 3: Serve and Enjoy

1. Serve immediately as a spread for sandwiches or with crackers.

2. For a more elegant presentation, garnish with fresh parsley or a sprinkle of paprika.

Tips

Chop Finely: Ensure the ham is finely chopped for a smoother, more cohesive texture.

Customize the Flavor: Add a pinch of Dijon mustard, hot sauce, or smoked paprika for a flavor twist.

Premium Ingredients: Use high-quality mayonnaise and ham for the best taste.

Storage Options

Refrigeration: Store the Deviled Ham Salad in an airtight container in the refrigerator for up to one week.

Serving Again: Stir before serving to redistribute any liquid and maintain uniformity.

Deviled Ham Salad is a nostalgic yet versatile dish that’s as delicious as it is simple to prepare. Perfect for any occasion, it’s a timeless classic you’ll enjoy time and again!