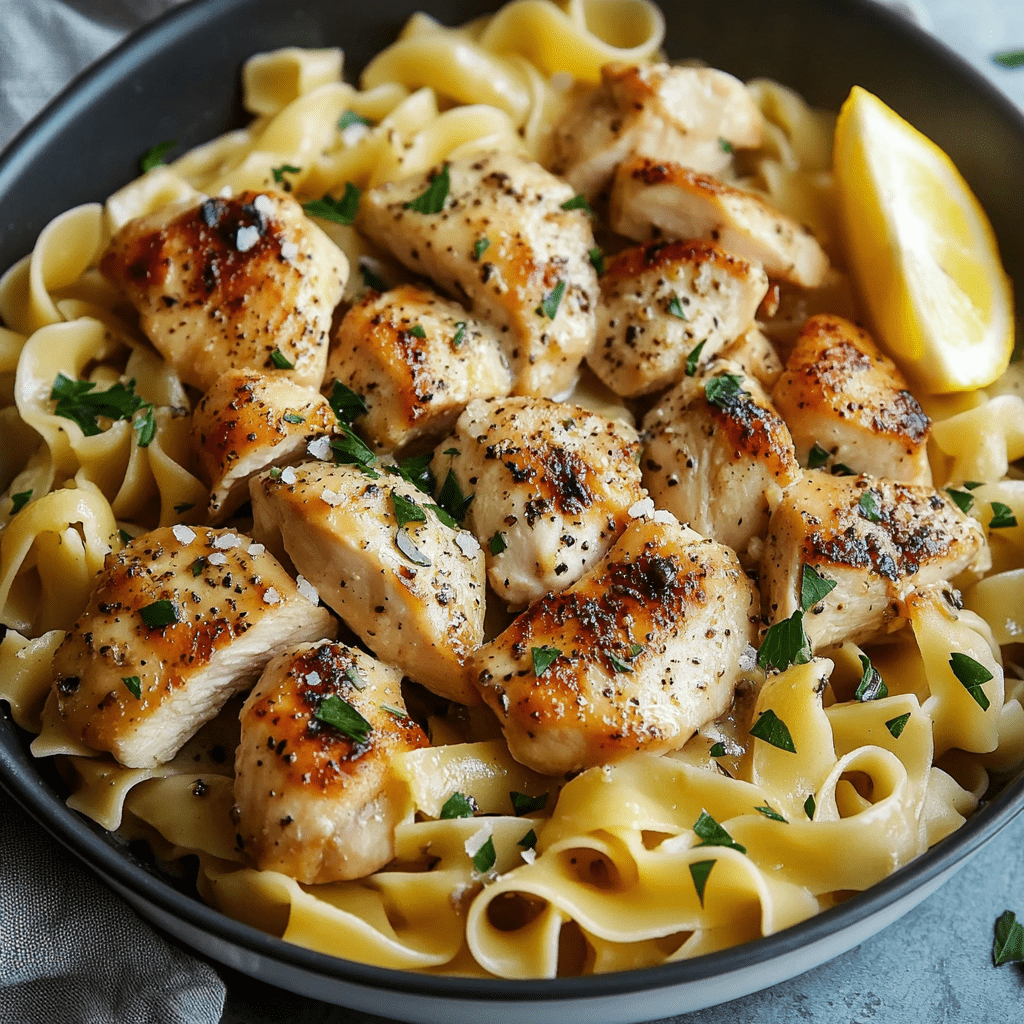
Mexican Shredded Beef

0

Transform a simple chuck roast into a vibrant and flavorful Mexican Shredded Beef using your Crock Pot. This recipe infuses the meat with bold spices and a hint of lime, making it a versatile component for tacos, burritos, or even as a hearty filling for enchiladas. The slow cooking process ensures that every strand of beef is tender and infused with rich, spicy flavors, making it a crowd-pleaser at any gathering or a comforting family dinner.

The preparation involves a straightforward rub and slow-cook method, which means minimal hands-on time and maximum flavor. This dish not only fills your kitchen with an enticing aroma but also provides a satisfying meal that’s both nourishing and delightfully tasty.

Why You’ll Love This Recipe:

  • Effortlessly Flavorful: The combination of spices and slow cooking creates deep, complex flavors in the beef.
  • Versatile: This shredded beef can be used in a variety of dishes, adapting to whatever meal you’re in the mood for.
  • Make-Ahead Friendly: Perfect for meal prepping as it keeps well and even tastes better the next day.

Ingredients:

Dry Rub Spices:

  • 2 tablespoons chili powder
  • ½ tablespoon onion powder
  • 1-2 teaspoons salt (adjust to preference, typically ½ teaspoon per pound of beef)
  • 2 teaspoons cumin
  • 2 teaspoons garlic powder
  • 1 teaspoon ground black pepper
  • ½ teaspoon cayenne pepper (optional, for added heat)
  • ½ teaspoon paprika

Other:

  • 3.5-4 lb chuck roast, boneless
  • ½ cup beef broth
  • 2 tablespoons tomato paste
  • 1 lime, juiced

Instructions:

  1. Prepare the Spice Mix: Combine all the dry rub spices in a small bowl and set aside.
  2. Mix Liquids: In another bowl, whisk together the beef broth and tomato paste until well blended.
  3. Season the Meat: Place the chuck roast in the Crock Pot insert. Rub half of the spice mixture onto the top of the roast, flip, and apply the remaining spices to the other side and edges.
  4. Add Broth Mixture: Pour the broth and tomato paste mixture over the top and sides of the roast.
  5. Cook: Cover and set the Crock Pot to low. Cook for 8 hours, or until the meat is fork-tender and can be easily shredded.
  6. Shred the Beef: Remove the roast from the Crock Pot and place it in a large bowl, leaving the broth behind. Shred the meat with two forks, discarding any excess fat.
  7. Finish with Lime: Return the shredded beef to the Crock Pot. Squeeze in the lime juice and stir. Taste and adjust the salt if necessary.
  8. Serve: The beef is now ready to be served. For a drier consistency, keep the beef in the bowl and add reserved broth to achieve the desired flavor and moisture.

Storage Options:

  • Refrigerator: Store in an airtight container for up to 5 days.
  • Freezer: Freeze in a sealed container for up to 3 months. Thaw in the refrigerator before reheating.

Tips:

  • For Best Results: Let the beef marinate with the spice rub overnight before cooking to deepen the flavors.
  • Serving Suggestions: Use this shredded beef in tacos, enchiladas, over rice, or in a beef salad.
  • Add More Heat: If you prefer a spicier dish, increase the amount of cayenne pepper or add diced jalapeños to the Crock Pot.

No Bake Peanut Butter Pie

0

Indulge in a delightful No Bake Peanut Butter Pie that marries the creamy texture of peanut butter with the crunch of pecans and chocolate, all wrapped up in a lusciously smooth filling. This dessert is not only scrumptious but also keto-friendly, making it a guilt-free treat for those watching their carb intake. The combination of rich flavors and no-bake convenience makes this pie a perfect choice for any occasion, from family gatherings to festive celebrations.

This pie stands out with its easy preparation and delectable layers, ensuring that even novice bakers can impress. The use of sugar-free ingredients like monkfruit sweetener and Lily’s dark chocolate chips keeps it within the keto guidelines without compromising on taste.

Why You’ll Love This Recipe:

  • No-Bake Convenience: No oven time required, which is perfect for warm days or when you want a quick dessert.
  • Keto-Friendly: Satisfies sweet cravings without the carb load, making it ideal for those on a ketogenic diet.
  • Rich and Creamy: The creamy texture of the filling combined with the crunchy crust offers a satisfying contrast.

Ingredients:For the Keto Crust:

  • 1 1/2 cups Highkey Mini Chocolate Chip Cookies
  • 1 cup roasted pecans, crushed
  • 4 tablespoons butter, melted

For the Pie Filling:

  • 1 cup heavy cream
  • 8 ounces cream cheese, room temperature
  • 1 1/2 cups creamy peanut butter
  • 1 cup powdered monkfruit sweetener
  • 1 teaspoon vanilla extract

For the Topping:

  • 1 cup heavy cream
  • 1 cup Lily’s sugar free dark chocolate chips

Instructions:

  1. Make the crust: Add the cookies, pecans, and melted butter to a food processor and pulse until it resembles a graham cracker crust. Line a 9-inch springform pan with parchment paper, pour the crust into the bottom of the pan, and pack very tightly. Place in the freezer while you prepare the filling.
  2. Whip the cream: In a large mixing bowl, beat the heavy whipping cream with electric beaters until stiff peaks form (this will take 4-6 minutes). Set the bowl in the fridge.
  3. Make the filling: In a second mixing bowl, beat the cream cheese, monkfruit sweetener, peanut butter, and vanilla extract until creamy. Add the whipped cream to the first bowl and beat on low until the mixture is completely smooth. Scrape the filling into the crust.
  4. Make the ganache: Add the chopped chocolate chips and piping hot heavy cream together and stir until a creamy ganache forms. Carefully pour it over the pie and chill at least 12 hours.

Storage Options:

  • Refrigerator: Keep the pie refrigerated and consume within 5 days for best freshness and texture.
  • Freezer: You can freeze the pie for up to a month. Thaw in the refrigerator overnight before serving.

Tips:

  • Smooth Filling: Ensure the cream cheese is at room temperature before mixing to avoid lumps in your filling.
  • Enhance the Flavor: Consider adding a sprinkle of sea salt over the ganache topping to enhance the chocolate and peanut butter flavors.
  • Decorative Touch: Garnish with chopped peanuts or a drizzle of peanut butter for an extra touch of elegance before serving.

This No Bake Peanut Butter Pie is not just a dessert, it’s a statement piece that’s sure to wow your guests and satisfy your sweet tooth without straying from your dietary goals. Enjoy the harmony of flavors and textures that this remarkable pie brings to your table.

Sausage and Pepperoni Pizza Pie

0

Imagine a dish where the crispy, flaky layers of a pie meet the cheesy, meaty goodness of a classic pizza. This Sausage and Pepperoni Pizza Pie does just that, marrying the hearty fill of traditional pizza toppings with the elegant presentation of a pie. It’s an indulgent twist on two family favorites, perfect for shaking up your dinner routine or impressing guests at a casual gathering.

The use of a pie crust as the base allows for a deeper filling, giving each slice a robust layer of sausage, pepperoni, vegetables, and melting cheese. This recipe is fantastic for anyone looking for a satisfying meal that combines the familiar flavors of pizza with a fun and festive pie format. It’s also a great way to involve kids in the kitchen, letting them help with assembling the layers of this delicious dish.

Why You’ll Love This Recipe:

  • Comforting and Hearty: It’s packed with flavorful meats and vegetables, all encased in a golden, flaky crust.
  • Perfect for Sharing: This pie is a showstopper at gatherings, making it a great choice for social dinners or parties.
  • Customizable: Easily adaptable with different meats, veggies, or even a vegetarian version, making it versatile for any taste.

Ingredients:

  • 1 package refrigerated pie crusts or homemade pie dough
  • 2 tbsp olive oil (divided for brushing and sautéing)
  • 1/2 onion, chopped
  • 2 cloves garlic, minced
  • 1 pound ground sausage or Italian sausage, casing removed
  • 1 cup pizza sauce
  • 1 cup mozzarella cheese, shredded
  • 1/2 cup pepperoni slices
  • 1/2 cup bell peppers, diced
  • 1/2 cup mushrooms, sliced
  • 1 tsp Italian seasoning
  • Salt and pepper to taste
  • Extra mozzarella cheese for topping
  • Additional pepperoni slices for topping

Instructions:

Preheat your oven to 375°F (190°C).

Roll out the pie crust and fit it into a deep pie dish. Brush with olive oil. Pre-bake for 8 minutes, then set aside to cool slightly.

In a large skillet, heat olive oil over medium heat. Sauté the onion and garlic until translucent. Add the sausage, cooking until browned and crumbly. Drain excess fat.

Stir in pizza sauce, mozzarella cheese, pepperoni, bell peppers, mushrooms, Italian seasoning, salt, and pepper. Cook until combined and cheese begins to melt.

Spoon the filling into the pre-baked crust. Top with extra cheese and pepperoni. Optionally, add a top crust, sealing edges and cutting slits for steam.

Bake for 25-30 minutes or until crust is golden and filling is bubbly.

Allow to cool for a few minutes before slicing and serving warm.

Storage Options:

  • Refrigerator: Keep leftovers in an airtight container for up to 3 days. Reheat in the oven to preserve the crust’s texture.
  • Freezer: Freeze the whole pie or individual slices in airtight containers for up to 1 month. Reheat after thawing in the refrigerator.

Tips:

  • Crust Choice: For a lighter option, consider using a puff pastry sheet as an alternative to traditional pie crust.
  • Spice it Up: Add a sprinkle of chili flakes or a dash of hot sauce to the filling for a spicy kick.
  • Make it Vegetarian: Substitute the meats with a mix of additional vegetables such as olives, artichokes, and zucchini for a vegetarian version without compromising the hearty nature of the dish.

Philly Cheesesteak Baked Potatoes

0

These Philly Cheesesteak Baked Potatoes are a hearty twist on the classic sandwich, combining the rich flavors of a Philly cheesesteak with the comforting texture of baked potatoes. This dish is perfect for a satisfying dinner, blending the tender juiciness of ribeye steak with the robust flavors of onions and peppers, all topped with melty provolone cheese. It’s a full meal packed into a potato!

Why You’ll Love This Recipe:

  • Comforting and Hearty: Perfect for a filling meal that satisfies cheesesteak cravings in a unique way.
  • Customizable: Easy to adapt with different cheeses or additional toppings like mushrooms or jalapeños.
  • Perfect for Any Occasion: Ideal for a family dinner, game day, or any gathering that calls for a robust, flavorful dish.

Ingredients:

  • 4 large russet potatoes
  • 1 lb. ribeye steak, thinly sliced
  • 1 onion, thinly sliced
  • 1 green bell pepper, sliced
  • 1 cup provolone cheese, shredded
  • Salt and pepper to taste

Optional Ingredients for Extra Flavor:

  • 2 cloves garlic, minced
  • 1 teaspoon paprika
  • 1 tablespoon olive oil
  • Fresh parsley, chopped (for garnish)

Instructions:

1. Preheat and Prepare the Potatoes:

  • Preheat Oven: Start by heating your oven to 400°F (200°C) for optimal baking.
  • Prepare the Potatoes: Clean and dry the potatoes. Pierce them with a fork to allow steam to escape.
  • Bake: Place the potatoes directly on the oven rack or on a baking sheet and bake for 45-60 minutes, until tender.

2. Cook the Steak and Vegetables:

  • Prepare Steak: Slice the ribeye thinly against the grain for tenderness.
  • Heat Skillet: Warm the olive oil in a large skillet over medium-high heat.
  • Cook Steak: Season the steak with salt and pepper, then cook until browned. Remove and set aside.
  • Sauté Vegetables: In the same skillet, add the onions and bell peppers (and garlic and paprika if using), cooking until soft.

3. Assemble the Baked Potatoes:

  • Slice and Fluff: Once baked, slit the top of each potato and fluff the insides with a fork.
  • Add Steak Mixture: Spoon the steak and vegetable mixture into each potato.
  • Add Cheese: Top with shredded provolone cheese.

4. Melt the Cheese:

  • Bake Again: Return the potatoes to the oven for 5-10 minutes, or until the cheese is melted and bubbly.
  • Optional Broil: For a crispy cheese topping, broil for 1-2 minutes, watching carefully to avoid burning.

5. Garnish and Serve:

  • Garnish: Sprinkle with chopped parsley for a fresh touch.
  • Serve: Enjoy hot, possibly with a side salad or steamed vegetables for a balanced meal.

Storage Tips:

  • Refrigerator: Store any leftovers in the fridge, covered, for up to 3 days.
  • Reheating: Reheat in the oven or microwave until warm throughout.

These Philly Cheesesteak Baked Potatoes offer a deliciously satisfying twist on two classic dishes, making them the perfect choice for a comforting and filling meal.

Heavenly Pineapple Cheeseball

0

This Heavenly Pineapple Cheeseball combines the creamy texture of cream cheese with the tropical tang of pineapple, all wrapped in a nutty pecan exterior. This recipe is perfect for gatherings and parties, offering a unique twist on the traditional cheeseball with its delightful mix of flavors and textures. The addition of green onions, green pepper, and a duo of seasonings enhances the freshness and savoriness, making it a standout appetizer that’s both easy to make and incredibly satisfying.

Why You’ll Love This Recipe:

  • Unique Flavor Combination: The pineapple adds a sweet tang that pairs wonderfully with the creamy cheese and savory seasonings.
  • Perfect for Parties: It’s an easy-to-make, portable, and attractive addition to any party spread.
  • Versatile: Serve with a variety of crackers or even sliced baguette for dipping.

Ingredients:

  • 2 packages of cream cheese, softened and room temperature
  • 1 can crushed pineapple, well-drained
  • ½ cup chopped green onions
  • ½ cup chopped green pepper
  • 1 tsp seasoning salt
  • 1 tsp lemon pepper seasoning
  • 2 cups pecans, finely chopped
  • Assorted crackers, for serving

Instructions:

1. Prepare the Cream Cheese:

  • In a large bowl, beat the cream cheese until smooth, ensuring there are no lumps for a creamy texture.

2. Add Vegetables and Pineapple:

  • Gently fold in the chopped green onions and green pepper along with the well-drained pineapple into the cream cheese. It’s crucial that the pineapple is thoroughly drained to prevent the cheeseball from becoming too moist.

3. Season:

  • Stir in the seasoning salt and lemon pepper seasoning, mixing well to distribute the flavors evenly throughout the cream cheese mixture.

4. Add Pecans:

  • Mix in ½ cup of the chopped pecans. These will add a slight crunch and nuttiness to the inside of the cheeseball.

5. Form the Cheeseball:

  • Lay out a sheet of plastic wrap and transfer the cheese mixture onto it. Use the plastic wrap to help shape the mixture into a ball. This method keeps your hands clean and helps achieve a more uniform shape.

6. Chill:

  • Refrigerate the cheeseball overnight to allow the flavors to meld together and the ball to firm up, making it easier to handle.

7. Coat with Pecans:

  • Just before serving, roll the cheeseball in the remaining 1½ cups of chopped pecans until fully coated. This gives the cheeseball its classic nutty exterior.

8. Serve:

  • Place the cheeseball on the center of a serving plate and surround it with an assortment of crackers. This presentation makes it easy for guests to slice and serve themselves.

Storage Options:

  • Refrigerator: The cheeseball can be stored in the refrigerator for up to 1 week. Wrap it tightly in plastic wrap to keep it fresh.
  • Freezer: For longer storage, you can freeze the cheeseball (without the pecan outer layer) for up to 1 month. Thaw in the refrigerator overnight before rolling in pecans and serving.

Tips:

  • Enhance Texture: For an extra crunch, consider adding a small amount of chopped celery or bell pepper.
  • Additional Flavor: If you like a little heat, a dash of cayenne pepper or diced jalapeño can be mixed into the cheeseball for a spicy kick.

This Heavenly Pineapple Cheeseball is not just an appetizer but a conversation starter, perfect for any occasion where you want to impress with minimal effort. Its combination of flavors and textures will leave your guests coming back for more. Enjoy the creamy, tangy, and nutty profiles that make this cheeseball truly heavenly.

Strawberry Cream Cheese Icebox Cake

0

This Strawberry Cream Cheese Icebox Cake is a delightful no-bake dessert that layers graham crackers, creamy cheesecake filling, and fresh strawberries. It’s perfect for summer gatherings or any time you need a refreshing, sweet treat without turning on the oven. The combination of sweetened condensed milk, cheesecake pudding, and strawberries creates a delicious harmony of flavors and textures that’s both satisfying and visually appealing.

Why You’ll Love This Recipe:

  • No-Bake Ease: Perfect for hot days when you want a fabulous dessert without the heat of baking.
  • Creamy and Fruity: Combines the richness of cream cheese and the brightness of fresh strawberries.
  • Make-Ahead Friendly: Great for preparing a day ahead, making it convenient for entertaining.

Ingredients:

  • 2 pounds strawberries, sliced
  • 2 sleeves graham crackers
  • 1 (8-ounce) package cream cheese, room temperature
  • 1 (14-ounce) can sweetened condensed milk
  • 2 (3.4-ounce) packages instant cheesecake flavored pudding
  • 3 cups milk
  • 1 (12-ounce) carton Cool Whip, divided

Directions:

Step 1: Prepare the Strawberries

  • Clean and Slice: Rinse the strawberries under cold water, pat dry, and slice into 1/4-inch pieces. Set aside.

Step 2: Prepare the Baking Dish

  • Layer Graham Crackers: Line a 3-quart 13×9-inch baking dish with graham crackers, breaking as necessary to fit.

Step 3: Prepare the Cream Cheese Mixture

  • Mix Ingredients: In a large bowl, beat the cream cheese and sweetened condensed milk until smooth.
  • Add Pudding and Milk: Incorporate the pudding mixes and milk, mixing until thickened.
  • Fold in Cool Whip: Gently fold in 2 cups of Cool Whip until combined.

Step 4: Assemble the Cake

  • First Layer: Spread half of the cream cheese mixture over the graham crackers.
  • Strawberry Layer: Place a layer of sliced strawberries over the cream.
  • Second Graham Layer: Add another layer of graham crackers.
  • Remaining Cream Mixture: Top with the remaining cream cheese mixture.
  • Final Strawberry Layer: Finish with a layer of strawberries.

Step 5: Refrigerate

  • Chill: Cover and refrigerate for 6 to 8 hours, allowing the cake to set.

Step 6: Final Touches

  • Check Moisture: Before serving, pat any excess moisture from the strawberries.
  • Top with Cool Whip: Spread the remaining Cool Whip over the top.
  • Add Graham Cracker Crumbs: Sprinkle crushed graham crackers for added texture.

Storage Options:

  • Store covered in the refrigerator and consume within 3 days for best freshness and texture.

Tips:

  • Enhanced Flavor: For an extra touch, drizzle a little strawberry sauce or sprinkle mini chocolate chips over the final layer of Cool Whip before adding the graham cracker crumbs.
  • Serving: This cake is best served chilled and can be cut into squares for easy serving.

4-Ingredient Lemon Cream Cheese Dump Cake

0

This 4-Ingredient Lemon Cream Cheese Dump Cake is the epitome of simplicity meets deliciousness. Combining the tangy taste of lemon with the rich texture of cream cheese, this cake is a delightfully refreshing dessert that requires minimal effort. Perfect for quick gatherings or a sudden dessert craving, this cake ensures a hassle-free baking experience with mouthwatering results.

Why You’ll Love This Recipe:

  • Effortless Preparation: With just four ingredients, the preparation process is straightforward and perfect for those with a busy schedule.
  • Delightfully Creamy: The cream cheese enhances the texture, making it rich and velvety.
  • Perfectly Balanced Flavor: The lemon provides a bright, tangy contrast to the sweet, buttery crust.

Ingredients:

  • 1 box yellow cake mix
  • 1 can (21 ounces) lemon pie filling
  • 1 package (8 ounces) cream cheese, softened
  • 1/2 cup (1 stick) unsalted butter, melted

Instructions:

1. Preparation:

Preheat the Oven: Begin by heating your oven to 350°F (175°C) to ensure it reaches the correct temperature for baking.

Grease the Baking Dish: Lightly grease a 9×13-inch baking dish with cooking spray or a thin layer of butter to prevent sticking and facilitate easy serving.

2. Make the Crumb Mixture:

Combine Cake Mix and Butter: In a large mixing bowl, stir together the yellow cake mix and melted butter until the mixture is crumbly, resembling coarse crumbs.

3. Layer the Crumb Mixture:

Form the Base Layer: Press half of the crumb mixture evenly into the bottom of your prepared baking dish to form a solid base.

4. Prepare the Lemon Cream Cheese Filling:

Mix Cream Cheese and Lemon Pie Filling: In a separate bowl, blend the softened cream cheese with the lemon pie filling until smooth, ensuring there are no lumps.

5. Assemble the Cake:

Spread the Filling: Evenly spread the lemon cream cheese mixture over the prepared crumb base in the baking dish.

6. Add the Final Crumb Layer:

Top with Remaining Crumbs: Sprinkle the rest of the crumb mixture over the filling to create a sweet, crumbly topping.

7. Bake the Cake:

Bake: Place the dish in the oven and bake for 40-45 minutes, or until the topping is golden brown and the filling is bubbly and set.

8. Cool and Serve:

Cool: Allow the cake to cool slightly in the pan, which helps it set and makes it easier to slice.

Serve: Cut the cake into squares and serve warm or at room temperature. Optional garnishes include a dusting of powdered sugar, whipped cream, or fresh berries for an extra touch of elegance.

Storage Options:

  • Refrigerator: Store leftovers in an airtight container in the refrigerator for up to 5 days.
  • Freezer: For longer storage, freeze the cake for up to 1 month. Thaw in the refrigerator before serving.

Tips:

  • Smooth Filling: Ensure the cream cheese is at room temperature before mixing to avoid lumps in your filling.
  • Crisp Topping: For a crisper topping, you can broil the cake for 1-2 minutes at the end of baking, watching closely to prevent burning.

This Lemon Cream Cheese Dump Cake is a breeze to make and offers a delightful combination of flavors that are sure to please any crowd. Its simplicity and delicious taste make it a go-to recipe for any occasion.

Decadent German Chocolate Pecan Pound Cake Delight

0

This Decadent German Chocolate Pecan Pound Cake Delight is a luxurious dessert that combines the rich flavors of German chocolate and pecans in a moist, dense pound cake. Topped with a silky German chocolate pecan glaze, this cake is sure to satisfy your sweet tooth and impress at any gathering. It’s a perfect blend of nutty and chocolatey notes, making it a delightful treat for any occasion.

Why You’ll Love This Recipe:

  • Rich Flavor: The German chocolate enhances the depth of the cake’s flavor, while the pecans add a delightful crunch.
  • Elegant Presentation: Drizzled with a luscious glaze and sprinkled with pecans, it’s as beautiful as it is delicious.
  • Perfect for Celebrations: Ideal for birthdays, holidays, or any special event where you want to leave a lasting impression.

Ingredients:

For the Cake:

  • 1 cup unsalted butter, softened
  • 2 cups white sugar
  • 4 eggs
  • 1 tsp vanilla extract
  • 2 cups all-purpose flour
  • ½ tsp baking powder
  • ¼ tsp salt
  • 1 cup sour cream
  • 1 cup German chocolate, chopped
  • 1 cup pecans, chopped and toasted

For the German Chocolate Pecan Glaze:

  • 1 cup German chocolate, chopped
  • ½ cup heavy cream
  • ½ cup pecans, chopped and toasted

Directions:

Preheat Oven:
Preheat the oven to 325°F (165°C). Grease and flour a 10-inch bundt pan to prepare it for baking.

Cream Butter and Sugar:
In a large bowl, cream together the softened butter and white sugar until light and fluffy, creating a perfect base for the cake.

Add Eggs and Vanilla:
Beat in the eggs one at a time, incorporating fully after each addition. Stir in the vanilla extract for flavor.

Combine Dry Ingredients:
In a separate bowl, whisk together the flour, baking powder, and salt. This mixture will help create the structure of the cake.

Mix Batter:
Gradually add the dry ingredients to the butter mixture, alternating with the sour cream. Mix until just combined to keep the cake tender.

Fold in Chocolate and Pecans:
Gently fold in the chopped German chocolate and toasted pecans, distributing them evenly throughout the batter.

Prepare for Baking:
Pour the batter into the prepared bundt pan, smoothing the top to ensure an even bake.

Bake:
Bake in the preheated oven for 60-70 minutes, or until a toothpick inserted into the center comes out clean. The baking time ensures a perfectly moist cake.

Cool:
Allow the cake to cool in the pan for 10 minutes before transferring it to a wire rack to cool completely. This step helps in handling the cake without breaking.

For the German Chocolate Pecan Glaze:

Heat Cream:
In a small saucepan, heat the heavy cream until it just begins to simmer, being careful not to let it boil over.

Melt Chocolate:
Remove the saucepan from heat and add the chopped German chocolate. Allow it to sit for a few minutes, then stir until the mixture is smooth and creamy.

Glaze the Cake:
Drizzle the warm glaze over the cooled pound cake, ensuring it covers the surface and drips down the sides for a stunning presentation. Sprinkle with toasted pecans for added texture and flavor.

Enjoy!
Serve this decadent cake at room temperature to allow the flavors to shine. It’s perfect with a cup of coffee or as the grand finale to a special meal.

Storage Options:
Store any leftovers in an airtight container at room temperature for up to 3 days, or refrigerate for up to a week. Ensure the cake is covered to retain its moisture and texture.

This Decadent German Chocolate Pecan Pound Cake Delight is not just a dessert; it’s a showstopper that promises to be as enjoyable to look at as it is to eat. Each slice is packed with rich flavors and textures that make it a memorable treat for any chocolate and pecan lover.

Spicy Jalapeño Chicken Stir-Fry

0

Bring a kick to your dinner routine with this Spicy Jalapeño Chicken Stir-Fry, featuring tender chicken thighs and bold flavors of jalapeño and garlic, all tossed in a savory sauce. This dish is perfect for those who appreciate a little spice in their meals. The combination of soy sauce, sesame oil, and light brown sugar creates a beautifully balanced sauce that enhances the natural flavors of the chicken and vegetables.

Why You’ll Love This Recipe:

  • Full of Flavor: The sauce is rich with the umami of soy sauce and the sweetness of brown sugar, perfectly complemented by the heat of jalapeños.
  • Quick and Easy: This meal comes together in about 30 minutes, making it ideal for a fast weeknight dinner.
  • Customizable: Adjust the amount of jalapeño to suit your spice preference or swap them for a milder pepper if you’re less inclined towards spicy food.

Ingredients:

  • 2 pounds boneless skinless chicken thighs, fat removed, cut into 1-inch pieces
  • ¼ cup (32 g) cornstarch
  • ¼ teaspoon kosher salt
  • ¼ teaspoon ground black pepper
  • 2 tablespoons extra virgin olive oil
  • ⅓ cup (85 g) soy sauce
  • ⅓ cup (83 g) water
  • ⅓ cup (67 g) light brown sugar, packed
  • 1 teaspoon sesame oil
  • 2 teaspoons garlic, minced
  • ½ yellow onion, diced
  • 2 large jalapeño peppers, sliced into thin rounds
  • Sesame seeds, for garnish
  • Cooked white rice, for serving

Instructions:

Step 1: Coat the Chicken
In a large mixing bowl, combine chicken, cornstarch, salt, and pepper. Toss to coat evenly on all sides. Set aside.

Step 2: Prepare the Sauce
In a medium mixing bowl, combine water, soy sauce, brown sugar, sesame oil, and garlic. Mix well and set aside.

Step 3: Cook the Chicken
Heat a large nonstick skillet over medium-high heat and add olive oil. Once the oil is shimmering, carefully add the chicken. Cook for 2-3 minutes per side or until browned and cooked through to an internal temperature of 165°F. Transfer the cooked chicken to a plate and tent with foil to keep warm.

Step 4: Sauté the Vegetables
In the same skillet, add onions and jalapeño. Cook until softened, about 4-6 minutes.

Step 5: Combine and Simmer
Add the chicken back to the skillet along with the soy sauce mixture. Stir to combine and continue to cook for 2-3 minutes, allowing the flavors to meld.

Step 6: Serve
Serve the chicken hot, garnished with sesame seeds over a bed of cooked white rice.

Storage Options:

  • Refrigerator: Store any leftovers in an airtight container for up to 3 days. Reheat in a microwave or on the stovetop until thoroughly warmed.
  • Freezer: Freeze in a sealed container for up to a month. Thaw in the refrigerator overnight and reheat as above.

Tips:

  • Enhance Flavor: Add a splash of lime juice or zest for an extra tangy flavor lift.
  • Adjust Spice Levels: For less heat, remove the seeds from the jalapeños before slicing, or for more heat, add additional jalapeño or a dash of hot sauce.
  • Additional Vegetables: Consider adding bell peppers or broccoli for more texture and nutritional value.

This Spicy Jalapeño Chicken Stir-Fry is not just a meal but an experience, perfect for those who love their food with a bit of a punch. It’s quick, easy, and leaves a memorable taste with every spicy bite!

Homemade Turtle Candy With Pecans and Caramel

0

Indulge in the sweet delight of Homemade Turtle Candy, a classic treat that combines crunchy pecans with gooey caramel and rich chocolate. This simple yet decadent recipe is perfect for sharing during the holidays, gifting, or enjoying as a special treat. With just a few ingredients, you can create these charming candies that look as good as they taste.

Why You’ll Love This Recipe:

  • Decadently Sweet: The perfect blend of textures with crunchy pecans, smooth caramel, and velvety chocolate.
  • Easy to Make: Requires minimal baking skills and is great for an afternoon of candy making.
  • Perfect for Gifting: These candies are not only delicious but also make beautiful gifts when packaged.

Ingredients:

  • 12 ounces soft caramels (homemade or store-bought)
  • 6 ounces pecans (halves, toasted)
  • 8 ounces chocolate (semi-sweet, chips are fine)

Instructions:

Step 1: Prepare the Baking Sheet
Cover a cookie sheet with aluminum foil or parchment paper and lightly spray it with nonstick cooking spray. This will help prevent the candies from sticking.

Step 2: Arrange the Pecans
Arrange the pecans on the prepared sheet in clusters of four, each pecan pointing outwards like the legs of a turtle. You can also drop them in small clusters if preferred.

Step 3: Melt the Caramels
Unwrap the caramels and place them in a microwave-safe bowl. If they are very stiff, add a spoonful of water to ensure the caramel stays soft after cooling. Microwave until melted, stirring every 30 seconds to avoid overheating.

Step 4: Add Caramel to Pecans
Once the caramel has cooled slightly (it should still be fluid but not piping hot), spoon it over each pecan cluster. Aim for a rustic look; it’s fine if some pecans poke through.

Step 5: Melt the Chocolate
Melt the chocolate chips in the microwave or using a double boiler, stirring frequently to ensure it melts evenly without burning.

Step 6: Cover with Chocolate
Spoon the melted chocolate over the caramel layer, making sure it drips down the sides and covers the caramel completely. Gently nudge the chocolate into place as needed.

Step 7: Set the Candy
Place the baking sheet in the refrigerator and let the candies set for at least 30 minutes. This will harden the chocolate and caramel, making them easier to handle.

Step 8: Serve
Once set, serve the turtle candies at room temperature for the best flavor and texture.

Storage Options:

  • Refrigerator: Store in an airtight container for up to two weeks. If in the fridge, let them come to room temperature before serving for optimal taste.
  • Room Temperature: Can be kept at a cool room temperature in a tightly sealed container, away from direct sunlight.

Tips:

  • Quality Ingredients: Use high-quality chocolate and fresh pecans for the best flavor.
  • Variations: Experiment with different types of nuts or chocolates, like dark chocolate or almonds, for a personalized touch.
  • Decorating: Drizzle extra chocolate over the set candies or sprinkle with sea salt for an extra flavor boost.

These Homemade Turtle Candies are not only a joy to make but also a delight to eat. Each piece is a bite of heaven that’s sure to satisfy your sweet tooth!