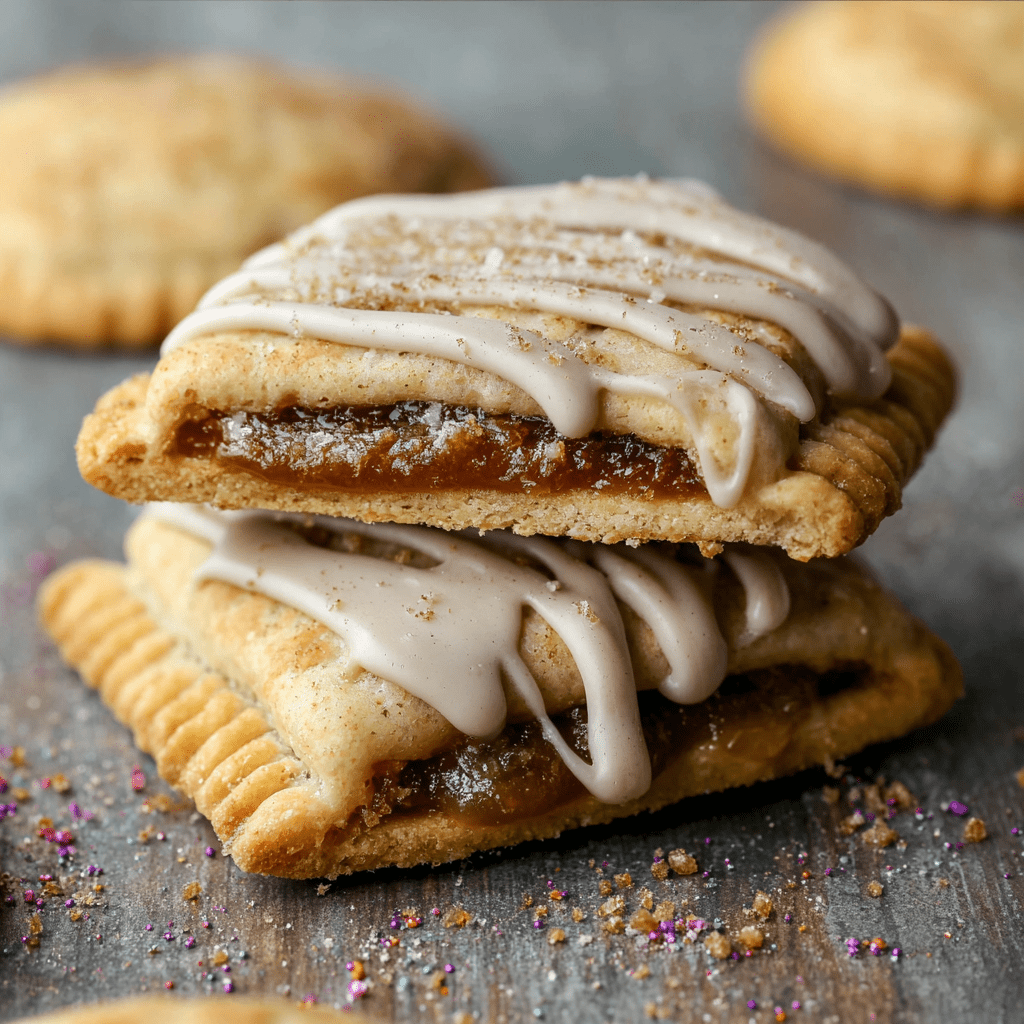
Herb-Infused Baked Potato Balls with Parmesan

0

If you’ve got leftover mashed potatoes and are wondering what to do with them, these Herb-Infused Baked Potato Balls with Parmesan are the answer. They’re crispy on the outside, soft and flavorful on the inside, and packed with herby goodness, salty bacon, and cheesy charm. Think of them as the elegant cousin to mashed potatoes—bite-sized and perfect for snacks, sides, or even party platters. The best part? You don’t need a deep fryer or anything fancy. Just a hot oven and a little olive oil spray get the job done beautifully.

These potato balls are incredibly beginner-friendly and come together in minutes with simple, wholesome ingredients. Fresh dill adds a pop of brightness, while Parmesan brings that nutty, salty kick. A quick roll in breadcrumbs gives them that perfect golden crunch without the mess of frying. They’re great for making ahead and reheating, and they disappear fast whenever they’re on the table. Trust me, they’re the kind of thing you’ll make once and want to repeat weekly.

Why You’ll Love This Recipe:

• Perfect for using up leftover mashed potatoes

• Crispy outside, creamy inside—no frying required

• Customizable with herbs, cheeses, or meats

• Great appetizer or side dish for any occasion

Ingredients:

  • 2 cups mashed potatoes
  • 1/2 cup grated Parmesan cheese
  • 2 tablespoons chopped dill (fresh preferred)
  • 1/4 cup crumbled bacon, cooked
  • 1 egg, beaten
  • Salt and pepper to taste
  • 1 cup breadcrumbs
  • Olive oil spray (for baking)

Instructions:

Preheat the oven

• Preheat your oven to 400°F (200°C) and line a baking sheet with parchment paper.

Make the potato mixture

• In a large mixing bowl, combine the mashed potatoes, Parmesan cheese, chopped dill, crumbled bacon, beaten egg, salt, and pepper. Mix until well combined.

Shape the balls

• Using clean hands or a cookie scoop, shape the mixture into golf ball-sized portions.

Bread the potato balls

• Roll each ball in the breadcrumbs until fully coated and place them on the prepared baking sheet.

Bake to perfection

• Lightly spray the tops of the potato balls with olive oil spray. Bake for 20–25 minutes or until golden and crispy on the outside.

Cool and serve

• Let the potato balls cool slightly before serving. Enjoy warm for the best flavor and texture!

Tips:

Customize the herbs: Try using parsley, chives, or thyme instead of dill.

Add a cheesy twist: Swap in shredded cheddar or gouda for a different flavor profile.

Make it vegetarian: Skip the bacon or replace it with finely chopped sautéed mushrooms.

Want more crunch? Try double-coating the potato balls by dipping them in a little beaten egg, then the breadcrumbs again.

Storage and Reheating:

Refrigerator: Store leftover potato balls in an airtight container in the fridge for up to 3 days.

Freezer: Freeze uncooked or baked balls on a tray until solid, then transfer to a freezer bag. Bake from frozen at 375°F (190°C) for 25–30 minutes.

To Reheat: Pop leftovers in a 350°F (175°C) oven or air fryer for 10–15 minutes until heated through and crispy again. Avoid the microwave—it’ll make them soft instead of crisp.

Black Pepper Chicken

0

This Black Pepper Chicken is your new go-to for bold, savory takeout-style stir fry at home. Loaded with tender bites of chicken, sweet peppers, and onions all glazed in a glossy, peppery sauce—it’s better than what you’d get at the mall food court, and you control every ingredient. The kick from freshly ground black pepper brings heat without being spicy, and the sticky, garlicky sauce ties everything together in the most satisfying way.

Pair it with steamed white rice, jasmine rice, or even a simple fried rice for a comforting weeknight dinner that comes together fast and doesn’t skimp on flavor.

Why You’ll Love This Recipe:

Restaurant-style taste right from your own kitchen

Quick marinated chicken means juicy, tender bites every time

Bold, peppery sauce with a hint of sweetness

Perfect for busy weeknights or make-ahead meals

Great with rice, noodles, or cauliflower rice for a lower-carb option

Ingredients:

Black Pepper Sauce:

  • ⅓ cup low sodium chicken broth
  • ⅓ cup low sodium soy sauce
  • ¼ cup Shaoxing wine (or dry sherry)
  • 1½ tablespoons brown sugar (or 2 tablespoons Mirin)
  • 1 tablespoon cornstarch
  • 2 teaspoons freshly ground black pepper

Black Pepper Chicken Stir Fry:

  • ½ pound chicken breast, cut into thin bite-sized pieces
  • 2 tablespoons low sodium soy sauce
  • 1½ tablespoons cornstarch
  • Vegetable oil
  • 1 medium onion, diced
  • 1 red or green bell pepper, finely diced
  • 3 cloves garlic, minced
  • 1 tablespoon grated fresh ginger (or ginger paste)
  • 2 green onions, thinly sliced (for garnish)

Instructions:

Make the sauce:

In a small bowl, whisk together the chicken broth, soy sauce, Shaoxing wine, brown sugar, cornstarch, and black pepper until smooth. Set aside.

Marinate the chicken:

In a separate bowl, combine the chicken, 2 tablespoons soy sauce, and 1½ tablespoons cornstarch. Stir to coat and let marinate for 15–20 minutes while you prep the vegetables.

Cook the chicken:

Heat a little vegetable oil in a large skillet or wok over medium-high heat. Remove the chicken from the marinade using tongs and cook it in batches to avoid overcrowding the pan. Sauté until golden and cooked through, flipping once. Transfer the cooked chicken to a plate.

Cook the veggies:

In the same skillet, add a little more oil and toss in the onions and bell peppers. Sauté until they’re crisp-tender, about 2–3 minutes. Lower the heat to medium-low, then stir in the garlic and ginger. Cook for 1 minute, stirring constantly. Transfer veggies to the same plate as the chicken.

Finish the sauce:

Give the reserved sauce a quick stir, then pour it into the skillet over medium heat. Stir often and let it cook for 2–3 minutes, or until it’s slightly thickened and glossy.

Combine and serve:

Add the chicken and vegetables back into the skillet. Toss to coat everything in the sauce and cook for 2 more minutes to warm through.

Garnish with sliced green onions and serve immediately.

Tips:

No Shaoxing wine? Dry sherry or even rice vinegar with a pinch of sugar will do.

Want a little heat? Add a pinch of crushed red pepper flakes with the garlic and ginger.

Too peppery? Dial it back to 1 teaspoon and taste as you go.

Swap the protein: Thin-sliced beef or tofu also works great with this sauce.

Storage and Reheating:

Refrigerator:

Store leftovers in an airtight container in the fridge for up to 4 days.

Freezer:

Freeze in a freezer-safe container for up to 2 months. Thaw overnight in the fridge before reheating.

Reheating:

Warm in a skillet over medium heat with a splash of water or broth to loosen the sauce. Microwave works too—just cover and stir halfway through.


This is one of those dishes that’ll make you want to skip takeout more often. Serve it with hot rice, a crisp cucumber salad, or a veggie stir-fry and call it dinner done right.

Apple and Carrot Zucchini Bread

0

This Apple and Carrot Zucchini Bread is everything you love about moist, spiced quick bread—with a twist of fruity brightness and a touch of citrusy glaze. Loaded with juicy apple chunks, shredded zucchini, and sweet carrots, it’s the ultimate way to sneak in some goodness while still feeling like you’re indulging. The warm spices, crunchy pecans, and a tangy orange cream cheese frosting pull it all together for a loaf that’s as beautiful as it is delicious.

Whether you’re making it for a brunch table, afternoon tea, or just because it’s a Tuesday and you want something cozy and home-baked, this bread never disappoints. And don’t even think about skipping that drizzle of frosting—it’s sunshine in every bite.

Why You’ll Love This Recipe:

Super moist and flavorful – thanks to zucchini, apples, and carrots

Warm spices and citrusy notes that scream comfort food

Cream cheese orange glaze adds a bakery-style finish

Great for breakfast, snack, dessert, or gifting

Freezer-friendly and perfect for make-ahead baking

Ingredients:

For the Bread:

• ½ cup chopped pecans

• 1 cup diced apple chunks

• 1 cup shredded zucchini

• 2 cups shredded carrots

• 1 cup unsalted butter, melted

• 2 cups granulated sugar

• 3 eggs, at room temperature

• ¼ cup fresh orange juice

• 1 tbsp vanilla extract

• ½ tsp salt

• 2 ½ tsp baking powder

• ¾ tsp baking soda

• 1 tsp ground cinnamon

• ⅛ tsp ground cloves

• ⅛ tsp ground nutmeg

Cream Cheese Frosting:

• ½ cup cream cheese, softened

• ¼ cup unsalted butter, softened

• 1 to 3 tbsp orange juice, to desired consistency

• 2 to 3 cups confectioners sugar

Instructions:

Step 1: Preheat and Prepare the Pans

Preheat your oven to 350°F (175°C).

Grease and line two loaf pans with parchment paper for easy removal.

Step 2: Prep the Zucchini

Use a clean kitchen towel to squeeze out as much liquid as possible from the shredded zucchini. This keeps the bread from becoming too dense or soggy.

Step 3: Mix the Dry Ingredients

In a large bowl, whisk together the salt, baking powder, baking soda, cinnamon, cloves, nutmeg, and flour (if not listed in ingredients, use 2 ½ cups all-purpose flour). Set aside.

Step 4: Make the Wet Mixture

In a medium bowl, beat together the melted butter and granulated sugar until combined.

Add the orange juice, vanilla extract, and eggs, and beat until smooth.

Step 5: Combine Wet and Dry

Gradually add the dry ingredients into the wet mixture in batches, stirring just until incorporated—don’t overmix.

Step 6: Add the Good Stuff

Fold in the shredded carrots, zucchini, apple chunks, and pecans. The batter will be thick and colorful!

Step 7: Fill the Loaf Pans

Divide the batter evenly between the two prepared loaf pans and smooth the tops.

Step 8: Bake

Bake for 55–60 minutes, or until golden brown and a toothpick inserted in the center comes out clean.

Let the loaves cool in the pans for 10–15 minutes, then transfer to a wire rack to cool completely.

Step 9: Make the Frosting

In a medium bowl, beat together the softened cream cheese, butter, and orange juice until fluffy.

Gradually beat in the confectioners sugar until the glaze reaches your desired consistency—thick enough to drizzle but not runny.

Step 10: Glaze and Serve

Once the loaves are completely cooled, drizzle the glaze generously over the top. Let it set for a few minutes before slicing.

Tips:

No fresh orange juice? Bottled works in a pinch, or swap with lemon juice for a tangier version.

Want it nut-free? Just skip the pecans or use toasted sunflower seeds for a little crunch.

Don’t skip the squeeze! Removing excess liquid from the zucchini is key to the perfect texture.

Make it muffins: Pour into muffin tins and bake at 350°F for 20–25 minutes.

Storage and Reheating:

Room Temperature:

Store the unfrosted bread wrapped tightly in plastic wrap for up to 2 days. Frosted loaves should be kept in the fridge.

Refrigerator:

Wrap slices or whole loaves in foil or an airtight container. Keeps well for 5–6 days. Bring to room temp before serving for best texture.

Freezer:

Wrap the whole loaf or slices (without frosting) tightly in plastic wrap and freeze for up to 2 months. Thaw overnight in the fridge and glaze before serving.


This Apple and Carrot Zucchini Bread is the perfect way to welcome fall—or just satisfy a craving for something warmly spiced and home-baked. That cream cheese glaze with orange juice? Don’t be surprised if you catch yourself licking the spoon.

Slow Cooker Spiced Cracker Barrel Copycat Fried Apples

0

These Slow Cooker Spiced Fried Apples are a cozy, comforting treat that taste just like the warm, sweet apples served at Cracker Barrel — but even easier thanks to your slow cooker. The apples turn tender and syrupy with the perfect blend of brown sugar, cinnamon, and a hint of vanilla. This simple dish makes a wonderful side for pork chops or ham, but it’s also sweet enough to double as dessert with a scoop of ice cream.

They’re nostalgic, effortless, and fill your kitchen with the smell of homemade goodness — without ever needing to turn on the stove.

Why You’ll Love This Recipe:

Slow cooker convenience – hands-off cooking with maximum flavor

Just like Cracker Barrel – sweet, tender, and perfectly spiced

Versatile – great as a side, topping, or dessert

Uses pantry staples – no fancy ingredients here

Perfect for fall, holidays, or whenever you’re craving comfort food

Ingredients:

• 6 large apples, peeled, cored, and sliced

• 2 tbsp cornstarch

• ¼ cup brown sugar

• ¼ cup granulated sugar

• 1 tsp ground cinnamon

• ¼ tsp ground nutmeg

• ¼ cup melted butter

• 1 tbsp lemon juice

• 1 tsp vanilla extract

Instructions:

Step 1: Prep the Apples

Peel, core, and slice your apples into wedges. Add them directly to the slow cooker.

Step 2: Mix the Spices

In a small bowl, combine the cornstarch, brown sugar, granulated sugar, cinnamon, and nutmeg. Stir until evenly mixed.

Step 3: Add to the Slow Cooker

Sprinkle the sugar and spice mixture over the apples in the slow cooker.

Step 4: Add the Wet Ingredients

Drizzle the melted butter, lemon juice, and vanilla extract over the apples.

Step 5: Toss to Coat

Gently toss or stir the apples in the slow cooker to make sure they’re evenly coated with all that sweet, buttery goodness.

Step 6: Cook

Cover and cook on high for 2–3 hours, or until the apples are soft and the sauce is thick and syrupy. Give them a gentle stir once or twice during cooking if possible.

Tips:

Best apples to use: Granny Smith for tartness, Honeycrisp for sweetness, or a mix of both for balance.

Want them thicker? If the sauce is too thin, remove the lid for the last 30 minutes to help it thicken naturally.

Need it sweeter? Add a tablespoon more brown sugar toward the end of cooking if you like it extra sweet.

Extra spice: A dash of ground cloves or allspice adds a deeper fall flavor.

Serving ideas: Spoon over pancakes, waffles, oatmeal, pork chops, or vanilla ice cream.

Storage and Reheating:

Refrigerator:

Store leftovers in an airtight container in the fridge for up to 4 days.

Freezer:

Freeze in a freezer-safe container for up to 2 months. Thaw overnight in the refrigerator.

To Reheat:

Warm in a saucepan over low heat or microwave in 30-second bursts until hot and bubbly.


Whether you’re recreating a classic comfort side dish or treating yourself to a spoonful of cinnamon-sweet nostalgia, these slow cooker fried apples are pure cozy bliss. Set it and forget it — and let the slow cooker fill your home with the scent of warm apple pie.

Creamy Cucumber Tomato Salad

0

This Creamy Cucumber Tomato Salad is a summer classic — crisp cucumbers, juicy tomatoes, and sweet onions all tossed in a light and tangy sour cream dressing. It’s cool, refreshing, and comes together in minutes with simple pantry ingredients. This is the kind of dish you whip up when the garden’s overflowing or when you need an easy side for everything from grilled chicken to burgers on the back porch.

It’s creamy without being heavy, and that touch of dill gives it that unmistakable flavor that makes it feel like something Grandma might’ve brought to a picnic. Best served cold and best eaten on a warm day.

Why You’ll Love This Recipe:

Simple pantry-friendly ingredients – nothing fancy, just fresh and delicious

Quick to make – ready in 15 minutes or less

Light, tangy dressing with a hint of dill and garlic

Perfect as a BBQ side or refreshing lunch

Easy to scale up for potlucks or gatherings

Ingredients:

Dressing Ingredients:

• ⅓ cup sour cream

• ¼ cup mayonnaise

• 1 teaspoon dried dill

• ¼ teaspoon garlic powder

Cucumber Tomato Salad:

• 2 medium cucumbers, sliced in half lengthwise and then thinly sliced

• 3 small tomatoes, cut into thin wedges (or use cherry tomatoes, halved)

• ½ sweet onion, thinly sliced

• Kosher salt and freshly ground black pepper, to taste

Instructions:

Step 1: Make the Dressing

In a large mixing bowl, stir together the sour cream, mayonnaise, dried dill, and garlic powder until smooth and well blended.

Step 2: Add the Vegetables

Add the sliced cucumbers, tomatoes, and onion to the bowl with the dressing.

Step 3: Toss and Season

Gently stir everything together until the vegetables are evenly coated in the creamy dressing. Taste and season with kosher salt and black pepper as needed.

Step 4: Chill or Serve Immediately

You can serve this right away, but it’s even better after 15–30 minutes in the fridge to let the flavors mingle.

Tips:

Fresh dill substitute: If you have fresh dill on hand, use 1 tablespoon in place of the dried.

Low-fat option: You can substitute Greek yogurt for the sour cream or mayonnaise if you’d like to lighten it up.

Extra crunch: Add chopped radishes or a few slices of green bell pepper for texture.

Want to make it a meal? Toss in some diced cooked chicken or crumbled feta cheese.

Storage and Reheating:

Refrigerator:

Store any leftovers in an airtight container in the refrigerator for up to 2 days. After that, the vegetables may release too much moisture and become soggy.

Note:

This salad is best enjoyed cold, straight from the fridge. No reheating needed!


Cool, creamy, and full of crisp garden freshness, this is the kind of dish you’ll reach for all season long. Whether it’s a quick weeknight dinner or a backyard BBQ, this Creamy Cucumber Tomato Salad belongs on your table.

Lemon Zest Cream Cheese Pie

0

When life gives you lemons… make this bright, creamy, melt-in-your-mouth pie that tastes like sunshine wrapped in a graham cracker crust. It’s got a rich cream cheese base, a sweet-tangy sour cream topping, and just the right kiss of lemon zest to make everything pop. Simple ingredients, easy steps, and zero stress.

Why You’ll Love This Recipe:

  • No fancy tools or water baths — just mix, bake, and chill
  • Tangy lemon zest adds fresh flavor without overpowering
  • Velvety smooth texture with a cool, creamy finish
  • Make-ahead friendly — perfect for potlucks or holidays

Ingredients:

For the Pie:

• 1 (9-inch) graham cracker crust (store-bought or homemade)

• 2 (8 oz) blocks cream cheese, softened

• 2 eggs

• ¾ cup sugar

• 1 teaspoon vanilla extract

• 1 tablespoon lemon zest, divided

For the Topping:

• 1 cup sour cream

• ¼ cup sugar

• 1 teaspoon vanilla extract

• Remaining lemon zest

Instructions:

Step 1: Preheat and Prepare

Preheat your oven to 350°F (175°C). Set your graham cracker crust on a baking sheet for easy transfer.

Step 2: Mix the Filling

In a large mixing bowl, beat together cream cheese, eggs, ¾ cup sugar, 1 tsp vanilla, and half of the lemon zest until the mixture is silky smooth.

Step 3: Fill and Bake

Pour the cream cheese filling into your prepared crust and smooth the top. Bake for 30–35 minutes, until the edges are set but the center still has a slight jiggle.

Step 4: Stir Together the Topping

While the pie bakes, combine sour cream, ¼ cup sugar, 1 tsp vanilla, and the remaining lemon zest in a small bowl. Stir until smooth.

Step 5: Cool, Top, and Finish Baking

Once the pie is out of the oven, let it sit for 5–10 minutes. Raise the oven temperature to 450°F (230°C). Spread the sour cream topping evenly over the warm pie. Return to the oven and bake for 5 minutes — just enough to set the top.

Step 6: Chill and Serve

Let the pie cool on the counter to room temperature. Cover and refrigerate for at least 4 hours, preferably overnight, until fully set.

Step 7: Slice and Enjoy

Serve chilled, with an optional twist of lemon or whipped cream for extra flair.

Tips:

Use fresh lemon zest — it’s the secret to that bright citrus flavor.

Don’t overbake the filling — a little jiggle means it’s just right.

Let it chill fully for the creamiest texture and cleanest slices.

Want to go homemade? Swap in a scratch-made graham cracker crust.

Storage and Reheating:

Refrigerator:

Store covered in the fridge for up to 4 days.

Freezer:

Wrap tightly in plastic and foil and freeze for up to 1 month. Thaw overnight in the fridge before serving.


This is one of those pies that sneaks up on people. It looks humble — then one bite in, bam — creamy, zesty, just sweet enough, and totally unforgettable.

Cinnamon Roll Cake

0

Imagine all the gooey, buttery goodness of a warm cinnamon roll — but in easy, sliceable cake form. That’s exactly what this Cinnamon Roll Cake delivers. It’s tender, rich, and swirled with a luscious cinnamon-sugar filling, then finished off with a silky vanilla glaze that melts right into the warm cake. Perfect for brunch, potlucks, or cozy weekends, it’s a crowd-pleasing bake that tastes like home.

Whether you’re baking for guests or just treating yourself, this is one of those “smells amazing while baking” kind of recipes that fills your kitchen with warm, cinnamon-sugar joy.

Why You’ll Love This Recipe:

All the flavor of cinnamon rolls, none of the yeast fuss

Simple batter — comes together in one bowl

That buttery brown sugar swirl melts right into the cake

Perfect for breakfast, dessert, or anytime snacking

Easy to make ahead and even freeze-friendly!

Ingredients:

Cinnamon Swirl:

• ½ cup unsalted butter, softened

• 1 cup packed light brown sugar

• 2 tablespoons all-purpose flour

• 1 tablespoon ground cinnamon

Cinnamon Roll Cake:

• 3 cups all-purpose flour

• 1 tablespoon baking powder

• ½ teaspoon salt

• 1 cup granulated sugar

• 2 large eggs, room temperature

• 1½ teaspoons vanilla extract

• 1½ cups whole milk, warmed to room temperature

• 6 tablespoons unsalted butter, melted and slightly cooled

Vanilla Glaze:

• 2 cups powdered sugar

• 3–4 tablespoons whole milk

• 1 teaspoon vanilla extract

Instructions:

Step 1: Preheat and Prep

Preheat your oven to 350°F (175°C). Grease a 9×13-inch baking dish and set it aside.

Step 2: Make the Cinnamon Swirl

In a small bowl, mix together softened butter, brown sugar, flour, and cinnamon until smooth. If the mixture is too stiff, microwave it in 30-second intervals at 30% power until it’s easily spoonable.

Step 3: Prepare the Cake Batter

In a large bowl, whisk together the flour, baking powder, salt, and granulated sugar.

Make a well in the center and add eggs, vanilla, and warm milk, then slowly stir in the melted butter until just combined. Don’t overmix!

Step 4: Assemble the Cake

Pour the batter into your prepared dish and smooth it out. Drop tablespoonfuls of the cinnamon swirl mixture across the top, then use a chopstick or the end of a spoon to swirl it into the batter.

Step 5: Bake

Bake for 35–40 minutes, or until a toothpick inserted into the center comes out clean. While the cake is still warm, prepare the glaze.

Step 6: Glaze and Serve

Whisk together powdered sugar, milk, and vanilla extract until smooth. Drizzle or spread the glaze over the warm cake and let it soak in a bit before slicing.

Tips:

Make it extra decadent: Add chopped pecans or walnuts to the cinnamon swirl.

Don’t overmix: Stir just until combined to keep the cake soft and tender.

Add a hint of spice: A pinch of nutmeg in the batter complements the cinnamon beautifully.

Shortcut swirl: If you’re short on time, melt the swirl ingredients together to make drizzling easier.

Storage and Reheating:

Refrigerator:

Store covered in the fridge for up to 4 days. Bring to room temp or reheat slightly before serving.

Freezer:

Wrap individual pieces in plastic wrap and freeze for up to 2 months. Thaw overnight in the fridge and warm briefly in the microwave or oven.

To Reheat:

Microwave slices for 15–20 seconds or pop in a 300°F oven for 8–10 minutes until warmed through.


Warm, buttery, and loaded with cinnamon, this cake brings the comfort of cinnamon rolls without all the rolling and rising. One bite and you’ll see why it’s a family favorite!

Strawberry Angel Food Cake

0

Light, fluffy, and full of berry bliss, this Strawberry Angel Food Cake is the kind of no-fuss dessert that’s perfect for warm-weather gatherings, family dinners, or when you just want something sweet without turning on the oven. It’s soft, creamy, and refreshingly cool — like strawberry shortcake’s fun, no-bake cousin.

The combination of tender angel food cake, whipped topping, sweet jello, and fresh strawberries is simply irresistible. Plus, it’s easy enough for even beginner bakers to whip up in a flash.

Why You’ll Love This Recipe:

No Baking Required: Just mix, layer, and chill.

Perfect for Summer: Cool, creamy, and fruity.

Quick to Assemble: Only a few simple ingredients.

Make-Ahead Friendly: Chill it before serving for the best flavor and texture.

Great for Groups: Feeds a crowd and looks pretty in a glass dish!

Ingredients:

• 1 store-bought angel food cake

• 1 package (3 oz) strawberry jello mix

• 1 cup boiling water

• ½ cup cold water

• 1 cup fresh strawberries, sliced

• 1 container (8 oz) whipped topping, thawed

Instructions:

Step 1: Prepare the Cake

Tear the angel food cake into bite-sized pieces and set aside.

Step 2: Make the Jello Base

In a large mixing bowl, dissolve the strawberry jello mix in 1 cup boiling water, stirring until fully dissolved. Add ½ cup cold water and stir to combine.

Step 3: Fold in the Whipped Topping

Gently fold the whipped topping into the jello mixture until smooth and creamy.

Step 4: Layer the Dessert

In a 9×13 inch dish, layer half of the angel food cake pieces, followed by half of the jello mixture, and half of the sliced strawberries.

Repeat with the remaining cake, jello mixture, and strawberries.

Step 5: Chill and Serve

Cover and refrigerate for at least 2 hours, or until fully set.

Serve chilled and enjoy every soft, fruity bite!

Tips:

Add Extra Fruit: Blueberries or raspberries add a beautiful color contrast.

Want More Strawberry Flavor? Use strawberry-flavored whipped topping or stir in some strawberry jam.

Fresh or Frozen: Frozen strawberries work in a pinch — just thaw and drain before layering.

Make It Fancy: Garnish with extra berries or a drizzle of chocolate before serving.

Storage and Reheating:

Refrigerator:

Store covered in the fridge for up to 3 days. It’s best served cold, straight from the fridge.

Freezer:

Not recommended — the texture of whipped topping and jello can change after freezing.


This Strawberry Angel Food Cake is sweet, airy, and simple — like a slice of summer sunshine on your plate. Whether it’s a holiday, potluck, or Tuesday night treat, this dessert delivers every time.

Chef Salad

0

A classic Chef Salad is like a deli platter tossed right into a bowl — crisp lettuce, savory deli meats, creamy cheese, and crunchy toppings that all come together for one satisfying and refreshing meal. Whether you’re meal prepping for the week or throwing together a last-minute lunch, this hearty salad is quick to assemble and endlessly customizable.

It’s the kind of salad that doesn’t feel like a compromise — it’s full of bold textures, protein-packed ingredients, and your favorite dressing drizzled over top. Serve it as a full meal or as a starter for a larger gathering. It’s one of those dishes that never goes out of style.

Why You’ll Love This Recipe:

Hearty and Satisfying: Packed with protein from ham, turkey, bacon, and eggs.

Quick Assembly: No cooking required (aside from boiling eggs and bacon).

Perfect for Meal Prep: Stays fresh when prepped ahead, dressing added later.

Customizable: Use your favorite deli meats, cheeses, or dressings.

Crowd-Friendly: Great for family meals, picnics, or potlucks.

Ingredients:

• 1 medium head romaine lettuce, chopped

• 2–3 cups iceberg lettuce, chopped into bite-sized pieces

• 4 hard-boiled eggs, peeled and quartered lengthwise

• 4 slices crispy cooked bacon

• 4 ounces deli-style sliced Swiss cheese, cut into julienne strips

• 4 ounces deli-style sliced ham, cut into julienne strips

• 4 ounces deli-style sliced turkey, cut into julienne strips

• 1 cup sliced English cucumber (about 1/3 of a cucumber)

• 1 cup halved grape tomatoes

• 1 cup seasoned croutons

• ⅔–1 cup salad dressing (ranch, chipotle ranch, avocado ranch, bleu cheese, Italian, or honey mustard)

• Kosher salt, to taste

• Freshly ground black pepper, to taste

Instructions:

Prepare the Base

Add the romaine and iceberg lettuce to a large salad bowl or arrange on a serving platter.

Layer the Toppings

Arrange the hard-boiled eggs, bacon, Swiss cheese, ham, and turkey over the lettuce.

Scatter the cucumbers, grape tomatoes, and croutons evenly across the top.

Dress and Serve

Drizzle your favorite salad dressing over the salad right before serving.

Toss lightly to coat, or serve the dressing on the side for guests to add their own.

Season with kosher salt and fresh ground black pepper to taste.

Tips:

Use Freshly Cooked Bacon: It adds irresistible crunch and flavor.

Prep Ahead: Chop veggies and meats ahead of time and store separately for quick weekday lunches.

Customize Your Protein: Try grilled chicken, roast beef, or salami instead of deli turkey or ham.

Egg Tip: Use older eggs for easier peeling when boiling.

Cheese Options: Swap Swiss for cheddar, provolone, or pepper jack depending on your preference.

Storage and Reheating:

Refrigerator:

Store salad components separately in airtight containers in the fridge for up to 3 days.

Keep dressing and croutons separate until ready to serve to avoid sogginess.

Make-Ahead Tip:

Assemble the salad base (lettuce, meats, cheese, and veggies) in a large container or meal prep boxes. Add croutons and dressing just before eating to keep textures crisp and fresh.


Whether you’re feeding a crowd or just yourself, this Chef Salad is a well-balanced, crave-worthy dish that checks every box — crunchy, creamy, fresh, and filling. It’s a timeless recipe that you’ll find yourself making again and again.

Baked Onion Beef Fried Rice with Mixed Vegetables

0

This Baked Onion Beef Fried Rice is the perfect cozy dish for busy weeknights, meal prep days, or when you’re staring into your fridge thinking, “I need something easy and satisfying.” It’s hearty, flavorful, and built around pantry staples like rice, ground beef, onions, and mixed veggies. What makes it extra special? The finishing touch in the oven that gives the top layer a toasty texture — almost like a crispy rice crust you’d find at the bottom of a good wok.

This version ditches the traditional stir-fry method and embraces a comforting, baked approach. The flavors deepen, and you get a dish that holds up beautifully whether served straight from the oven or enjoyed as leftovers. And with garlic, onion, soy sauce, and oyster sauce, every bite is packed with savory umami goodness. It’s family-friendly, freezer-friendly, and definitely taste-bud-friendly.

Why You’ll Love This Recipe:

One-Pan Wonder: Start on the stove and finish in the oven — minimal cleanup, maximum flavor.

Comforting and Hearty: Loaded with beef, rice, and vegetables for a satisfying all-in-one meal.

Customizable: Easy to swap in your favorite veggies or use ground turkey instead.

Crispy-Top Finish: Baking adds a golden, slightly crispy top layer that sets this version apart from traditional fried rice.

Great for Leftovers: Tastes even better the next day and reheats like a dream.

Ingredients:

• 2 cups cooked rice (preferably day-old)

• 1 pound ground beef

• 1 large onion, diced

• 1 cup mixed vegetables (peas, carrots, corn)

• 2 tbsp soy sauce

• 1 tbsp oyster sauce

• 2 cloves garlic, minced

• 1 tbsp vegetable oil

• Salt and pepper to taste

• 2 green onions, sliced (for garnish)

Instructions:

Preheat the Oven

Preheat your oven to 350°F (175°C) so it’s hot and ready for baking once your rice mixture is prepped.

Brown the Beef

In a large skillet, heat the vegetable oil over medium-high heat.

Add the ground beef and cook until browned, breaking it up into crumbles as it cooks. This should take about 5–7 minutes.

Add Aromatics and Veggies

Stir in the diced onion and minced garlic. Sauté for about 3 minutes, or until the onion turns soft and translucent.

Add the mixed vegetables and cook for another 2–3 minutes, just until heated through.

Incorporate the Rice and Sauces

Add the cooked rice to the skillet, breaking up any clumps with your spoon or spatula.

Pour in the soy sauce and oyster sauce, stirring well to evenly coat the rice and meat mixture.

Season with salt and pepper to taste.

Transfer and Bake

Pour the mixture into a greased baking dish and spread it out evenly.

Bake in the preheated oven for 15–20 minutes, or until the top gets a little golden and slightly crisp.

Cool and Garnish

Remove from the oven and let rest for about 5 minutes to settle.

Sprinkle with sliced green onions for a fresh finish before serving.

Tips:

Day-Old Rice Works Best: Freshly cooked rice can be too moist. If using fresh rice, spread it out on a baking sheet and let it cool for 15–20 minutes first.

Make It Spicy: Add a dash of sriracha or a pinch of red pepper flakes to the skillet if you want some heat.

Swap Your Protein: Ground turkey, chicken, or even plant-based meat can easily be substituted.

Mix Up the Veggies: Frozen mixed vegetables are super convenient, but feel free to use chopped bell peppers, broccoli, or edamame.

Add an Egg: For a true fried rice vibe, stir in a scrambled egg or two right before baking.

Storage and Reheating:

Refrigerator:

Store leftovers in an airtight container in the fridge for up to 4 days. Reheat in the microwave or oven until warmed through.

Freezer:

Let the dish cool completely, then store in a freezer-safe container for up to 2 months. Thaw overnight in the fridge and reheat in a 350°F oven for 20–25 minutes, or until hot in the center.


This baked fried rice is a game-changer for those days when you want the taste of takeout without the wok or the effort. It’s savory, comforting, and just as satisfying as any restaurant version — with the added bonus of crispy baked edges.