Slow Cooker Apple Kielbasa Bites

0

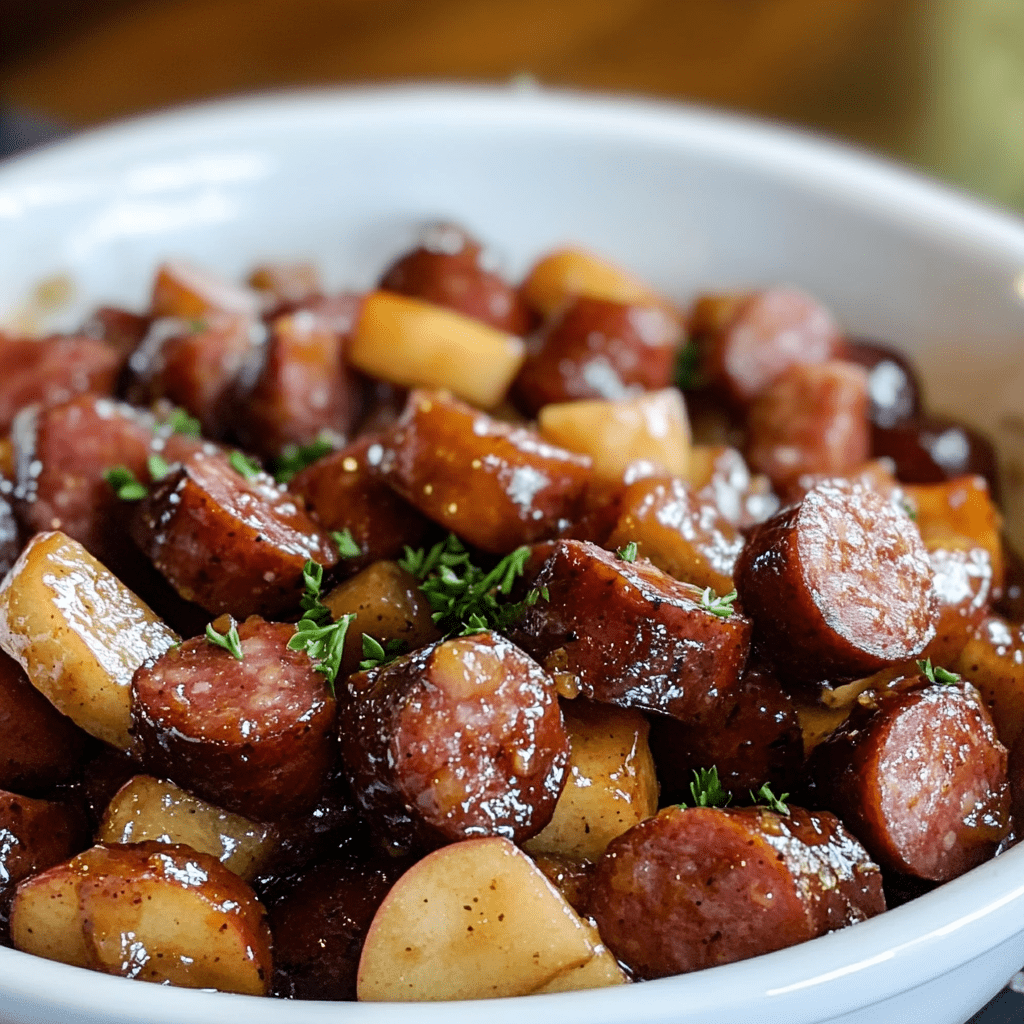
Slow Cooker Apple Kielbasa Bites combine the savory goodness of kielbasa sausage with the sweet tang of apples and a flavorful glaze. This dish is perfect as an appetizer or a hearty snack, ideal for gatherings or cozy nights at home.

Why You’ll Love This Recipe:
This recipe is effortless to prepare with minimal hands-on time, thanks to the convenience of the slow cooker. The combination of apples, brown sugar, Dijon mustard, and spices creates a delicious glaze that complements the smoky flavor of the kielbasa perfectly. It’s a crowd-pleaser that’s sure to disappear quickly!

Ingredients:

  • 1 lb kielbasa sausage, sliced into 1/2 inch pieces
  • 2 large apples, peeled, cored, and chopped
  • 1/2 cup brown sugar
  • 2 tablespoons Dijon mustard
  • 1 tablespoon apple cider vinegar
  • 1 teaspoon ground cinnamon
  • 1/4 teaspoon ground nutmeg
  • 1/2 cup onion, finely chopped

Step-by-Step Directions:

Step 1: Prepare the Slow Cooker

Place the Kielbasa:
Place the sliced kielbasa sausage into your slow cooker, spreading it evenly across the bottom.

Step 2: Mix the Apple Mixture

Combine Ingredients:
In a bowl, mix together the chopped apples, brown sugar, Dijon mustard, apple cider vinegar, ground cinnamon, and ground nutmeg until well combined.

Step 3: Add to Slow Cooker

Pour Over Kielbasa:
Pour the apple mixture over the kielbasa in the slow cooker, ensuring it covers the sausage evenly.

Step 4: Add Chopped Onion

Top with Onion:
Sprinkle the finely chopped onion over the apple and kielbasa mixture in the slow cooker.

Step 5: Cook

Cover and Cook:
Cover the slow cooker with the lid and cook on low for 4-6 hours, stirring occasionally if possible. Cook until the apples are tender and the kielbasa is nicely glazed with the sauce.

Step 6: Serve

Serve Warm:
Once cooked, serve the Slow Cooker Apple Kielbasa Bites warm directly from the slow cooker. Garnish with a sprinkle of fresh parsley if desired.

Tips:

  • Choose a kielbasa sausage with your preferred level of smokiness for the best flavor.
  • Adjust the sweetness by varying the amount of brown sugar according to your taste preference.
  • Serve these bites as an appetizer, side dish, or even as a main dish with a side of mashed potatoes or rice.

Storage Options:
Store any leftovers in an airtight container in the refrigerator for up to 3 days. Reheat gently in the microwave or on the stove before serving.


Enjoy these flavorful Slow Cooker Apple Kielbasa Bites as a delightful addition to your menu!

Honey Mustard Baked Pork Chops

0

Honey Mustard Baked Pork Chops are a savory and sweet dish that combines juicy pork chops with a flavorful honey-mustard sauce. Baked to perfection, these pork chops are tender, moist, and full of delicious flavors that make them perfect for any meal.

Why You’ll Love This Recipe:
This recipe is quick and easy to prepare, making it ideal for busy weeknights or when you want a comforting meal without spending hours in the kitchen. The combination of Dijon mustard, honey, garlic, and fresh rosemary creates a sauce that coats the pork chops beautifully as they bake, resulting in a dish that’s both impressive and delicious.

Ingredients:

  • 2 pounds pork chops (bone-in adds extra flavor)
  • 1/4 cup Dijon mustard
  • 1 tablespoon minced garlic
  • 2 tablespoons salted butter
  • 5 tablespoons honey
  • 1 teaspoon freshly chopped rosemary
  • Salt and pepper, to taste

Step-by-Step Directions:

Step 1: Prep the Chops

Preheat Your Oven:
Preheat your oven to 350°F (175°C). This temperature ensures even baking of the pork chops, keeping them juicy and tender.

Prepare the Baking Dish:
Lightly grease a baking dish to prevent sticking and ease cleanup.

Season the Pork Chops:
Season both sides of the pork chops with salt and pepper. Arrange them in a single layer in the greased baking dish.

Step 2: Make the Sauce

Combine Ingredients:
In a small bowl, whisk together Dijon mustard, minced garlic, honey, freshly chopped rosemary, and salted butter.

Melt the Butter:
Microwave the mixture for about 30 seconds or until the butter melts completely, ensuring all ingredients blend smoothly.

Mix Thoroughly:
Stir well to create a smooth, homogeneous sauce where the honey, mustard, and butter meld together.

Step 3: Dress the Chops

Apply the Sauce:
Pour half of the honey-mustard mixture over the pork chops, using a spoon to spread it evenly over the surface.

Flip and Repeat:
Flip the pork chops and pour the remaining sauce over the other side, ensuring each chop is well coated.

Step 4: Bake to Perfection

Bake the Pork Chops:
Place the baking dish in the preheated oven and bake for about 30 minutes. The pork chops should reach an internal temperature of 145°F (63°C) for optimal doneness.

Check for Doneness:
After 30 minutes, check that the pork chops are cooked through, tender, and juicy. If needed, bake for an additional 5-10 minutes.

Step 5: Serve with Style

Plate the Pork Chops:
Carefully remove the baking dish from the oven and let the pork chops rest for a few minutes to allow the juices to redistribute.

Add the Sauce:
Plate the pork chops and spoon the rich sauce from the baking dish over them, adding extra flavor and moisture to the dish.

Tips:

  • Ensure the pork chops are cooked through but avoid overcooking to maintain their juiciness.
  • Serve these pork chops with sides like roasted vegetables, mashed potatoes, or a fresh green salad for a complete meal.
  • Store any leftovers in an airtight container in the refrigerator for up to 3 days. Reheat gently in the oven or microwave before serving.

Storage Options:
Store any leftover Honey Mustard Baked Pork Chops in an airtight container in the refrigerator for up to 3 days. Reheat gently to preserve their juiciness and flavor.


Enjoy these delicious Honey Mustard Baked Pork Chops for a delightful meal that’s both easy to make and satisfying to eat!

Baked Honey Lime Garlic Butter Salmon

0

Baked Honey Lime Garlic Butter Salmon is a flavorful dish that combines the richness of salmon with a sweet and tangy honey-lime garlic butter sauce. This easy-to-make recipe is perfect for a quick and delicious dinner that’s sure to impress.

Why You’ll Love This Recipe:
This recipe enhances the natural flavors of salmon with a simple yet flavorful honey-lime garlic butter sauce. It’s quick to prepare and perfect for busy weeknights or special occasions when you want a dish that’s both elegant and delicious. The addition of fresh parsley and lime wedges adds brightness and freshness to each bite.

Ingredients:

  • 4 (6-ounce) salmon fillets
  • Salt and pepper, to taste
  • 4 tablespoons unsalted butter, melted
  • 4 cloves garlic, minced
  • 2 tablespoons honey
  • 1 tablespoon lime juice
  • Zest of 1 lime
  • 2 tablespoons freshly chopped parsley, for garnish
  • Lime wedges, for serving

Step-by-Step Directions:

Step 1: Preheat and Prepare

Preheat the Oven:
Preheat your oven to 375°F (190°C). Line a baking sheet with foil or parchment paper for easy cleanup and to prevent sticking.

Step 2: Season the Salmon

Pat Dry and Season:
Pat the salmon fillets dry with paper towels. Season both sides of each fillet with salt and pepper to taste. This step helps to ensure a nice sear and enhances the flavor of the salmon.

Step 3: Make the Honey Lime Garlic Butter Sauce

Prepare the Sauce:
In a small bowl, whisk together the melted butter, minced garlic, honey, lime juice, and lime zest until well combined. This mixture will serve as the flavorful sauce for the salmon.

Step 4: Add Flavor and Bake

Coat the Salmon:
Drizzle the honey lime garlic butter mixture evenly over each salmon fillet, making sure to coat them thoroughly for even flavor distribution during baking.

Bake the Salmon:
Place the baking sheet in the preheated oven and bake the salmon for 15-18 minutes, or until the salmon flakes easily with a fork. For a slightly golden and crisped top, you can broil the fillets for the last 2-3 minutes of cooking. Watch closely to prevent burning.

Step 5: Garnish and Serve

Garnish and Serve:
Once cooked to your liking, remove the salmon from the oven. Sprinkle freshly chopped parsley over the fillets for added color and freshness. Serve immediately with lime wedges on the side for an extra burst of citrus flavor.

Tips:

  • Ensure the salmon fillets are evenly coated with the honey lime garlic butter sauce to maximize flavor absorption.
  • Adjust baking time based on the thickness of your salmon fillets to ensure they cook evenly.
  • Serve with your favorite sides such as rice, roasted vegetables, or a fresh green salad for a complete meal.

Storage Options:
Any leftover Baked Honey Lime Garlic Butter Salmon can be stored in an airtight container in the refrigerator for up to 2 days. Reheat gently in the oven or microwave until warmed through before serving.


Enjoy the delicious flavors of this Baked Honey Lime Garlic Butter Salmon, perfect for any occasion!

Mini BBQ Meatloaves (Mini Meatloaf Muffins)

0

Mini BBQ Meatloaves are a delightful twist on the classic comfort food, packed with savory flavors and topped with a sweet and tangy glaze. These individual portions are perfect for serving at parties, family dinners, or whenever you’re craving a comforting, homemade meal.

Why You’ll Love This Recipe:
These mini meatloaves are not only cute and perfectly portioned but also incredibly flavorful. They combine the richness of ground beef with the savory-sweet notes of BBQ sauce and a tangy glaze on top. Easy to make and quick to bake, they’re a great option for busy weeknights or whenever you want a comforting meal without the fuss of a full-sized meatloaf.

Ingredients:

  • 1 ½ lbs Ground beef
  • ½ cup Chopped onion
  • ½ cup Chopped bell pepper
  • 2 tsp Worcestershire sauce
  • 2 tbsp Chopped fresh parsley
  • 1 tsp Dijon mustard
  • ¼ cup BBQ sauce
  • ⅔ cup Bread crumbs
  • 1 tsp Italian seasoning
  • 1 tsp Garlic powder
  • 1 Large egg
  • Salt and pepper, to taste

For the Glaze:

  • ¼ cup BBQ sauce
  • ¼ cup Ketchup
  • 1 tbsp Honey

Step-by-Step Directions:

Step 1: Prepare The Meatloaf Mixture

Preheat the Oven:
Preheat your oven to 350°F (175°C). Grease a muffin tin well to prevent sticking.

Mix the Meatloaf Ingredients:
In a mixing bowl, combine the ground beef, chopped onion, chopped bell pepper, Worcestershire sauce, chopped parsley, Dijon mustard, BBQ sauce, bread crumbs, Italian seasoning, garlic powder, egg, salt, and pepper. Mix well with your hands until thoroughly combined.

Step 2: Shape and Glaze the Mini Meatloaves

Shape the Meatloaves:
Divide the meatloaf mixture evenly into 10 sections. Place each section into the prepared muffin tin, pressing down gently to form mini meatloaves.

Prepare the Glaze:
In a small bowl, stir together the BBQ sauce, ketchup, and honey until well combined.

Top with Glaze:
Spoon the glaze mixture evenly over the top of each mini meatloaf, spreading it to cover the surface.

Step 3: Bake The Mini Meatloaves

Bake:
Place the muffin tin in the preheated oven and bake for 25 minutes, or until the mini meatloaves are browned and cooked completely through.

Step 4: Serve and Enjoy

Serve:
Remove the mini meatloaves from the oven and let them cool slightly in the muffin tin before serving.

Tips:

  • For extra flavor, consider adding a sprinkle of shredded cheese on top of the glaze before baking.
  • Customize the mini meatloaves with your favorite herbs or additional vegetables like finely chopped mushrooms.
  • Leftover mini meatloaves can be stored in an airtight container in the refrigerator for up to 3 days. Reheat gently in the microwave or oven before serving.

Storage Options:
Store any leftover Mini BBQ Meatloaves in an airtight container in the refrigerator for up to 3 days. Reheat portions as needed for quick and delicious meals.

This format ensures clarity and provides all the details needed to successfully recreate these tasty Mini BBQ Meatloaves. Enjoy your meal!

Slow Cooker Pot Roast

0

This Slow Cooker Pot Roast is a comforting and hearty dish that’s perfect for cozy family dinners or when you want a satisfying meal with minimal effort. Tender chuck roast is slow-cooked to perfection with savory vegetables and a flavorful broth, creating a meal that’s rich in taste and sure to please everyone at the table.

Why You’ll Love This Recipe:
This recipe simplifies the cooking process by using a slow cooker, allowing you to set it and forget it until dinner time. The chuck roast becomes incredibly tender and infused with the flavors of the vegetables and broth. It’s a versatile dish that can be served with mashed potatoes, rice, or crusty bread for soaking up the delicious juices.

Ingredients:

  • 3-4 lbs chuck roast
  • Salt and pepper, to taste
  • 2 tablespoons olive oil
  • 1 large onion, chopped
  • 3 cloves garlic, minced
  • 4 carrots, peeled and chopped
  • 3 parsnips, peeled and chopped
  • 2 potatoes, peeled and chopped
  • 2 cups beef broth
  • 1 cup red wine (optional, or use additional beef broth)
  • 2 tablespoons tomato paste
  • 1 tablespoon Worcestershire sauce
  • 2 sprigs fresh thyme (or 1 teaspoon dried thyme)
  • 2 bay leaves

Step-by-Step Directions:

Step 1: Prepare The Ingredients

Season the Chuck Roast:
Generously season the chuck roast with salt and pepper.

Sear the Roast:
In a large skillet, heat the olive oil over medium-high heat. Sear the roast on all sides until browned, about 4-5 minutes per side.

Transfer to Slow Cooker:
Transfer the seared roast to the slow cooker.

Saute the Vegetables:
In the same skillet, add the chopped onion and garlic. Sauté until softened and fragrant, about 3 minutes. Add the sautéed onion and garlic to the slow cooker.

Add Vegetables and Broth:
Add the chopped carrots, parsnips, and potatoes to the slow cooker with the roast.

Prepare the Broth Mixture:
In a mixing bowl, combine the beef broth, red wine (if using), tomato paste, Worcestershire sauce, thyme, and bay leaves. Pour this mixture over the meat and vegetables in the slow cooker.

Step 2: Cooking The Pot Roast

Cook:
Cover the slow cooker with the lid. Cook on low for 8-10 hours or on high for 4-6 hours, until the meat is tender and the vegetables are cooked through.

Step 3: Finish and Serve

Remove Herbs:
Before serving, remove the thyme sprigs and bay leaves from the slow cooker.

Shred the Meat (Optional):
If desired, shred the meat with two forks directly in the slow cooker and stir it into the juices.

Serve:
Serve the pot roast hot, spooning the vegetables and broth over slices of the tender meat.

Tips:

  • For a deeper flavor, marinate the chuck roast with salt and pepper overnight before cooking.
  • Substitute the red wine with additional beef broth if preferred.
  • Leftovers can be stored in an airtight container in the refrigerator for up to 3 days. Reheat gently on the stove or in the microwave for a quick and satisfying meal.

Storage Options:
Store any leftover Slow Cooker Pot Roast in an airtight container in the refrigerator for up to 3 days. Reheat portions as needed for easy meals throughout the week.


This format ensures clarity and provides all the details needed to successfully recreate this delicious Slow Cooker Pot Roast.

Slow Cooker Baked Ziti

0

Slow Cooker Baked Ziti is a comforting Italian-American dish that brings together layers of pasta, savory meat sauce, creamy ricotta cheese, and gooey melted mozzarella. This easy-to-make recipe is perfect for busy days when you want a hearty meal waiting for you at home. It’s a crowd-pleaser that satisfies with every cheesy, flavorful bite.

Why You’ll Love This Recipe:
This Slow Cooker Baked Ziti simplifies the traditional baked ziti by utilizing the convenience of a slow cooker. It allows the flavors to meld together slowly, resulting in a rich, comforting dish that’s perfect for family dinners or potluck gatherings. The layering technique ensures each bite is packed with deliciousness, from the tender pasta to the cheesy, meaty goodness.

Ingredients:

  • 1 lb Ground Beef (or ground turkey/chicken)
  • 16 oz Dried Ziti
  • 2 jars Pasta Sauce (marinara or tomato basil)
  • 15 oz Ricotta Cheese
  • 1 cup Shredded Mozzarella Cheese
  • 2 cups Shredded Parmesan Cheese
  • 2 Eggs
  • 15 oz Tomato Sauce
  • 1/3 cup Fresh Basil, chopped
  • Salt and Pepper, to taste
  • Cooking Spray (for greasing)

Step-by-Step Directions:

Step 1: Prepare The Ingredients

Cook The Ground Beef:
Brown the ground beef in a skillet over medium heat until fully cooked, breaking it into small pieces as it cooks. Drain any excess fat and set aside.

Make The Cheese Mixture:
In a medium-sized bowl, combine the ricotta cheese, eggs, and chopped basil. Mix until well combined.

Prepare The Sauce:
In a separate bowl, mix together the tomato sauce and pasta sauce to combine well.

Step 2: Assemble The Ziti In The Slow Cooker

Grease The Slow Cooker:
Lightly spray the inside of your slow cooker with cooking spray to prevent sticking.

Layer The Ingredients:

  1. Spread about 2⅓ cups of the sauce mixture evenly over the bottom of the slow cooker.
  2. Add a layer of dried ziti (about a third of the pasta), spreading it evenly over the sauce.
  3. Spread a layer of the ricotta cheese mixture over the ziti.
  4. Sprinkle half of the shredded Parmesan cheese over the ricotta layer.
  5. Evenly distribute the cooked ground beef over the Parmesan layer.
  6. Repeat the layering process until all ingredients are used, ending with a layer of sauce on top.

Step 3: Cooking The Ziti

Cook:
Cover the slow cooker with a lid and set it to high heat. Cook for 2-3 hours, or until the pasta is tender and the flavors have melded together.

Add Mozzarella:
About 10-15 minutes before serving, sprinkle the shredded mozzarella over the top of the ziti. Cover again and let the cheese melt.

Step 4: Serve and Enjoy

Serve:
Once the mozzarella is fully melted, scoop the ziti into bowls or onto plates. Garnish with additional fresh basil if desired.

Enjoy the warm, comforting flavors of this slow-cooked Italian classic.

Tips:

  • Customize with your favorite additions such as spinach, mushrooms, or extra herbs.
  • Ensure the slow cooker is well-greased to prevent sticking during cooking.
  • Leftovers can be stored in an airtight container in the refrigerator for up to 3 days. Reheat in the microwave or oven for a quick and delicious meal.

Storage Options:
Store any leftover Slow Cooker Baked Ziti in an airtight container in the refrigerator for up to 3 days. Reheat portions in the microwave or oven until heated through before serving.


This format maintains clarity and ease of following along, ensuring the recipe is both detailed and straightforward for anyone looking to recreate it.

Mini Pizza Sliders

0

Enjoy the flavors of pizza in a bite-sized form with these delicious pizza sliders. Perfect for parties, gatherings, or a fun family meal, these sliders combine savory meat patties, tangy sauce, gooey cheese, and your favorite pizza toppings, all baked to perfection. They’re easy to assemble and even easier to devour, making them a crowd-pleasing favorite.

Why You’ll Love This Recipe:

These pizza sliders are not only tasty but also versatile. You can customize them with your preferred toppings, whether it’s classic pepperoni, mushrooms, bell peppers, or any other favorite pizza fixings. They’re quick to prepare, making them ideal for busy weeknights or whenever you’re craving a pizza-inspired treat without the hassle of making a traditional pizza crust.

Ingredients:

For the meat patties:

• 1 lb (450g) ground beef or ground turkey

• 1 small onion, finely diced

• 2 garlic cloves, minced

• 1 tablespoon Italian seasoning

• Salt and pepper, to taste

• 1 tablespoon olive oil (for cooking)

For the sliders:

• 8 small burger buns or slider rolls (you can also use sliced bread or mini bagels)

• 1/2 cup pizza sauce or marinara sauce

• 1 cup sliced pepperoni or any toppings of choice (such as mushrooms, bell peppers, etc.)

• 2 cups shredded mozzarella cheese (or a blend of mozzarella and cheddar)

• 1/4 cup grated Parmesan cheese (optional)

• Fresh basil or parsley for garnish (optional)

Instructions:

1. Prepare the meat patties: In a mixing bowl, combine the ground meat with diced onions, minced garlic, Italian seasoning, salt, and pepper. Mix thoroughly to distribute the seasoning. Shape the mixture into small, round patties, roughly the size of your buns.

2. Cook the patties: Heat a skillet over medium-high heat with olive oil. Cook the patties for about 3-4 minutes on each side, until browned and fully cooked through. Set aside on a plate lined with paper towels to drain excess oil.

3. Assemble the sliders: Preheat your oven to 375°F (190°C). Place the bottom half of each bun (or bread slice) on a baking sheet. Spread a spoonful of pizza or marinara sauce on each bun. Add a layer of pepperoni or other toppings, followed by one cooked meat patty.

4. Add the cheese: Top each patty with shredded mozzarella cheese. For extra flavor, sprinkle grated Parmesan cheese on top. Place the top halves of the buns on each slider.

5. Bake: Place the sliders in the preheated oven and bake for 10-12 minutes, until the cheese is fully melted and bubbly. For a crispier top, turn on the broiler for the last 2-3 minutes.

6. Serve: Remove from the oven and let cool for a minute before serving. Garnish with fresh basil or parsley if desired, and serve with extra pizza sauce for dipping.

Tips:

• Customize with your favorite pizza toppings such as olives, onions, or even pineapple for a Hawaiian twist.

• Ensure patties are fully cooked through by checking with a meat thermometer (internal temperature should reach 160°F or 71°C).

• Leftovers can be stored in an airtight container in the refrigerator for up to 3 days. Reheat in the oven or microwave for a quick snack or meal.

Storage Options:

Store any leftover pizza sliders in an airtight container in the refrigerator for up to 3 days. Reheat in the oven or microwave until heated through before serving.

This format ensures clarity and consistency, making it easy to follow and replicate for future recipes.

Homemade Nougat with Mixed Nuts and Dried Fruits

0

Indulge in the sweet delight of homemade nougat, filled with a mix of crunchy nuts and chewy dried fruits. This recipe brings together the richness of sugar syrup, the lightness of whipped egg whites, and the wholesome goodness of nuts and fruits for a treat that’s perfect for any occasion.

Why You’ll Love This Recipe:

  • Customizable Flavors: You can personalize this nougat with your favorite nuts and dried fruits, creating a unique blend of textures and flavors.
  • Homemade Goodness: Making nougat from scratch allows you to control the ingredients, ensuring a fresh and wholesome treat.
  • Impressive Results: Serve these homemade nougat bars as a thoughtful gift or enjoy them as a delightful snack at home.

Ingredients:

  • 2 cups granulated sugar
  • 1 cup honey
  • 1/2 cup water
  • 2 large egg whites
  • 1/4 teaspoon salt
  • 1 teaspoon vanilla extract
  • 2 cups mixed nuts (almonds, pistachios, hazelnuts, etc.)
  • 1 1/2 cups mixed dried fruits (cranberries, apricots, raisins, etc.)
  • Rice paper or parchment paper (optional, for lining)

Instructions:

  • Prepare the Pan:
    Line an 8×8-inch square baking pan with rice paper or parchment paper. If using parchment, lightly grease it with a bit of oil or non-stick spray.
  • Toast the Nuts:
    Preheat the oven to 350°F (175°C).
    Spread the mixed nuts on a baking sheet and toast them in the oven for about 8-10 minutes, until they are lightly browned and fragrant. Let them cool and chop if desired.
  • Cook the Sugar Syrup:
    In a medium saucepan, combine the sugar, honey, and water.
    Cook over medium heat, stirring until the sugar dissolves, then stop stirring and let it cook until the syrup reaches 300°F (150°C) on a candy thermometer.
  • Whip the Egg Whites:
    While the syrup is cooking, place the egg whites in a large mixing bowl. Add the salt.
    Beat the egg whites on medium speed until soft peaks form.
    When the sugar syrup reaches 300°F (150°C), slowly pour it in a thin stream into the egg whites while continuing to beat on low speed.
  • Add the Flavorings and Nuts:
    Continue to beat the mixture until it thickens and becomes glossy, about 5 minutes.
    Add the vanilla extract and fold in the toasted nuts and dried fruits until evenly distributed.
  • Shape and Cool:
    Quickly pour the nougat mixture into the prepared pan. Use a spatula to smooth the top.
    If using rice paper, place another sheet on top of the nougat and press gently.
    Let the nougat cool completely at room temperature, about 2 hours or until firm.
  • Cut and Serve:
    Once set, remove the nougat from the pan. If using parchment, peel it off carefully.
    Cut the nougat into squares or bars with a sharp knife.
    Store the nougat in an airtight container at room temperature.

Tips:

  • Precision in Temperature: Use a candy thermometer to ensure the sugar syrup reaches the correct temperature for the best texture in your nougat.
  • Mixing Technique: Fold in the nuts and fruits gently to avoid deflating the whipped egg whites, which help create the nougat’s light and airy texture.
  • Storage: Store the nougat in an airtight container at room temperature to maintain its freshness and texture.

This format provides a clear, step-by-step guide to making homemade nougat with mixed nuts and dried fruits.

Classic Meatloaf

0

Savor the comforting flavors of Classic Meatloaf, where tender ground beef blends with savory vegetables and oats for a hearty dish that’s perfect for family dinners. This recipe ensures moistness and flavor in every slice, complemented by a hint of tangy ketchup glaze.

Why You’ll Love This Recipe:

  • Moist and Flavorful: The combination of vegetables, oats, and seasonings keeps the meatloaf juicy and packed with flavor.
  • Easy Preparation: Simple steps and common ingredients make this recipe accessible for any cook.
  • Versatile: Serve it fresh out of the oven or enjoy leftovers in sandwiches the next day.

Ingredients:

  • 2 teaspoons canola oil
  • 1 cup finely chopped white mushrooms
  • 1 cup finely chopped onion
  • 1 carrot, peeled and finely chopped
  • 1 stalk celery, finely chopped
  • 1 pound lean ground beef (7% or less fat)
  • 1/2 cup quick cooking or old-fashioned oats (not instant)
  • 2 large egg whites (or 1 whole egg)
  • 3 tablespoons ketchup (plus more for brushing on top)
  • 1 tablespoon Worcestershire sauce
  • 1 teaspoon dried thyme leaves (not ground thyme)
  • 1 teaspoon salt
  • 1/4 teaspoon black pepper
  • 1/2 teaspoon garlic powder (or 1 teaspoon minced fresh garlic)

Instructions:

  1. Prepare the Oven and Pan: Preheat your oven to 350°F (175°C). Spray a loaf pan with cooking spray to prevent sticking. Alternatively, use a baking sheet lined with parchment paper or foil for a different shape.
  2. Cook the Vegetables: Heat canola oil in a large nonstick skillet over medium heat. Add mushrooms, onion, carrot, and celery. Cook, stirring frequently, for about 5 minutes until the onion is translucent and vegetables are softened.
  3. Combine Ingredients: Transfer cooked vegetables to a large mixing bowl. Add ground beef, oats, egg whites (or whole egg), ketchup, Worcestershire sauce, dried thyme, salt, pepper, and garlic powder (or minced garlic). Mix thoroughly using your hands until well combined, being careful not to overmix.
  4. Shape and Bake: Press the meat mixture into the prepared loaf pan, ensuring it’s firmly packed. Alternatively, shape it into a loaf shape on the baking sheet. Optional: Brush additional ketchup on top for a glaze.
  5. Bake: Place the meatloaf in the preheated oven and bake for 30 minutes. After 30 minutes, apply more ketchup glaze if desired. Continue baking for an additional 30 to 45 minutes, or until the internal temperature reaches 160°F (71°C) measured with an instant-read thermometer.
  6. Rest and Serve: Remove the meatloaf from the oven and let it rest for 5 minutes before slicing. This allows juices to redistribute, enhancing moisture. Serve warm, sliced into 8 portions, alongside mashed potatoes, vegetables, or a salad.

Storage Tips:

  • Refrigeration: Store leftovers in an airtight container in the refrigerator for up to 3 days. Reheat slices in the oven or microwave before serving.
  • Freezing: Wrap cooled meatloaf tightly in plastic wrap and foil. Label with the date and freeze for up to 3 months. Thaw overnight in the refrigerator before reheating.

Classic Meatloaf is a timeless dish that brings warmth and satisfaction to any mealtime. Its blend of hearty ingredients and savory flavors makes it a staple in many households, perfect for both casual dinners and special occasions.

Creamy Broccoli Pasta Bake

0

Indulge in the comforting flavors of Creamy Broccoli Pasta Bake, where tender pasta, vibrant broccoli, and a rich cheese sauce come together in a satisfying casserole. This dish is perfect for a family dinner or a potluck, offering a balance of creamy goodness and wholesome ingredients.

Why You’ll Love This Recipe:

  • Creamy and Cheesy: The combination of Parmesan and mozzarella cheeses creates a luscious, cheesy sauce that coats every bite.
  • Nutritious Addition: Broccoli adds color, texture, and nutritional value to the dish, making it a wholesome meal.
  • Easy to Prepare: With simple ingredients and straightforward instructions, this pasta bake is perfect for busy weeknights.

Ingredients:

  • 12 oz pasta (penne or fusilli recommended)
  • 4 cups broccoli florets
  • 2 tbsp olive oil
  • 1 medium onion, finely chopped
  • 3 cloves garlic, minced
  • 2 tbsp all-purpose flour
  • 2 cups milk
  • 1 cup heavy cream
  • 1 tsp dried basil
  • 1 tsp dried oregano
  • 1 cup grated Parmesan cheese
  • 2 cups shredded mozzarella cheese
  • Salt and pepper to taste
  • 1/2 cup breadcrumbs
  • 2 tbsp melted butter

Instructions:

  1. Preheat the oven to 375°F (190°C).
  2. Cook Pasta and Broccoli: Cook the pasta according to package instructions until al dente. During the last 2 minutes of cooking, add the broccoli florets to the boiling water with the pasta. Drain and set aside.
  3. Prepare the Sauce: In a large skillet, heat olive oil over medium heat. Add chopped onion and cook until translucent, about 5 minutes. Add minced garlic and cook for another minute until fragrant.
  4. Make the Roux: Sprinkle flour over the onions and garlic, stirring continuously for 2 minutes to create a roux.
  5. Add Milk and Cream: Slowly whisk in milk and heavy cream, ensuring there are no lumps. Cook and stir until the sauce thickens, about 5-7 minutes.
  6. Season the Sauce: Add dried basil, dried oregano, salt, and pepper to taste. Stir in grated Parmesan cheese until melted and the sauce is well combined.
  7. Combine Pasta and Sauce: Mix the cooked pasta and broccoli with the sauce in the skillet, ensuring everything is evenly coated.
  8. Assemble the Casserole: Transfer the pasta mixture into a greased baking dish. Sprinkle shredded mozzarella cheese evenly over the top.
  9. Add Breadcrumb Topping: In a small bowl, combine breadcrumbs with melted butter. Sprinkle this mixture evenly over the mozzarella cheese.
  10. Bake: Place the baking dish in the preheated oven and bake for 20-25 minutes, or until the top is golden brown and the casserole is bubbly.
  11. Serve: Allow the Creamy Broccoli Pasta Bake to cool for a few minutes before serving. Enjoy this comforting dish warm with a side salad or garlic bread.

Storage Tips:

  • Refrigeration: Store any leftovers in an airtight container in the refrigerator for up to 3 days. Reheat in the oven or microwave before serving.
  • Freezing: If you plan to freeze the pasta bake, do so before baking. Cover tightly with plastic wrap and aluminum foil, label with the date, and freeze for up to 3 months. Thaw overnight in the refrigerator before baking as directed.

This Creamy Broccoli Pasta Bake is a versatile and satisfying dish that’s sure to become a family favorite. Its creamy texture, combined with the crunch of breadcrumbs and cheesy goodness, makes it a comforting choice for any occasion.