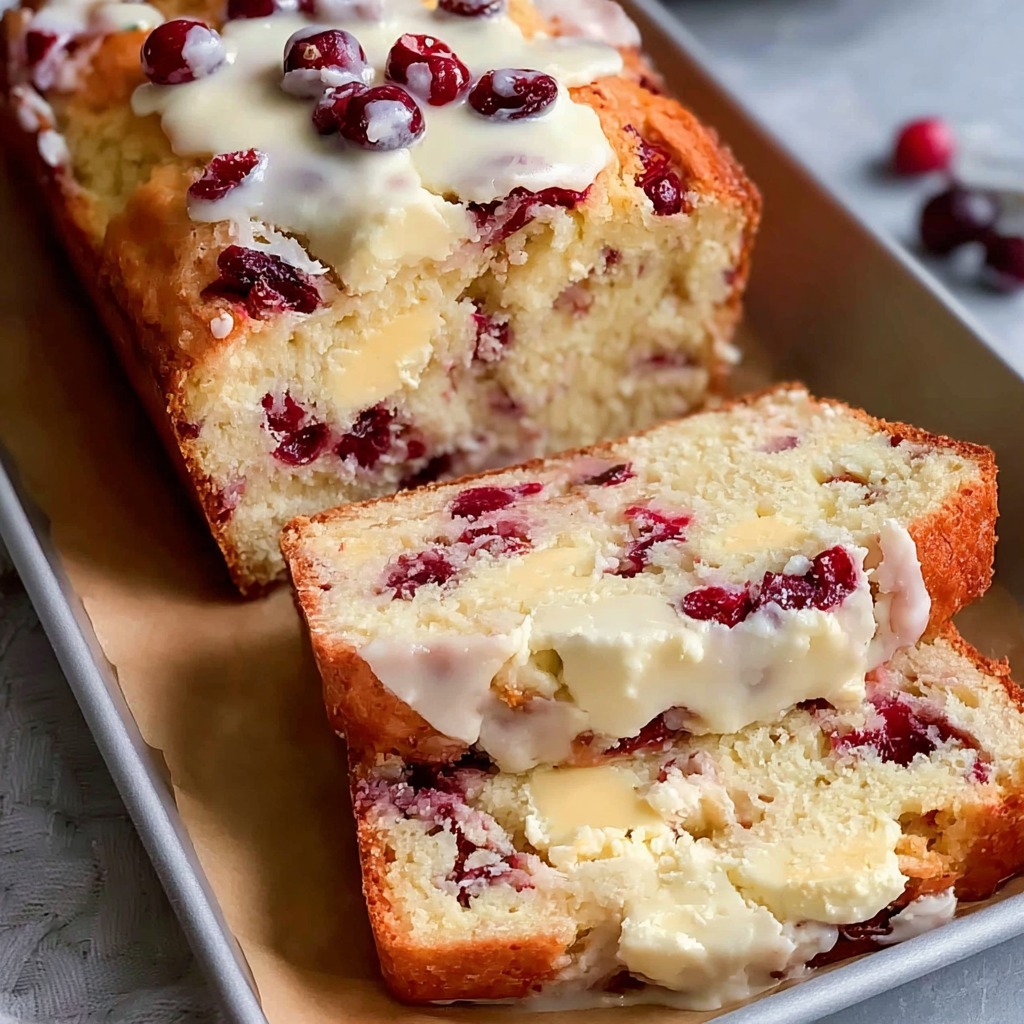
Chicken and Rice

0

Chicken and Rice is the kind of comforting, one-pot meal that never goes out of style. It’s warm, hearty, and full of classic flavors that come together easily with just a few fresh ingredients and pantry staples. This version uses jasmine or basmati rice, which gives the dish a soft, aromatic base that pairs beautifully with the lightly seasoned chicken and sautéed vegetables.

What makes this dish special is how it slowly simmers, allowing the rice to absorb the rich chicken broth and the flavors of the garlic, herbs, and vegetables. Everything cooks in one pot, meaning minimal cleanup and maximum flavor. It’s perfect for a weeknight dinner but also satisfying enough to serve to guests with a side of crusty bread or a simple green salad.

Why You’ll Love This Recipe

• Easy one-pot meal with minimal cleanup

• Loaded with flavor from fresh herbs and vegetables

• Perfect for leftovers and meal prepping

Ingredients

1 tablespoon olive oil

2 tablespoons unsalted butter

1½ lb boneless skinless chicken breast, cut into bite-size pieces

⅕ teaspoon paprika

¼ teaspoon kosher salt

½ teaspoon fresh ground black pepper

1 medium yellow onion, chopped

2 ribs celery, chopped

3 large carrots, peeled and chopped

2 cloves garlic, minced

½ teaspoon dried thyme

½ teaspoon crushed rosemary

½ teaspoon marjoram

2 cups jasmine or basmati rice, uncooked

4½ cups chicken broth

Kosher salt and fresh ground black pepper, to taste

Chopped fresh thyme or rosemary (for garnish)

Instructions

Step 1: Brown the Chicken

Heat olive oil and 1 tablespoon of butter in a large deep skillet or Dutch oven over medium heat.

While the pan heats, season the chicken pieces with paprika, kosher salt, and black pepper.

Add the chicken to the hot skillet and brown on both sides. This step locks in flavor.

Once browned, remove the chicken and transfer to a plate. Cover loosely to keep warm.

Step 2: Cook the Vegetables

Add the remaining 1 tablespoon of butter to the skillet.

Add the chopped onion, celery, and carrots.

Cook for 5–6 minutes or until the onions and celery are softened. Stir occasionally to avoid browning too quickly.

Step 3: Toast the Rice and Spices

Reduce the heat to low.

Add minced garlic, dried thyme, crushed rosemary, marjoram, and the uncooked jasmine rice.

Stir constantly for 1–2 minutes to lightly toast the rice and release the aroma of the herbs.

Step 4: Add the Broth and Simmer

Pour in the chicken broth and stir to combine all ingredients evenly.

Increase the heat and bring the mixture to a gentle boil.

Once boiling, reduce heat to low and return the browned chicken (with its juices) to the pot.

Cover with a tight-fitting lid and let it simmer for 20 minutes—resist the urge to lift the lid.

Step 5: Let It Rest

After simmering, remove the pot from heat.

Let it sit, covered, for another 5 minutes. This allows the rice to steam and fully absorb the flavors.

Step 6: Fluff and Garnish

Use a fork to fluff the rice, separating the grains and mixing everything evenly.

Sprinkle with chopped fresh thyme or rosemary for a fragrant finish.

Tips for Success

• Use high-quality broth for the best flavor

• Don’t skip toasting the rice—it adds depth

• Letting the dish sit before fluffing helps avoid mushy rice

Storage Options

Store leftovers in an airtight container in the refrigerator for up to 4 days

Freeze for up to 2 months and thaw overnight in the fridge before reheating

Reheat gently on the stovetop or in the microwave with a splash of broth or water to loosen the rice

Pineapple Upside Down Sugar Cookies

0

These Pineapple Upside Down Sugar Cookies are a tropical twist on a classic treat, combining soft, chewy sugar cookie dough with the caramelized flavor of pineapple and the sweetness of maraschino cherries. They’re everything you love about pineapple upside-down cake—reimagined into handheld cookies. Each one is topped with a golden pineapple ring and a bright cherry center, giving it a fun, vintage look that’s both eye-catching and delicious.

Perfect for parties, bake sales, or summertime gatherings, these cookies bake up beautifully and offer a refreshing burst of fruitiness in every bite. The cookie base is buttery and sweet, while the pineapple topping creates a juicy contrast that’s hard to resist. A sprinkle of brown sugar on top creates a hint of caramelization in the oven, making these cookies smell and taste just like a slice of sunshine.

Why You’ll Love This Recipe

• Combines a classic sugar cookie with fruity topping

• Soft, buttery texture with crisp golden edges

• Eye-catching presentation with minimal effort

Ingredients

1 cup unsalted butter, softened

1 cup granulated sugar

½ cup brown sugar

2 large eggs

1 teaspoon vanilla extract

3 cups all-purpose flour

1 teaspoon baking powder

½ teaspoon salt

24 maraschino cherries

24 pineapple rings, drained

¼ cup light brown sugar (for topping)

Instructions

Step 1: Preheat the Oven

Preheat your oven to 350°F (175°C).

Line a large baking sheet with parchment paper or a silicone baking mat.

Step 2: Cream the Butter and Sugars

In a large bowl, cream together the softened butter, granulated sugar, and brown sugar using a mixer on medium speed.

Beat until the mixture is light and fluffy, about 2–3 minutes.

Step 3: Add the Eggs and Vanilla

Add the eggs one at a time, beating well after each addition.

Stir in the vanilla extract until fully incorporated.

Step 4: Mix the Dry Ingredients

In a separate bowl, whisk together the flour, baking powder, and salt.

Gradually add the dry mixture to the butter mixture, mixing just until a soft dough forms.

Step 5: Shape the Cookies

Roll the dough into 1-inch balls and place them on the prepared baking sheet, spacing them about 2 inches apart.

Flatten each dough ball slightly with your fingers or the bottom of a glass.

Step 6: Add the Pineapple and Cherry

Gently press a pineapple ring on top of each dough ball.

Place a maraschino cherry in the center of each pineapple ring.

Sprinkle a pinch of light brown sugar over the top of each assembled cookie for a caramelized effect.

Step 7: Bake

Bake in the preheated oven for 12–15 minutes, or until the edges of the cookies are golden brown and the pineapples are lightly caramelized.

Step 8: Cool and Serve

Let the cookies cool on the baking sheet for 5 minutes before transferring to a wire rack.

Allow them to cool completely before serving so the fruit sets properly.

Tips for Success

• Pat the pineapple rings dry with paper towels to reduce excess moisture

• Use a cookie scoop for even portioning of dough

• Rotate the baking sheet halfway through baking for even browning

Storage Options

Store in an airtight container at room temperature for up to 3 days

Refrigerate for longer shelf life (up to 1 week)

Freeze the unbaked dough balls and top with pineapple/cherry just before baking for make-ahead convenience

Philly Cheese Steak Cheesy Bread

0

This Philly Cheese Steak Cheesy Bread is the ultimate comfort food—meaty, cheesy, and wrapped in golden puff pastry. Inspired by the bold flavors of a classic Philly cheesesteak, this recipe brings together seasoned ground beef, crispy bacon, sautéed onions and jalapeños, and a melty cheese blend that oozes with every bite. Wrapped in puff pastry and baked until golden, these cheesy bread bombs are perfect as party appetizers, game day snacks, or even a casual dinner.

The flavor is rich and savory with layers of texture—from the crisp bacon and golden crust to the creamy cheese and spicy jalapeño heat. Easy to make ahead and a crowd favorite every time, they’re everything you love about a cheesesteak, packed into a handheld, puffed-up bite.

Why You’ll Love This Recipe

• Crispy on the outside, melty on the inside

• Loaded with bacon, beef, cheese, and bold seasoning

• Perfect for snacks, parties, or a fun dinner

Ingredients

1 lb ground beef

1–2 tablespoons Burger Royale seasoning (or your favorite burger seasoning)

6 oz bacon, diced

1 small onion, diced

1 jalapeño, diced

1 tablespoon Worcestershire sauce

1 tablespoon yellow mustard

1 tablespoon F&S Original BBQ Sauce (or any mild BBQ sauce)

8 oz American cheese, shredded

8 oz cheddar cheese, shredded

1 sheet puff pastry, thawed

1 egg, beaten (for egg wash)

Instructions

Step 1: Prepare the Sauce

In a small bowl, mix together Worcestershire sauce, yellow mustard, and BBQ sauce. Stir until smooth and refrigerate until ready to use.

Step 2: Cook the Bacon

In a large skillet over medium heat, cook the diced bacon until crispy.

Remove the bacon with a slotted spoon and set it aside. Reserve 1–2 tablespoons of the bacon grease in the skillet.

Step 3: Sauté the Veggies

In the reserved bacon grease, sauté the diced onion and jalapeño until softened and lightly caramelized, about 5–7 minutes.

Transfer them to a plate and set aside.

Step 4: Brown the Ground Beef

In the same skillet, add the ground beef. Sear it on both sides without breaking it up at first to develop flavor.

Then break up the beef and cook until browned and no longer pink.

Season with 1–2 tablespoons of Burger Royale seasoning and mix well.

Step 5: Combine the Filling

Return the cooked bacon, sautéed onions, and jalapeños to the skillet with the beef.

Add the prepared sauce mixture and stir until well combined.

Sprinkle in half of the shredded American cheese and stir until everything is melty and incorporated. Remove from heat.

Step 6: Preheat the Oven

Preheat your oven to 375°F (190°C).

Line a baking sheet with parchment paper.

Step 7: Assemble the Bread Bombs

On a floured surface, roll out the puff pastry sheet.

Cut into 9 equal squares.

Spoon a generous amount of the cheesesteak filling onto the center of each square.

Top each with a small pinch of remaining shredded American cheese.

Step 8: Shape and Seal

Fold the corners of each pastry square up and toward the center to seal the filling inside.

Gently press and shape into a round ball.

Step 9: Egg Wash and Cheese Topping

Place the pastry balls seam-side down on the prepared baking sheet.

Brush the tops with the beaten egg.

Sprinkle each with shredded cheddar cheese for extra flavor and a golden crust.

Step 10: Bake

Bake in the preheated oven for 25–30 minutes, or until golden brown, puffed, and bubbling.

Remove from the oven and serve hot.

Tips for Success

• Thaw puff pastry in the fridge, not on the counter, to keep it firm and easier to handle

• Use gloves when chopping jalapeños if you’re sensitive to spice

• Don’t overfill the pastry or it may split open while baking

Storage Options

Store leftovers in an airtight container in the refrigerator for up to 3 days

Reheat in the oven or air fryer to bring back the crispiness

Freeze unbaked bombs on a baking sheet, then transfer to a bag—bake straight from frozen, adding 5–7 minutes to the baking time

Mediterranean Grilled Cheese Sandwich

0

Mediterranean Grilled Cheese Sandwich is a bright and flavorful twist on the classic comfort food, packed with tangy feta, creamy ricotta, and stretchy mozzarella. Add in sun-dried tomatoes, olives, and spinach, and you’ve got a sandwich that feels indulgent and wholesome all at once. The combination of cheeses gives it layers of texture and flavor, while the sun-dried tomatoes and olives add that signature Mediterranean kick.

Grilled to golden perfection between two slices of sourdough or whole grain bread, this sandwich is perfect for lunch, a light dinner, or a quick bite between meals. It’s hearty without being heavy, and every bite offers a mix of melted cheese, savory vegetables, and crispy toasted bread.

Why You’ll Love This Recipe

• A flavorful spin on classic grilled cheese

• Melty, creamy, and tangy with each bite

• Quick to make and incredibly satisfying

Ingredients

1 cup fresh spinach leaves, chopped

½ cup shredded mozzarella cheese

2 tablespoons crumbled feta cheese

2 tablespoons ricotta cheese

2 tablespoons sun-dried tomatoes, drained and chopped

1 tablespoon sliced black or Kalamata olives

4 slices whole grain or sourdough bread

2 tablespoons butter, softened

Instructions

Step 1: Wilt the Spinach

Place the chopped spinach in a microwave-safe bowl.

Microwave on high for 45 seconds until wilted.

Step 2: Prepare the Cheese Mixture

Add the wilted spinach to a bowl with mozzarella, feta, ricotta, sun-dried tomatoes, and olives.

Mix thoroughly until all ingredients are well combined into a creamy, flavorful filling.

Step 3: Assemble the Sandwiches

Spread the cheese and spinach mixture evenly over two slices of bread.

Top with the remaining slices of bread to close the sandwiches.

Butter the outer sides of each sandwich for a crispy golden crust.

Step 4: Grill the Sandwiches

Heat a skillet over medium-low heat.

Place the sandwiches in the skillet, buttered side down.

Cook for 2–3 minutes per side, pressing gently with a spatula for even browning.

Cook until the bread is golden and the cheese is melted through.

Step 5: Serve and Enjoy

Remove the sandwiches from the skillet.

Slice in half and serve warm.

Tips for Success

• Use a lid while grilling to help melt the cheese evenly

• Add a small spoon of olive oil dressing to the filling for extra Mediterranean flavor

• Sourdough adds a slight tang that pairs perfectly with feta and sun-dried tomatoes

Storage Options

Best enjoyed fresh

Leftovers can be stored in foil in the fridge for up to 1 day

Reheat in a skillet or toaster oven for a crispy finish

Blueberry Butter

0

Blueberry Butter is the perfect blend of sweet fruit and creamy richness that adds a luxurious touch to anything you spread it on. Whether slathered on warm toast, dolloped over pancakes, or tucked inside a biscuit, this velvety spread brings a burst of blueberry flavor with a hint of honey and citrus. It’s a beautiful way to preserve the season’s berries and make everyday breakfasts feel a little more indulgent.

Unlike fruit jams that require long cooking or precise setting, blueberry butter is easy to prepare in under 30 minutes and uses simple ingredients you probably already have at home. The honey enhances the natural sweetness of the berries, while a touch of lemon juice brightens the flavor, keeping it fresh and vibrant. Once chilled, the mixture becomes a smooth, spreadable delight that’s as stunning in appearance as it is in taste.

Why You’ll Love This Recipe

• Quick and easy with only 4 ingredients

• Naturally sweetened with honey

• Perfect for toast, muffins, waffles, and more

Ingredients

1 cup fresh blueberries

¼ cup honey

½ cup unsalted butter, softened

1 teaspoon lemon juice

Instructions

Step 1: Cook the Blueberries

In a small saucepan over medium heat, combine the blueberries and honey.

Let the mixture bubble gently for 8–10 minutes, stirring occasionally.

The blueberries will begin to pop and release their juices, creating a syrupy blend.

Step 2: Cool and Mash

Remove the pan from the heat and let the mixture cool for 5–10 minutes.

Transfer the blueberry mixture to a bowl.

Mash with a fork for a chunky texture or blend with an immersion blender for a smoother consistency.

Step 3: Combine with Butter

Add the softened butter and lemon juice to the bowl.

Mix until fully combined and creamy, with the blueberries evenly distributed.

You can use a hand mixer for a whipped texture or a spoon for a rustic feel.

Step 4: Chill

Spoon the blueberry butter into an airtight jar or container.

Refrigerate for 2–3 hours until firm and spreadable.

Step 5: Serve and Enjoy

Spread on toast, warm muffins, scones, pancakes, or waffles.

It’s also delicious melted over hot biscuits or stirred into oatmeal.

Tips for Success

• Use unsalted butter for the purest flavor

• Make sure the butter is softened, not melted, for the creamiest texture

• For a deeper flavor, add a tiny pinch of cinnamon or vanilla extract

Storage Options

Refrigerate in an airtight container for up to 2 weeks

Freeze for up to 3 months—thaw overnight in the fridge before using

Bring to room temperature for easier spreading before serving

Lemon Cookies

0

Lemon Cookies are a bright and zesty treat perfect for spring, summer, or any time you crave something refreshing and sweet. These cookies strike a beautiful balance—soft and buttery in the center with just the right hint of crispness around the edges. The fresh lemon zest and juice baked into the dough give each bite a natural citrus burst, while the light glaze on top adds a tangy, sweet finish that brings everything together.

Perfect for casual afternoon snacks, cookie exchanges, or bridal showers, these cookies are elegant enough to impress yet simple enough to make on a whim. The lemon icing sets beautifully, making them great for stacking or storing, and they pair wonderfully with a cup of tea or a chilled glass of lemonade.

Why You’ll Love This Recipe

• Bright lemon flavor in every bite

• Soft texture with a crisp edge

• Easy to make and perfect for sharing

Ingredients

Lemon Cookies

2¼ cups all-purpose flour

½ teaspoon baking powder

½ teaspoon baking soda

½ teaspoon salt

1 cup granulated sugar

1 cup unsalted butter, softened

1 large egg

2 tablespoons lemon zest

1½ tablespoons lemon juice

1 teaspoon vanilla extract

Lemon Icing

1½ cups powdered sugar

1½ tablespoons lemon juice

1½ tablespoons milk

2 tablespoons lemon zest

Instructions

Step 1: Prep the Oven and Pans

Preheat oven to 350°F (175°C).

Line baking sheets with parchment paper or silicone baking mats for even baking and easy cleanup.

Step 2: Mix the Dry Ingredients

In a medium bowl, whisk together the flour, baking powder, baking soda, and salt. Set aside.

Step 3: Cream the Butter and Sugar

In a large bowl, using a stand mixer or hand mixer on medium speed, cream the softened butter and sugar together until light and fluffy, about 2–3 minutes.

Step 4: Add the Wet Ingredients

Turn the mixer to low. Add in the egg, lemon zest, lemon juice, and vanilla extract. Mix just until combined.

Step 5: Incorporate the Dry Mixture

Gradually add the flour mixture to the butter mixture in three parts. Mix on low speed just until all the flour is incorporated—avoid overmixing to keep the cookies tender.

Step 6: Scoop and Bake

Using a 1½-tablespoon cookie scoop, place cookie dough balls on the prepared baking sheets, spacing them about 2 inches apart.

Bake for 10–12 minutes, or until the edges are just turning golden and the tops are set.

Step 7: Cool the Cookies

Remove from the oven and let the cookies sit on the baking sheet for 2 minutes.

Transfer to cookie cooling racks and cool completely before icing.

Step 8: Prepare the Lemon Icing

In a small bowl, whisk together the powdered sugar, lemon juice, milk, and lemon zest until smooth. The glaze should be pourable but thick enough to coat the cookie tops.

Step 9: Ice the Cookies

Once the cookies are completely cool, spoon or drizzle icing over the tops.

Place cookies back on the cooling rack and let the icing set for about 30 minutes.

Tips for Success

• Use fresh lemons for the best flavor—bottled juice doesn’t compare

• Zest lemons before juicing to make it easier

• If the icing is too thick, add a few drops of milk at a time until desired consistency is reached

Storage Options

Store in an airtight container at room temperature for up to 5 days

Refrigerate if you want a firmer glaze or longer shelf life (up to 1 week)

Freeze un-iced cookies for up to 2 months; thaw and glaze when ready to serve

Strawberry Rhubarb Pie

0

Strawberry Rhubarb Pie is a classic spring and summer dessert that perfectly balances tart and sweet flavors in every bite. The combination of juicy strawberries and tangy rhubarb tucked into a buttery, flaky crust and topped with a golden, crumbly streusel makes this pie a favorite at family gatherings, potlucks, or simply as a treat to enjoy with your favorite cup of tea or coffee. The fruit filling thickens beautifully as it bakes, while the topping provides a rich, sugary crunch that complements the soft interior.

This version keeps things traditional with a scratch-made crust and crumb topping, allowing the fresh fruit to be the star. Whether served warm with vanilla ice cream or cooled to enjoy on its own, this pie is both nostalgic and irresistible. It’s a seasonal must-bake that celebrates the flavors of the garden in the most comforting way.

Why You’ll Love This Recipe

• Sweet and tart fruit combo with a rich streusel topping

• Buttery homemade crust that holds up beautifully

• A crowd-pleasing dessert that looks as good as it tastes

Ingredients

Pie Crust

½ cup chilled unsalted butter, cut into small cubes

1½ cups all-purpose flour

½ teaspoon salt

4–6 tablespoons chilled water

Streusel Crumb Topping

1¼ cups all-purpose flour

⅓ cup granulated sugar

⅓ cup brown sugar

½ cup unsalted butter, cut into cubes

Pie Filling

3 cups sliced rhubarb (¼–½ inch thick)

2½ cups chopped strawberries

⅓ cup granulated sugar

⅓ cup packed brown sugar

3½ tablespoons cornstarch

½ teaspoon vanilla extract

½ teaspoon lemon juice

Instructions

Step 1: Make the Pie Dough

In a large bowl, combine flour and salt.

Add the cubed butter and use a pastry blender or fork to cut it in until the mixture resembles coarse crumbs.

Add chilled water, one tablespoon at a time, mixing with a fork until the dough just comes together.

Form into a disk, wrap in plastic wrap, and chill for at least 2 hours.

Step 2: Prepare the Streusel Topping

In a separate bowl, whisk together flour, granulated sugar, and brown sugar.

Add cubed butter and cut it in with a pastry blender or fork until the mixture is crumbly.

Set aside in the fridge while preparing the filling.

Step 3: Mix the Filling

In a large bowl, stir together rhubarb, strawberries, granulated sugar, brown sugar, cornstarch, vanilla extract, and lemon juice.

Let sit while you roll out the pie dough so the juices begin to release.

Step 4: Roll Out the Crust

On a lightly floured surface, roll the chilled pie dough into a 12-inch circle.

Carefully transfer it to a 9-inch pie plate.

Tuck the dough into the bottom and sides of the plate without stretching it.

Trim excess dough, leaving about 1 inch hanging over the edge. Fold it under and crimp or flute the edge.

Step 5: Assemble the Pie

Spoon the fruit filling evenly into the prepared crust.

Sprinkle the streusel topping generously over the fruit mixture, covering as much of the surface as possible.

Step 6: Bake

Preheat the oven to 375°F (190°C).

Place the pie on a rimmed baking sheet to catch any bubbling juices.

Bake for 50–55 minutes, or until the filling is bubbling and the topping is golden brown.

If the topping begins to brown too quickly, loosely cover with foil for the final 10–15 minutes.

Step 7: Cool and Serve

Let the pie cool completely at room temperature to allow the filling to set.

Slice and serve as is or with a scoop of vanilla ice cream or a dollop of whipped cream.

Tips for Success

• Use cold butter and chilled water for the flakiest crust

• Chill the assembled pie for 10 minutes before baking to help the crust hold its shape

• Don’t skip the rimmed baking sheet—this pie loves to bubble over

Storage Options

Store covered at room temperature for 1 day or refrigerate for up to 3 days

Reheat individual slices in the microwave or enjoy cold

Can be frozen after baking; wrap tightly and thaw before reheating

Ham and Cheese Quiche

0

Ham and Cheese Quiche is the ultimate comfort dish that effortlessly blends savory flavors with a rich, creamy custard and buttery crust. Ideal for breakfast, brunch, or even dinner, this quiche brings together diced ham, sautéed onion, sharp cheddar, Monterey Jack, and vibrant broccoli, all suspended in a luscious mixture of eggs and cream. Whether you’re serving guests or planning ahead for the week, it’s a wholesome and filling option that’s both elegant and easy to make.

What sets this version apart is the homemade crust—flaky and golden, made from scratch with simple pantry staples. It provides the perfect base for the hearty filling and crisp edges that hold every slice together. The aromatic blend of dried parsley, marjoram, and ground mustard rounds out the flavor beautifully, giving each bite a balanced touch of herbs and depth.

Why You’ll Love This Recipe

• Buttery homemade crust that’s worth the extra step

• Hearty mix of ham, broccoli, and cheese in every slice

• Great for make-ahead meals and freezer-friendly

Ingredients

Homemade Crust

1 cup all-purpose flour

2 teaspoons granulated sugar

½ teaspoon salt

6 tablespoons unsalted butter

¼ cup ice cold water

Quiche Mixture

3 tablespoons unsalted butter

2 cups diced ham

1 small onion, finely chopped

2 cloves garlic, minced

1 tablespoon dried parsley

½ teaspoon dried marjoram

6 large eggs, room temperature

1 cup heavy cream, room temperature

1½ cups sharp cheddar cheese, shredded

1 cup Monterey Jack cheese

2 cups broccoli florets, finely chopped

1 teaspoon ground mustard

½ teaspoon salt

¼ teaspoon fresh ground black pepper

Instructions

Step 1: Make the Pie Dough

In a mixing bowl, whisk together the flour, sugar, and salt.

Cut in the butter using a pastry cutter until the mixture forms large crumbs.

Add ice water one tablespoon at a time, mixing with a fork or hands, until the dough comes together.

Form into a ball, flatten into a disk, wrap in plastic wrap, and chill for at least 1 hour.

Step 2: Roll Out and Prepare the Crust

On a lightly floured surface, roll the dough from the center outward, rotating often to keep it even.

Roll to about 13 inches in diameter.

Transfer to a 9-inch pie pan by wrapping around the rolling pin.

Trim excess dough, fold the edges under, and crimp. Refrigerate for 1 hour.

Step 3: Blind Bake the Crust

Preheat oven to 400°F (200°C).

Pierce the base of the crust with a fork. Line with parchment paper and fill with dried beans or rice.

Bake for 10–12 minutes. Remove the paper and weights, and bake for another 10 minutes until lightly golden.

Set aside to cool slightly.

Step 4: Sauté the Filling Base

In a large saucepan over medium-low heat, melt the butter.

Add diced ham and chopped onions. Cook for 2–3 minutes until the onion softens.

Stir in garlic, parsley, and marjoram, and cook for 1 more minute. Remove from heat.

Step 5: Mix the Egg Filling

In a large bowl, whisk together the eggs and heavy cream until smooth.

Stir in cheddar cheese, Monterey Jack, broccoli, ground mustard, salt, and pepper.

Add in the cooked ham mixture and stir to combine.

Step 6: Assemble and Bake

Pour the quiche mixture into the pre-baked pie crust, smoothing the top.

Bake at 350°F (175°C) for 40–45 minutes, or until a knife inserted in the center comes out clean.

If the crust begins to brown too quickly, cover the edges with foil.

Step 7: Rest and Serve

Let the quiche sit for 10 minutes before slicing. Serve warm, or let cool completely and chill to serve cold.

Tips for Success

• Use room temperature eggs and cream for the best texture

• Chop broccoli finely so it cooks evenly within the custard

• For a deeper flavor, add a pinch of nutmeg or crushed red pepper

Storage Options

Refrigerate leftovers for up to 4 days in an airtight container

Freeze individual slices for up to 2 months—reheat in the oven at 300°F until warmed through

Best enjoyed warm or at room temperature for optimal texture

Crescent Roll Apple Dumplings

0

Crescent Roll Apple Dumplings are a dreamy, comforting dessert that’s both rustic and indulgent. Tart Granny Smith apple slices are wrapped in buttery crescent dough, baked until golden, and drenched in a rich caramel-like sauce made from butter, brown sugar, and cinnamon. The addition of lemon-lime soda may sound unusual, but it creates a subtle fizz and depth that lifts the dish, giving the sauce a silky texture and unique flavor you won’t want to skip.

As the dumplings bake, the dough becomes crisp on the outside while the inside stays soft and pillowy, absorbing the spiced syrup bubbling around them. Paired with a scoop of vanilla ice cream melting into that warm sauce, it’s the kind of dessert that brings pure joy with every bite. It’s easy enough for weeknight treats and special enough for the holidays or Sunday dinners.

Why You’ll Love This Recipe

• Only a few simple ingredients

• Warm, gooey, and sweet with a crisp edge

• Perfect with a scoop of ice cream

Ingredients

¾ cup unsalted butter, plus more for greasing the pan

2 Granny Smith apples, peeled, cored, and cut into 8 wedges each

2 cans crescent roll dough (8 oz each)

1 cup packed light brown sugar

1½ teaspoons ground cinnamon

1 teaspoon pure vanilla extract

Pinch of kosher salt

8 oz lemon-lime soda (such as Sprite or 7-Up)

Vanilla ice cream, for serving

Instructions

Step 1: Prepare the Oven and Pan

Preheat your oven to 350°F (175°C).

Grease a 13×9-inch baking dish with a light layer of butter.

Step 2: Slice the Apples

Peel, core, and slice the apples into 8 equal wedges each, for a total of 16 slices.

Step 3: Wrap the Apples

Unroll the crescent dough and separate it into triangles.

Place one apple wedge at the wide end of each triangle.

Roll the dough around the apple slice, starting at the wide end and tucking the point underneath.

Place each rolled apple into the prepared baking dish, seam-side down.

Step 4: Make the Sauce

In a small saucepan over medium heat, melt the butter.

Stir in the brown sugar, cinnamon, vanilla extract, and a pinch of kosher salt.

Continue stirring until the mixture becomes smooth and glossy.

Step 5: Pour and Assemble

Pour the brown sugar sauce evenly over the dumplings, coating them well.

Gently pour the lemon-lime soda around the edges of the pan and in between the dumplings—avoid pouring it directly on top of the rolls.

Step 6: Bake

Bake uncovered for 30 minutes, or until the dumplings are golden brown and the sauce is bubbly and thickened.

Step 7: Serve

Let cool for 5 minutes before serving. Spoon extra sauce over each dumpling and top with a scoop of vanilla ice cream for a perfect finish.

Tips for Success

• Use Granny Smith apples for their tartness—they balance the sweetness beautifully

• Avoid pouring soda over the tops to keep the dough from becoming soggy

• Want more spice? Add a pinch of nutmeg or clove to the sauce

Storage Options

Store leftovers in an airtight container in the refrigerator for up to 3 days

Reheat in the microwave or oven at 300°F until warmed through

Not freezer-friendly due to the crescent dough’s texture after thawing

Honey Garlic Shrimp, Sausage & Broccoli

0

This Honey Garlic Shrimp, Sausage & Broccoli skillet is a fast, flavor-packed meal that brings together sweet, savory, and a little bit of spice in every bite. Juicy shrimp and smoky sausage are seared to perfection, then tossed with tender-crisp broccoli and coated in a sticky honey garlic sauce that clings to every ingredient. The combination is satisfying and vibrant, and it pairs beautifully with rice or quinoa to soak up all the extra glaze.

Perfect for busy weeknights or when you want something exciting without much fuss, this dish comes together in just one skillet and less than 30 minutes. The balance of garlic, soy, and honey gives you that irresistible takeout-style flavor—only better and fresher. A dash of red pepper flakes adds optional heat, and a squeeze of lemon brightens everything up.

Why You’ll Love This Recipe

• Quick and ready in under 30 minutes

• One-skillet meal = easy cleanup

• Sweet, savory, and just a little spicy

Ingredients

1 lb large shrimp, peeled and deveined

8 oz smoked sausage, sliced into ½-inch pieces

2 cups broccoli florets

4 cloves garlic, minced

¼ cup honey

¼ cup low-sodium soy sauce

1 tablespoon olive oil

1 tablespoon lemon juice

¼ teaspoon red pepper flakes (optional)

Salt and pepper to taste

Cooked rice or quinoa, for serving

Fresh parsley or cilantro, chopped (optional garnish)

Instructions

Step 1: Prepare the Sauce

In a small bowl, whisk together the honey, soy sauce, minced garlic, lemon juice, and red pepper flakes if using. Set aside.

Step 2: Sear the Sausage

Heat the olive oil in a large skillet over medium-high heat.

Add the sliced sausage and cook for 4–5 minutes, stirring occasionally, until both sides are browned.

Remove the sausage from the skillet and set aside.

Step 3: Cook the Shrimp

In the same skillet, add the shrimp. Season lightly with salt and pepper.

Cook for 2–3 minutes per side, or until the shrimp are pink and opaque.

Transfer the shrimp to the plate with the sausage.

Step 4: Sauté the Broccoli

Add broccoli florets to the skillet and sauté for about 4–5 minutes until tender-crisp.

If the pan gets too dry, add a splash of water and cover for a minute to steam the broccoli.

Step 5: Combine Everything

Return the cooked sausage and shrimp to the skillet with the broccoli.

Pour the honey garlic sauce over the mixture and stir well to coat everything evenly.

Cook for an additional 2–3 minutes until the sauce thickens slightly and clings to the ingredients.

Step 6: Serve

Spoon the mixture over cooked rice or quinoa.

Garnish with fresh parsley or cilantro, if desired. Serve hot and enjoy!

Tips for Success

• Use tail-on shrimp for a more elegant presentation

• For extra sauce, double the honey garlic mixture

• Swap broccoli for green beans or snow peas if desired

Storage Options

Store leftovers in an airtight container in the fridge for up to 3 days

Reheat gently in a skillet or microwave

Not recommended for freezing, as shrimp may overcook upon reheating