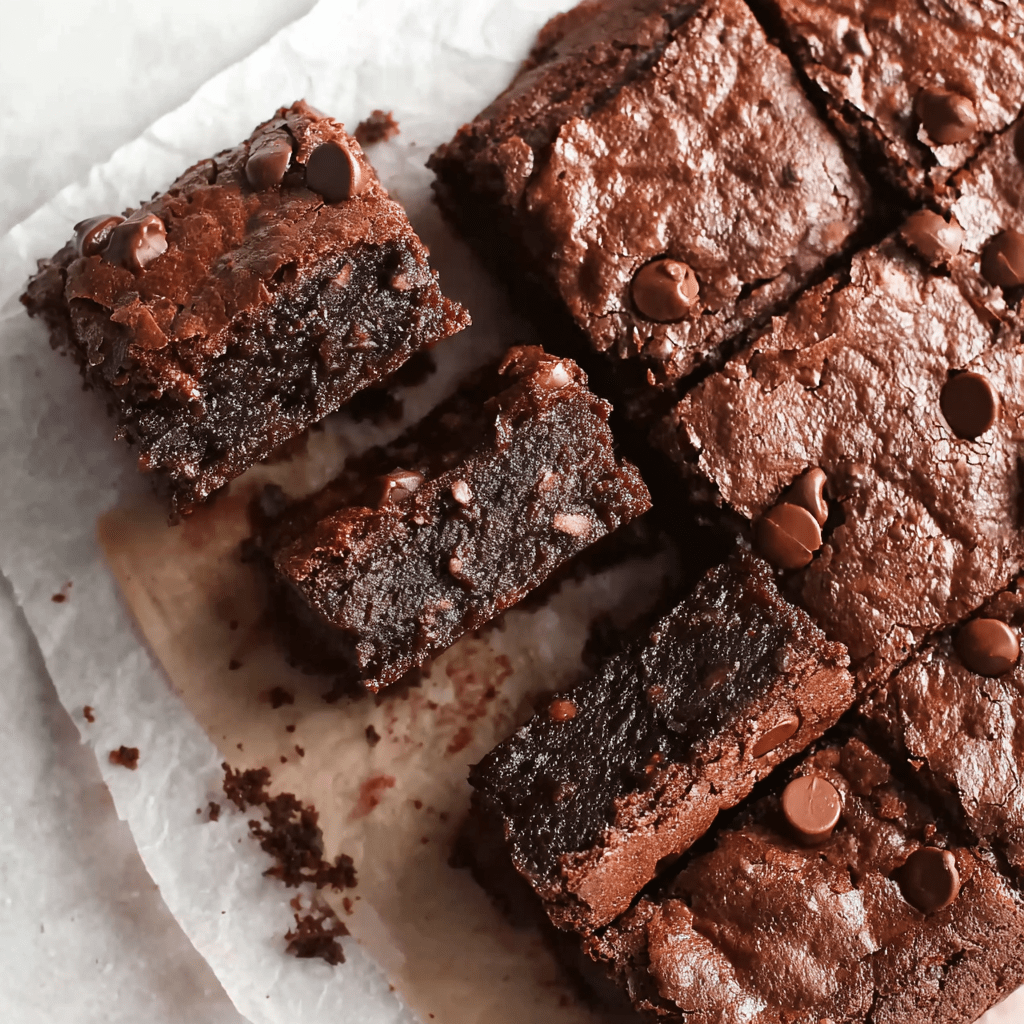
Creamy Baked Macaroni and Cheese

0

Creamy Baked Macaroni and Cheese is the ultimate comfort food, combining a rich and velvety cheese sauce with tender elbow macaroni and a crispy, golden-brown panko topping. This dish delivers the perfect balance of creaminess and texture, making it a favorite for family dinners, holiday feasts, or any occasion that calls for warm, cheesy goodness.

This recipe blends Velveeta for ultra-smooth cheesiness with sharp cheddar and Monterey Jack for depth of flavor. The addition of eggs and butter enhances the richness, while garlic powder and paprika add a hint of seasoning to complement the cheese. Baked until bubbly and topped with crispy seasoned panko, every bite is packed with indulgent, gooey satisfaction.

Why You’ll Love This Recipe

Ultra-Creamy & Cheesy: The combination of Velveeta, cheddar, and Monterey Jack creates the ultimate cheesy bite.

Golden & Crispy Topping: A crunchy panko crust contrasts beautifully with the creamy pasta.

Easy to Make: Simple steps with easy-to-find ingredients make this recipe foolproof.

Ingredients

• 1 lb elbow macaroni

• 1 lb Velveeta, cubed

• 1 cup milk, divided

• 4 tablespoons melted butter

• 2 large eggs, beaten

• ½ teaspoon garlic powder

• ½ teaspoon paprika

• 2 cups shredded cheddar cheese

• 2 cups shredded Monterey Jack cheese

• Salt and pepper to taste

• Seasoned panko bread crumbs for garnish

Instructions

Step 1: Preheat and Prepare Pasta

1. Preheat your oven to 375°F (190°C).

2. Bring a large pot of salted water to a boil.

3. Cook the elbow macaroni until al dente according to package instructions. Drain well and set aside.

Step 2: Make the Cheese Sauce

1. In a medium saucepan over medium heat, combine ½ cup milk and cubed Velveeta.

2. Stir continuously until the cheese is completely melted and smooth.

3. Pour the cheese sauce over the cooked macaroni and stir to combine.

Step 3: Mix the Egg & Cheese Blend

1. In a large mixing bowl, whisk together the beaten eggs, melted butter, garlic powder, paprika, salt, and pepper.

2. Stir in 1 cup of shredded cheddar and 1 cup of shredded Monterey Jack cheese.

3. Pour this mixture into the macaroni and stir well to evenly coat.

Step 4: Assemble and Bake

1. Grease a 9×13-inch baking dish and pour the macaroni mixture into it.

2. Top with the remaining 1 cup of shredded cheddar and 1 cup of shredded Monterey Jack cheese.

3. Sprinkle seasoned panko breadcrumbs evenly over the top for a crunchy finish.

4. Bake uncovered for 25 minutes, or until the cheese is melted, bubbly, and golden brown on top.

Step 5: Serve and Enjoy

1. Remove from the oven and let it rest for 5 minutes before serving.

2. Serve warm and enjoy the ultimate baked mac and cheese!

Tips

For Extra Creaminess: Add an additional ½ cup of milk if you prefer a softer, creamier mac and cheese.

Customize the Cheese Blend: Try swapping in Gruyère, Colby Jack, or Gouda for a unique flavor.

Make it Spicy: Add a pinch of cayenne pepper or a few dashes of hot sauce for a kick.

Crispier Topping: Lightly broil for the last 2 minutes to get a golden, crunchy panko crust.

Storage Options

Refrigeration: Store leftovers in an airtight container in the fridge for up to 4 days.

Freezing: Wrap tightly and freeze for up to 3 months. Thaw overnight in the fridge before reheating.

Reheating: Warm in the oven at 325°F for 15 minutes or in the microwave with a splash of milk to keep it creamy.

Serving Suggestions

With BBQ Ribs: The ultimate side dish for smoky, tender barbecue.

With Fried Chicken: Classic Southern pairing for a satisfying meal.

With Roasted Vegetables: Balance the richness with roasted Brussels sprouts, asparagus, or broccoli.

Cajun Shrimp Deviled Eggs

0

Cajun Shrimp Deviled Eggs are a bold and flavorful twist on the classic deviled egg recipe, combining creamy, tangy egg yolk filling with perfectly seasoned shrimp. The rich and spicy kick from Old Bay seasoning, hot sauce, and fresh dill creates a delicious contrast against the cool, smooth filling. Topped with a juicy shrimp and a hint of lemon, these deviled eggs are perfect for appetizers, holiday gatherings, or any occasion where you want to impress guests with a little Southern flair.

The process is simple: hard-boiled eggs are filled with a creamy, seasoned yolk mixture and crowned with succulent shrimp. The slight crunch from sweet pickle relish balances out the heat, while the lemon juice adds a refreshing brightness. These deviled eggs are not only packed with flavor but also visually appealing, making them a standout dish for any table.

Why You’ll Love This Recipe

Bursting with Flavor: Cajun-spiced shrimp with a creamy, tangy filling.

Perfect for Any Occasion: Great for parties, brunch, or a game-day snack.

Easy to Make Ahead: Can be prepared in advance for stress-free entertaining.

Ingredients

• 12 large eggs

• 2-3 tablespoons mayonnaise

• 1 tablespoon hot sauce

• 1 tablespoon sweet pickle relish

• 24 shrimp, peeled and deveined

• 1 tablespoon oil (for sautéing)

• 4 teaspoons Old Bay seasoning, divided

• ½ lemon

• ¼ teaspoon garlic powder

• 2 tablespoons fresh dill, chopped (divided)

• Salt and pepper, to taste

Instructions

Step 1: Boil and Peel the Eggs

1. Place the eggs in a pot and cover with water.

2. Bring the water to a boil, then turn off the heat. Cover the pot and let the eggs sit for 15-20 minutes.

3. Immediately transfer the eggs to an ice water bath to cool.

4. Once cooled, peel the eggs carefully and slice them in half lengthwise.

Step 2: Prepare the Egg Filling

1. Remove the yolks and place them in a mixing bowl.

2. Add mayonnaise, hot sauce, sweet pickle relish, 2 teaspoons of Old Bay seasoning, garlic powder, 2 tablespoons of chopped dill, and salt and pepper to taste.

3. Mash and mix until smooth and creamy. Set aside.

Step 3: Cook the Shrimp

1. Heat oil in a skillet over medium-high heat.

2. Add the shrimp and season with the remaining 2 teaspoons of Old Bay seasoning.

3. Sauté until the shrimp are opaque and cooked through, about 3-4 minutes.

4. Squeeze fresh lemon juice over the shrimp and set aside.

Step 4: Assemble the Deviled Eggs

1. Spoon or pipe the creamy yolk mixture into the center of each egg white half.

2. Place one cooked shrimp on top of each deviled egg.

Step 5: Garnish and Serve

1. Sprinkle with extra fresh dill for a pop of color and added freshness.

2. Serve immediately or chill in the refrigerator until ready to enjoy.

Tips

Perfect Hard-Boiled Eggs: Shocking eggs in an ice bath after boiling makes them easier to peel.

Adjust the Spice Level: Add more or less hot sauce depending on your heat preference.

Make it Ahead: Prepare the egg mixture and shrimp in advance, but assemble just before serving for the best texture.

Alternative Proteins: Swap shrimp for crab, smoked salmon, or even crispy bacon for a different twist.

Storage Options

Refrigeration: Store in an airtight container in the refrigerator for up to 2 days.

No Freezing: Freezing is not recommended, as the texture of the eggs and filling will change.

Serving Suggestions

On a Party Platter: Pair with fresh vegetables, crackers, or a charcuterie spread.

With Southern Dishes: Serve alongside gumbo, jambalaya, or Cajun cornbread.

As a Low-Carb Snack: Enjoy as a protein-packed treat any time of the day.

Pan-Fried Tilapia with Lemon Butter Sauce

0

Pan-Fried Tilapia with Lemon Butter Sauce is a light, flavorful dish that comes together in under 20 minutes, making it perfect for a quick and satisfying meal. The delicate, flaky fish is seasoned simply with garlic powder, salt, and pepper, then pan-fried to a crispy golden perfection. The real star of the dish is the rich lemon butter sauce, which adds a tangy, buttery finish that enhances the mild sweetness of the tilapia.

This dish is versatile and pairs beautifully with a variety of sides, from roasted vegetables and mashed potatoes to steamed rice or a fresh green salad. Whether you’re preparing a weeknight dinner or a special meal for guests, this recipe is guaranteed to impress with its restaurant-quality flavor and simplicity.

Why You’ll Love This Recipe

Quick & Easy: Ready in just 15-20 minutes with minimal prep.

Rich & Flavorful: A perfectly balanced lemon butter sauce enhances the mild, flaky fish.

Healthy & Light: A great source of lean protein with simple, fresh ingredients.

Ingredients

• 4 tilapia fillets (6 oz each, about 1.5 lbs total)

• ½ teaspoon garlic powder (for seasoning tilapia)

• 1 teaspoon sea salt

• ¼ teaspoon black pepper

• 2 tablespoons olive oil

For the Lemon Butter Sauce:

• ½ cup salted butter

• 2 tablespoons lemon juice (from 1 lemon)

• ½ teaspoon garlic powder

Instructions

Step 1: Prepare the Tilapia

1. Pat the tilapia fillets dry with paper towels to remove excess moisture.

2. Season both sides evenly with garlic powder, sea salt, and black pepper.

3. Set aside while you heat the pan.

Step 2: Cook the Tilapia

1. Heat 2 tablespoons of olive oil in a large skillet over medium-high heat for about 2 minutes, until the oil is hot but not smoking.

2. Place the seasoned tilapia fillets in the skillet in a single layer.

3. Cook for 3-4 minutes on the first side, until the edges turn opaque and the bottom is golden brown.

4. Flip the fillets gently and cook for another 2-4 minutes, or until the fish is fully cooked and flakes easily with a fork.

5. Transfer the cooked fillets to a plate and cover with foil to keep warm.

Step 3: Make the Lemon Butter Sauce

1. Reduce the skillet heat to medium-low.

2. Add ½ cup salted butter and let it melt, stirring occasionally.

3. Stir in the lemon juice and garlic powder, cooking for 1-2 minutes until the sauce is smooth and slightly thickened.

Step 4: Assemble and Serve

1. Drizzle a small amount of lemon butter sauce on each plate.

2. Place the cooked tilapia fillets over the sauce.

3. Drizzle more sauce on top of the fish.

4. Serve immediately with your choice of sides.

Tips

Don’t Overcook the Fish: Tilapia cooks quickly—remove it from heat as soon as it flakes easily with a fork.

Use Fresh Lemon Juice: Freshly squeezed lemon juice gives the sauce a bright, natural flavor.

Crispy Texture Tip: For a crispier crust, lightly coat the fish in flour before pan-frying.

Enhance the Sauce: Add a pinch of red pepper flakes or chopped fresh parsley for extra flavor.

Storage Options

Refrigeration: Store leftovers in an airtight container for up to 3 days.

Reheating: Warm in a skillet over low heat with a little butter to keep the fish moist. Avoid microwaving, as it can dry out the fillets.

Freezing: While tilapia freezes well, the lemon butter sauce is best made fresh. If freezing, store fish separately and make the sauce upon reheating.

Serving Suggestions

With Vegetables: Roasted asparagus, sautéed spinach, or steamed broccoli make excellent pairings.

With Rice or Potatoes: Serve over jasmine rice, mashed potatoes, or garlic butter quinoa for a hearty meal.

With a Fresh Salad: A crisp garden salad with a lemon vinaigrette adds freshness to balance the rich sauce.

Italian Carbonara with Bacon

0

Italian Carbonara with Bacon is a rich and creamy pasta dish that’s packed with flavor and perfect for a comforting meal. This recipe takes the classic Italian favorite and gives it a smoky twist by using thick-cut Applewood smoked bacon instead of traditional pancetta. Combined with freshly grated Parmesan cheese, eggs, and a splash of dry vermouth, this dish brings a luxurious, velvety sauce that perfectly coats every strand of spaghetti.

The key to a good carbonara lies in its simplicity and the timing of mixing the ingredients so that the heat from the pasta cooks the eggs gently, creating a silky sauce without scrambling. The addition of whipping cream adds extra creaminess, making it a satisfying and indulgent dish. This recipe is ideal for a weeknight dinner but elegant enough to serve on a special occasion.

Why You’ll Love This Recipe

Creamy and Rich: A velvety sauce made from eggs, cream, and Parmesan.

Smoky Flavor: Applewood smoked bacon adds a deeper, richer flavor.

Quick and Easy: Comes together in under 30 minutes with simple ingredients.

Ingredients

• 16 ounces spaghetti (cooked according to package directions)

• 12 slices thick-cut Applewood smoked bacon

• 2 tablespoons olive oil

• 1 onion, finely chopped

• 2 cloves garlic, freshly minced

• ¼ cup dry vermouth

• 1 cup Parmesan cheese, freshly shredded

• ½ cup whipping cream

• 4 large eggs, beaten

• 1 tablespoon ground black pepper

Instructions

Step 1: Cook the Pasta

1. Bring a large pot of salted water to a boil.

2. Cook the spaghetti according to package directions until al dente.

3. Drain the pasta and set it aside, drizzling with a little olive oil to prevent sticking.

Step 2: Cook the Bacon

1. In a large skillet over medium-high heat, fry the bacon until crispy.

2. Transfer the cooked bacon to a paper towel-lined plate to drain excess grease.

3. Reserve 2 tablespoons of bacon grease in the skillet, discarding the rest.

4. Once cooled, chop the bacon into small pieces and set aside.

Step 3: Prepare the Sauce Base

1. Add the chopped onion and 1 tablespoon of olive oil to the skillet with the reserved bacon grease.

2. Sauté the onions for about 5 minutes, or until they become translucent.

3. Add the minced garlic and cook for an additional minute until fragrant.

4. Pour in the dry vermouth and allow it to boil for 1-2 minutes to cook off the alcohol.

5. Stir in the chopped bacon and mix well.

Step 4: Make the Creamy Carbonara Sauce

1. In a medium bowl, whisk together the beaten eggs, Parmesan cheese, whipping cream, and ground black pepper until fully combined.

Step 5: Assemble the Dish

1. Place the cooked spaghetti in a large bowl.

2. Drizzle with a little olive oil to keep the noodles from sticking together.

3. Pour the bacon and onion mixture over the pasta and mix until evenly combined.

4. Quickly pour the egg and cream mixture over the warm pasta, stirring constantly. The heat from the pasta will cook the eggs gently, forming a creamy sauce without scrambling.

Step 6: Serve and Enjoy

1. Plate the pasta immediately while it’s still hot.

2. Garnish with extra Parmesan cheese and freshly ground black pepper if desired.

3. Serve with a slice of crusty bread and a glass of white wine for a complete meal.

Tips

Use Freshly Grated Parmesan: It melts better and provides a richer flavor than pre-shredded cheese.

Work Quickly: To avoid scrambling the eggs, mix the sauce into the hot pasta quickly and stir continuously.

Substitute Pancetta: For a more traditional carbonara flavor, substitute bacon with pancetta.

Don’t Overcook the Sauce: The residual heat from the pasta is enough to cook the eggs—avoid putting the mixture back on the stove.

Storage Options

Refrigeration: Store leftovers in an airtight container in the refrigerator for up to 3 days.

Reheating: Gently reheat on the stovetop over low heat, adding a splash of cream or broth to loosen the sauce. Avoid microwaving, as it can overcook the eggs and make the sauce grainy.

Freezing: Not recommended, as the creamy sauce may separate when thawed.

Serving Suggestions

With Garlic Bread: The perfect accompaniment for soaking up any leftover sauce.

With a Side Salad: A light green salad with a lemon vinaigrette balances the richness of the pasta.

With Roasted Vegetables: Serve alongside roasted asparagus or green beans for a complete meal.

Homemade Big Mac Sauce

0

This Homemade Big Mac Sauce is a perfect copycat of the iconic McDonald’s burger sauce, delivering that creamy, tangy, and slightly sweet flavor that makes the Big Mac so irresistible. Whether you’re making burgers, sandwiches, or using it as a dipping sauce for fries, this quick and easy recipe brings the signature taste of the famous fast-food favorite right to your kitchen.

With just a handful of simple ingredients like mayo, Miracle Whip, relishes, and French dressing, this sauce is a breeze to whip up. The key to getting that authentic taste lies in balancing the sweet and tangy flavors with a creamy base. This recipe comes together in minutes, and with a little resting time in the fridge, the flavors meld beautifully, making it even better than the original.

Why You’ll Love This Recipe

Fast and Easy: Ready in just minutes with no cooking required.

Tastes Just Like the Real Thing: A perfect balance of creamy, tangy, and sweet flavors.

Versatile: Use as a burger spread, sandwich dressing, or dipping sauce.

Ingredients

• ¼ cup Miracle Whip

• ¼ cup mayonnaise

• 2 tablespoons French dressing

• ½ tablespoon sweet relish

• 1½ tablespoons dill relish

• 1 teaspoon sugar

• 1 teaspoon dried onion

• 1 teaspoon white vinegar

• 1 teaspoon ketchup

• Pinch of salt

Instructions

Step 1: Mix the Ingredients

1. In a microwave-safe bowl, combine Miracle Whip, mayonnaise, French dressing, sweet relish, dill relish, sugar, dried onion, white vinegar, ketchup, and a pinch of salt.

2. Stir the ingredients together until well combined and smooth.

Step 2: Heat the Sauce

1. Microwave the mixture on high for 15 seconds.

2. Stir again to ensure everything is evenly blended.

Step 3: Chill and Set

1. Cover the bowl with plastic wrap or transfer the sauce to an airtight container.

2. Refrigerate for at least 1 hour to allow the flavors to meld together.

Step 4: Serve and Enjoy

1. Use the sauce on homemade burgers, sandwiches, or as a dipping sauce for fries and chicken nuggets.

Tips

Let It Rest: Allow the sauce to chill for at least an hour for the best flavor. The longer it sits, the better it tastes.

Adjust Sweetness: Add more or less sugar depending on how sweet you prefer your sauce.

Add a Kick: Stir in a pinch of cayenne pepper or a dash of hot sauce for a spicier version.

Storage Options

Refrigeration: Store in an airtight container in the refrigerator for up to 2 weeks.

No Freezing: Freezing is not recommended, as the texture will change once thawed.

Serving Suggestions

Classic Big Mac: Spread on both buns of a double-decker burger with lettuce, cheese, onions, pickles, and two beef patties.

Dip for Fries: A perfect dipping sauce for fries, onion rings, or chicken nuggets.

Sandwich Spread: Use it as a flavorful spread for sandwiches or wraps.

Salad Dressing: Thin with a bit of milk or buttermilk to turn it into a creamy salad dressing.

Sweet Amish Macaroni Salad

0

Sweet Amish Macaroni Salad is a classic, creamy, and tangy side dish that’s perfect for picnics, potlucks, and family gatherings. Known for its signature sweet and slightly tangy dressing, this salad offers a refreshing balance of flavors and textures with crunchy celery, tender elbow macaroni, and crisp red bell peppers. The addition of sweet pickle relish and hard-boiled eggs adds richness and depth to every bite.

This recipe is easy to prepare and can be made ahead of time, making it a convenient option for busy days or hosting events. The unique blend of Miracle Whip, yellow mustard, and sugar gives the salad its traditional sweet and creamy flavor, while the vinegar adds just the right amount of tanginess. It’s a nostalgic, comforting dish that pairs wonderfully with grilled meats, sandwiches, or as part of a larger buffet spread.

Why You’ll Love This Recipe

Classic Flavor: A perfect balance of sweet, tangy, and creamy.

Easy to Make: Simple ingredients and straightforward instructions.

Perfect for Gatherings: Great for barbecues, picnics, or holiday meals.

Ingredients

• 2 cups uncooked elbow macaroni

• 3 large eggs, hard-boiled

• 3 sticks celery, chopped

• 1 small onion, chopped or diced

• 2 tablespoons sweet pickle relish

• 3 tablespoons yellow mustard

• 1 small red bell pepper, stemmed, seeded, and chopped

• 2 cups Miracle Whip salad dressing

• ¾ cup white sugar

• 2¼ teaspoons white vinegar

• ½ teaspoon celery seed

• Salt and pepper to taste

Instructions

Step 1: Cook the Macaroni

1. Bring a large pot of salted water to a boil.

2. Add the elbow macaroni and cook according to the package directions until al dente.

3. Drain the macaroni and rinse under cold water to stop the cooking process. Set aside to cool.

Step 2: Prepare the Vegetables and Eggs

1. In a large mixing bowl, combine the chopped celery, diced onion, red bell pepper, and sweet pickle relish.

2. Peel and chop the hard-boiled eggs, then add them to the vegetable mixture.

Step 3: Make the Dressing

1. In a separate small bowl, whisk together the Miracle Whip, yellow mustard, white vinegar, white sugar, and celery seed until smooth and well combined.

2. Season with salt and pepper to taste.

Step 4: Assemble the Salad

1. Pour the dressing mixture over the vegetables and eggs.

2. Add the cooled macaroni to the bowl and stir until everything is well coated and evenly mixed.

Step 5: Chill and Serve

1. Cover the bowl with plastic wrap or a lid.

2. Refrigerate for at least 1 hour before serving to allow the flavors to meld together.

3. Stir the salad again just before serving and adjust seasoning if needed.

Tips

Cook Pasta Properly: Don’t overcook the pasta—keep it al dente to maintain a firm texture when mixed with the creamy dressing.

Use Fresh Veggies: Crisp, fresh celery and onions enhance the crunch and overall texture of the salad.

Chill Time: Letting the salad chill allows the flavors to blend and develop, making it even tastier after a few hours in the fridge.

Optional Add-ins: Add a handful of shredded carrots or green peas for extra color and nutrition.

Storage Options

Refrigeration: Store leftovers in an airtight container in the refrigerator for up to 4 days. Stir before serving as the dressing may settle at the bottom.

Freezing: This salad doesn’t freeze well due to the creamy dressing separating when thawed. It’s best enjoyed fresh.

Serving Suggestions

With BBQ Dishes: Pairs perfectly with grilled chicken, ribs, or pulled pork sandwiches.

As a Picnic Side: A great complement to sandwiches, burgers, or fried chicken at outdoor gatherings.

On Its Own: Serve as a light lunch with a slice of fresh bread or crackers.

Reese’s Peanut Butter Cup Pie

0

Reese’s Peanut Butter Cup Pie is the ultimate dessert for anyone who loves the iconic chocolate and peanut butter combination. This no-bake pie is rich, creamy, and packed with crunchy peanut butter goodness layered between smooth chocolate ganache. It’s a decadent treat perfect for special occasions, holiday gatherings, or whenever you’re craving a sweet indulgence.

The crust and topping are made from silky milk chocolate ganache, while the filling features a delightful blend of crunchy peanut butter, powdered sugar, graham cracker crumbs, and melted butter. Every bite delivers the perfect balance of sweet, salty, and creamy flavors, making it taste just like a giant Reese’s cup—but better because it’s homemade!

Why You’ll Love This Recipe

No-Bake Dessert: Easy to make without using the oven.

Rich & Creamy: Smooth chocolate ganache paired with a crunchy, peanut buttery filling.

Perfect for Parties: A crowd-pleasing dessert that’s sure to impress guests.

Ingredients

For the Chocolate Ganache:

• 2½ cups milk chocolate chips

• 1½ tablespoons vegetable oil

For the Chunky Peanut Butter Filling:

• 1⅓ cups powdered sugar

• 1 cup graham cracker crumbs

• 1¼ cups crunchy peanut butter

• ½ cup salted sweet cream butter, melted

Instructions

Step 1: Prepare the Pan

1. Lightly grease a 9-inch tart pan or pie dish to prevent sticking.

Step 2: Make the Chocolate Ganache Base

1. In a microwave-safe bowl, combine the milk chocolate chips and vegetable oil.

2. Microwave in 30-second intervals, stirring between each, until smooth and fully melted.

3. Pour half of the melted chocolate mixture into the greased pan.

4. Use a spatula to spread the chocolate evenly across the bottom and slightly up the sides of the pan.

5. Place the pan in the refrigerator for about 20-30 minutes, or until the chocolate is firm.

Step 3: Prepare the Peanut Butter Filling

1. In a large mixing bowl, combine the powdered sugar, graham cracker crumbs, crunchy peanut butter, and melted butter.

2. Stir until all ingredients are fully combined and the mixture becomes thick and slightly crumbly.

3. Press the peanut butter mixture evenly over the chilled chocolate layer, smoothing the top with a spatula.

Step 4: Add the Final Chocolate Layer

1. Pour the remaining melted chocolate ganache over the peanut butter filling.

2. Use a spatula to spread the chocolate evenly across the top, ensuring the entire surface is covered.

Step 5: Chill and Set

1. Place the pie in the refrigerator and chill for at least 4 hours or until fully set.

2. For best results, let the pie chill overnight.

Step 6: Slice and Serve

1. Once fully set, remove the pie from the refrigerator.

2. Use a sharp knife to slice into wedges and serve.

3. Store any leftovers in the refrigerator.

Tips

Use High-Quality Chocolate Chips: This enhances the richness and creaminess of the ganache.

Add a Pinch of Salt: If using unsalted butter, add a pinch of salt to the peanut butter filling for a balanced flavor.

Decorate for Fun: Add chopped peanuts, mini Reese’s pieces, or a drizzle of melted peanut butter over the top before chilling.

Serve Chilled: This pie is best enjoyed straight from the fridge for the perfect texture.

Storage Options

Refrigeration: Store in an airtight container in the refrigerator for up to 5 days.

Freezing: Wrap the pie tightly in plastic wrap and store in a freezer-safe container for up to 2 months. Thaw in the refrigerator overnight before serving.

Serving Suggestions

With Whipped Cream: Add a dollop of whipped cream for extra indulgence.

With Ice Cream: Pair a slice with vanilla or chocolate ice cream for a decadent dessert experience.

As a Party Dessert: Slice into bite-sized pieces and serve as a finger food at gatherings or holiday parties.

Creamy Mushroom Asparagus Chicken Pasta

0

Creamy Mushroom Asparagus Chicken Pasta is the perfect comfort food that brings together tender chicken, earthy mushrooms, fresh asparagus, and a rich, creamy Parmesan sauce. This one-pot meal is both hearty and satisfying, offering a perfect balance of protein, vegetables, and pasta in every bite. It’s ideal for busy weeknights but elegant enough for a weekend dinner party.

The creamy sauce made from chicken broth, heavy cream, and Parmesan cheese creates a luxurious texture that coats the pasta and vegetables beautifully. Meanwhile, the mushrooms and asparagus add depth and freshness, balancing out the richness of the cream. This versatile dish can also be customized with different vegetables or spices, making it a go-to recipe you’ll want to revisit again and again.

Why You’ll Love This Recipe

Rich and Creamy: The Parmesan-infused sauce is velvety and flavorful.

Easy One-Pot Meal: Simple steps with minimal cleanup.

Customizable: Swap vegetables or spices to suit your preferences.

Ingredients

• 12 oz penne pasta

• 1 lb chicken breast or thighs, cut into bite-sized pieces

• 2 cups mushrooms, sliced

• 1 cup asparagus, cut into 2-inch pieces

• 2 cups chicken broth

• 1 cup heavy cream

• ½ cup grated Parmesan cheese

• 2 tablespoons olive oil

• 2 tablespoons butter

• 2 tablespoons all-purpose flour

• 1 teaspoon garlic powder

• 1 teaspoon onion powder

• Salt and pepper to taste

• Red pepper flakes (optional, for heat)

Instructions

Step 1: Cook the Pasta

1. Bring a large pot of salted water to a boil.

2. Cook the penne pasta according to the package instructions until al dente.

3. Drain and set aside.

Step 2: Prepare the Chicken

1. Season the chicken pieces with garlic powder, onion powder, salt, and pepper.

2. Heat olive oil in a large skillet over medium heat.

3. Add the seasoned chicken and sauté until golden brown and cooked through, about 6-8 minutes.

4. Remove the chicken from the skillet and set aside.

Step 3: Sauté the Vegetables

1. In the same skillet, add the mushrooms and asparagus.

2. Cook over medium heat until the mushrooms are browned and the asparagus is tender, about 5 minutes.

3. Remove the vegetables from the skillet and set aside.

Step 4: Make the Creamy Sauce

1. Reduce heat to low and melt the butter in the skillet.

2. Stir in the flour and cook for 1-2 minutes until it forms a paste (this creates a roux).

3. Gradually whisk in the chicken broth and heavy cream, stirring continuously to avoid lumps.

4. Simmer for 3-5 minutes until the sauce thickens.

Step 5: Combine and Finish

1. Add the grated Parmesan cheese to the sauce and stir until melted.

2. Return the chicken, mushrooms, asparagus, and cooked pasta to the skillet.

3. Stir well to coat everything in the creamy sauce.

4. Cook for another 2-3 minutes over low heat until everything is warmed through.

5. Season with additional salt, pepper, and red pepper flakes (if desired).

Step 6: Serve and Enjoy

1. Plate the creamy pasta and garnish with extra Parmesan cheese and fresh parsley if desired.

2. Serve immediately and enjoy the rich, comforting flavors.

Tips

Use Fresh Parmesan: Freshly grated Parmesan melts better and adds a richer flavor than pre-grated versions.

Cook Pasta Al Dente: This prevents the pasta from becoming too soft when mixed with the sauce.

Add a Splash of Lemon: A little lemon zest or juice can brighten up the flavors.

Try Other Vegetables: Broccoli, spinach, or peas also pair wonderfully with the creamy sauce.

Storage Options

Refrigeration: Store leftovers in an airtight container for up to 3 days.

Freezing: Freeze portions in a freezer-safe container for up to 2 months. Thaw overnight in the fridge before reheating.

Reheating: Gently reheat on the stovetop with a splash of cream or broth to prevent the sauce from drying out.

Serving Suggestions

Garlic Bread: A crunchy slice of garlic bread pairs perfectly with this creamy pasta.

Fresh Salad: Serve alongside a simple green salad with a light vinaigrette.

White Wine: A crisp white wine like Chardonnay complements the creamy sauce beautifully.

Shrimp Pie

0

Shrimp Pie is a savory, creamy, and flavorful dish that combines tender shrimp, rich cheeses, and a flaky pie crust for a comforting and satisfying meal. This easy-to-make recipe is perfect for brunch, lunch, or dinner and offers a delightful twist on seafood dishes. The creamy filling, made with chive-and-onion cream cheese and pepper jack cheese, complements the shrimp beautifully, creating a harmonious blend of textures and flavors.

Using a pre-made deep-dish pie crust makes this recipe quick and convenient, while the simple filling requires minimal prep time. The result is a pie with a crisp crust, a smooth, cheesy interior, and bursts of savory shrimp in every bite. Whether you’re serving this dish as the centerpiece of a casual family dinner or as an impressive addition to a special gathering, Shrimp Pie is guaranteed to be a hit.

Why You’ll Love This Recipe

Quick and Easy: Uses a pre-made crust to save time while delivering delicious homemade flavors.

Creamy and Savory: The cream cheese and pepper jack create a rich, flavorful filling.

Perfect for Any Occasion: Great for brunch, dinner, or even as leftovers the next day.

Ingredients

• 1 crust from a 12 oz package of frozen Pillsbury™ Deep Dish Pie Crusts (2-count)

• ½ cup chive-and-onion cream cheese spread (from an 8-oz container)

• 4 large eggs

• 12 oz frozen cooked, deveined, peeled medium shrimp (thawed, well-drained, and coarsely chopped, with tail shells removed)

• ½ cup shredded pepper jack cheese (2 oz)

Instructions

Step 1: Prepare the Oven and Pie Crust

1. Place a cookie sheet on the middle rack of your oven.

2. Preheat the oven to 375°F (190°C).

3. Thaw one pie crust at room temperature for 10 to 20 minutes.

4. Once thawed, prick the bottom and sides of the crust thoroughly with a fork to prevent air bubbles.

5. Place the crust on the cookie sheet and bake for 9 to 11 minutes, or until the crust turns a very light golden brown.

6. Remove from the oven and set aside to cool slightly.

Step 2: Prepare the Filling

1. In a medium-sized mixing bowl, use a whisk or an electric mixer to beat the chive-and-onion cream cheese spread until smooth and creamy.

2. Add the eggs one at a time, beating well after each addition to create a smooth, blended mixture.

3. Gently stir in the chopped shrimp and shredded pepper jack cheese until all ingredients are evenly combined.

Step 3: Assemble and Bake the Pie

1. Pour the prepared filling into the pre-baked pie crust, spreading it evenly across the surface.

2. Place the pie back on the cookie sheet and return it to the oven.

3. Bake for 30 to 35 minutes, or until the center is set and the top is lightly golden brown.

Step 4: Cool and Serve

1. Once baked, remove the pie from the oven and let it stand at room temperature for 15 minutes.

2. This resting time helps the filling set properly and makes slicing easier.

3. Serve warm and enjoy!

Tips

Use Fresh Shrimp: For the best flavor, use fresh shrimp instead of frozen if available. Just cook and chop them before adding to the mixture.

Spice It Up: Add a pinch of cayenne pepper or a few dashes of hot sauce to the filling for a spicier version.

Even Cooking: Ensure your shrimp are well-drained to prevent extra moisture from affecting the pie’s texture.

Storage Options

Refrigeration: Store leftover shrimp pie in an airtight container in the refrigerator for up to 3 days.

Freezing: Freeze slices of the pie by wrapping them tightly in plastic wrap and placing them in a freezer-safe bag for up to 2 months. Thaw in the refrigerator overnight before reheating.

Reheating: Warm individual slices in the microwave for 1-2 minutes or reheat the whole pie in a 300°F oven until heated through.

Serving Suggestions

With a Side Salad: A fresh green salad with a light vinaigrette complements the richness of the shrimp pie.

With Roasted Vegetables: Roasted asparagus or green beans add color and texture to your meal.

As Part of a Brunch Spread: Serve alongside quiches, pastries, and fresh fruit for a full brunch experience.

Pillsbury Cinnamon Roll Icing

0

This homemade Pillsbury Cinnamon Roll Icing is the perfect complement to soft, gooey cinnamon rolls. It’s rich, creamy, and perfectly sweet—adding that melt-in-your-mouth finishing touch. Unlike store-bought versions, this frosting is made with simple pantry staples like butter, powdered sugar, and heavy cream, delivering a smooth, luxurious texture and just the right hint of vanilla.

Whether you’re making cinnamon rolls from scratch or enhancing store-bought dough, this icing turns an everyday breakfast into a decadent treat. The buttery base makes it creamy and spreadable, while the addition of heavy cream ensures it stays soft and glossy. It’s also versatile enough to use on other baked goods, such as muffins, quick breads, or even as a glaze for scones.

Why You’ll Love This Recipe

Rich and Creamy: Made with real butter and cream for a luxurious texture.

Easy to Make: Comes together in just 5 minutes with basic ingredients.

Versatile: Perfect for cinnamon rolls, muffins, or even as a cupcake frosting.

Ingredients

• ½ cup unsalted butter (room temperature)

• 2 teaspoons vanilla extract

• ⅛ teaspoon fine salt

• 3 cups powdered sugar

• ¼ cup heavy cream (room temperature)

Instructions

Step 1: Beat the Butter

1. In a large mixing bowl, beat the room-temperature butter using a hand mixer or stand mixer on medium speed.

2. Continue beating for 2-3 minutes until the butter is smooth, pale, and creamy.

Step 2: Add Vanilla and Salt

1. Mix in the vanilla extract and fine salt until fully combined.

2. Scrape down the sides of the bowl to ensure everything is evenly mixed.

Step 3: Add Powdered Sugar

1. Gradually add the powdered sugar, 1 cup at a time, mixing on low speed after each addition to prevent it from puffing out of the bowl.

2. Increase to medium speed once fully incorporated and beat until light and fluffy.

Step 4: Stir in Heavy Cream

1. Slowly pour in the heavy cream while mixing on low speed.

2. Continue to beat until the frosting is smooth, creamy, and spreadable. Add more cream, 1 tablespoon at a time, if you prefer a thinner consistency.

Step 5: Spread and Serve

1. Generously spread the icing over warm cinnamon rolls for the best results—this allows the frosting to slightly melt and coat the rolls evenly.

2. Serve immediately and enjoy every gooey, sweet bite.

Tips

Room Temperature Ingredients: Make sure your butter and cream are at room temperature for a smooth consistency.

Thicker Icing: If you prefer a thicker icing, reduce the amount of heavy cream slightly.

Flavor Boost: Add a pinch of cinnamon or a drop of almond extract for a unique twist.

Storage Options

Refrigeration: Store any leftover icing in an airtight container in the refrigerator for up to 1 week.

Freezing: Freeze in a sealed container for up to 2 months. Thaw overnight in the refrigerator before using.

Reheating: Bring chilled icing back to room temperature and give it a quick stir before spreading.

Serving Suggestions

Classic Cinnamon Rolls: The perfect finishing touch for any cinnamon roll recipe.

Glazed Muffins: Use it as a sweet glaze for blueberry or banana muffins.

Sweet Dip: Serve as a dip for fresh fruit or baked churros.