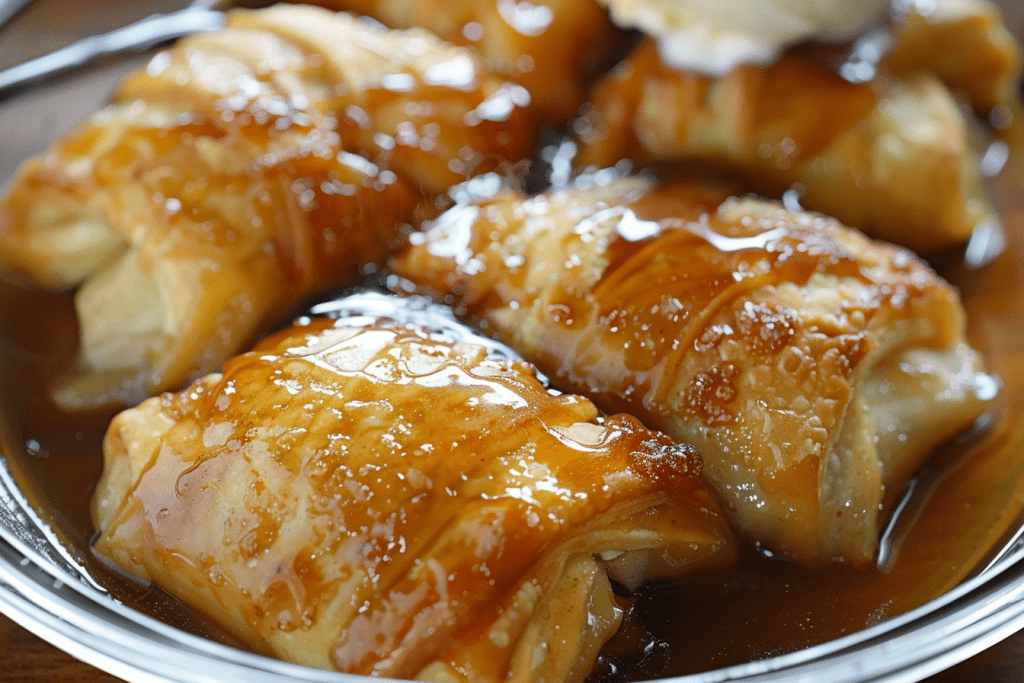
Chocolate Chip Cheesecake Bars

0

These Chocolate Chip Cheesecake Bars offer a decadent twist on your typical dessert bar, blending a rich, creamy cheesecake layer with a chewy chocolate chip cookie base. Made with keto-friendly ingredients, this dessert not only satisfies your sweet tooth but also fits into a low-carb lifestyle. The combination of almond flour and monkfruit sweeteners provides a delicious alternative without sacrificing taste. Perfect for parties, family gatherings, or as a special treat to enjoy with your coffee, these cheesecake bars are bound to be a hit!

Why You’ll Love This Recipe:

  • Low Carb and Keto Friendly: Uses almond flour and monkfruit sweeteners, making it suitable for those following a ketogenic diet.
  • Decadent Layers: Features a satisfying texture with layers of cookie and cheesecake.
  • Easy to Make: Simple steps and common ingredients used in low-carb baking.

Ingredients:

Chocolate Chip Cookie Layer:

  • 1 1/2 cups almond flour
  • 1/2 teaspoon baking soda
  • 1/4 teaspoon baking powder
  • 1/2 teaspoon salt
  • 6 tablespoons butter
  • 3/4 cup packed golden monkfruit sweetener
  • 1 1/2 teaspoons vanilla extract
  • 1 large egg
  • 1 cup Lily’s chocolate chips

Cheesecake Layer:

  • 8 ounces cream cheese
  • 1/3 cup confectioners monkfruit sweetener
  • 1 teaspoon vanilla extract
  • 1 egg yolk

Instructions:

Prepare the Cookie Layer:

    • Preheat your oven to 350 degrees F (175 degrees C).
    • In a small bowl, mix the almond flour, baking soda, baking powder, and salt.
    • In a stand mixer, cream together the butter, golden monkfruit sweetener, and vanilla extract until creamy.
    • Add the egg and beat on low speed. Gradually add the almond flour mixture until well combined.
    • Stir in the chocolate chips. Place the dough in the refrigerator to chill while you prepare the cheesecake layer.

    Prepare the Cheesecake Layer:

      • In a separate bowl, combine the cream cheese, confectioners monkfruit sweetener, vanilla extract, and egg yolk.
      • Beat with an electric mixer until creamy.

      Assemble the Bars:

        • Line an 8×8 inch baking dish with parchment paper.
        • Press three-quarters of the cookie dough evenly into the bottom of the pan.
        • Spread the cheesecake mixture over the cookie dough base.
        • Break the remaining cookie dough into small chunks and scatter them over the cheesecake layer.

        Bake:

          • Bake in the preheated oven for 30-35 minutes, or until the cheesecake layer is set and no longer jiggles when the pan is lightly shaken.

          Cool and Serve:

            • Let the bars cool completely in the pan before lifting out the parchment paper to cut into squares.

            Storage Options:

            • Refrigerator: Store the bars in an airtight container in the refrigerator for up to 5 days.
            • Freezer: Freeze the bars for up to a month for best taste and texture. Thaw in the refrigerator before serving.

            Tips:

            • Chocolate Chips: Ensure you use sugar-free chocolate chips to keep this recipe keto-friendly.
            • Smooth Cheesecake: Make sure your cream cheese is at room temperature to avoid lumps in your cheesecake layer.
            • Serving Suggestion: Serve chilled for a firmer texture and to enhance the flavors.

            Enjoy your baking adventure with these Chocolate Chip Cheesecake Bars, a treat that promises the ultimate indulgence for any dessert lover looking to maintain a low-carb diet.

            Creamy Cajun Chicken Soup

            0

            This Creamy Cajun Chicken Soup is a comforting, spicy delight that’s perfect for chilly evenings or anytime you crave a hearty meal. Infused with the bold flavors of Cajun seasoning and a hint of hot sauce, this soup combines tender vegetables and succulent chicken in a creamy, flavorful broth. Whether you’re looking to warm up or simply enjoy a delicious and satisfying meal, this soup is sure to hit the spot.

            Why You’ll Love This Recipe:

            • Flavorful and Spicy: Packed with Cajun spices and a dash of hot sauce for a delightful kick.
            • Comforting and Hearty: Filled with chicken and vegetables, making it a wholesome meal.
            • Creamy Texture: The addition of heavy cream and cream cheese gives this soup a luxurious, smooth consistency.

            Ingredients:

            • 1 tablespoon butter or olive oil
            • 1 tablespoon minced garlic
            • 1 cup chopped onion
            • 1 cup chopped carrots
            • 1 1/2 cups chopped celery
            • 1 1/2 cups chopped bell pepper (any color or a mix)
            • 1 1/2 pounds chicken breast
            • 2 tablespoons Old Bay or Cajun seasoning
            • 2 teaspoons hot sauce
            • 1 (14 ounce) can fire-roasted tomatoes, drained
            • 3 cups chicken broth
            • 1/4 cup heavy cream
            • 8 ounces cream cheese, softened

            Instructions:

            1. Saute Vegetables: In a large pot or Dutch oven, heat the butter or olive oil over medium heat. Add garlic, onion, celery, bell pepper, and carrots. Saute for 3-4 minutes until the vegetables are tender.
            2. Cook Chicken: Add the chicken breasts to the pot. Sprinkle with Cajun seasoning and hot sauce. Add the drained fire-roasted tomatoes and chicken broth. Bring the mixture to a simmer, then cover the pot and reduce the heat to medium-low.
            3. Simmer: Let the soup cook for about 30 minutes, stirring occasionally. Once the chicken is tender and cooked through, remove it from the pot and shred it with forks.
            4. Add Cream and Cheese: While the chicken is being shredded, add the heavy cream and softened cream cheese to the pot. Whisk until the cream cheese is completely incorporated and the soup is smooth.
            5. Combine and Serve: Return the shredded chicken to the pot. Stir well to combine all the ingredients. Serve the soup hot.

            Optional Toppings:

            • Sliced green onions
            • Shredded sharp cheddar cheese
            • Additional hot sauce

            Storage Options:

            • Refrigerator: Store any leftovers in an airtight container in the refrigerator for up to 3 days.
            • Freezer: Freeze in airtight containers for up to 3 months. Thaw in the refrigerator overnight before reheating on the stove.

            Tips:

            • Adjust Spice Levels: Customize the amount of Cajun seasoning and hot sauce based on your preference for spice.
            • Vegetable Variations: Feel free to add other vegetables like spinach or potatoes for more texture and flavor.
            • Serving Suggestion: Serve this creamy soup with a side of crusty bread for dipping.

            This Creamy Cajun Chicken Soup is not only delicious but also a comforting meal that’s perfect for feeding a crowd or enjoying a cozy night in. Enjoy the rich flavors and creamy texture of this delightful soup!

            Steak Doneness Guide: Finding Your Perfect Sizzle

            0

            When it comes to cooking steak, opinions can be as fiery as the grill itself. I’ve experienced this firsthand in a spirited debate with my sister over steak doneness. I’m convinced I’ve achieved the perfect medium-rare, while she contends it’s undercooked—nearly raw. This culinary disagreement made me ponder: What exactly defines medium-rare? Steak doneness preferences can spark intense discussions around the dinner table, often dividing diners. If you’ve ever found yourself in a similar debate, here’s a guide to help you navigate the subtle differences in steak doneness and arm you with the knowledge to settle any disputes.

            Understanding Steak Doneness Levels

            Grasping the various doneness levels is crucial to mastering the art of steak cooking. Here’s a detailed overview:

            1. Rare
              A rare steak is quickly seared on the outside but remains cool and predominantly red in the center, reaching an internal temperature of 120°F to 125°F. It’s tender, moist, and has a bold taste that can seem almost primal to some, while others may find it too underdone.
            2. Medium-Rare
              Often considered the ideal by steak aficionados, medium-rare steak boasts a warm, red center with an internal temperature of 130°F to 135°F. It strikes a delightful balance between tenderness and flavor, having a well-browned exterior while keeping the inside soft and juicy. This level of doneness is where I claim victory in my culinary clash with my sister.
            3. Medium
              For those who prefer less red, medium offers a warm pink center with temperatures between 140°F to 145°F. It’s firmer than medium-rare yet retains a good deal of juiciness and flavor, making it a popular middle ground.
            4. Medium-Well
              Cooked to an internal temperature of 150°F to 155°F, medium-well steaks have a slight pinkness at the center. They appeal to those desiring less moisture and a more solid texture, though some steak purists might consider this level approaching overdone.
            5. Well-Done
              For a well-done steak, expect no pink at all with temperatures reaching 160°F and above. It’s fully browned throughout, sacrificing juiciness and tenderness for perceived safety. This doneness is often preferred by those cautious of any red in their meat.

            Tools and Techniques for Precise Steak Doneness

            While personal taste influences steak preferences, achieving consistency is crucial. Here are some tools and methods to ensure you hit your doneness target every time:

            1. Meat Thermometer: The most accurate way to determine doneness is by using a thermometer. Aim for 130°F for a perfect medium-rare before removing your steak from the heat, keeping in mind that it will continue to cook slightly while resting.
            2. Touch Test: This old chef’s trick involves comparing the firmness of the steak to the fleshy part of your palm below your thumb when touching different fingers together. This method estimates the steak’s feel at various doneness levels.
            3. Resting the Steak: Always let your steak rest for 5 to 10 minutes after cooking. This step is essential as it allows the juices to redistribute, ensuring a more tender, flavorful steak.

            Navigating Steak Doneness Debates

            Misunderstandings about steak doneness can often be resolved with clear communication and understanding that perceptions of ‘perfect’ can vary widely:

            1. Clearly State Your Preference: When ordering or cooking, specify your preferred doneness clearly. Descriptive phrases like “a warm red center” can provide clearer guidance than just “medium-rare.”
            2. Visual Aids: Utilize pictures or a doneness chart when explaining your preferences to others, which can help bridge different understandings.
            3. Keep Practicing: Mastery comes with practice. Experiment with different cooking times and temperatures to familiarize yourself with how steaks cook.

            Resolving the Medium-Rare vs. Raw Debate

            The key distinction between medium-rare and undercooked lies in the temperature and texture. A medium-rare steak should be warm with a vibrant red center, whereas an undercooked steak might still feel cool inside. If your steak hits the right internal temperature and rests properly, you can confidently claim it’s medium-rare.

            Final Thoughts: Embrace Different Tastes

            Steak doneness is deeply personal, and achieving a consensus may sometimes mean agreeing to disagree. The essence lies in understanding and respecting diverse preferences and honing your skills to cater to them. Whether it’s reaching a compromise with my sister or cooking multiple steaks to different doneness levels, the goal is to enjoy the journey of culinary mastery.

            So, gear up for your next grill session with this knowledge, and remember, the perfect steak is the one that satisfies your taste the most. Happy grilling!

            Nutty Pistachio Delight Bread

            0

            Embark on a culinary journey with Nutty Pistachio Delight Bread, a dessert that combines the simplicity of a cake mix with the rich, nutty flavors of pistachio. This bread is not just a treat for the palate but also a visual delight, thanks to its vibrant green hue and festive toppings. Perfect for any occasion, from casual gatherings to holiday celebrations, this pistachio bread will impress your guests and satisfy your cravings for something sweet and unique.

            Why You’ll Love This Recipe:

            • Easy Preparation: Utilizes a golden cake mix for simplicity and consistency.
            • Rich Pistachio Flavor: Enhanced with the addition of pistachio pudding and chopped nuts.
            • Visually Appealing: The optional green food coloring and festive sprinkles make it a showstopper.

            Ingredients:

            • 1 (15.25 oz) box of golden cake mix
            • 3 (3.4 oz each) boxes of instant pistachio pudding
            • 1 cup of hot water
            • 1/2 cup of vegetable oil
            • 4 room temperature eggs
            • 1/4 cup of finely chopped pistachios
            • 2-4 drops of green food coloring (optional)
            • A sprinkle of red and green for a festive touch (optional)

            Instructions:

            1. Preheat your oven to 350 degrees F (175 degrees C). This step ensures that your bread will bake evenly and develop a perfect crust.
            2. Prepare your loaf pans by greasing them thoroughly. This prevents the bread from sticking and helps in easy removal after baking.
            3. Mix the batter: In a large mixing bowl, combine the golden cake mix, instant pistachio pudding mix, hot water, vegetable oil, and eggs. For a more vibrant color, add the green food coloring at this stage. Whisk together until the batter is smooth and homogenous.
            4. Add texture and character: Stir in the finely chopped pistachios to incorporate a delightful crunch and enhance the nutty flavor of your bread.
            5. Transfer to loaf pans: Pour the batter into the prepared loaf pans. If using, sprinkle the top with red and green decorations for a festive look.
            6. Bake for 40-45 minutes: Place in the preheated oven and bake until a toothpick inserted into the center comes out clean, indicating that the bread is perfectly baked.
            7. Cool and enjoy: Allow the bread to cool in the pans for a while before transferring them to a wire rack. This patience is crucial as it prevents the loaves from breaking apart.
            8. Slice and savor: Once cooled, slice the bread and enjoy the rich, flavorful experience of your homemade Nutty Pistachio Delight Bread.

            Storage Options:

            • Room Temperature: Keep in an airtight container for up to 3 days.
            • Refrigerator: For longer storage, refrigerate for up to a week.
            • Freezer: Wrap tightly and freeze for up to 3 months. Thaw and reheat gently before serving.

            Tips:

            • Uniform Baking: Ensure your oven is properly calibrated for the best results.
            • Enhance Flavors: Toasting the chopped pistachios lightly before adding them to the batter can enhance their flavor.
            • Serving Suggestions: Serve with a dollop of whipped cream or a drizzle of honey for extra decadence.

            This Nutty Pistachio Delight Bread is more than just a treat; it’s a testament to how a few simple ingredients can be transformed into something extraordinarily delicious and visually appealing.

            Candied Pecans

            0

            Indulge in the sweet simplicity of Candied Pecans, a delightful treat that combines the rich, nutty flavor of pecans with a glossy, caramelized coating. This recipe is a wonderful way to enjoy pecans and makes a fantastic gift or a tasty snack for any seasonal gathering. With just a few ingredients and minimal preparation time, you can create a batch of these irresistible nuts that are sure to warm hearts and tantalize taste buds.

            Why You’ll Love This Recipe:

            • Simple Ingredients: Requires only a handful of pantry staples.
            • Quick and Easy: Ready in just a few minutes, perfect for last-minute treats.
            • Versatile Snack: Great for gifting, adding to salads, or enjoying on their own.

            Ingredients:

            • 2 cups pecans
            • 1 cup brown sugar
            • 1 teaspoon salt
            • 1/2 teaspoon cinnamon
            • 3 tablespoons water

            Preparation:

            1. Prepare Ingredients: Gather all your ingredients so you have everything close at hand.
            2. Heat Sugar Mixture: In a medium saucepan over medium heat, combine the brown sugar, salt, cinnamon, and water. Stir continuously until the sugar has completely melted. This will create your candying syrup.
            3. Add Pecans: Once the sugar mixture is smooth and fully combined, add the pecans to the saucepan. Stir the pecans into the syrup, ensuring they are evenly coated with the sugar mixture.
            4. Cook Pecans: Continue to cook the pecans in the syrup for about two minutes, stirring constantly. This process will help the sugar syrup thicken and adhere to the pecans, giving them a nice glossy coat.
            5. Cool: Spread the candied pecans out on a sheet of parchment paper to cool. Ensure they are in a single layer to prevent them from sticking together. Allow them to cool completely, which will help the candy coating harden and become crisp.
            6. Serve or Gift: Once cooled, your candied pecans are ready to be enjoyed! Pack them in airtight containers or pretty bags if giving them as gifts.

            Storage Options:

            • Room Temperature: Store candied pecans in an airtight container at room temperature for up to 2 weeks.
            • Refrigerator: For longer storage, keep them in the refrigerator, where they will stay fresh for about a month.

            Tips:

            • Watch the Heat: Keep an eye on the pecans as they cook with the sugar mixture; they can burn easily if left unattended.
            • Spice Variations: Feel free to experiment with different spices like nutmeg or pumpkin spice for a seasonal twist.
            • Gift Giving: Package these candied pecans in mason jars tied with a ribbon for a charming homemade gift.

            Candied pecans are not just a treat; they’re a gesture of warmth and care. Enjoy making them as much as you enjoy giving them to the people you love. 🍁🧡💛🍂

            OLD FASHIONED GOULASH

            0

            This hearty Beef or Turkey Goulash recipe brings a comforting and savory blend of meat, pasta, and melted cheese together in one pot, making it a perfect meal for any day of the week. Featuring a robust tomato base and a medley of spices, this dish promises not only ease of preparation but also delivers on flavor. It’s a family-friendly meal that combines the simplicity of pantry staples with the wholesomeness of home-cooked fare.

            Why You’ll Love This Recipe:

            • Versatile and Hearty: Whether you choose beef or turkey, the recipe remains a satisfying and filling dish.
            • One-Pot Wonder: Minimal cleanup is required as the entire dish is cooked in a single pan.
            • Rich in Flavor: The combination of Italian and adobo seasonings creates a deep and aromatic flavor profile that enhances the meat and tomatoes.

            Ingredients:

            • 2 lbs ground beef or turkey
            • 3 teaspoons minced garlic
            • 1 large yellow onion, diced
            • 2 ½ cups water
            • ½ cup beef broth
            • ⅓ cup olive oil
            • 2 (15-ounce) cans tomato sauce
            • 2 (15-ounce) cans diced tomatoes
            • 1 tablespoon Italian seasoning
            • 1 tablespoon adobo seasoning
            • 3 bay leaves
            • 1 tablespoon seasoned salt
            • ½ tablespoon black pepper
            • 2 cups elbow macaroni, uncooked
            • 1 cup shredded mozzarella cheese
            • ½ cup shredded cheddar cheese

            Instructions:

            1. Cook the Ground Meat: Heat a large skillet over medium-high heat. Add the ground meat and cook until it’s browned and half-cooked, breaking it into small pieces with a spatula. Once partially cooked, remove from heat and set aside.
            2. Sauté the Vegetables: In the same skillet, add olive oil if needed and heat over medium. Add minced garlic and diced onion, sautéing until soft and fragrant, about 5 minutes.
            3. Combine Ingredients: Return the meat to the skillet. Add water, beef broth, tomato sauce, and diced tomatoes, stirring to combine.
            4. Season the Goulash: Incorporate Italian seasoning, adobo seasoning, bay leaves, seasoned salt, and black pepper. Stir well.
            5. Simmer: Reduce heat to medium-low, cover, and let the mixture simmer for 20 minutes, stirring occasionally.
            6. Add Macaroni: Stir in uncooked elbow macaroni, cover, and continue to simmer for 30 more minutes, or until the pasta is cooked, stirring occasionally.
            7. Add Cheese: Remove the bay leaves. Stir in the shredded cheddar cheese until melted and integrated.
            8. Top with Mozzarella: Sprinkle mozzarella cheese over the top and allow it to melt slightly before serving.

            Storage Options:

            • Refrigerator: Store leftovers in an airtight container for up to 4 days.
            • Freezer: Freeze portions in suitable containers for up to 2 months. Thaw in the refrigerator before reheating.

            Tips:

            • Meat Selection: For a leaner option, turkey is excellent, but beef provides a richer flavor.
            • Cheese Varieties: Experiment with different cheeses for varied flavors and textures.
            • Spice Adjustments: Adjust the level of adobo seasoning and black pepper to suit your taste for heat and spice.

            This Goulash is not just a meal but an experience of comfort and warmth, making it a favorite for both weeknight dinners and casual gatherings. Enjoy the deep flavors and hearty textures that make this dish uniquely satisfying.

            Mexican Shredded Beef

            0

            Transform a simple chuck roast into a vibrant and flavorful Mexican Shredded Beef using your Crock Pot. This recipe infuses the meat with bold spices and a hint of lime, making it a versatile component for tacos, burritos, or even as a hearty filling for enchiladas. The slow cooking process ensures that every strand of beef is tender and infused with rich, spicy flavors, making it a crowd-pleaser at any gathering or a comforting family dinner.

            The preparation involves a straightforward rub and slow-cook method, which means minimal hands-on time and maximum flavor. This dish not only fills your kitchen with an enticing aroma but also provides a satisfying meal that’s both nourishing and delightfully tasty.

            Why You’ll Love This Recipe:

            • Effortlessly Flavorful: The combination of spices and slow cooking creates deep, complex flavors in the beef.
            • Versatile: This shredded beef can be used in a variety of dishes, adapting to whatever meal you’re in the mood for.
            • Make-Ahead Friendly: Perfect for meal prepping as it keeps well and even tastes better the next day.

            Ingredients:

            Dry Rub Spices:

            • 2 tablespoons chili powder
            • ½ tablespoon onion powder
            • 1-2 teaspoons salt (adjust to preference, typically ½ teaspoon per pound of beef)
            • 2 teaspoons cumin
            • 2 teaspoons garlic powder
            • 1 teaspoon ground black pepper
            • ½ teaspoon cayenne pepper (optional, for added heat)
            • ½ teaspoon paprika

            Other:

            • 3.5-4 lb chuck roast, boneless
            • ½ cup beef broth
            • 2 tablespoons tomato paste
            • 1 lime, juiced

            Instructions:

            1. Prepare the Spice Mix: Combine all the dry rub spices in a small bowl and set aside.
            2. Mix Liquids: In another bowl, whisk together the beef broth and tomato paste until well blended.
            3. Season the Meat: Place the chuck roast in the Crock Pot insert. Rub half of the spice mixture onto the top of the roast, flip, and apply the remaining spices to the other side and edges.
            4. Add Broth Mixture: Pour the broth and tomato paste mixture over the top and sides of the roast.
            5. Cook: Cover and set the Crock Pot to low. Cook for 8 hours, or until the meat is fork-tender and can be easily shredded.
            6. Shred the Beef: Remove the roast from the Crock Pot and place it in a large bowl, leaving the broth behind. Shred the meat with two forks, discarding any excess fat.
            7. Finish with Lime: Return the shredded beef to the Crock Pot. Squeeze in the lime juice and stir. Taste and adjust the salt if necessary.
            8. Serve: The beef is now ready to be served. For a drier consistency, keep the beef in the bowl and add reserved broth to achieve the desired flavor and moisture.

            Storage Options:

            • Refrigerator: Store in an airtight container for up to 5 days.
            • Freezer: Freeze in a sealed container for up to 3 months. Thaw in the refrigerator before reheating.

            Tips:

            • For Best Results: Let the beef marinate with the spice rub overnight before cooking to deepen the flavors.
            • Serving Suggestions: Use this shredded beef in tacos, enchiladas, over rice, or in a beef salad.
            • Add More Heat: If you prefer a spicier dish, increase the amount of cayenne pepper or add diced jalapeños to the Crock Pot.

            No Bake Peanut Butter Pie

            0

            Indulge in a delightful No Bake Peanut Butter Pie that marries the creamy texture of peanut butter with the crunch of pecans and chocolate, all wrapped up in a lusciously smooth filling. This dessert is not only scrumptious but also keto-friendly, making it a guilt-free treat for those watching their carb intake. The combination of rich flavors and no-bake convenience makes this pie a perfect choice for any occasion, from family gatherings to festive celebrations.

            This pie stands out with its easy preparation and delectable layers, ensuring that even novice bakers can impress. The use of sugar-free ingredients like monkfruit sweetener and Lily’s dark chocolate chips keeps it within the keto guidelines without compromising on taste.

            Why You’ll Love This Recipe:

            • No-Bake Convenience: No oven time required, which is perfect for warm days or when you want a quick dessert.
            • Keto-Friendly: Satisfies sweet cravings without the carb load, making it ideal for those on a ketogenic diet.
            • Rich and Creamy: The creamy texture of the filling combined with the crunchy crust offers a satisfying contrast.

            Ingredients:For the Keto Crust:

            • 1 1/2 cups Highkey Mini Chocolate Chip Cookies
            • 1 cup roasted pecans, crushed
            • 4 tablespoons butter, melted

            For the Pie Filling:

            • 1 cup heavy cream
            • 8 ounces cream cheese, room temperature
            • 1 1/2 cups creamy peanut butter
            • 1 cup powdered monkfruit sweetener
            • 1 teaspoon vanilla extract

            For the Topping:

            • 1 cup heavy cream
            • 1 cup Lily’s sugar free dark chocolate chips

            Instructions:

            1. Make the crust: Add the cookies, pecans, and melted butter to a food processor and pulse until it resembles a graham cracker crust. Line a 9-inch springform pan with parchment paper, pour the crust into the bottom of the pan, and pack very tightly. Place in the freezer while you prepare the filling.
            2. Whip the cream: In a large mixing bowl, beat the heavy whipping cream with electric beaters until stiff peaks form (this will take 4-6 minutes). Set the bowl in the fridge.
            3. Make the filling: In a second mixing bowl, beat the cream cheese, monkfruit sweetener, peanut butter, and vanilla extract until creamy. Add the whipped cream to the first bowl and beat on low until the mixture is completely smooth. Scrape the filling into the crust.
            4. Make the ganache: Add the chopped chocolate chips and piping hot heavy cream together and stir until a creamy ganache forms. Carefully pour it over the pie and chill at least 12 hours.

            Storage Options:

            • Refrigerator: Keep the pie refrigerated and consume within 5 days for best freshness and texture.
            • Freezer: You can freeze the pie for up to a month. Thaw in the refrigerator overnight before serving.

            Tips:

            • Smooth Filling: Ensure the cream cheese is at room temperature before mixing to avoid lumps in your filling.
            • Enhance the Flavor: Consider adding a sprinkle of sea salt over the ganache topping to enhance the chocolate and peanut butter flavors.
            • Decorative Touch: Garnish with chopped peanuts or a drizzle of peanut butter for an extra touch of elegance before serving.

            This No Bake Peanut Butter Pie is not just a dessert, it’s a statement piece that’s sure to wow your guests and satisfy your sweet tooth without straying from your dietary goals. Enjoy the harmony of flavors and textures that this remarkable pie brings to your table.

            Sausage and Pepperoni Pizza Pie

            0

            Imagine a dish where the crispy, flaky layers of a pie meet the cheesy, meaty goodness of a classic pizza. This Sausage and Pepperoni Pizza Pie does just that, marrying the hearty fill of traditional pizza toppings with the elegant presentation of a pie. It’s an indulgent twist on two family favorites, perfect for shaking up your dinner routine or impressing guests at a casual gathering.

            The use of a pie crust as the base allows for a deeper filling, giving each slice a robust layer of sausage, pepperoni, vegetables, and melting cheese. This recipe is fantastic for anyone looking for a satisfying meal that combines the familiar flavors of pizza with a fun and festive pie format. It’s also a great way to involve kids in the kitchen, letting them help with assembling the layers of this delicious dish.

            Why You’ll Love This Recipe:

            • Comforting and Hearty: It’s packed with flavorful meats and vegetables, all encased in a golden, flaky crust.
            • Perfect for Sharing: This pie is a showstopper at gatherings, making it a great choice for social dinners or parties.
            • Customizable: Easily adaptable with different meats, veggies, or even a vegetarian version, making it versatile for any taste.

            Ingredients:

            • 1 package refrigerated pie crusts or homemade pie dough
            • 2 tbsp olive oil (divided for brushing and sautéing)
            • 1/2 onion, chopped
            • 2 cloves garlic, minced
            • 1 pound ground sausage or Italian sausage, casing removed
            • 1 cup pizza sauce
            • 1 cup mozzarella cheese, shredded
            • 1/2 cup pepperoni slices
            • 1/2 cup bell peppers, diced
            • 1/2 cup mushrooms, sliced
            • 1 tsp Italian seasoning
            • Salt and pepper to taste
            • Extra mozzarella cheese for topping
            • Additional pepperoni slices for topping

            Instructions:

            Preheat your oven to 375°F (190°C).

            Roll out the pie crust and fit it into a deep pie dish. Brush with olive oil. Pre-bake for 8 minutes, then set aside to cool slightly.

            In a large skillet, heat olive oil over medium heat. Sauté the onion and garlic until translucent. Add the sausage, cooking until browned and crumbly. Drain excess fat.

            Stir in pizza sauce, mozzarella cheese, pepperoni, bell peppers, mushrooms, Italian seasoning, salt, and pepper. Cook until combined and cheese begins to melt.

            Spoon the filling into the pre-baked crust. Top with extra cheese and pepperoni. Optionally, add a top crust, sealing edges and cutting slits for steam.

            Bake for 25-30 minutes or until crust is golden and filling is bubbly.

            Allow to cool for a few minutes before slicing and serving warm.

            Storage Options:

            • Refrigerator: Keep leftovers in an airtight container for up to 3 days. Reheat in the oven to preserve the crust’s texture.
            • Freezer: Freeze the whole pie or individual slices in airtight containers for up to 1 month. Reheat after thawing in the refrigerator.

            Tips:

            • Crust Choice: For a lighter option, consider using a puff pastry sheet as an alternative to traditional pie crust.
            • Spice it Up: Add a sprinkle of chili flakes or a dash of hot sauce to the filling for a spicy kick.
            • Make it Vegetarian: Substitute the meats with a mix of additional vegetables such as olives, artichokes, and zucchini for a vegetarian version without compromising the hearty nature of the dish.

            Philly Cheesesteak Baked Potatoes

            0

            These Philly Cheesesteak Baked Potatoes are a hearty twist on the classic sandwich, combining the rich flavors of a Philly cheesesteak with the comforting texture of baked potatoes. This dish is perfect for a satisfying dinner, blending the tender juiciness of ribeye steak with the robust flavors of onions and peppers, all topped with melty provolone cheese. It’s a full meal packed into a potato!

            Why You’ll Love This Recipe:

            • Comforting and Hearty: Perfect for a filling meal that satisfies cheesesteak cravings in a unique way.
            • Customizable: Easy to adapt with different cheeses or additional toppings like mushrooms or jalapeños.
            • Perfect for Any Occasion: Ideal for a family dinner, game day, or any gathering that calls for a robust, flavorful dish.

            Ingredients:

            • 4 large russet potatoes
            • 1 lb. ribeye steak, thinly sliced
            • 1 onion, thinly sliced
            • 1 green bell pepper, sliced
            • 1 cup provolone cheese, shredded
            • Salt and pepper to taste

            Optional Ingredients for Extra Flavor:

            • 2 cloves garlic, minced
            • 1 teaspoon paprika
            • 1 tablespoon olive oil
            • Fresh parsley, chopped (for garnish)

            Instructions:

            1. Preheat and Prepare the Potatoes:

            • Preheat Oven: Start by heating your oven to 400°F (200°C) for optimal baking.
            • Prepare the Potatoes: Clean and dry the potatoes. Pierce them with a fork to allow steam to escape.
            • Bake: Place the potatoes directly on the oven rack or on a baking sheet and bake for 45-60 minutes, until tender.

            2. Cook the Steak and Vegetables:

            • Prepare Steak: Slice the ribeye thinly against the grain for tenderness.
            • Heat Skillet: Warm the olive oil in a large skillet over medium-high heat.
            • Cook Steak: Season the steak with salt and pepper, then cook until browned. Remove and set aside.
            • Sauté Vegetables: In the same skillet, add the onions and bell peppers (and garlic and paprika if using), cooking until soft.

            3. Assemble the Baked Potatoes:

            • Slice and Fluff: Once baked, slit the top of each potato and fluff the insides with a fork.
            • Add Steak Mixture: Spoon the steak and vegetable mixture into each potato.
            • Add Cheese: Top with shredded provolone cheese.

            4. Melt the Cheese:

            • Bake Again: Return the potatoes to the oven for 5-10 minutes, or until the cheese is melted and bubbly.
            • Optional Broil: For a crispy cheese topping, broil for 1-2 minutes, watching carefully to avoid burning.

            5. Garnish and Serve:

            • Garnish: Sprinkle with chopped parsley for a fresh touch.
            • Serve: Enjoy hot, possibly with a side salad or steamed vegetables for a balanced meal.

            Storage Tips:

            • Refrigerator: Store any leftovers in the fridge, covered, for up to 3 days.
            • Reheating: Reheat in the oven or microwave until warm throughout.

            These Philly Cheesesteak Baked Potatoes offer a deliciously satisfying twist on two classic dishes, making them the perfect choice for a comforting and filling meal.