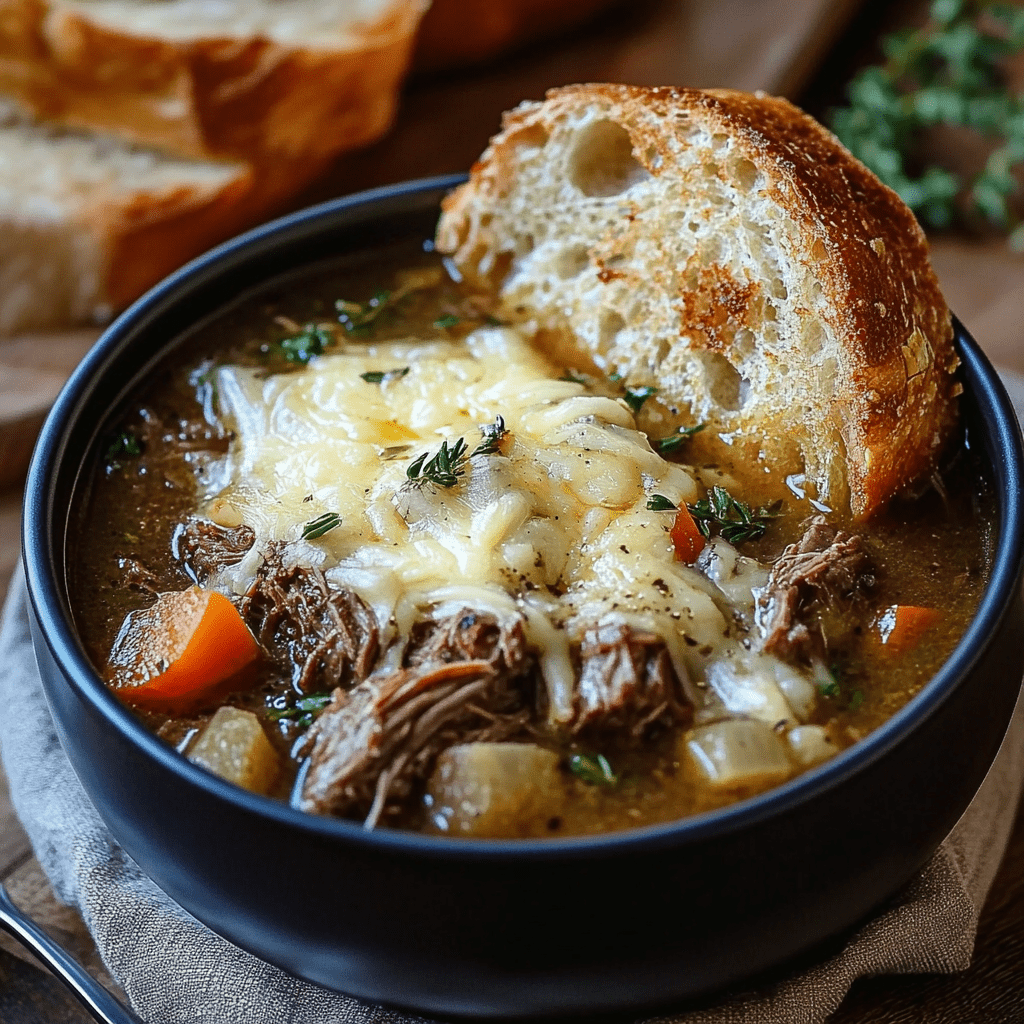
Chinese Sweet and Sour Sauce

0

Chinese Sweet and Sour Sauce is a versatile and flavorful condiment that perfectly balances tangy and sweet notes. Often paired with dishes like fried chicken, pork, or shrimp, this sauce also works wonderfully as a dip for spring rolls or wontons. Its vibrant color and zesty flavor make it a favorite in Chinese cuisine and beyond.

The combination of simple pantry ingredients creates a sauce that’s both easy to prepare and endlessly customizable. Add a hint of pineapple juice, ginger, or garlic for extra depth, or keep it classic for a traditional flavor profile.

Why You’ll Love This Recipe

Perfect Balance: A delightful blend of tangy vinegar and sweet sugar.

Quick to Make: Ready in under 10 minutes.

Customizable: Adjust the flavor and thickness to suit your taste.

Ingredients

• ½ cup water

• ⅓ cup white vinegar

• ½ cup sugar

• 3 tbsp ketchup

• 1 tbsp soy sauce

• 1 tsp cornstarch dissolved in 2 tbsp water (cornstarch slurry)

• Optional: A splash of pineapple juice, minced ginger, or minced garlic for added zest

Instructions

Step 1: Blend the Ingredients

1. In a small saucepan, combine water, white vinegar, sugar, ketchup, and soy sauce.

2. If desired, add optional ingredients like pineapple juice, minced ginger, or garlic for additional flavor.

3. Stir until the sugar begins to dissolve, ensuring a smooth base.

Step 2: Simmer Gracefully

1. Place the saucepan over medium heat and bring the mixture to a gentle simmer.

2. Stir occasionally to fully dissolve the sugar and prevent sticking.

Step 3: Thicken with Elegance

1. Prepare the cornstarch slurry by dissolving 1 teaspoon of cornstarch in 2 tablespoons of water, ensuring it’s lump-free.

2. Gradually add the slurry to the simmering sauce while stirring continuously.

3. Continue stirring for 1–2 minutes until the sauce thickens to your desired consistency.

Step 4: Adjust Consistency

1. Remove the sauce from heat once thickened.

2. If the sauce is too thick, thin it with additional water or pineapple juice, stirring well.

3. If too thin, prepare more cornstarch slurry and add it gradually while simmering, stirring constantly.

Step 5: Cool and Serve

1. Let the sauce cool slightly to allow the flavors to settle and the texture to firm up.

2. Use immediately as a glaze, dip, or drizzle. Alternatively, store in an airtight container in the refrigerator for up to 1 week. Ensure the sauce is completely cooled before storing.

Tips

Adjust Sweetness: Add more sugar for a sweeter sauce or reduce it for a tangier result.

Spice It Up: For a spicy kick, stir in a pinch of chili flakes or a splash of hot sauce.

Make It Thicker: If the sauce isn’t thick enough after adding the slurry, simmer it longer, stirring constantly.

Storage Options

Refrigerator: Store in an airtight container for up to 1 week. Reheat gently on the stove or in the microwave, adding a splash of water if needed.

Freezer: For longer storage, freeze in small portions. Thaw and reheat as needed.

This Chinese Sweet and Sour Sauce is a staple for creating restaurant-quality dishes at home. Whether paired with crispy meats, vegetables, or dumplings, its delightful balance of flavors will keep you coming back for more!

Snickerdoodle Zucchini Bread Recipe

0

Snickerdoodle Zucchini Bread is a delightful twist on classic zucchini bread, combining the moist, tender crumb of zucchini bread with the warm, spiced sweetness of snickerdoodle cookies. This quick bread is topped with a cinnamon-sugar crust that adds a satisfying crunch and enhances its flavor. Perfect for breakfast, dessert, or an afternoon snack, this recipe is a great way to use up summer zucchini while indulging in a comforting treat.

Why You’ll Love This Recipe

Unique Flavor: The snickerdoodle-inspired cinnamon-sugar topping elevates the classic zucchini bread.

Moist and Tender: Properly prepared zucchini ensures a perfectly moist texture without being soggy.

Versatile Treat: Enjoy it plain, or pair it with butter or cream cheese for an extra layer of indulgence.

Ingredients

For the Bread:

• 2 cups grated zucchini

• ¾ cup granulated sugar

• ½ cup brown sugar

• ½ cup vegetable oil

• 2 large eggs

• 1 tsp vanilla extract

• 2 cups all-purpose flour

• 1 tsp baking powder

• ½ tsp baking soda

• ½ tsp salt

• 1½ tsp ground cinnamon

For the Topping:

• 2 tbsp granulated sugar

• 1 tsp ground cinnamon

Instructions

Step 1: Prepare the Zucchini

1. Wash and dry the zucchini, then trim off the ends. Grate the zucchini using a box grater or food processor.

2. Place the grated zucchini in a clean kitchen towel or cheesecloth and squeeze out as much moisture as possible. Set aside.

Step 2: Make the Batter

1. Preheat your oven to 350°F (175°C). Grease and flour a 9×5-inch loaf pan, or line it with parchment paper.

2. In a large mixing bowl, whisk together the granulated sugar, brown sugar, and vegetable oil until smooth.

3. Add the eggs and vanilla extract, whisking until creamy.

4. Stir the grated zucchini into the wet mixture until evenly distributed.

5. In a separate bowl, whisk together the flour, baking powder, baking soda, salt, and ground cinnamon.

6. Gradually fold the dry ingredients into the wet mixture, stirring gently until just combined. Avoid overmixing to maintain a tender texture.

Step 3: Prepare the Topping

1. In a small bowl, mix the granulated sugar and ground cinnamon.

Step 4: Assemble and Bake

1. Pour the batter into the prepared loaf pan, spreading it evenly.

2. Sprinkle the cinnamon-sugar mixture evenly over the top of the batter.

3. Bake in the preheated oven for 50–60 minutes, or until a toothpick inserted into the center comes out clean. If the top browns too quickly, tent with aluminum foil.

Step 5: Cool and Serve

1. Allow the bread to cool in the pan for 10–15 minutes.

2. Carefully remove the bread from the pan and transfer it to a wire rack to cool completely.

3. Slice into thick pieces once cooled and serve plain, with butter, or cream cheese.

Tips

Perfect Texture: Be sure to thoroughly squeeze the moisture from the zucchini to prevent a soggy bread.

Extra Crunch: Double the topping mixture for an even thicker cinnamon-sugar crust.

Make Ahead: Wrap tightly and store overnight for flavors to meld and the bread to become even more moist.

Storage Options

Room Temperature: Store in an airtight container for up to 3 days.

Refrigerator: Extend freshness by refrigerating for up to 1 week.

Freezer: Wrap slices individually in plastic wrap, then place in a freezer-safe bag. Freeze for up to 3 months. Thaw at room temperature before serving.

Snickerdoodle Zucchini Bread is a flavorful and comforting treat that blends the best of classic quick bread and snickerdoodle cookies. With its tender crumb and irresistible cinnamon-sugar topping, it’s sure to be a favorite!

Creamy Sausage Balls with Cheese and Rotel

0

Creamy Sausage Balls with Cheese and Rotel are a flavorful and easy appetizer or snack that’s perfect for any gathering. The combination of spicy sausage, creamy cheese, and tangy Rotel makes these bite-sized treats irresistible. The biscuit mix creates a tender and slightly crispy exterior, making them ideal for dipping or enjoying on their own.

These sausage balls are incredibly versatile, whether you’re serving them at a game-day party, potluck, or family brunch. They’re quick to prepare, bake up beautifully, and disappear just as fast!

Why You’ll Love This Recipe

Bursting with Flavor: Packed with savory sausage, melted cheese, and the zesty kick of Rotel.

Simple to Make: Minimal prep and straightforward instructions.

Crowd-Pleaser: Perfect for entertaining or a comforting snack.

Ingredients

• 1 pound ground sausage

• 8 ounces cream cheese, softened

• 1 can (10 ounces) Rotel diced tomatoes and green chilies, drained

• 2 cups shredded cheddar cheese

• 2 cups biscuit baking mix (such as Bisquick)

• ½ tsp garlic powder

• ½ tsp onion powder

• ¼ tsp black pepper

• Optional: Chopped fresh parsley or green onions for garnish

Instructions

Step 1: Preheat the Oven

1. Preheat your oven to 375°F (190°C).

Step 2: Prepare the Baking Sheet

1. Lightly grease a baking sheet or line it with parchment paper for easy cleanup.

Step 3: Mix the Ingredients

1. In a large mixing bowl, combine the ground sausage, softened cream cheese, drained Rotel, shredded cheddar cheese, biscuit mix, garlic powder, onion powder, and black pepper.

2. Mix thoroughly using a wooden spoon or your hands until the ingredients are evenly combined.

Step 4: Shape the Sausage Balls

1. Scoop out portions of the mixture and roll them into 1-inch balls.

2. Place the sausage balls on the prepared baking sheet, spacing them about 1 inch apart.

Step 5: Bake the Sausage Balls

1. Bake in the preheated oven for 20–25 minutes, or until the sausage balls are golden brown and cooked through.

2. Use a meat thermometer to check that the internal temperature reaches at least 160°F (71°C).

Step 6: Cool and Garnish

1. Remove the sausage balls from the oven and let them cool on the baking sheet for 5 minutes to firm up.

2. Garnish with chopped parsley or green onions if desired.

Step 7: Serve

1. Arrange the sausage balls on a serving platter.

2. Serve warm with your favorite dipping sauces like ranch, spicy mayo, or honey mustard.

Tips

Customize the Heat: Use hot sausage or spicy Rotel for a bolder flavor.

Make-Ahead: Prepare the sausage balls ahead of time, refrigerate, and bake when ready.

Cheese Options: Experiment with different cheeses like pepper jack or Colby for variety.

Perfect Consistency: If the mixture feels too dry, add a splash of milk for better binding.

Storage Options

Refrigerator: Store leftovers in an airtight container for up to 3 days. Reheat in the oven or microwave.

Freezer: Freeze uncooked sausage balls on a baking sheet, then transfer them to a freezer-safe bag. Bake directly from frozen, adding a few extra minutes to the cooking time.

Creamy Sausage Balls with Cheese and Rotel are a delectable treat that’s easy to make and sure to impress. With their bold flavors and creamy texture, they’re guaranteed to be a hit at any table!

Chocolate Zucchini Bread Recipe

0

Chocolate Zucchini Bread is a moist, rich treat that combines the indulgence of chocolate with the natural goodness of zucchini. Perfect as a snack, breakfast, or dessert, this bread strikes a delightful balance between sweetness and nutrition. The zucchini ensures a tender crumb without overpowering the chocolatey flavor, while chocolate chips add bursts of decadence in every bite.

This easy-to-make recipe is a great way to use up extra zucchini and sneak some veggies into your diet. Enjoy it with your favorite coffee or tea for a comforting and satisfying treat!

Why You’ll Love This Recipe

Decadently Moist: The zucchini ensures a soft, tender texture.

Chocolate Lover’s Dream: Cocoa powder and chocolate chips make it irresistibly rich.

Simple and Versatile: Quick to prepare and perfect for any occasion.

Ingredients

Dry Ingredients:

• 1½ cups all-purpose flour

• ½ cup unsweetened cocoa powder

• 1 tsp baking soda

• ½ tsp baking powder

• ½ tsp salt

Wet Ingredients:

• ½ cup vegetable oil

• ½ cup granulated sugar

• ½ cup brown sugar

• 2 large eggs

• 1 tsp vanilla extract

Add-ins:

• 1½ cups grated zucchini

• 1 cup chocolate chips

Instructions

Step 1: Preheat the Oven and Prepare the Pan

1. Preheat your oven to 350°F (175°C).

2. Grease a 9×5-inch loaf pan with cooking spray or butter, ensuring even coverage.

Step 2: Prepare the Dry Ingredients

1. In a medium bowl, whisk together the flour, cocoa powder, baking soda, baking powder, and salt until combined and lump-free.

Step 3: Prepare the Wet Ingredients

1. In a large bowl, mix the vegetable oil, granulated sugar, brown sugar, eggs, and vanilla extract.

2. Whisk until the mixture is smooth and the sugars are fully dissolved.

Step 4: Combine Wet and Dry Ingredients

1. Gradually add the dry ingredients to the wet ingredients, mixing gently until just combined.

2. Avoid overmixing to keep the bread tender.

Step 5: Add Zucchini and Chocolate Chips

1. Fold in the grated zucchini and chocolate chips.

2. Ensure even distribution without overmixing.

Step 6: Bake the Bread

1. Pour the batter into the prepared loaf pan and smooth the top with a spatula.

2. Bake in the preheated oven for 50–60 minutes, or until a toothpick inserted into the center comes out clean or with a few crumbs.

Step 7: Cool and Serve

1. Allow the bread to cool in the pan for 10 minutes.

2. Transfer the loaf to a wire rack to cool completely before slicing. Run a knife around the edges if necessary to release it from the pan.

Tips

Zucchini Prep: No need to peel the zucchini; just grate it finely and squeeze out excess moisture if it’s particularly wet.

Chocolate Variety: Swap semi-sweet chocolate chips with dark or milk chocolate, depending on your preference.

Extra Flavors: Add a handful of chopped nuts or a teaspoon of espresso powder for a unique twist.

Storage Options

Room Temperature: Wrap tightly in plastic wrap or store in an airtight container for up to 3 days.

Refrigerator: Store for up to 1 week for extended freshness.

Freezer: Freeze slices or the whole loaf in a freezer-safe bag for up to 3 months. Thaw at room temperature before serving.

Chocolate Zucchini Bread is a delightful treat that’s as nutritious as it is indulgent. Its moist texture and rich chocolate flavor make it a go-to recipe for any chocolate lover!

Classic Tapioca Pudding Recipe

0

Classic Tapioca Pudding is a timeless dessert with a creamy texture and subtly sweet flavor. Its delightful chewy pearls add a unique texture, making it both comforting and satisfying. Perfectly balanced with the rich taste of milk and the aroma of vanilla, this pudding is a treat that evokes nostalgic memories of homemade goodness.

Whether served plain or topped with fresh fruit, cinnamon, or a dollop of whipped cream, this dessert is a versatile choice for any occasion.

Why You’ll Love This Recipe

Classic Comfort Food: Simple ingredients come together to create a creamy and satisfying dessert.

Versatile: Customize with your favorite toppings or mix-ins.

Perfect Texture: Soft tapioca pearls add a delightful chewiness.

Ingredients

• ½ cup small tapioca pearls

• 4 cups milk (whole or 2%)

• ¾ cup + 1 cup white sugar, divided

• 3 eggs

• 1 tsp vanilla extract

Instructions

Step 1: Prep the Tapioca Pearls

1. Rinse the tapioca pearls under cold water in a fine-mesh strainer.

2. Place the pearls in a small bowl, cover with water, and let them soak for 45–60 minutes to soften and expand.

Step 2: Cook the Tapioca Mixture

1. In a large pot, combine the milk and ¾ cup of sugar.

2. Bring the mixture to a boil over medium heat, stirring occasionally to prevent burning.

3. Drain the soaked tapioca pearls and add them to the boiling milk.

4. Reduce the heat to a simmer and cook, stirring frequently, until the tapioca pearls are tender and the mixture thickens slightly.

Step 3: Temper the Eggs

1. In a large bowl, beat the eggs with the remaining 1 cup of sugar until smooth.

2. Gradually temper the eggs by slowly adding about ⅓ cup of the hot tapioca mixture to the eggs, whisking constantly to avoid scrambling.

3. Repeat the process until the egg mixture is warmed through.

Step 4: Combine and Final Cooking

1. Slowly pour the tempered egg mixture back into the pot with the remaining tapioca mixture, stirring continuously.

2. Cook over low heat, stirring constantly, until the pudding thickens and just begins to bubble. Do not let it boil.

Step 5: Add Flavor and Chill

1. Remove the pot from heat and stir in the vanilla extract.

2. Pour the pudding into a serving bowl or individual dessert dishes.

3. Cover with plastic wrap, pressing it directly onto the surface to prevent a skin from forming.

4. Refrigerate until chilled and set.

Step 6: Serve

1. Serve the tapioca pudding cold.

2. Garnish with a sprinkle of cinnamon, fresh fruit, or whipped cream for added flavor.

Tips

Perfect Texture: Avoid overcooking the tapioca pearls to maintain their chewiness.

Milk Substitutes: For a dairy-free version, use coconut milk or almond milk.

Extra Richness: Add a splash of cream before serving for a richer flavor.

Storage Options

Refrigerator: Store in an airtight container for up to 3 days.

Freezer: Not recommended, as freezing can affect the texture of the tapioca pearls.

Classic Tapioca Pudding is a simple, delightful dessert that’s sure to please both kids and adults. Its creamy consistency and timeless flavors make it a dessert worth savoring again and again!

Crispy Baked Zucchini Fries

0

Crispy Baked Zucchini Fries are a delicious and healthier alternative to traditional fried snacks. Coated in a savory breadcrumb and Parmesan mixture, these oven-baked zucchini sticks achieve a golden, crunchy exterior while remaining tender on the inside. Perfect as an appetizer, snack, or side dish, they’re flavorful, easy to prepare, and a crowd-pleaser for any occasion.

Pair these fries with your favorite dipping sauces for added flavor, such as marinara, ranch, or a zesty garlic aioli. With a simple preparation process and wholesome ingredients, these zucchini fries are a guilt-free indulgence you’ll love!

Why You’ll Love This Recipe

Healthier Alternative: Oven-baked for a crispy texture without excess oil.

Simple Ingredients: Uses pantry staples and fresh zucchini.

Versatile: Great as a snack, side dish, or party appetizer.

Ingredients

• 3 zucchinis, cut into sticks

• 1 cup breadcrumbs

• ½ cup grated Parmesan cheese

• 2 eggs, beaten

• 1 tsp garlic powder

• 1 tsp dried oregano

• ½ tsp salt

• ¼ tsp black pepper

Instructions

Step 1: Preheat the Oven

1. Preheat your oven to 425°F (220°C).

2. Line a baking sheet with parchment paper or lightly grease it with cooking spray.

Step 2: Prepare the Zucchini

1. Wash the zucchinis thoroughly and pat them dry.

2. Trim off both ends, then slice each zucchini into uniform sticks for even cooking.

Step 3: Prepare the Coating

1. In a medium bowl, mix breadcrumbs, Parmesan cheese, garlic powder, oregano, salt, and black pepper until well combined.

2. In another bowl, beat the eggs until the yolks and whites are fully blended.

Step 4: Coat the Zucchini Sticks

1. Dip each zucchini stick into the beaten eggs, ensuring full coverage.

2. Roll the stick in the breadcrumb mixture, pressing gently to coat all sides evenly.

3. Place the coated sticks on the prepared baking sheet, ensuring they are spaced apart to allow even crisping.

Step 5: Bake the Zucchini Fries

1. Bake in the preheated oven for 20–25 minutes, flipping the zucchini sticks halfway through.

2. The fries are ready when they are golden brown, crispy on the outside, and tender inside.

Step 6: Serve

1. Allow the zucchini fries to cool slightly on the baking sheet to firm up.

2. Serve warm with your choice of dipping sauce, such as marinara, ranch, or garlic aioli.

Tips

Uniform Sizing: Slice the zucchini evenly to ensure consistent cooking.

Extra Crispness: For a crispier texture, use panko breadcrumbs instead of regular breadcrumbs.

Make-Ahead: Bread the zucchini sticks in advance and refrigerate them until ready to bake.

Cheese Alternatives: Swap Parmesan for Pecorino Romano or a blend of Italian cheeses for a different flavor.

Storage Options

Refrigerator: Store leftovers in an airtight container for up to 3 days. Reheat in the oven at 375°F (190°C) to restore crispness.

Freezer: Freeze unbaked, breaded zucchini sticks on a baking sheet until firm, then transfer to a freezer-safe bag. Bake from frozen, adding a few extra minutes to the cooking time.

Crispy Baked Zucchini Fries are a fun and nutritious way to enjoy zucchini. With their golden, crunchy exterior and savory flavor, they’re sure to become a family favorite!

Muffin Tin Potatoes

0

Muffin Tin Potatoes are a delightful twist on classic mashed potatoes. These individual portions are creamy on the inside, crispy on the outside, and loaded with savory toppings like bacon, cheese, and herbs. Perfect for dinner parties, family meals, or as an elegant side dish, they offer the comfort of mashed potatoes with a touch of sophistication.

These little potato cups are easy to customize, allowing you to incorporate your favorite flavors and toppings. Whether served alongside roast chicken or as a stand-alone snack, they’re sure to be a hit!

Why You’ll Love This Recipe

Easy to Make: Uses simple ingredients and straightforward steps.

Customizable: Add your favorite mix-ins for endless variations.

Crowd-Pleaser: Fun individual servings that everyone will love.

Ingredients

• Mashed potatoes (enough to fill your muffin tin)

• Butter (plus extra for greasing)

• Cooked bacon, crumbled

• Cheese (cheddar or mozzarella), shredded

• Parsley, finely chopped

• Green onion, sliced

• Garlic, minced

• Optional: sour cream, chives, paprika, or other preferred ingredients

Instructions

Step 1: Preheat the Oven

1. Preheat your oven to 375°F (190°C).

Step 2: Prepare the Potato Mixture

1. In a large mixing bowl, combine the mashed potatoes with a generous amount of butter until smooth.

2. Stir in the cooked bacon, shredded cheese, parsley, green onion, and minced garlic.

3. If desired, add sour cream, chives, or paprika for extra flavor. Mix until all ingredients are evenly distributed.

Step 3: Assemble in the Muffin Tin

1. Grease a muffin tin with butter or non-stick spray to prevent sticking.

2. Spoon the mashed potato mixture into the muffin cups, filling each one just below the top.

3. Smooth the tops with the back of a spoon or small spatula.

4. Brush the tops lightly with melted butter or olive oil for added crispness.

Step 4: Bake

1. Place the muffin tin in the preheated oven.

2. Bake for 20–25 minutes, or until the tops are golden brown and crispy.

Step 5: Serve

1. Remove the muffin tin from the oven and let the potato muffins cool for a few minutes.

2. Carefully remove the potato cups from the tin using a spoon or small spatula.

3. Garnish with additional parsley or green onions if desired and serve hot.

Tips

Make-Ahead: Prepare the potato mixture in advance and refrigerate until ready to bake.

Crispier Edges: Use a combination of butter and olive oil for greasing to achieve crispy edges.

Add More Flavor: Sprinkle a little Parmesan or paprika on top before baking for extra flavor.

Serving Suggestions

• Pair with roasted chicken, grilled steak, or baked salmon for a complete meal.

• Serve as an appetizer or snack with sour cream or ranch dipping sauce.

Storage Options

Refrigerator: Store leftovers in an airtight container for up to 3 days. Reheat in the oven to restore crispness.

Freezer: Freeze baked potato muffins in a single layer. Reheat in the oven directly from frozen for a quick side dish.

Muffin Tin Potatoes are a versatile and delicious way to enjoy mashed potatoes. With their creamy centers and golden, crispy tops, they’ll quickly become a favorite addition to your meal rotation!

Old Time Oven Peach Cobbler

0

Old Time Oven Peach Cobbler is a classic dessert that’s both simple to make and rich in flavor. With tender, spiced peaches nestled in a buttery, golden crust, this cobbler is a nostalgic treat that brings comfort and joy to the table. It’s perfect for family gatherings, potlucks, or a cozy evening at home.

The Bisquick mix simplifies the preparation process, while the addition of cinnamon and nutmeg infuses warm, aromatic flavors. Serve it warm with a scoop of vanilla ice cream, and you’ll have a dessert that’s impossible to resist!

Why You’ll Love This Recipe

Classic Comfort: A traditional recipe with timeless appeal.

Quick and Easy: Minimal prep and straightforward instructions.

Versatile: Enjoy it as is, or pair it with ice cream for a special touch.

Ingredients

• 1 large can of sliced peaches, drained

• 1 cup Bisquick mix

• 1 cup milk

• ½ tsp nutmeg

• ½ tsp cinnamon

• ½ cup melted butter

• 1 cup sugar

• Vanilla ice cream (optional)

Instructions

Step 1: Preheat the Oven

1. Preheat your oven to 375°F (190°C).

Step 2: Prepare the Batter

1. In an 8×8-inch baking dish, mix the Bisquick mix, nutmeg, and cinnamon until well combined.

2. Stir in the milk until a smooth batter forms, ensuring there are no lumps.

3. Mix in the melted butter, stirring until fully incorporated.

Step 3: Prepare the Peach Mixture

1. Drain the liquid from the peaches. (Optional: Reserve a small amount of syrup for a juicier cobbler.)

2. In a separate bowl, mix the drained peaches with the sugar until the peaches are evenly coated.

Step 4: Assemble the Cobbler

1. Pour the batter into the baking dish, spreading it evenly to cover the bottom.

2. Spoon the peach mixture over the batter, ensuring the peaches are evenly distributed.

Step 5: Bake the Cobbler

1. Place the baking dish in the preheated oven.

2. Bake for 45–60 minutes, or until the top is golden brown and the edges are bubbling.

3. Check the cobbler at the 45-minute mark to avoid over-baking.

Step 6: Cool and Serve

1. Allow the cobbler to cool for 10–15 minutes before serving. This will help the juices thicken.

2. Serve warm with a scoop of vanilla ice cream for a classic pairing.

Tips

Custom Flavors: Add a splash of vanilla or almond extract to the batter for an extra layer of flavor.

Fresh Peaches: Use fresh, peeled peaches for a seasonal twist. If using fresh peaches, adjust the sugar depending on their sweetness.

Topping Variations: Sprinkle a little brown sugar or extra cinnamon on top before baking for added caramelization.

Storage Options

Refrigerator: Store leftovers in an airtight container for up to 3 days. Reheat in the oven or microwave before serving.

Freezer: Freeze the baked cobbler for up to 2 months. Thaw overnight in the refrigerator and warm in the oven before serving.

Old Time Oven Peach Cobbler is the perfect blend of sweet, spiced fruit and buttery crust. Whether served warm from the oven or enjoyed as leftovers, this timeless dessert is sure to delight everyone at your table!

Apple Cinnamon Walnut Cake with Sweet Glaze

0

Apple Cinnamon Walnut Cake is a moist, flavorful dessert that perfectly captures the essence of fall. The warmth of cinnamon, the crunch of walnuts, and the natural sweetness of apples combine to create a cake that’s comforting, rich, and satisfying. Topped with a simple sweet glaze that seeps into the cracks, every bite is a delightful balance of textures and flavors.

Perfect for a cozy gathering, holiday dessert table, or an indulgent treat with coffee, this cake is sure to be a favorite. Its quick preparation and irresistible aroma will have everyone eagerly awaiting a slice.

Why You’ll Love This Recipe

Warm and Comforting: Spiced with cinnamon and packed with apples.

Easy to Make: Simple ingredients and straightforward steps.

Perfectly Sweet: Balanced by the glaze and a touch of nuttiness from walnuts.

Ingredients

For the Cake:

• 2 cups all-purpose flour

• 1 large apple, peeled and chopped

• 1 cup vegetable oil

• 1 cup dark brown sugar

• ½ cup granulated white sugar

• ½ cup walnuts, chopped

• 2 large eggs

• 1 tbsp ground cinnamon

• 1 tsp vanilla extract

• ½ tsp baking powder

• ½ tsp baking soda

• ½ tsp salt

For the Glaze:

• 1 cup powdered sugar

• 2–3 tbsp milk

• ½ tsp vanilla extract

Instructions

Step 1: Preheat the Oven

1. Preheat your oven to 350°F (175°C).

2. Lightly grease a 9-inch round cake pan and set it aside.

Step 2: Prepare Wet Ingredients

1. In a medium bowl, whisk together the eggs and vegetable oil until smooth.

2. Stir in the cinnamon, dark brown sugar, granulated sugar, and vanilla extract.

Step 3: Mix Dry Ingredients

1. Add the flour, salt, baking soda, and baking powder to the wet mixture.

2. Stir until just combined, avoiding overmixing.

Step 4: Add Apples and Walnuts

1. Gently fold in the chopped apples and walnuts, ensuring they are evenly distributed.

Step 5: Bake the Cake

1. Pour the batter into the prepared cake pan, spreading it evenly.

2. Bake in the preheated oven for 35–40 minutes, or until a toothpick inserted into the center comes out clean.

Step 6: Prepare the Glaze

1. While the cake is baking, mix the powdered sugar, milk, and vanilla extract in a small bowl until smooth and pourable. Adjust the consistency by adding more milk or powdered sugar as needed.

Step 7: Add the Glaze

1. Remove the cake from the oven and let it cool for 10 minutes in the pan.

2. While still warm, drizzle the glaze over the top, allowing it to seep into the cracks.

Step 8: Serve

1. Let the cake cool slightly before slicing.

2. Serve warm or at room temperature, allowing the glaze to complement the moist and spiced cake.

Tips

Customize Nuts: Replace walnuts with pecans or omit them for a nut-free option.

Apple Variety: Use tart apples like Granny Smith for a contrast to the sweetness.

Extra Spices: Add a pinch of nutmeg or allspice for enhanced warmth.

Storage: Store the cake in an airtight container at room temperature for up to 2 days or in the refrigerator for up to 5 days.

Serving Suggestions

• Pair with a dollop of whipped cream or a scoop of vanilla ice cream for a decadent dessert.

• Enjoy a slice with your morning coffee or tea for a cozy treat.

Apple Cinnamon Walnut Cake with Sweet Glaze is a delightful dessert that brings comfort and joy to any table. With its simple preparation and crowd-pleasing flavors, it’s a recipe you’ll want to make again and again!

Coconut Milk Pudding

0

Coconut Milk Pudding is a creamy, smooth, and slightly tropical dessert that’s as simple to make as it is delicious. The rich, velvety texture of this pudding comes from the combination of coconut milk and cornstarch, while the subtle sweetness is perfectly balanced by the natural coconut flavor. It’s a dessert that feels indulgent yet light, making it suitable for any occasion.

This pudding is not only versatile but also customizable. You can enjoy it plain or enhance it with toasted coconut flakes, fresh fruits, or even a drizzle of caramel sauce for added decadence. It’s the perfect treat to whip up when you’re craving something sweet and creamy, with a touch of exotic flavor.

Why You’ll Love This Recipe

Simple and Quick: Few ingredients and minimal prep time.

Rich and Creamy: A velvety texture that feels luxurious.

Customizable: Top with your favorite garnishes to suit any occasion.

Ingredients

• 1 can coconut milk (400 ml)

• 1 cup whole milk (or your preferred milk)

• ⅓ cup sugar

• ¼ cup cornstarch

• 1 tsp vanilla extract

• A pinch of salt

• Coconut flakes, toasted, for garnish

Instructions

Step 1: Prepare the Mixture

1. In a medium saucepan, combine the coconut milk, whole milk, sugar, cornstarch, and a pinch of salt.

2. Whisk thoroughly until the cornstarch is completely dissolved.

Step 2: Cook the Pudding

1. Place the saucepan over medium heat.

2. Stir continuously as the mixture heats and thickens. This process should take about 5–8 minutes.

3. Once the mixture starts to boil, continue stirring and cook for an additional 1–2 minutes to ensure the cornstarch is fully cooked.

Step 3: Add Flavoring

1. Remove the saucepan from heat.

2. Stir in the vanilla extract until evenly combined.

Step 4: Chill the Pudding

1. Pour the pudding into individual serving bowls or a single large bowl.

2. Allow it to cool slightly at room temperature.

3. Cover the surface of the pudding with plastic wrap to prevent a skin from forming.

4. Refrigerate until fully chilled.

Step 5: Serve

1. Once chilled, serve the pudding garnished with toasted coconut flakes.

2. Add additional toppings like fresh berries or a sprinkle of cinnamon, if desired.

Tips

Prevent Lumps: Whisk the mixture continuously while cooking to maintain a smooth consistency.

Dairy-Free Option: Use almond or oat milk instead of whole milk for a fully dairy-free dessert.

Garnish Variations: Try topping with fresh mango slices, crushed nuts, or a dollop of whipped cream for a twist.

Make Ahead: Prepare the pudding a day in advance and refrigerate for convenience.

Storage Options

Refrigerator: Store in an airtight container for up to 3 days.

Freezer: Not recommended, as freezing can alter the creamy texture.

Coconut Milk Pudding is a delightful dessert that combines simplicity and elegance. Whether you’re entertaining guests or treating yourself, this luscious pudding is sure to impress with its creamy texture and tropical flavor!