Noodles Romanoff

0

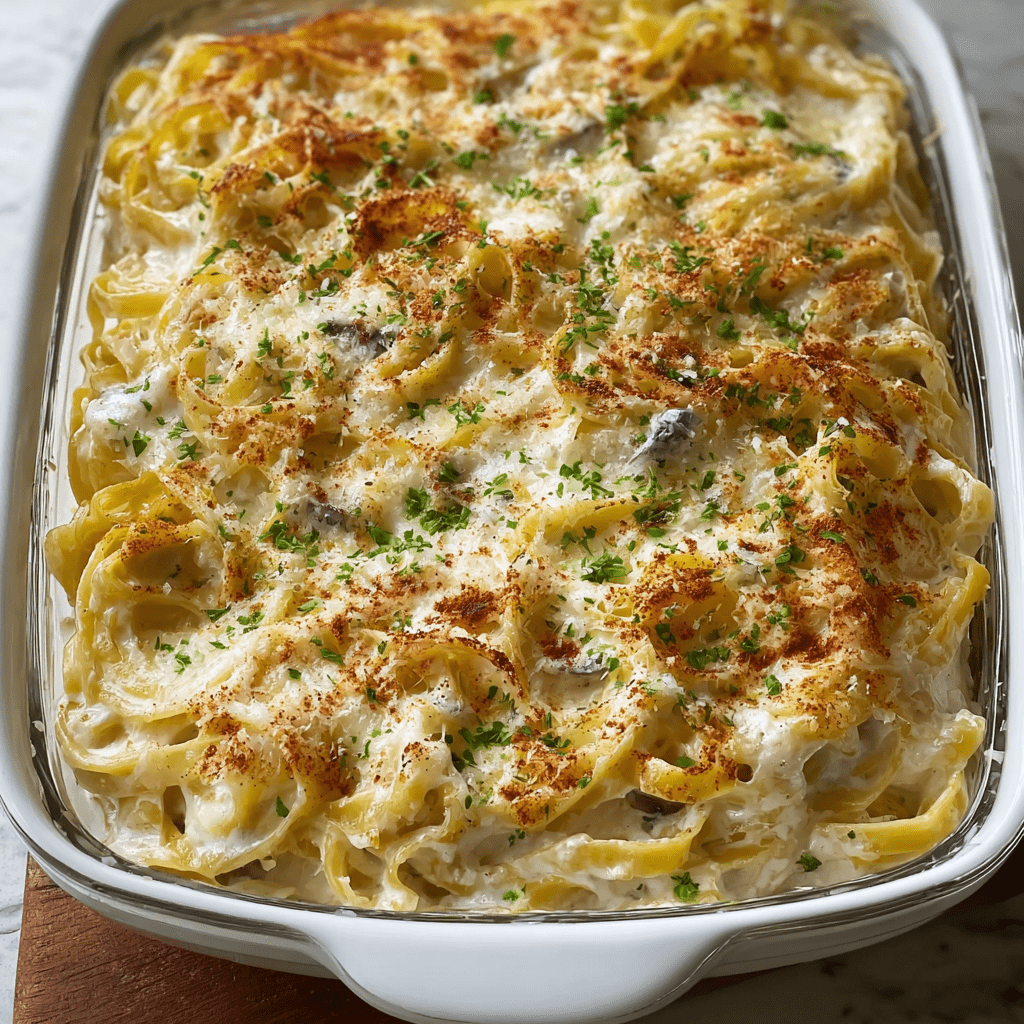
Noodles Romanoff is a gloriously retro and decadently creamy pasta bake that has earned its place as a timeless comfort food classic. This recipe is a masterful blend of simplicity and indulgence, transforming basic pasta, cream cheese, and sour cream into a rich, tangy, and deeply satisfying casserole with a golden, cheesy crust. The magic begins by marrying the warm, al dente pasta with softened cream cheese and butter, creating a velvety base that clings to every noodle. This is then enveloped in a luxurious blanket of sour cream, which provides the dish’s signature tang, and seasoned with a warm, aromatic blend of black pepper, garlic powder, and a whisper of nutmeg—the secret ingredient that adds an unmistakable depth. A generous amount of Parmesan cheese is stirred into the sauced noodles and then sprinkled on top, baking into a crisp, flavorful crust that contrasts beautifully with the creamy, tender pasta beneath.

The true brilliance of Noodles Romanoff lies in its effortless elegance and its ability to be both a comforting side dish and a hearty vegetarian main course. It is a versatile recipe that comes together with pantry staples and requires no complicated techniques, yet the final result feels special and indulgent. Unlike many pasta bakes that can be heavy, this one achieves a perfect balance of richness and brightness thanks to the tangy sour cream. It’s the ideal accompaniment to grilled steak or roasted chicken, yet it is substantial enough to stand alone with a simple green salad. Baked until bubbly and golden, Noodles Romanoff is more than just a recipe; it’s a warm, nostalgic, and utterly delicious tribute to homestyle cooking that promises to soothe and satisfy with every creamy, cheesy forkful.

Why You’ll Love This Recipe:

  • Ultimate Creamy Comfort Food: This dish is the epitome of rich, tangy, and cheesy pasta perfection.
  • Simple, Pantry-Staple Ingredients: Made with common ingredients you likely already have on hand, it’s an easy and economical choice.
  • Perfect Make-Ahead Side: Assemble it ahead of time and bake it just before serving, making it ideal for holiday dinners or potlucks.
  • Vegetarian Main or Side: It’s a satisfying meatless meal on its own or a spectacularly rich side dish for roasted meats.

Ingredients:

  • 8 ounces fettuccine or egg noodles
  • 4 ounces cream cheese, softened to room temperature
  • 2 tablespoons unsalted butter, softened to room temperature
  • 16 ounces (2 cups) sour cream, at room temperature
  • 1 teaspoon freshly ground black pepper
  • ½ teaspoon fine sea salt
  • ½ teaspoon garlic powder
  • ¼ teaspoon ground nutmeg
  • 1 ½ cups grated Parmesan cheese, divided
  • ¼ teaspoon paprika (for garnish)
  • Fresh chives or parsley, chopped (for garnish, optional)

Instructions:

Step 1: Preheat and Prepare
Preheat your oven to 350°F (175°C). Lightly grease an 8×8-inch or 2-quart baking dish.

Step 2: Cook the Pasta
Bring a large pot of salted water to a boil. Cook the pasta according to package directions until al dente. Drain well and return the hot pasta to the warm pot.

Step 3: Create the Creamy Sauce
Immediately add the softened cream cheese and butter to the hot pasta. Stir vigorously until both are completely melted and coat the noodles. Add the sour cream, black pepper, salt, garlic powder, and nutmeg. Stir until the mixture is smooth and creamy.

Step 4: Add Cheese and Assemble
Stir in 1 cup of the grated Parmesan cheese until well combined. Transfer the cheesy noodle mixture to the prepared baking dish and spread it into an even layer. Sprinkle the remaining ½ cup of Parmesan cheese evenly over the top, followed by a light dusting of paprika.

Step 5: Bake
Bake, uncovered, for 25-30 minutes, or until the casserole is heated through, bubbly around the edges, and the top is lightly golden.

Step 6: Garnish and Serve
Let the casserole cool for 5-10 minutes before serving. This allows it to set slightly. Garnish with fresh chopped chives or parsley if desired, and serve warm.

Tips:

  • Room Temperature is Key: Using room-temperature cream cheese, butter, and sour cream is crucial. It allows them to blend smoothly into a silky sauce without any lumps or graininess.
  • Don’t Overcook the Pasta: The pasta will continue to cook in the oven, so cooking it to al dente ensures it doesn’t become mushy in the final dish.
  • Use Freshly Grated Parmesan: Pre-grated cheese contains anti-caking agents that can prevent it from melting as smoothly. Grating a block of Parmesan yourself makes a significant difference.
  • Customize It: Add a cup of cooked peas, diced ham, or sautéed mushrooms to the noodle mixture before baking for a heartier dish.

Storage Options:

  • Refrigerator: Store leftovers in an airtight container in the refrigerator for up to 4 days.
  • Reheating: Reheat individual portions in the microwave. For larger portions, reheat in a covered oven-safe dish at 325°F (165°C) until warmed through.
  • Freezing: While you can freeze this casserole, the texture of the sour cream may change slightly upon thawing, becoming a bit grainy. It’s best enjoyed fresh or refrigerated.

Christmas Chaos Cake

0

Christmas Chaos Cake is a wonderfully whimsical and delightfully decadent dessert that embodies the festive spirit of the season in one spectacular, marbled masterpiece. This recipe is a joyful rebellion against precision, celebrating the beautiful “chaos” of swirling rich, tangy cream cheese, sweet-tart cranberry sauce, and buttery pecans into a simple, tender cake batter. The journey begins with a layer of toasted pecans that forms a nutty, crunchy crust on the bottom of the cake, providing a surprising and delightful textural contrast. A classic cake mix batter serves as the effortless and reliable canvas, ready to cradle the bold flavors swirled within. The true magic happens with the addition of generous dollops of velvety cream cheese filling and vibrant whole-berry cranberry sauce, which are then artfully swirled together with the batter to create a stunning, festive pattern of red and white. Each slice reveals a unique landscape of creamy, fruity, and nutty layers, making every bite a delightful surprise.

The brilliance of this cake lies in its playful ease and its spectacular presentation. It is the perfect dessert for holiday gatherings where time is precious but impression is key. The method encourages creativity—there’s no wrong way to swirl, guaranteeing a one-of-a-kind “chaotic” design that looks professionally artistic. The flavors are a quintessential holiday trio: the warmth of pecans, the bright pop of cranberry, and the rich indulgence of cream cheese, all harmonized by the soft vanilla cake. It’s forgiving, fun to make, and even more fun to serve, as guests marvel at the beautiful interior. Christmas Chaos Cake is more than just a treat; it’s a festive experience, a centerpiece dessert that captures the joyful, bustling, and delicious essence of the holidays in every messy, magnificent slice.

Why You’ll Love This Recipe:

  • Festive Flavor and Appearance: The red cranberry and white cream cheese swirls against the golden cake look stunningly festive and taste like the holidays.
  • Effortlessly Impressive: Using a cake mix base with easy, homemade swirls creates a dessert that looks and tastes far more complex than it actually is.
  • Perfect Textural Party: Enjoy the soft cake, creamy cheese filling, juicy berries, and crunchy pecans all in one bite.
  • Ideal for Holiday Potlucks: This cake is easy to transport in its pan, serves a crowd, and is a guaranteed conversation starter.

Ingredients:

  • 1 ½ cups pecans, roughly chopped
  • 1 box (15.25 oz) white or yellow cake mix
  • Ingredients listed on cake mix box (typically: 1 cup water, ½ cup vegetable oil, 3 eggs)
  • 1 (8 oz) package cream cheese, softened
  • ½ cup (1 stick) unsalted butter, softened
  • 1 teaspoon vanilla extract
  • 2 cups powdered sugar
  • ¾ cup whole berry cranberry sauce (from a can or homemade)

Instructions:

Step 1: Preheat and Prepare Pan
Preheat your oven to 350°F (175°C). Generously grease a 9×13-inch baking pan.

Step 2: Create the Nutty Base
Spread the chopped pecans in an even layer across the bottom of the prepared baking pan.

Step 3: Prepare the Cake Batter
In a large bowl, prepare the cake batter according to the package directions, using the water, oil, and eggs. Pour the batter evenly over the pecans in the pan.

Step 4: Make the Cream Cheese Swirl
In a medium bowl, use an electric mixer to beat the softened cream cheese, softened butter, and vanilla extract until completely smooth and creamy. Gradually add the powdered sugar, beating on low speed until fully incorporated and smooth.

Step 5: Assemble the Chaos
Drop large, random spoonfuls of the cream cheese mixture and the cranberry sauce over the top of the cake batter. Using a thin knife or a skewer, gently swirl through the batter, cream cheese, and cranberry just a few times to create a marbled effect. Do not over-mix; you want distinct ribbons of color.

Step 6: Bake
Bake for 45-50 minutes, or until the top is golden and a toothpick inserted into the center of the cake portion comes out clean or with a few moist crumbs. The cream cheese areas will remain very soft.

Step 7: Cool and Serve
Place the pan on a wire rack and allow the cake to cool completely in the pan, for at least 1-2 hours. The cake will firm up as it cools. Serve at room temperature.

Tips:

  • Soften Ingredients Thoroughly: Ensure the cream cheese and butter are very soft for a perfectly smooth swirl without lumps.
  • Use Whole Berry Sauce: The texture of whole-berry cranberry sauce is essential for distinct swirls. Jellied sauce will blend in too much.
  • Swirl with a Light Hand: The goal is a marbled pattern, not a homogenized batter. Just 4-5 figure-eight passes with a knife is plenty.
  • Check for Doneness Correctly: When testing with a toothpick, avoid the obvious cream cheese or cranberry pockets. Test the actual cake batter areas.

Storage Options:

  • Room Temperature: The cake can be covered and stored at room temperature for up to 1 day due to the dairy in the swirl.
  • Refrigerator: For longer storage, cover tightly and refrigerate for up to 4 days. Let it sit at room temperature for 30 minutes before serving for the best texture.
  • Freezing: This cake freezes well. Cool completely, wrap the entire pan tightly in plastic wrap and foil, and freeze for up to 2 months. Thaw overnight in the refrigerator.

Slow Cooker Hurry Chicken

0

Slow Cooker Hurry Chicken is the ultimate testament to effortless, flavor-packed cooking, a dish that delivers the sticky, sweet, and savory satisfaction of takeout-style glazed chicken with the simple “set it and forget it” convenience of a slow cooker. This recipe is a masterclass in pantry-staple alchemy, transforming a handful of common ingredients into a rich, complex sauce that deeply permeates tender chicken drumsticks or thighs. The sauce is a brilliant blend of sweet ketchup and brown sugar, tangy Worcestershire, and the savory, all-in-one seasoning punch of dry onion soup mix, with a hint of red pepper flake for a subtle kick. A quick slurry of cornstarch and water added at the beginning ensures the sauce thickens perfectly as it cooks, eliminating the need for a final reduction step. As the chicken simmers low and slow in this potent glaze, it becomes fall-off-the-bone tender while absorbing all the robust flavors, resulting in a dish that is irresistibly juicy and coated in a glossy, finger-licking sauce.

The true genius of this recipe lies in its unparalleled simplicity and its guaranteed crowd-pleasing results. It requires mere minutes of active prep—just mix the sauce and add the chicken—making it a lifesaver for the busiest of days. The slow cooker does all the heavy lifting, gently cooking the chicken to perfect tenderness while developing the sauce’s depth. This method is incredibly forgiving, ensuring the chicken never dries out. Serve this “Hurry Chicken” over a bed of fluffy rice, creamy mashed potatoes, or with a side of steamed vegetables to soak up the delicious sauce. It’s a family-friendly, comfort food classic that proves you don’t need complicated techniques or exotic ingredients to create a deeply satisfying and delicious homemade meal.

Why You’ll Love This Recipe:

  • Effortless and Fast Prep: With just 10 minutes of active work, you can have this delicious dinner cooking away, freeing up your entire day.
  • Deep, Complex Flavor: The combination of onion soup mix, brown sugar, and Worcestershire creates a sauce that tastes like you spent hours developing it.
  • Foolproof Tenderness: The slow, moist cooking environment guarantees incredibly juicy, tender chicken every single time.
  • Pantry-Staple Ingredients: Made entirely with ingredients you likely already have on hand, it’s a budget-friendly and convenient meal solution.

Ingredients:

  • 3 pounds chicken drumsticks and/or thighs, skin removed
  • 1 cup ketchup
  • ⅓ cup packed light brown sugar
  • 1 tablespoon Worcestershire sauce
  • 1 (1 oz) packet dry onion soup mix
  • ¼ teaspoon red pepper flakes (adjust to taste)
  • ⅓ cup water
  • 1 tablespoon cornstarch
  • Non-stick cooking spray

Instructions:

Step 1: Prepare the Sauce
In a medium bowl, whisk together the ketchup, brown sugar, Worcestershire sauce, dry onion soup mix, and red pepper flakes until smooth. In a small separate bowl, stir the cornstarch into the water until dissolved, then whisk this slurry into the ketchup mixture until fully incorporated.

Step 2: Assemble in the Slow Cooker
Lightly spray the insert of a 5-6 quart slow cooker with non-stick cooking spray. Arrange the chicken pieces in the bottom of the cooker. Pour the prepared sauce evenly over the chicken, turning the pieces to ensure they are all well-coated.

Step 3: Cook
Cover and cook on LOW for 5-6 hours or on HIGH for 3-4 hours. The chicken is done when it is tender and reaches an internal temperature of 165°F (74°C).

Step 4: Serve
Carefully transfer the chicken to a serving platter. The sauce will be thick and glossy. You can skim off any excess fat from the surface if desired. Spoon the sauce over the chicken and serve immediately.

Tips:

  • Remove the Skin: Taking the time to remove the chicken skin before cooking prevents the sauce from becoming greasy.
  • Pat Chicken Dry: Patting the chicken pieces dry before adding them to the slow cooker helps the sauce adhere better.
  • Thicken Sauce Further (Optional): If you prefer an even thicker glaze, you can transfer the sauce to a small saucepan after cooking and simmer for 5-10 minutes until it reaches your desired consistency.
  • Customize the Heat: Adjust the red pepper flakes to your liking, or add a tablespoon of sriracha to the sauce for more spice.

Storage Options:

  • Refrigerator: Store leftover chicken and sauce in an airtight container in the refrigerator for up to 4 days.
  • Reheating: Reheat gently in a covered skillet over low heat or in the microwave until hot.
  • Freezing: The cooked chicken and sauce freeze well. Cool completely and store in a freezer-safe container for up to 3 months. Thaw overnight in the refrigerator before reheating.

Caramel Cheesecake Bars

0

Caramel Cheesecake Bars are a delectable fusion of two beloved desserts, offering the rich, creamy indulgence of a classic cheesecake in a convenient, shareable bar form with a glorious ribbon of sweet, swirled caramel. This recipe masterfully simplifies the cheesecake-making process, eliminating the need for a water bath and delivering a perfectly set, tangy-sweet filling atop a buttery, crisp graham cracker crust. The crust, a simple blend of crumbs, sugar, and melted butter, is pressed firmly to create a sturdy and flavorful foundation. The filling is a luscious mixture of cream cheese, sugar, and vanilla, beaten until velvety smooth and enriched with eggs to provide structure. The crowning touch is a thick caramel topping, lightly thickened with flour to prevent it from sinking, which is artfully swirled into the creamy batter. As they bake, the bars transform into a stunning marbled masterpiece, with pockets of gooey caramel nestled within the dense, velvety cheesecake.

The true brilliance of this dessert lies in its perfect balance of elegance and ease. It is an ideal treat for potlucks, bake sales, or holiday trays, as it travels well and yields many perfectly portioned servings. The swirl technique is simple yet creates a beautiful, professional-looking effect, while the flour in the caramel helps it maintain its distinct ribbon during baking. These bars are wonderfully rich, so a small square is deeply satisfying, offering the perfect ratio of tangy cream cheese to sweet, buttery caramel in every bite. After a mandatory chill to firm up, they slice into clean, beautiful bars that are sure to impress. Caramel Cheesecake Bars are more than just a dessert; they are a handheld celebration of classic flavors, promising to be the star of any dessert table with minimal effort.

Why You’ll Love This Recipe:

  • Two Desserts in One: Enjoy the creamy tang of cheesecake and the sweet, buttery flavor of caramel in every single bite.
  • Simple, No-Water-Bath Cheesecake: This bar method is foolproof and much simpler than baking a traditional whole cheesecake.
  • Perfect for Sharing and Gifting: These bars are easy to transport, slice, and serve, making them ideal for parties, potlucks, or edible gifts.
  • Stunning Marbled Appearance: The swirled caramel creates a beautiful, bakery-worthy look with very little effort.

Ingredients:

For the Crust:

  • 1 ½ cups graham cracker crumbs (about 12 full sheets)
  • ¼ cup granulated sugar
  • ½ cup (1 stick) unsalted butter, melted

For the Cheesecake Filling:

  • 2 (8 oz) packages full-fat cream cheese, softened to room temperature
  • ½ cup granulated sugar
  • 1 teaspoon vanilla extract
  • 2 large eggs, at room temperature

For the Caramel Swirl:

  • ½ cup thick caramel sauce or topping (not ice cream syrup)
  • 1 tablespoon all-purpose flour

Instructions:

Step 1: Preheat and Prepare Pan
Preheat your oven to 350°F (175°C). Line a 9×13-inch baking pan with parchment paper, leaving an overhang on two sides for easy removal.

Step 2: Make the Graham Cracker Crust
In a medium bowl, stir together the graham cracker crumbs and ¼ cup sugar. Pour in the melted butter and mix until the crumbs are evenly moistened. Press the mixture firmly and evenly into the bottom of the prepared pan. Bake for 8 minutes. Remove and let cool slightly while you prepare the filling. Leave the oven on.

Step 3: Prepare the Cheesecake Filling
In a large bowl using a hand mixer or stand mixer, beat the softened cream cheese, ½ cup sugar, and vanilla extract on medium speed until completely smooth and creamy, about 2-3 minutes. Scrape down the sides of the bowl.

Add the eggs one at a time, beating on low speed after each addition until just combined. Do not overmix.

Step 4: Prepare the Caramel Swirl
In a small bowl, stir the caramel sauce and flour together until smooth and no lumps of flour remain.

Step 5: Assemble and Swirl
Pour the cream cheese filling over the baked crust, spreading it into an even layer. Drop spoonfuls of the flour-caramel mixture randomly over the top of the filling. Use a thin knife or a toothpick to gently swirl the caramel into the cheesecake layer, creating a marbled pattern.

Step 6: Bake and Cool
Bake for 30-35 minutes, or until the edges are set and the center only has a slight jiggle when gently shaken. Remove from the oven and place the pan on a wire rack. Let the bars cool completely at room temperature, then refrigerate for at least 4 hours, or preferably overnight, to allow them to set completely.

Step 7: Slice and Serve
Using the parchment paper overhang, lift the entire slab of bars out of the pan. Place on a cutting board and slice into squares with a sharp knife. For clean cuts, wipe the knife clean between slices.

Tips:

  • Use Room Temperature Ingredients: This is crucial for a smooth, lump-free cheesecake filling. Take the cream cheese and eggs out of the fridge at least an hour ahead.
  • Don’t Overmix the Filling: Once the eggs are added, mix on low speed just until incorporated. Overbeating incorporates too much air and can cause cracking.
  • Thicken the Caramel: The tablespoon of flour mixed with the caramel is important. It helps stabilize the caramel so it swirls beautifully and doesn’t sink to the bottom during baking.
  • Chill Thoroughly: Patience is key! The bars must be completely chilled to achieve the perfect firm, sliceable texture.

Storage Options:

  • Refrigerator: Store the bars in an airtight container in the refrigerator for up to 5 days.
  • Freezer: These bars freeze exceptionally well. Place the cooled, uncut slab (or individual bars) on a parchment-lined baking sheet to freeze solid. Then wrap tightly in plastic wrap and foil. Freeze for up to 3 months. Thaw overnight in the refrigerator before serving.

Stuffed Garlic Cream Cheese Rolls

0

Stuffed Garlic Cream Cheese Rolls are an irresistible, ooey-gooey, and decadently savory twist on classic dinner rolls, transforming soft, sweet Hawaiian rolls into individual pockets of warm, cheesy, and garlicky bliss. This recipe is a masterclass in easy yet impressive entertaining, starting with the ingenious technique of slicing an “X” into the top of each roll to create a perfect cavity for a rich, luxurious filling. The filling itself is a dreamy blend of creamy, tangy cream cheese, shredded mozzarella for that perfect stretch, and a potent punch of fresh minced garlic and Italian herbs. Piped directly into the heart of each roll, this mixture melts into a molten core as the rolls bake. The crowning touch is a generous drizzle of garlic-infused butter and a shower of more cheese over the top, which bakes into a golden, bubbling, and fragrant crust that is impossible to resist. Each pull-apart roll becomes a self-contained, shareable delight, offering the perfect balance of sweet, buttery bread and savory, creamy garlic cheese in every single bite.

The true brilliance of this recipe lies in its clever assembly and its guaranteed crowd-pleasing nature. It takes mere minutes to prepare but yields results that look and taste like they came from a professional bakery. The combination of the sweet Hawaiian roll with the savory, garlicky filling creates a universally beloved flavor profile that is perfect as an appetizer, a side dish for pasta or soup, or even a fun and indulgent main course. As they bake, the rolls puff up around the filling, the butter soaks into the tops, and the cheese forms a golden, irresistible crust, filling your kitchen with an aroma that will have everyone gathering around the oven. Stuffed Garlic Cream Cheese Rolls are more than just a side; they are a festive, shareable, and utterly delicious centerpiece that is sure to be the star of any meal or gathering.

Why You’ll Love This Recipe:

  • Irresistible Flavor Combination: The sweet, soft roll with the savory, garlicky cream cheese filling is a match made in appetizer heaven.
  • Perfect Party Food: These individual, pull-apart rolls are easy to serve and eat, making them ideal for game day, holidays, or any gathering.
  • Shockingly Easy to Make: With just a few minutes of prep and simple assembly, you can create an impressive and delicious dish.
  • Customizable Filling: Easily adapt the filling by adding cooked bacon, spinach, jalapeños, or using different cheese blends.

Ingredients:

  • 1 (12-pack) package classic Hawaiian sweet rolls
  • 8 oz cream cheese, softened to room temperature
  • 3 cups shredded mozzarella cheese, divided
  • ½ cup shredded Parmesan cheese
  • ½ cup (1 stick) unsalted butter, melted
  • 4 cloves garlic, minced
  • 3 teaspoons Italian seasoning, divided
  • 1 teaspoon garlic powder
  • 2 tablespoons melted butter (for greasing dish)

Instructions:

Step 1: Preheat and Prepare Pan
Preheat your oven to 375°F (190°C). Pour 2 tablespoons of the melted butter into a 7×11-inch or 9×13-inch baking dish, tilting to coat the bottom.

Step 2: Prepare the Rolls
Without separating the individual rolls, use a sharp serrated knife to carefully slice the entire slab of rolls in half horizontally (like a giant sandwich), if desired, to create a top and bottom layer for easier stuffing. For individual stuffed rolls, carefully separate each roll. Using a small, sharp knife, cut an “X” into the top of each roll, about ¾ of the way down, being careful not to cut through the bottom. Gently open the slit with your fingers or the handle of a wooden spoon to create a pocket. Place the rolls in the prepared baking dish.

Step 3: Make the Cream Cheese Filling
In a medium bowl, beat the softened cream cheese with a hand mixer until smooth. Stir in 1 ½ cups of the shredded mozzarella cheese, the minced garlic, and 1 ½ teaspoons of the Italian seasoning until well combined.

Step 4: Stuff the Rolls
Transfer the cheese mixture to a piping bag or a zip-top bag with a corner snipped off. Pipe the filling into the pocket of each roll, dividing it evenly.

Step 5: Add Garlic Butter and Cheese Topping
In a small bowl, mix the remaining ½ cup of melted butter with the garlic powder and the remaining 1 ½ teaspoons of Italian seasoning. Drizzle or brush this garlic butter mixture evenly over the tops of all the stuffed rolls. Sprinkle the remaining 1 ½ cups of mozzarella cheese and the ½ cup of Parmesan cheese over the top.

Step 6: Bake
Bake for 12-15 minutes, or until the rolls are golden brown on top, the cheese is melted and bubbly, and the filling is hot.

Step 7: Serve
Let the rolls cool in the pan for 2-3 minutes before serving. They are best enjoyed warm while the cheese is perfectly gooey.

Tips:

  • Soften Cream Cheese Thoroughly: This is essential for a smooth, pipeable filling. Leave it out on the counter for at least an hour.
  • Don’t Cut Through the Bottom: When making the “X”, the goal is to create a pocket, not a hole. A solid bottom keeps the filling contained.
  • Use Fresh Garlic: The flavor of fresh minced garlic is far superior to garlic powder in the filling.
  • Tent with Foil if Needed: If the tops are browning too quickly before the rolls are hot, loosely tent the dish with aluminum foil.

Storage Options:

  • Best Served Immediately: These rolls are at their absolute peak fresh from the oven.
  • Refrigerator: Store leftovers in an airtight container in the refrigerator for up to 3 days.
  • Reheating: Reheat in a 350°F (175°C) oven for 5-10 minutes until warmed through. The microwave will make the bread chewy.
  • Make-Ahead: You can assemble the rolls (stuff and add butter/cheese topping) a few hours in advance, cover, and refrigerate. Bake just before serving, adding 2-3 minutes to the bake time.

Mandarin Quinoa Crunch Salad

0

Mandarin Quinoa Crunch Salad is a vibrant, nutrient-packed dish that masterfully combines the satisfying heartiness of whole grains with the bright, fresh flavors of a vegetable slaw and the sweet-tangy zing of a homemade Asian-inspired dressing. This recipe is a celebration of textures and tastes, beginning with a base of fluffy, cooled quinoa that provides a protein-rich foundation. It’s then generously mixed with a colorful array of shredded cabbage and carrots from a coleslaw mix, crisp diced red bell pepper, and juicy segments of fresh mandarin oranges, which add a burst of citrus sweetness. The salad is elevated with a delightful crunch from both creamy cashews and toasty sliced almonds, while green onions contribute a mild, sharp bite. The entire creation is brought to life by a deeply flavorful, emulsified dressing that balances the salty depth of soy sauce, the tang of rice vinegar, the warmth of fresh ginger, and the rich aroma of sesame oil, creating a cohesive and utterly addictive dish.

The true brilliance of this salad lies in its versatility and make-ahead convenience. It is a perfect meal-prep champion, as the flavors meld and improve overnight in the refrigerator, making it an ideal lunch for busy weeks. It stands proudly as a light yet complete vegetarian main course or serves as a stunning, colorful side dish for grilled chicken, fish, or tofu. Unlike delicate leafy salads, this one holds up beautifully for hours, making it a fantastic choice for potlucks, picnics, and parties. The Mandarin Quinoa Crunch Salad is more than just a salad; it’s a wholesome, satisfying, and explosively flavorful meal that proves healthy eating can be an exciting and delicious adventure for the senses.

Why You’ll Love This Recipe:

  • Perfect Meal Prep Salad: This salad gets better as it sits, making it the ultimate make-ahead lunch or dinner for the week.
  • Explosion of Texture and Flavor: Enjoy the contrast of fluffy quinoa, crisp vegetables, juicy fruit, crunchy nuts, and a savory-sweet dressing in every bite.
  • Nutrient-Packed and Satisfying: Packed with plant-based protein, fiber, and healthy fats, it’s a light meal that will keep you full and energized.
  • Versatile Side or Main: It’s substantial enough to be a vegetarian main dish but also pairs beautifully as a side with any Asian-inspired protein.

Ingredients:

  • 1 ½ cups uncooked quinoa, rinsed
  • 1 (16 oz) bag coleslaw mix (shredded cabbage and carrots)
  • 1 red bell pepper, diced
  • 4 mandarin oranges (such as clementines or satsumas), peeled and segmented
  • 5 green onions, thinly sliced
  • ½ cup raw cashews, roughly chopped
  • ¼ cup sliced almonds
  • ¼ cup olive oil
  • ¼ cup rice vinegar
  • ¼ cup low-sodium soy sauce
  • 1-2 tablespoons honey (or maple syrup), to taste
  • 2 teaspoons sesame oil
  • 1 ½ tablespoons fresh ginger, finely grated
  • 1 teaspoon garlic powder

Instructions:

Step 1: Cook and Cool the Quinoa
Cook the quinoa according to package directions, typically using a 1:2 ratio of quinoa to water. Once cooked, fluff with a fork and spread it on a large plate or baking sheet to cool to room temperature. This prevents the salad from becoming mushy.

Step 2: Combine Salad Ingredients
In a very large mixing bowl, combine the cooled quinoa, coleslaw mix, diced red bell pepper, mandarin orange segments, sliced green onions, chopped cashews, and sliced almonds.

Step 3: Prepare the Dressing
In a small bowl or a jar with a tight-fitting lid, combine the olive oil, rice vinegar, soy sauce, honey, sesame oil, grated ginger, and garlic powder. Whisk vigorously or shake the jar until the mixture is completely emulsified and smooth.

Step 4: Dress the Salad
Pour the dressing over the quinoa and vegetable mixture. Using salad tongs or two large spoons, toss everything together gently but thoroughly until every ingredient is evenly coated in the dressing.

Step 5: Chill and Serve
For the best flavor, cover the bowl and refrigerate the salad for at least 30 minutes before serving. This allows the quinoa to absorb the dressing and the flavors to meld. The salad can be served chilled or at room temperature.

Tips:

  • Rinse the Quinoa: Always rinse quinoa under cold water before cooking to remove its natural bitter coating (saponin).
  • Toast the Nuts (Optional): For an even deeper, nuttier flavor, toast the cashews and almonds in a dry skillet over medium heat for 3-5 minutes until fragrant before adding them to the salad.
  • Customize Your Add-Ins: Feel free to add other ingredients like shelled edamame, diced cucumber, or shredded chicken for extra protein.
  • Adjust the Sweetness: Taste the dressing before adding it to the salad. Add more honey if you prefer a sweeter profile, or a splash of lime juice for more tang.

Storage Options:

  • Refrigerator: This salad stores exceptionally well. Keep it in an airtight container in the refrigerator for up to 4-5 days. The nuts may soften slightly but will still be delicious.
  • Make-Ahead: This is an ideal make-ahead dish. Prepare the entire salad (including dressing) 1-2 days in advance.
  • Freezing: Freezing is not recommended, as the texture of the fresh vegetables and quinoa will become unpleasantly mushy upon thawing.

Pizza Stuffed Crescent Rolls

0

Pizza Stuffed Crescent Rolls are the ultimate fun, fast, and flavorful fusion food, brilliantly combining the gooey, cheesy satisfaction of pizza with the buttery, flaky convenience of crescent roll dough. This recipe is a masterstroke of simplicity, transforming a tube of refrigerated dough and a handful of classic pizza toppings into irresistible, handheld snacks that are perfect for any occasion. The method is wonderfully straightforward: each triangle of dough is layered with slices of pepperoni and a half-piece of mozzarella cheese stick before being rolled into its signature crescent shape. As they bake, the dough puffs into golden, delicate layers while the cheese inside melts into a stretchy, savory core. A brush of egg wash gives them a professional, glossy finish, and a sprinkle of Italian seasoning and grated Parmesan before baking infuses every bite with authentic pizza-parlor aroma and flavor.

The true genius of this recipe lies in its incredible versatility and crowd-pleasing nature. It is an ideal project for cooking with kids, a lifesaver for last-minute party appetizers, or a quick and satisfying dinner solution that everyone will love. The entire process takes mere minutes, and the results are consistently delicious. Served with a side of warm marinara sauce for dipping, these rolls deliver the complete pizza experience in a neat, portable package. They can be easily customized with different fillings like cooked sausage, diced peppers, or even a sprinkle of red pepper flakes for heat. Pizza Stuffed Crescent Rolls are more than just a snack; they are a guaranteed hit that brings the joy of pizza and the comfort of warm, buttery pastry together in one endlessly enjoyable bite.

Why You’ll Love This Recipe:

  • 5-Minute Prep: With just a few ingredients and almost no prep work, you can have these in the oven in under 5 minutes.
  • Fun for the Whole Family: Kids love helping assemble these, and everyone loves eating them. They’re perfect for a quick dinner, after-school snack, or game day appetizer.
  • Endlessly Customizable: Use your favorite pizza toppings—try sausage, ham and pineapple, or veggies. Swap the mozzarella for pepper jack for a spicy kick.
  • Portable and Dippable: Their handheld size makes them perfect for parties, picnics, or lunchboxes, and the marinara dip completes the perfect pizza bite.

Ingredients:

  • 2 (8-count) cans refrigerated crescent roll dough
  • 8 mozzarella cheese sticks, each cut in half (16 pieces total)
  • 48-64 slices pepperoni (about 3-4 per roll)
  • 1 teaspoon garlic powder
  • 1 teaspoon dried oregano
  • 1 teaspoon dried basil
  • 1 large egg
  • 1 tablespoon water
  • 2 tablespoons freshly grated Parmesan cheese
  • Warm marinara or pizza sauce, for serving

Instructions:

Step 1: Preheat and Prepare Seasoning
Preheat your oven to 375°F (190°C). In a small bowl, mix together the garlic powder, dried oregano, and dried basil. Set aside.

Step 2: Prepare Egg Wash
In another small bowl, beat the egg with 1 tablespoon of water to create an egg wash.

Step 3: Assemble the Rolls
Unroll the crescent dough and separate it into 16 triangles. On the wide end of each triangle, place one half of a mozzarella cheese stick. Lay 3-4 slices of pepperoni over the cheese, folding them if necessary to fit.

Step 4: Roll and Season
Starting at the wide end, roll the dough up around the filling, ending at the point. Tuck the point underneath and place the roll point-side down on an ungreased or parchment-lined baking sheet, spacing them about 2 inches apart.

Step 5: Bake
Brush the top of each roll lightly with the egg wash. Sprinkle evenly with the prepared Italian seasoning blend. Bake for 11-13 minutes, or until the rolls are puffed and a deep golden brown.

Step 6: Finish and Serve
Immediately upon removing the rolls from the oven, sprinkle them with the grated Parmesan cheese. Let cool on the baking sheet for 2-3 minutes before serving. The cheese inside will be very hot. Serve warm with a side of marinara sauce for dipping.

Tips:

  • Don’t Overstuff: Using a full cheese stick per roll can cause the dough to burst open as the cheese melts and expands. Cutting them in half is the perfect size.
  • Seal the Point: Tucking the pointed end of the crescent underneath the roll helps prevent it from unraveling during baking.
  • Watch Closely: Ovens vary, so check the rolls at the 11-minute mark. They are done when they are a uniform golden brown.
  • Customize Your Fillings: Feel free to add a pinch of cooked Italian sausage, a slice of black olive, or a thin strip of green bell pepper with the pepperoni before rolling.

Storage Options:

  • Best Served Fresh: These are at their absolute peak straight from the oven when the dough is flaky and the cheese is molten.
  • Refrigerator: Store leftovers in an airtight container in the refrigerator for up to 3 days.
  • Reheating: Reheat in a toaster oven or conventional oven at 350°F (175°C) for 5-8 minutes to restore crispiness. The microwave will make the dough soft.
  • Freezing (Unbaked): You can assemble the rolls, place them on a baking sheet to freeze solid, then transfer to a freezer bag. Bake from frozen, adding 2-3 minutes to the baking time.

Lemon Chicken Pasta

0

Lemon Chicken Pasta is a vibrant and elegant one-pan meal that masterfully balances rich, creamy comfort with the bright, refreshing zing of lemon, creating a dish that is both indulgent and invigorating. This recipe elevates simple chicken breasts by coating them in a Parmesan and lemon-pepper crust, which sears to a golden, flavorful finish, locking in juices and providing a delightful textural contrast to the tender pasta. The heart of the dish is a luxuriously creamy yet surprisingly light sauce, built on a foundation of sautéed garlic, reduced heavy cream, and chicken broth, then brilliantly brightened with the zest and juice of a fresh lemon. The addition of sweet frozen peas introduces a pop of color and freshness, while a generous amount of Parmesan cheese and a final swirl of cold butter enrich the sauce to a velvety, clingy consistency that coats every strand of spaghetti perfectly. Each component, from the savory chicken to the al dente pasta enveloped in the lemony cream, works in harmonious concert to deliver a restaurant-quality dinner with homestyle warmth.

The true brilliance of this recipe lies in its efficient, layered cooking method and its ability to deliver complex flavors with straightforward techniques. By using the same skillet to sear the chicken and build the sauce, you capture all the delicious browned bits (fond), infusing the sauce with deep savory notes. The sauce itself is a study in balance—the cream provides richness, the broth adds depth, and the fresh lemon cuts through with clarifying acidity, preventing the dish from feeling heavy. Finished with a sprinkle of fresh parsley, this pasta is a complete, satisfying meal that feels special enough for a date night at home yet comes together quickly enough for a sophisticated weeknight dinner. Lemon Chicken Pasta is more than just a recipe; it’s a sunny, comforting, and universally appealing dish that promises to brighten any table.

Why You’ll Love This Recipe:

  • Bright and Balanced Flavors: The perfect harmony of rich cream, savory Parmesan, and fresh, zesty lemon creates a truly addictive sauce.
  • Restaurant-Quality at Home: This dish looks and tastes like it came from a fine Italian bistro but is achievable in your own kitchen.
  • One-Skillet Efficiency: Cooking the chicken and sauce in the same pan maximizes flavor and minimizes cleanup.
  • Complete and Satisfying Meal: With protein, vegetables, and pasta in one dish, it’s a wholesome, all-in-one dinner solution.

Ingredients:

For the Chicken:

  • 2 large boneless, skinless chicken breasts, halved horizontally to make 4 cutlets
  • ¼ cup all-purpose flour
  • ¾ cup freshly grated Parmesan cheese, divided
  • 2 teaspoons lemon pepper seasoning
  • 2 tablespoons olive oil

For the Pasta and Sauce:

  • 12 ounces spaghetti or linguine
  • 1 tablespoon olive oil
  • 3 cloves garlic, minced
  • 1 ¼ cups heavy cream
  • ½ cup low-sodium chicken broth
  • ⅔ cup frozen peas
  • 1 large lemon, zested and juiced (about 3 tbsp juice)
  • 2 tablespoons cold unsalted butter, cubed
  • 2 tablespoons fresh Italian parsley, chopped
  • Salt and black pepper, to taste

Instructions:

Step 1: Prepare and Cook the Chicken
Pat the chicken cutlets dry. In a shallow dish, combine the flour, ¼ cup of the Parmesan cheese, and the lemon pepper. Dredge each cutlet in the mixture, shaking off excess. Heat 2 tablespoons of olive oil in a large skillet over medium-high heat. Cook the chicken for 3-4 minutes per side, until golden brown and cooked through (internal temperature 165°F). Transfer to a plate, tent loosely with foil, and set aside.

Step 2: Cook the Pasta
While the chicken cooks, bring a large pot of salted water to a boil. Cook the pasta according to package directions until al dente. Reserve ½ cup of pasta water, then drain the pasta.

Step 3: Build the Sauce
Reduce the skillet heat to medium-low. Add the remaining 1 tablespoon of olive oil. Add the minced garlic and cook for 1 minute until fragrant. Pour in the heavy cream and bring to a gentle simmer. Gradually whisk in the chicken broth. Let the sauce simmer for 3-4 minutes to reduce slightly.

Step 4: Finish the Sauce
Stir in the frozen peas, lemon zest, and lemon juice. Continue to simmer for 2-3 minutes. Reduce heat to low. Gradually sprinkle in the remaining ½ cup of Parmesan cheese, whisking constantly until melted and smooth.

Step 5: Combine Pasta and Sauce
Add the drained pasta to the skillet with the sauce. Toss to coat thoroughly, adding a splash of reserved pasta water if the sauce seems too thick. Add the cubed butter and fresh parsley, tossing until the butter is melted and the sauce is glossy. Season with salt and black pepper to taste.

Step 6: Slice Chicken and Serve
Slice the rested chicken cutlets against the grain. Serve the pasta in bowls, topped with slices of the lemon-pepper chicken. Garnish with extra parsley and Parmesan if desired.

Tips:

  • Pound the Chicken: For even cooking, place the halved chicken breasts between plastic wrap and gently pound to an even ½-inch thickness before dredging.
  • Use Fresh Lemon: Bottled lemon juice cannot replicate the bright, fragrant flavor of freshly squeezed juice and zest.
  • Grate Your Own Cheese: Pre-grated Parmesan contains anti-caking agents that can make the sauce grainy. A block of Parmesan that you grate yourself will melt much more smoothly.
  • Don’t Boil the Sauce: Once the cream is added, maintain a gentle simmer. Boiling can cause the sauce to break or become oily.

Storage Options:

  • Refrigerator: Store leftovers in an airtight container in the refrigerator for up to 3 days. The sauce will thicken when cold.
  • Reheating: Reheat gently in a skillet over low heat, adding a splash of chicken broth or cream to loosen the sauce. The microwave can also be used, but may soften the texture of the chicken.
  • Freezing: Freezing is not recommended, as the dairy-based sauce is likely to separate and become grainy upon thawing.

Kolaczki (Polish Cookies)

0

Kolaczki are a cherished and elegant Polish pastry, a delicate, melt-in-your-mouth cookie that showcases the beautiful simplicity of Eastern European baking. This recipe is a masterclass in creating a tender, flaky, and impossibly light dough from just three ingredients: cream cheese, butter, and flour. The magic begins by creaming the butter and cream cheese until luxuriously smooth and airy, which, when gently combined with flour, yields a dough that is both rich and delicate. After a crucial chill to firm up, the dough is rolled thin and cut into precise squares, each destined to become a vessel for a sweet, jewel-like dollop of thick fruit preserves. The classic folding technique—bringing two opposite corners to the center to form a charming, pinwheel-like shape—not only creates a beautiful presentation but also encases the filling perfectly. A final, generous snowfall of powdered sugar adds a touch of sweetness and a pristine, festive finish to these delightful bites.

The true brilliance of Kolaczki lies in their exquisite texture and their role as a celebratory treat. They are a staple at Polish weddings, holidays like Christmas and Easter, and family gatherings, symbolizing warmth and tradition. The dough is forgiving yet requires a gentle touch, rewarding the baker with cookies that are crisp at the edges and tender in the center, with a slight tang from the cream cheese that perfectly balances the sweet fruit filling. Using a sturdy, high-quality preserve is key to preventing leakage and ensuring each cookie holds its elegant shape. Kolaczki are more than just a cookie; they are a bite-sized piece of culinary heritage, a labor of love that results in a sophisticated, buttery, and utterly irresistible confection perfect for sharing on special occasions.

Why You’ll Love This Recipe:

  • Exquisite, Melt-in-Your-Mouth Texture: The cream cheese dough bakes into a tender, flaky, and incredibly delicate pastry.
  • Beautiful and Elegant Presentation: The folded, powdered-sugar-dusted cookies look impressive and professional on any cookie tray.
  • Versatile Filling Options: Customize with your favorite thick fruit preserves—apricot, raspberry, prune, or even poppy seed filling for authenticity.
  • A Taste of Tradition: Baking these cookies connects you to a rich Polish heritage, making them perfect for holiday celebrations and family gatherings.

Ingredients:

  • 8 ounces full-fat cream cheese, softened to room temperature
  • 1 cup (2 sticks) unsalted butter, softened to room temperature
  • 2 cups all-purpose flour, plus more for dusting
  • 1 cup thick fruit preserves (apricot, raspberry, prune, or lekvar)
  • 1 egg white, lightly beaten with 1 teaspoon water (optional, for sealing)
  • ½ cup powdered sugar, for dusting

Instructions:

Step 1: Make the Dough
In a large mixing bowl, use an electric mixer to beat the softened cream cheese and butter together on medium speed until the mixture is completely smooth, creamy, and lump-free, about 2-3 minutes.

Step 2: Incorporate Flour
Reduce the mixer speed to low. Gradually add the 2 cups of flour, mixing just until the dough comes together and no dry streaks of flour remain. Be careful not to overmix. The dough will be soft.

Step 3: Chill the Dough
Divide the dough into two equal portions. Shape each into a flat disk, wrap tightly in plastic wrap, and refrigerate for at least 1 hour, or until firm enough to roll. You can chill it overnight if needed.

Step 4: Preheat and Prepare
Preheat your oven to 350°F (175°C). Line two baking sheets with parchment paper.

Step 5: Roll, Cut, and Fill
On a lightly floured surface, roll one disk of dough out to a thickness of about ⅛-inch. Use a pastry wheel or sharp knife to trim the edges straight, then cut the dough into 2-inch squares.

Step 6: Shape the Cookies
Place about ½ teaspoon of fruit preserves in the center of each square. Using your finger or a pastry brush, lightly moisten two opposite corners of the square with the beaten egg white or water. Fold these two corners over the filling so they meet in the center, pressing lightly to adhere. Press the sealed point gently to ensure it holds. Place the cookies on the prepared baking sheets, spacing them about 1 inch apart.

Step 7: Bake
Bake for 12-15 minutes, or until the cookies are set and the edges are just beginning to turn a very light golden brown. They should not brown deeply.

Step 8: Cool and Dust
Let the cookies cool on the baking sheet for 5 minutes before transferring them to a wire rack to cool completely. Once completely cool, dust generously with powdered sugar using a fine-mesh sieve. Repeat the rolling and filling process with the second disk of dough.

Tips:

  • Room Temperature is Key: Ensure both the cream cheese and butter are truly softened for a smooth, lump-free dough.
  • Use Thick Preserves: A thick, high-quality fruit spread or lekvar is essential. Runny jam will leak out during baking. If your preserves are thin, you can simmer them in a saucepan for a few minutes to reduce and thicken.
  • Chill Thoroughly: A well-chilled dough is much easier to roll and handle without sticking. If it becomes too soft while working, return it to the refrigerator for 15 minutes.
  • Don’t Overfill: Using too much filling is the most common cause of leaking. A small, concentrated dollop in the center is perfect.

Storage Options:

  • Room Temperature: Store the completely cooled, dusted cookies in a single layer in an airtight container at room temperature for up to 3 days.
  • Refrigerator: They can be stored in the refrigerator for up to 1 week. The powdered sugar may dissolve slightly.
  • Freezing (Unbaked): The shaped, unbaked cookies freeze beautifully. Place them on a parchment-lined sheet to freeze solid, then transfer to a freezer bag. Bake from frozen, adding 1-2 minutes to the baking time.
  • Freezing (Baked): Baked, undusted cookies can be frozen. Thaw and dust with powdered sugar just before serving.

Slow Cooker Honey Garlic Pork

0

Slow Cooker Honey Garlic Pork is the ultimate set-it-and-forget-it meal, a dish that transforms lean pork tenderloin into a fall-apart tender, glazed masterpiece with minimal effort and maximum reward. This recipe is a perfect balance of sweet, savory, and aromatic flavors, where honey provides a luscious, caramelized sweetness that is beautifully countered by the salty depth of soy sauce and the tangy punch of ketchup and apple cider vinegar. The generous amount of minced garlic infuses the entire dish with its pungent, irresistible aroma, while oregano and a hint of optional red pepper flakes add layers of herbal warmth and subtle heat. As the pork slow-cooks in this potent sauce, it becomes exceptionally juicy and absorbs all the complex flavors, resulting in meat that is flavorful through and through. The final optional step of reducing the cooking liquids creates a rich, glossy glaze that clings perfectly to every slice, elevating the dish from a simple braise to a restaurant-quality presentation.

The true brilliance of this recipe lies in its incredible versatility and foolproof method. It is a lifesaver for busy weeknights, yet impressive enough for Sunday dinner or casual entertaining. The pork tenderloin, known for its lean nature, is kept supremely moist by the gentle, moist heat of the slow cooker, eliminating any risk of dryness. The sauce does double duty as both a cooking liquid and a finishing glaze, meaning every component is packed with flavor. This dish can be served in countless ways: sliced over a bed of fluffy rice or mashed potatoes, shredded for tacos or sandwiches, or even served alongside roasted vegetables for a complete, satisfying meal. Slow Cooker Honey Garlic Pork is more than just a recipe; it’s a reliable, family-friendly cornerstone that delivers deeply satisfying, gourmet taste with unparalleled ease.

Why You’ll Love This Recipe:

  • Effortless Perfection: The slow cooker does all the work, transforming simple ingredients into a tender, glazed pork dish with no active cooking time.
  • Perfect Flavor Balance: The harmony of sweet honey, salty soy, tangy vinegar, and rich garlic creates a universally loved sauce.
  • Incredibly Versatile: Serve it sliced, shredded, over grains, in sandwiches, or as a protein bowl component—the possibilities are endless.
  • Meal Prep Friendly: The pork and sauce reheat beautifully, making it an ideal make-ahead option for lunches or quick dinners throughout the week.

Ingredients:

  • 2 pounds pork tenderloin (usually 2 tenderloins)
  • ½ cup honey
  • ¼ cup soy sauce (low-sodium preferred)
  • ¼ cup ketchup
  • 6 cloves garlic, minced
  • 1 tablespoon apple cider vinegar
  • 1 teaspoon dried oregano
  • 1 teaspoon ground black pepper
  • ½ teaspoon salt
  • ¼ teaspoon red pepper flakes (optional)
  • 2 tablespoons cornstarch mixed with 2 tablespoons cold water (optional, for thickening)

Instructions:

Step 1: Prepare the Pork
Pat the pork tenderloins dry with paper towels. If there is a large piece of silver skin, you can trim it off, but it’s not necessary as it will tenderize during cooking. Place the tenderloins in the slow cooker insert.

Step 2: Make the Sauce
In a medium bowl, whisk together the honey, soy sauce, ketchup, minced garlic, apple cider vinegar, dried oregano, black pepper, salt, and red pepper flakes (if using) until smooth.

Step 3: Assemble and Cook
Pour the sauce over the pork tenderloins in the slow cooker, turning them to coat evenly. Cover and cook on LOW for 6-7 hours or on HIGH for 3-4 hours. The pork is done when it is fork-tender and reaches an internal temperature of 145°F (63°C) for slicing, or 165°F (74°C) for shredding.

Step 4: Rest and Slice/Shred
Carefully transfer the cooked pork to a cutting board or plate. Tent loosely with foil and let it rest for 10 minutes. Slice against the grain or shred with two forks.

Step 5: Thicken the Sauce (Optional)
For a thicker glaze, carefully pour the remaining sauce from the slow cooker into a small saucepan. Bring to a simmer over medium heat. Whisk the cornstarch and cold water slurry together, then slowly whisk it into the simmering sauce. Cook for 1-2 minutes, stirring constantly, until the sauce thickens. Alternatively, you can simmer the sauce without a slurry for 5-10 minutes to reduce and thicken it slightly.

Step 6: Serve
Return the sliced or shredded pork to the slow cooker with the thickened sauce, or drizzle the sauce over the pork on a serving platter. Serve immediately.

Tips:

  • Pat the Pork Dry: This helps the sauce adhere better and promotes better browning if you choose to sear the pork first.
  • Sear for Extra Flavor (Optional): For a deeper flavor, heat a tablespoon of oil in a skillet over high heat and sear the pork tenderloins on all sides until browned, about 2-3 minutes per side, before placing them in the slow cooker.
  • Adjust Sweetness: If you prefer a less sweet sauce, reduce the honey to ⅓ cup. You can also add a tablespoon of brown sugar for a more caramel-like depth.
  • Use a Thermometer: For perfectly cooked pork, use an instant-read thermometer. It prevents overcooking, especially important with lean tenderloin.

Storage Options:

  • Refrigerator: Store leftovers in an airtight container with the sauce for up to 4 days.
  • Reheating: Reheat gently in a covered skillet with a splash of water or sauce to prevent drying out, or in the microwave.
  • Freezing: The cooked and shredded pork freezes very well in its sauce. Freeze in airtight containers or bags for up to 3 months. Thaw in the refrigerator before reheating.